|
Re: Our 1932 901
|
||||
|---|---|---|---|---|
|
Home away from home

|
Received the wire and ran 12 gauge armor from the negative battery post on the inside frame along the frame rail to the rear of the car for the two cigar lighters in the back seat (Note of interest - any person smoking in the car will die a horrible, screaming death). I ran the wire back to where the shock absorber where I installed fuse and a junction was made to split the wire for both sides as there are lighters on the right and left arm rests.
The metal that goes around the back of the front seat, lower front seat frame, the driver's seat, the metal frames for the rear seat and the two metal panels that go over the right and left rear wheel wells were sent out for media blasting. These were painted with primer and then given a coat of semi-gloss. The stone shield that came with the car was repaired (see my call for help I posted). The chrome on shield was stripped by plater in order to silver solder the cracks. While silver soldering worked OK for repairing the cracks, metal expansion was an issue. Therefore, I switched to Muggy Weld Super Alloy 1 (Used for pot metal repairs). I did not use their flux since it cannot take direct flame, but instead used Nokorode Aqua Flux, which is used in plumbing applications. There were about a dozen areas that had cracked and were missing. These were also repaired by filling in with new pieces of brass. I rebuilt the ash tray assemblies that go in the rear. The chrome bezels were unsoldered and sent out for plating as were the metal parts for the cigar lighters. The metal ash buckets were soaked in Evapo Rust and then zinc plated. Once re-plated, the bezels were soldered to the ash buckets. The buckets were then painted with a semi-gloss paint. The main part of the assembly was cleaned up and painted. The same process was done on the dash ash tray. I've started work on restoring the steering wheel. Most of the hard rubber on the rim will need to be replaced. The spokes and hub are in good shape. I decided to use PC 7 (a two part epoxy) for the repair. I'm doing half of the rim at a time (starting with the worse half) so the other half can serve as an example. The process I'm using is to remove the bad rubber from the steel skeleton and then use a rotary sander to remove all of the rust. The epoxy will then be used to build up enough material so it can be filed and sanded into the correct shape. Then the other half will be processed as well as the spokes and hub. The final wheel will then be primed and painted with a semi-gloss epoxy paint. I'm assuming that semi-gloss will look more original, but I would welcome input from others. Attach file:  (116.95 KB) (116.95 KB)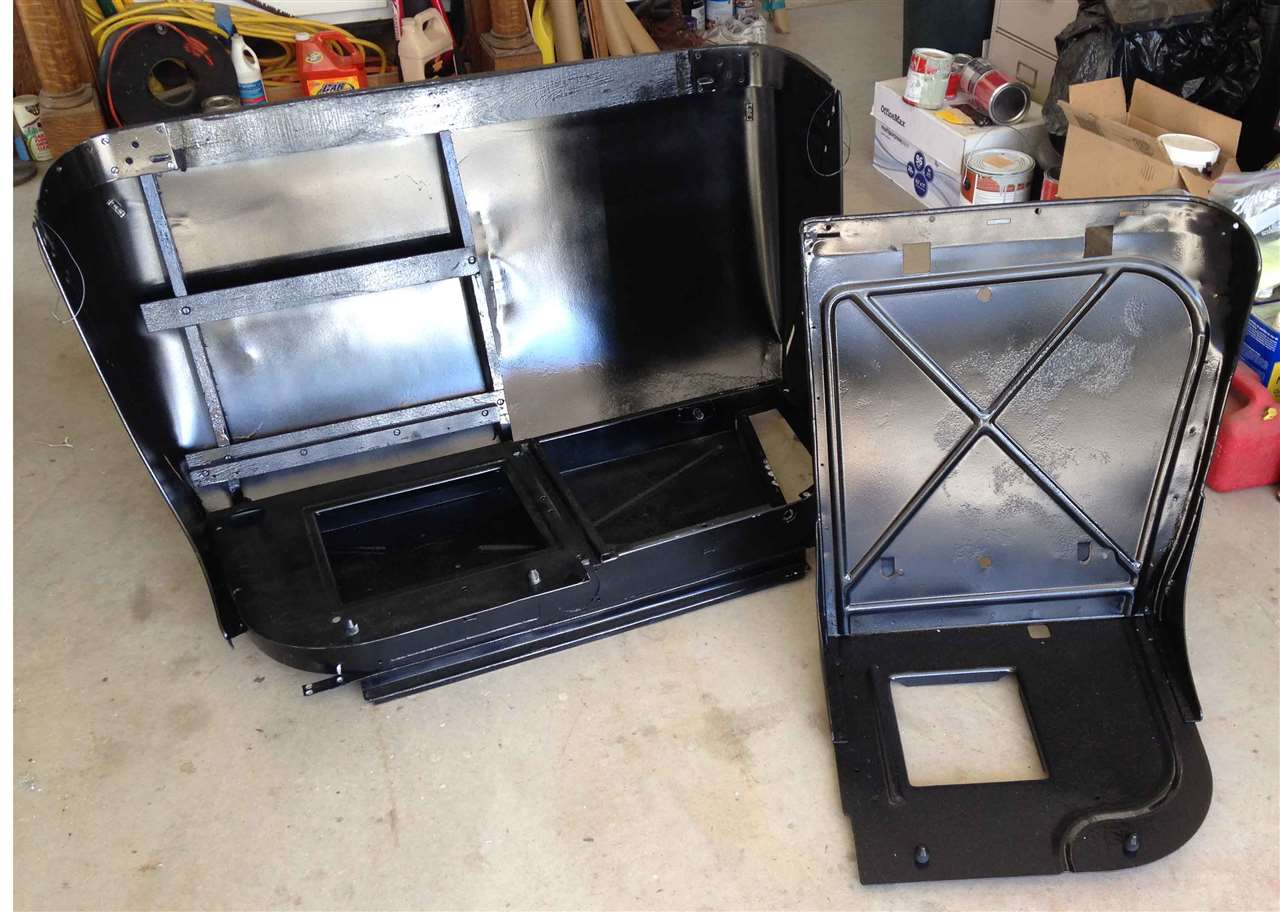 (91.17 KB) (91.17 KB)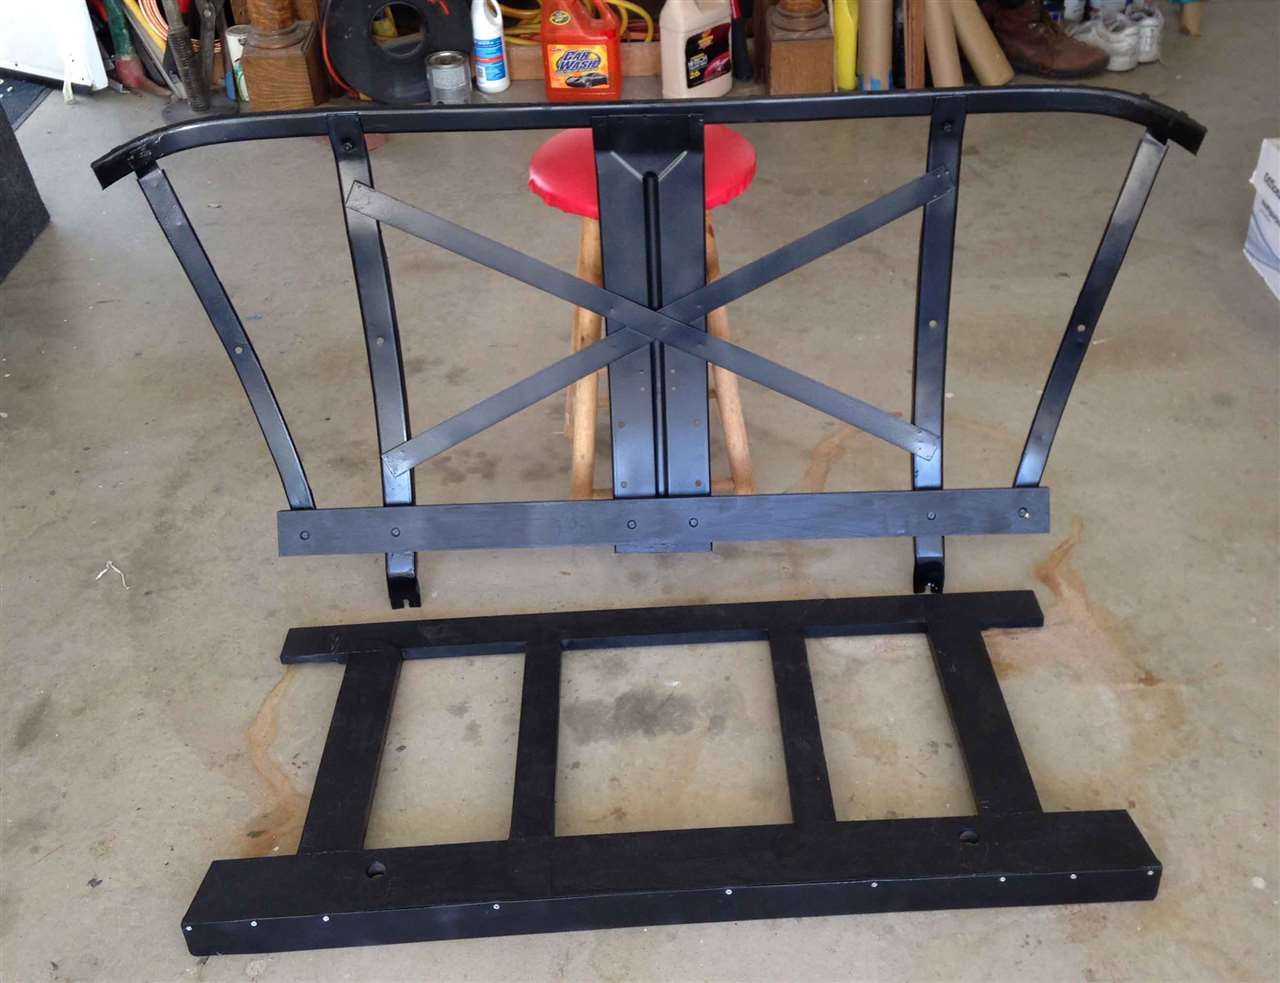 (135.43 KB) (135.43 KB)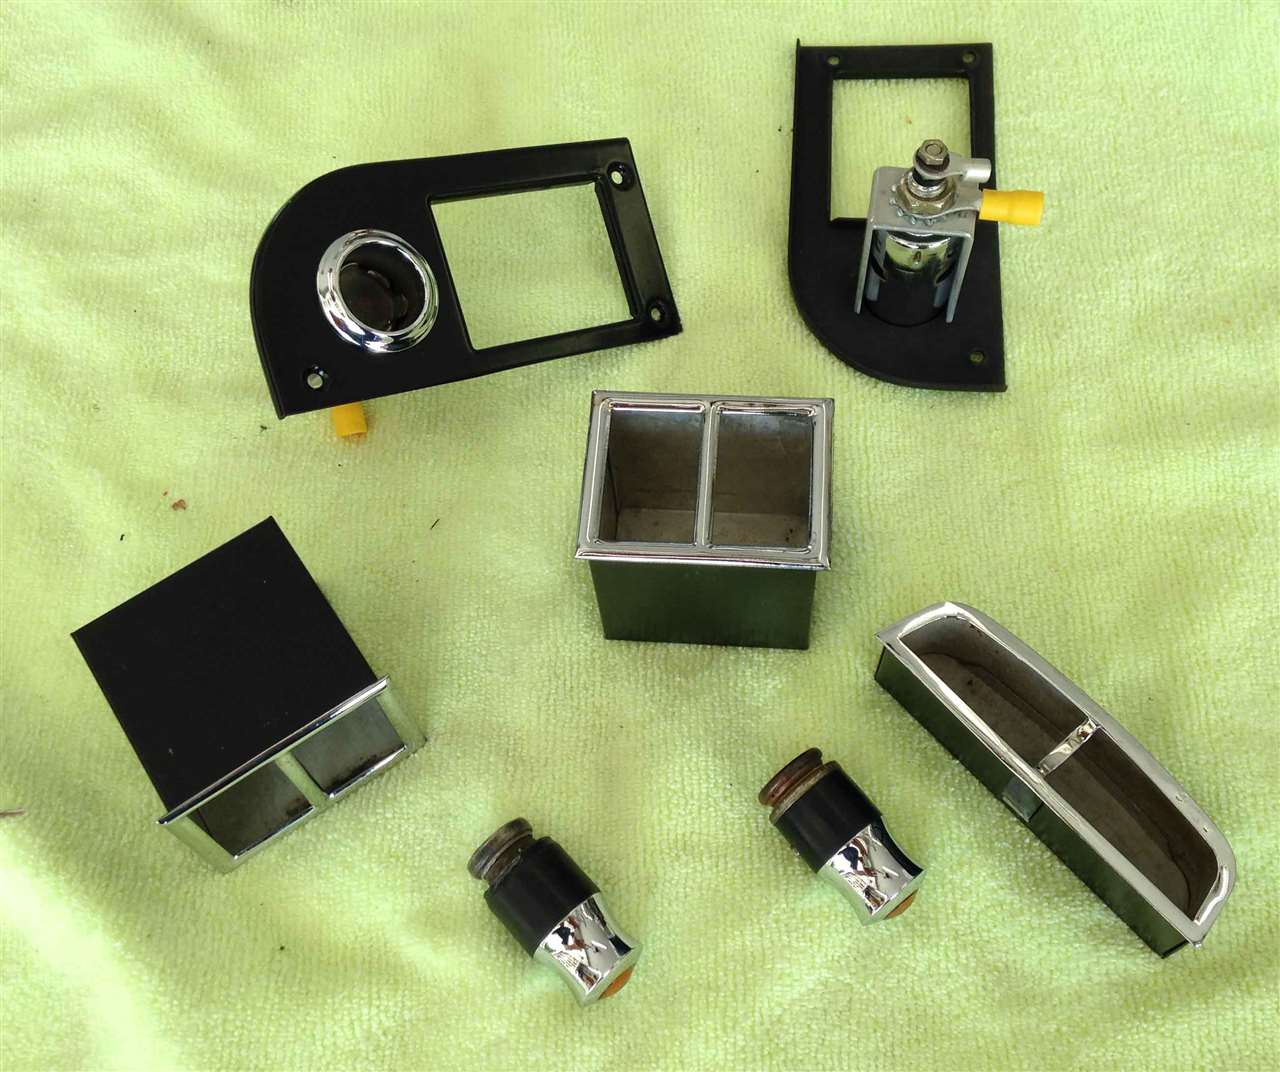
Posted on: 2016/4/3 18:02
|
|||
|
||||
|
Re: defrost/defog?
|
||||
|---|---|---|---|---|
|
Home away from home
|
I saw this today on ebay don't know if it helps or not Deflector
Posted on: 2016/4/2 10:29
|
|||
|
||||
|
Re: 1940 110 4dr king pins
|
||||
|---|---|---|---|---|
|
Home away from home
|
Wes - having never replaced a king pin, I went through your post. Nice write up with loads of pictures made it easy to understand and follow.
Thanks
Posted on: 2016/3/28 9:05
|
|||
|
||||
|
Re: Stone Guard on a 1932 901
|
||||
|---|---|---|---|---|
|
Home away from home
|
Don - thanks for the input and photos.
I can tell from Don's photos how it would be attached if I went with that approach. Does anyone out there have a photo that shows what the rear section looks like of the light bar clamp style?
Posted on: 2016/3/27 15:44
|
|||
|
||||
|
Re: Stone Guard on a 1932 901
|
||||
|---|---|---|---|---|
|
Home away from home
|
Dave & Tim - thanks for your inputs. Now all need to do is find a pair of them.
Posted on: 2016/3/26 19:14
|
|||
|
||||
|
Re: Stone Guard on a 1932 901
|
||||
|---|---|---|---|---|
|
Home away from home
|
Dave - I saw that post and it appears that it attaches to the light bar and at the top around the radiator cap. While it would not be hard to make the clamps for the light bar there is no way for that style to work for my 901 at the radiator cap. In there lies my concern as it would seem that three points of attachment would be much better than just the two.
Posted on: 2016/3/26 16:04
|
|||
|
||||
|
Stone Guard on a 1932 901
|
||||
|---|---|---|---|---|
|
Home away from home
|
I've started restoring the stone guard. There are a lot of breaks in the mesh and places where a short section of mesh is missing. I plan on silver soldering the breaks back together and to make, install and silver solder new pieces of brass in the area where the mesh is missing. Then I'll send the guard out to get it chrome plated.
My question pertains to mounting the guard. As I recall, I've seen pictures where it is mounted on both sides with a 'U" shaped bracket that goes over the head light bar and another "U" shape bracket that goes in front and partially around the radiator cap. I'm not sure that the bracket that goes around the radiator cap would fit on my radiator. Were there any other approaches for attaching the guard? If so, a few pictures would be great. Attach file: (102.62 KB)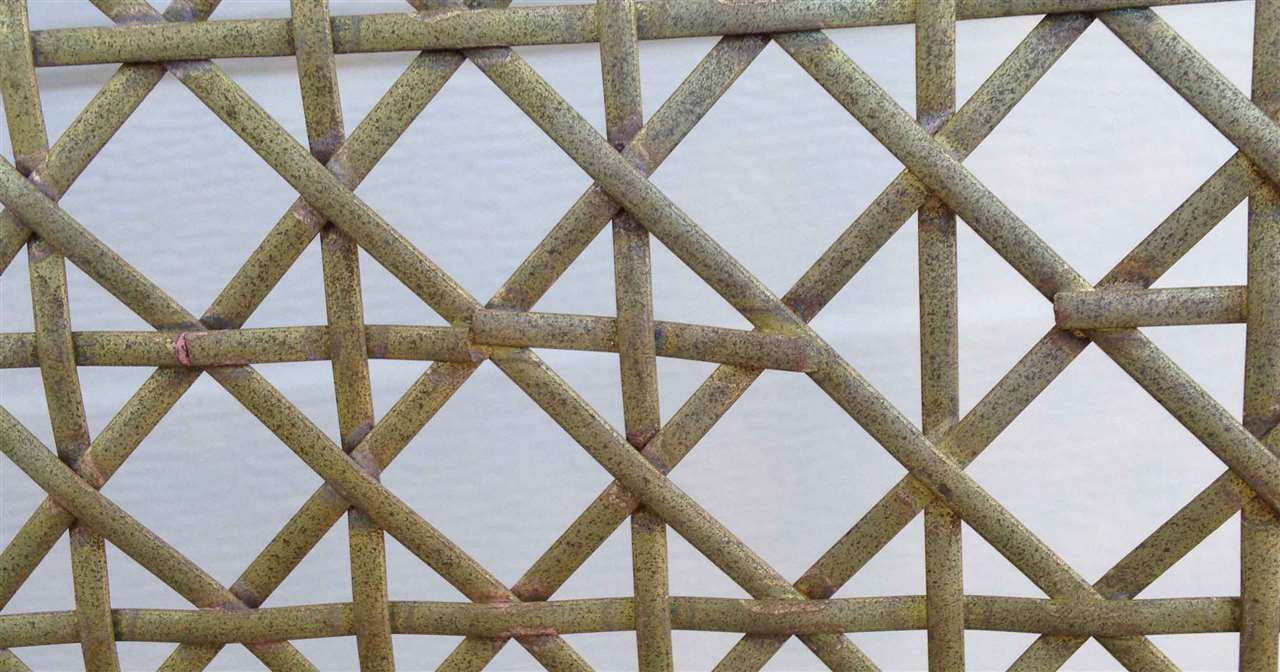
Posted on: 2016/3/25 11:23
|
|||
|
||||
|
Re: head gasket problems with 1935 eight
|
||||
|---|---|---|---|---|
|
Home away from home
|
Maybe a better use for the old head would be a fishing boat and a 6 pack. Then to use the pre-mentioned head as an anchor. Thus giving one the opportunity to reflect on all the good times we get from our Packards.
By the way, the anchor is suppose to be left behind in the lake.
Posted on: 2016/3/25 5:37
|
|||
|
||||
|
Re: OD for 39 Six
|
||||
|---|---|---|---|---|
|
Home away from home
|
Dave (32Model901) installed a gear vendor's unit in his '32 901. You can see his post here to see what that might entail.
I wish you father the best on his "Kit Car" as that is how I bought my '32 sedan. The owner had started on the restoration of the car that the family had had since the early 1950's. They let is decay when he started on it. He was doing a frame off and had started putting things back together. Everything was scattered in a big shop with other car parts and mixed up with no sense of keeping related things together. I boxed everything up, trying to make sure I grabbed everything that looked like it belonged (I did end up with some old Ford parts that I later returned). When I moved it the body was somewhat bolted to the frame. We filled the inside of the car with stuff and towed it home on a trailer with a pickup whose bed was completely full. In addition, there was another pickup with a full bed of stuff. It has be fun and I'll admit that it has also been a challenge as I have never worked on a car this old or a Packard in the past. I'm not sure what I would have done without all of the fantastic help I've received from the site. Right now I'm almost done with the last major piece to complete is the interior. Who knows, I may be able to put the old seats in it and take it for a drive this year when I get the mechanical/electrical stuff finished.
Posted on: 2016/3/20 9:36
|
|||
|
||||
|
Re: head gasket problems with 1935 eight
|
||||
|---|---|---|---|---|
|
Home away from home
|
Nice looking job on the head.
Posted on: 2016/3/20 9:01
|
|||
|
||||


