|
Re: 6v fuel pump wiring question
|
||||
|---|---|---|---|---|
|
Home away from home

|
This is turning out to be a good thread. A couple more questions below.
Attached are the two methods from the PAC, Library, Tech Tips, Electric Fuel Pumps article (legacy website, no direct url). JW, you're probably right. But, if you only use the electric fuel pump intermittently AND have a pressure control gauge on it, the likely hood of pumping fuel into the crankcase from the electric fuel pump is pretty low. The disadvantage of the parallel line is appearance in the engine compartment above the mechanical fuel pump near the carburetor. I know plenty of people would discount that. Better to have the car safe, running properly and protected. That was my approach for most of the 50-plus years I owned my car to keep it running. Of course, now I have literally paid the price of all those substitutions to re-store it. Keith...??? FUEL FILTER substitution for CHECK VALVE: I was told the fuel would only flow one way through the fuel filter. If that isn't so, then I need to replace the 2nd fuel filter in the main line with a check valve. I would also move the 1st fuel filter to the tank side of the Tee so it filters for both lines. ???ECH TG6053 is the NAPA 3-way switch I bought. It's 12v, but does that matter for this switch? It took a while to find it and locate one in the Portland area. I drilled a hole in the underside of the dash to the left of the glove box. I'm in the process of wiring it and will take pix tonight. EDIT: Kev, I read the info with a strong desire to believe it's true because I wouldn't know any better. Like "the electric fuel pumps will keep spewing gas under the car if you get in an accident with disastrous results. (my paraphrase of many comments on this subject.)" So yes, I wanted the best info to do it right with greatest safety, least damage, etc. This is what I thought I was doing and getting the necessary equipment to do it. What is the name and model number of the 6v 3.5psi pump you have? Might help someone who hasn't gone through rigmarole already. Attach file:  (52.44 KB) (52.44 KB)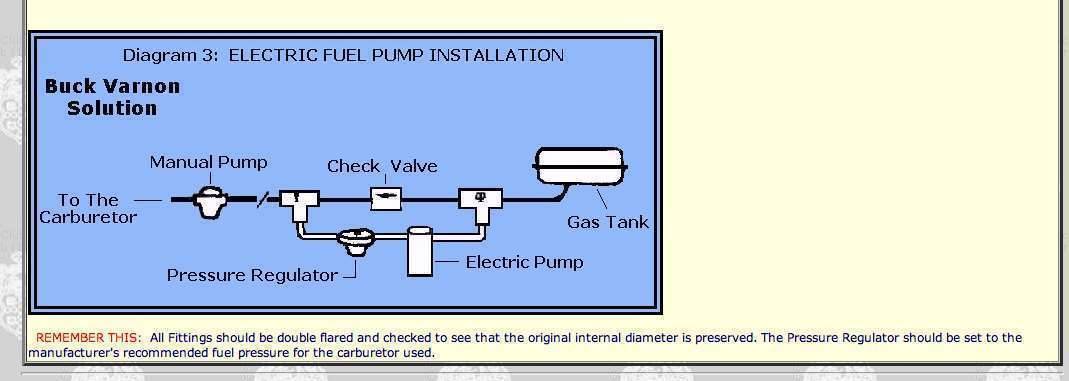 (46.42 KB) (46.42 KB)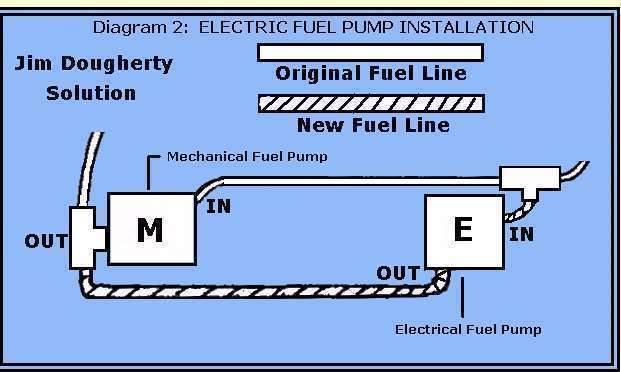
Posted on: 2011/10/24 14:24
|
|||
|
||||
|
Re: 6v fuel pump wiring question
|
||||
|---|---|---|---|---|
|
Home away from home
|
Thanks, Howard.
I think one of these articles mentioned a switch that did both. I found it. It's a 3-way testing toggle switch. Off, Spring-tensioned On for priming, and an On for continuous use. In the same paragraph the article also warms not to connect to Starter switch because it's possible to prime the carburetor without having the ignition on and no current to the distributor. So a 3-way toggle is what I'll look for today. That and a shield of some kind to keep the pump, valve and gauge clean. EDIT: Thanks, Saltydog, I'll add a switch. There were two main reasons in the article for not adding the pump directly in the fuel line. One is the pressure is higher than the specs for older carbs, like 7-10 PSI, but claasics' carburetors need typically 3-5 PSI. 7 pounds overwhelms the float needle and can run the engine too rich. This is corrected by using a fuel pressure regulator in the line, or the setup I have...valve and gauge. The second reason is, if the diagram in the mechanical fuel goes bad, the electric pump will keep on pumping (if you leave it on), pumping gas into the crank case. It isn't easy to notice until one day you check the oil and it smells like gas and it's over the full line. Joe, instant expert (I went back and re-read)
Posted on: 2011/10/23 12:14
|
|||
|
||||
|
6v fuel pump wiring question
|
||||
|---|---|---|---|---|
|
Home away from home
|
After 2 vapor locks in Portland, Oregon, and having to crank and pump, or pour gas in the carb to get started after a few days sitting, I decided to install an electric fuel pump on the Duchess, 1940 160, to use on an intermittent basis.
Thanks to earlier threads that directed me to PAC's Technical Tips on the subject, I decided to follow the attached diagram for all the reasons covered in these technical articles and to keep the authentic look up top, with a couple of exceptions. To find the parts needed in addition to the pump itself, an Airtex from Sacramento Vintage Ford, I called first and left work early Friday to collect the things I needed to install this weekend from places that are generally not open after 5pm and closed weekends. I'm talking about truck oil system and diesel fuel injection places. After making it to three places, I got a gauge and needle valve to control the pressure (you get a dumbfounded look when you ask for a pressure valve), some connecting pieces, pipe, clamps, and a fuel filter. The check valves were large, so I added a fuel filter to serve that purpose. The point of highest pressure is between the 6v pump and the needle valve, so I used a brass connection there. Hose for the rest. With all the clamps I could have installed fuel injection. So now comes the wiring. The tan wire goes to ground on a 1940 Packard with positive ground. I grounded it to the pump bracket which is attached to the frame with a bolt. Yes I'm getting to the question... If I wire this to my starter switch, would that make sense, instead of installing yet another switch? It's only when I'm starting the car that I need the electric fuel pump. I want it off when the engine is actually running. This would ensure I don't forget it because the starter switch is spring loaded. It makes sense to me, but that's what concerned me. Attach file: (52.44 KB) (47.72 KB) (47.72 KB)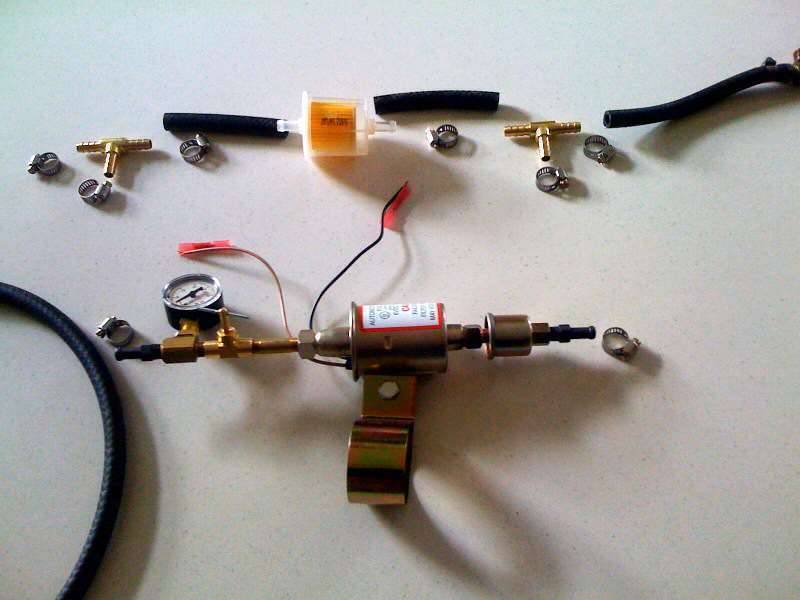
Posted on: 2011/10/23 10:56
|
|||
|
||||
|
Re: wiring a 1940 110 heater
|
||||
|---|---|---|---|---|
|
Home away from home
|
Probably don't need this, John.
Wiring instructions: Red: Ignition switch to heater switch (Loose Feed) Red: Heater Switch 1 to Heater Motor 1 Yellow: Heater Switch 2 to Heater Motor 2 Green: Heater Switch 3 to Heater Motor 3 Brown: Heater Motor Ground to Ground. Attach file: (45.72 KB)
Posted on: 2011/10/21 21:28
|
|||
|
||||
|
Re: Temp Gauge Repair
|
||||
|---|---|---|---|---|
|
Home away from home
|
Bruce did mine. Temp gauge is a capillary tube filled with gas. Probably not a lot of people do that these days. But this one is across the country from you.
http://www.abbottinstrumentrestoration.com/
Posted on: 2011/10/21 13:38
|
|||
|
||||
|
Re: wiring a 1940 110 heater
|
||||
|---|---|---|---|---|
|
Home away from home
|
John,
Here's what the paddle switch looks like. There is a wiring diagram for auxiliary equipment like a heater in the 1940 Owners Manual. https://www.packardinfo.com/xoops/html/downloads/1940_110_120_OwnersManual.pdf Page 41 Joe Attach file: (57.01 KB)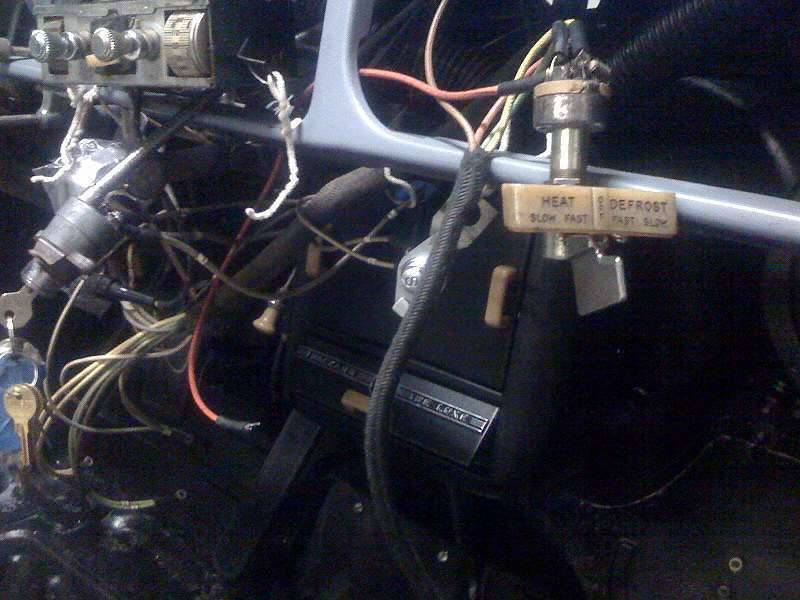
Posted on: 2011/10/21 13:31
|
|||
|
||||
|
Re: High oil pressure 1938 120
|
||||
|---|---|---|---|---|
|
Home away from home
|
The clueless, me, would switch out the oil pressure sending unit, if it is electrical on a 38, with a new one or another old one and see if the reading is consistent. That pressure should change across that range.
Posted on: 2011/10/21 12:43
|
|||
|
||||
|
Re: 1940 Super 8 160 Model 1803 Project
|
||||
|---|---|---|---|---|
|
Home away from home
|
Looks great, Jim.
Doing 55 on the freeway gets the rpms up there all right. You will love the overdrive. After cleaning the solenoid contacts, my worked like new. Second over is a great gear, and being able to pedal down and kick into 3rd from 3rd over after slowing down for a curve is awesome. Joe
Posted on: 2011/10/16 20:15
|
|||
|
||||
|
Re: 1940 Super 8 160 Model 1803 Project
|
||||
|---|---|---|---|---|
|
Home away from home
|
Jim's is a late 1940, one of the last. Mine's the one that early, sold on announcement day.
Better than a heat shield, which does little on my car to prevent vapor lock, even with fuel line insulated, is a 6 volt fuel pump used to start the car after it sits for a few days and to push through the vapors when it's hot, which I am adding on after gas tank is repaired.
Posted on: 2011/10/14 10:13
|
|||
|
||||
|
Re: 1940 Super 8 160 Model 1803 Project
|
||||
|---|---|---|---|---|
|
Home away from home
|
Great going, Jim. How does a year go by so quickly? Yet when I look at the first entry of my blog on Oct 20, 2010, I realize a lot more can happen in a year than I'd dreamed of after having the Duchess apart for 25 years. Can't wait to come down for a drag race. We'll give them something to talk about!
Joe
Posted on: 2011/10/14 9:24
|
|||
|
||||


.jpg")


