|
Re: Vacuum Tank
|
||||
|---|---|---|---|---|
|
Home away from home

|
I've had a look at the substance poured out of the vac tank but I can't determine for certain what it is. Unfortunately I'd put it in the motor oil drain pan and it had mixed somewhat with a little residual sump oil. I can say it is of a light consistency and brown in colour, which does suggest to me it could well have started out life as brake fluid. Apart from mixing with a very small amount of sump oil, it is possible that it also has mixed with surface rust inside the vac tank, assuming that rust does actually exist in there.
Based on Fred's guesswork, I'm now thinking that it probably is old brake fluid which has found its way into the tank when the old BTV gave up the ghost, and has lived comfortably in there for the last 6.5 years. It's been cleaned out now and the tank resoldered and refitted. Cheers, John
Posted on: 2016/9/21 6:16
|
|||
|
||||
|
Re: Vacuum Tank
|
||||
|---|---|---|---|---|
|
Home away from home
|
It's certainly possible, but it would have had to have been in there a fair while. I installed a reco'd BTV about 6.5 years ago because the one in the car lost all boost (hard pedal). I arranged for the reco BTV to be sent to me by the previous owner of the car and still have the failed one. I've not lost any brake fluid since installing the replacement and checked the reservoir two days ago and there was still plenty in there. I still have some of the old oil/fluid so I'll have another look at it tomorrow. I gather from your question Fred that it's possible for brake fluid to find its way into the vac tank. Cheers, John
Posted on: 2016/9/20 3:54
|
|||
|
||||
|
Vacuum Tank
|
||||
|---|---|---|---|---|
|
Home away from home
|
G'day Men, I've come across an issue that has me stumped and thought someone might have an answer for me. Yesterday while fitting new vac hoses, the hose pipe on the vac tank came loose. After removing the tank, and a right pain in the rear end that job is, I started cleaning everything prior to resoldering and was surprised to find a large quantity of oil in the tank, maybe up to an inch or so on the bottom. Now my question is, where in the bloody hell would that oil come from? Is that something purposely put in the tank for some specific reason that I can't think of? Regards, John
Posted on: 2016/9/19 5:15
|
|||
|
||||
|
Re: New Gas Tank Issue
|
||||
|---|---|---|---|---|
|
Home away from home
|
I decided to check my '56 Patrician and I can confirm that there's no notch in the filler neck. Cheers, John
Posted on: 2016/8/29 3:26
|
|||
|
||||
|
Re: V8 spark plug fitment?
|
||||
|---|---|---|---|---|
|
Home away from home
|
G'day Boys, I haven't contributed much lately but thought I should throw some small change into this topic. I can't tell you what numbers are on the heads of my '56 Patrician (body & engine # 5682 3692) until I can get back out in the shed (just had knee surgery this afternoon). What I can tell is that for quite a few years now I have been running NGK BPR5EY plugs in my car and have had no trouble whatsoever - just clean and regap every so often and all is good. By the way, if I remember correctly the "Y" in the number relates to a notched centre electrode which is supposed to divide the spark and give a better burn. Cheers, John
Posted on: 2016/8/15 2:44
|
|||
|
||||
|
Re: Alternator & Ammeter
|
||||
|---|---|---|---|---|
|
Home away from home
|
G'day Men (don't know if I should be using that term these days),
Today I had the setup inspected by an auto elec and he said the way it was wired is fine and the alternator is charging correctly. When asked about the ammeter he essentially said the same as Howard - if I didn't mind the needle deflection then it was quite safe to leave as is. He thought I possibly could have gotten away with connecting the alternator to the red wire out of the old regulator, but agreed the guage size of the old wires could be a problem under full electrical load. It would be better however, to leave this wire connected to the regulator as it's now receiving current flowing in the opposite direction, so is "hot". The regulator still remains inactive. Regarding this wire, he thought that the ammeter must have some sort of shunt behind it, but I told him that if it does have one it must be internal as I could see nothing attached behind the ammeter, other than two red wires which look of similar guage to the red regulator wire. So, I have now decided to leave it all as is and keep an eye on the charge rate via the plug-in voltmeter. One other thing we spoke about was headlights. I had previously installed halogens and was concerned about the heat which probably would be generated when switched on, especially high beam. I explained that I had checked the wiring behind one of the headlights a couple of days ago and the cloth covering on the wires was disintegrating. We agreed that the headlights should be rewired, through a relay, and he'll be doing that in about a week's time. Cheers, John
Posted on: 2016/6/24 22:50
|
|||
|
||||
|
Re: Alternator & Ammeter
|
||||
|---|---|---|---|---|
|
Home away from home
|
G'day Peter, to answer your question the only reason I went the way I did is because I didn't want to risk the consequences of the increased amperage overheating the wiring under the dash. If the meter could be made to work properly without this potential risk then good, which is what I was thinking when I said I might talk to an auto elec. Otherwise, I'm now just as comfortable leaving it as is and utilising a voltmeter to keep an eye on things. I'll report back on any developments if and when they happen. My thanks for all the helpful comments as electrical stuff is most definitely not my bag. Cheers, John
Posted on: 2016/6/10 5:24
|
|||
|
||||
|
Re: Alternator & Ammeter
|
||||
|---|---|---|---|---|
|
Home away from home
|
Thanks Gents, your input is much appreciated. I initially thought that with my wiring, the alternator current would bypass the ammeter and it then wouldn't register anything. However, when it did show a discharge I started to get concerned that I might end up frying something so thought I should ask about what I could do to either fix it or disconnect it completely. Howard's comments that the discharge causing the needle to move is not directly related to the alternator charge in itself and is therefore not a major concern, providing I could live with the needle deflection, is a great relief.
Yes, I could live with it. Also, today I tried to reach it to see about perhaps disconnecting the wires. However, being a 71 year old who is not as supple as I used to be, I can't even see the confounded meter, let alone reach it. I might go and see an auto elec and get his advice about the best way to proceed. In the meantime, I've bought a digital voltmeter that is designed to plug into the cigarette lighter socket and I can see whether the alternator is charging, or not, and the charge voltage (it's been pretty accurate thus far). When leaving the car I just unplug the meter, put it in the glovebox and replace it with the lighter. Thanks once again fellas. John
Posted on: 2016/6/10 0:27
|
|||
|
||||
|
Alternator & Ammeter
|
||||
|---|---|---|---|---|
|
Home away from home
|
G'day All, I realise the topic of alternator conversions has been done before but I find it pretty difficult to locate the files and add to them. In any event, my concern is not so much the alternator but the ammeter and how this invisible substance called electricity works.
But first, I did a fair bit of research on the internet on how to wire-up a three wire alternator and have now done so on my '56 Patrician. The generator was removed and the three wires attached to it taped off and not used again. The existing generator bracket was retained, although the bolt holes had to be elongated, and the tensioning bracket was retained as well. The alternator is a Bosch 85 amp universal type and, from what I learned on the net and the Bosch wiring instructions, the main power cable should be 6 B & S, which I understand is the same as 6 AWG. Also, to protect the rest of the car's electrics in the event of alternator failure, the advice is to make sure this cable is fused, and I've done that with a 100 amp "megafuse". This cable joins with the battery cable at the starter solenoid. The other two wires are marked "L" for lamp (idiot light) and "S" for sensing. The "S" wire is connected to the hot wire on the horn relay and, as I don't have an idiot light, the "L" wire was connected to the power seat relay where the Chevy wiper motor draws its power. I put a resister in the "L" wire so that the alternator would be excited sufficiently to commence charging. When tested, the battery was showing 13.0 volts and soon as the car was started the charge was measured at 14.4 volts, which told me the alternator is charging. Bosch advise that the internal regulator is set to charge at 14.2 volts, give or take depending upon temperature. After a short drive the charge rate was down to 14.15 volts so it appears as if the alternator is doing its job. I've attached some photo's so you can get an idea of how it looks. Now to my concern. Switching the headlights on before starting prompted the ammeter (Gen) needle to swing to the discharge side about a third of the way. Checking after starting, the needle went to about the same position. This suggests to me that there is a wiring issue affecting the ammeter and I've got no idea of how to fix it. I've had a good look at the wiring diagram and can see how the red wire from the generator regulator goes to the ammeter, but of course it now has no current being fed into it. I would prefer to retain the ammeter but if it must be disconnected then so be it. Has any body got any suggestions of the best way to fix it? Cheers, John Attach file:  (299.99 KB) (299.99 KB)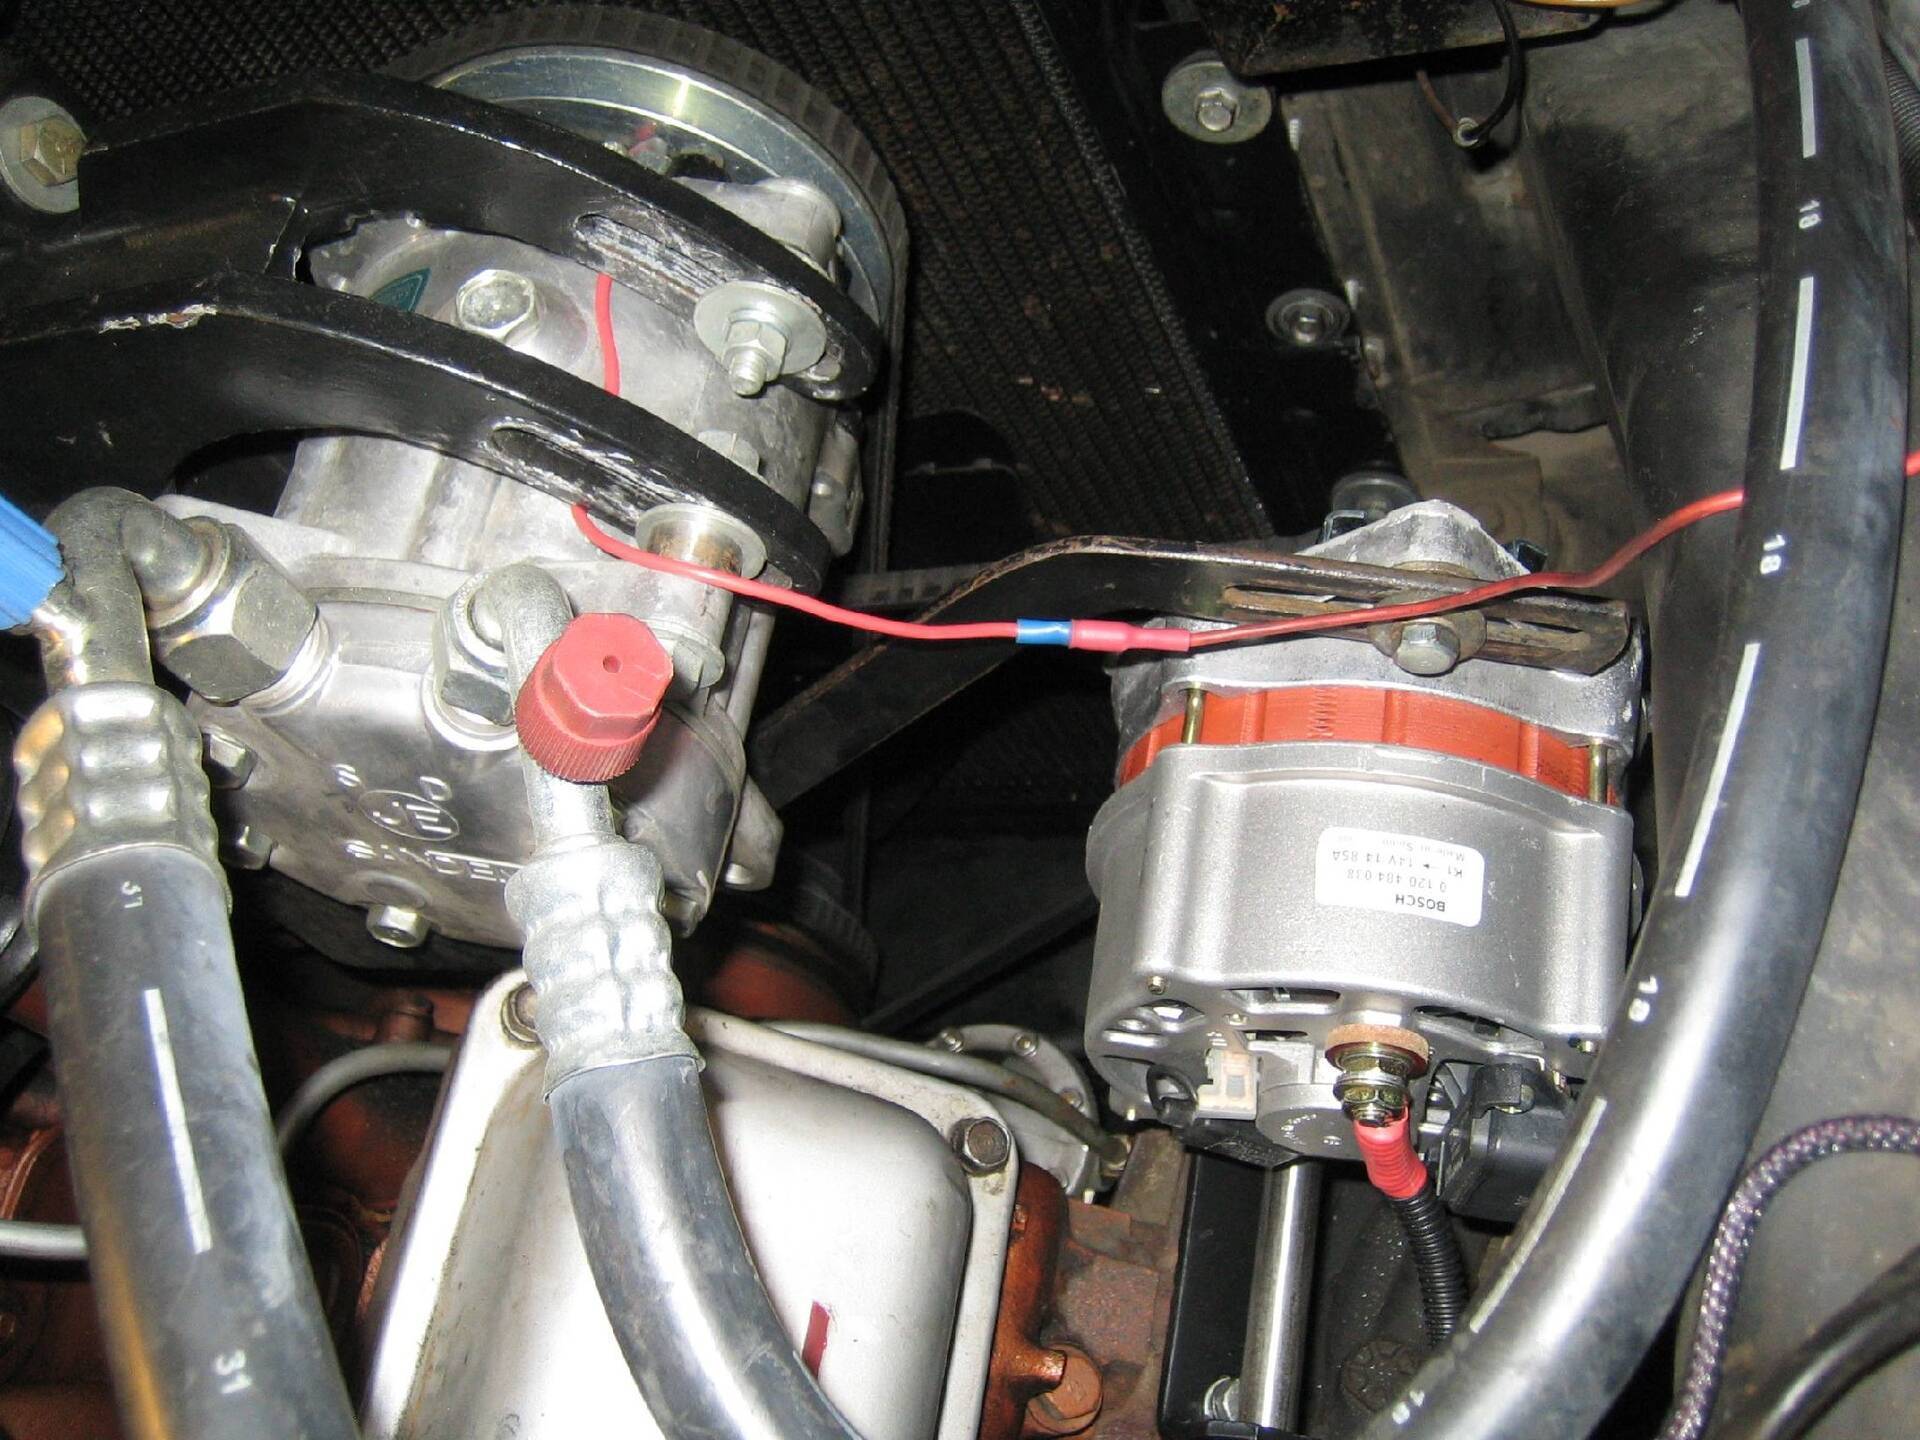 (227.51 KB) (227.51 KB)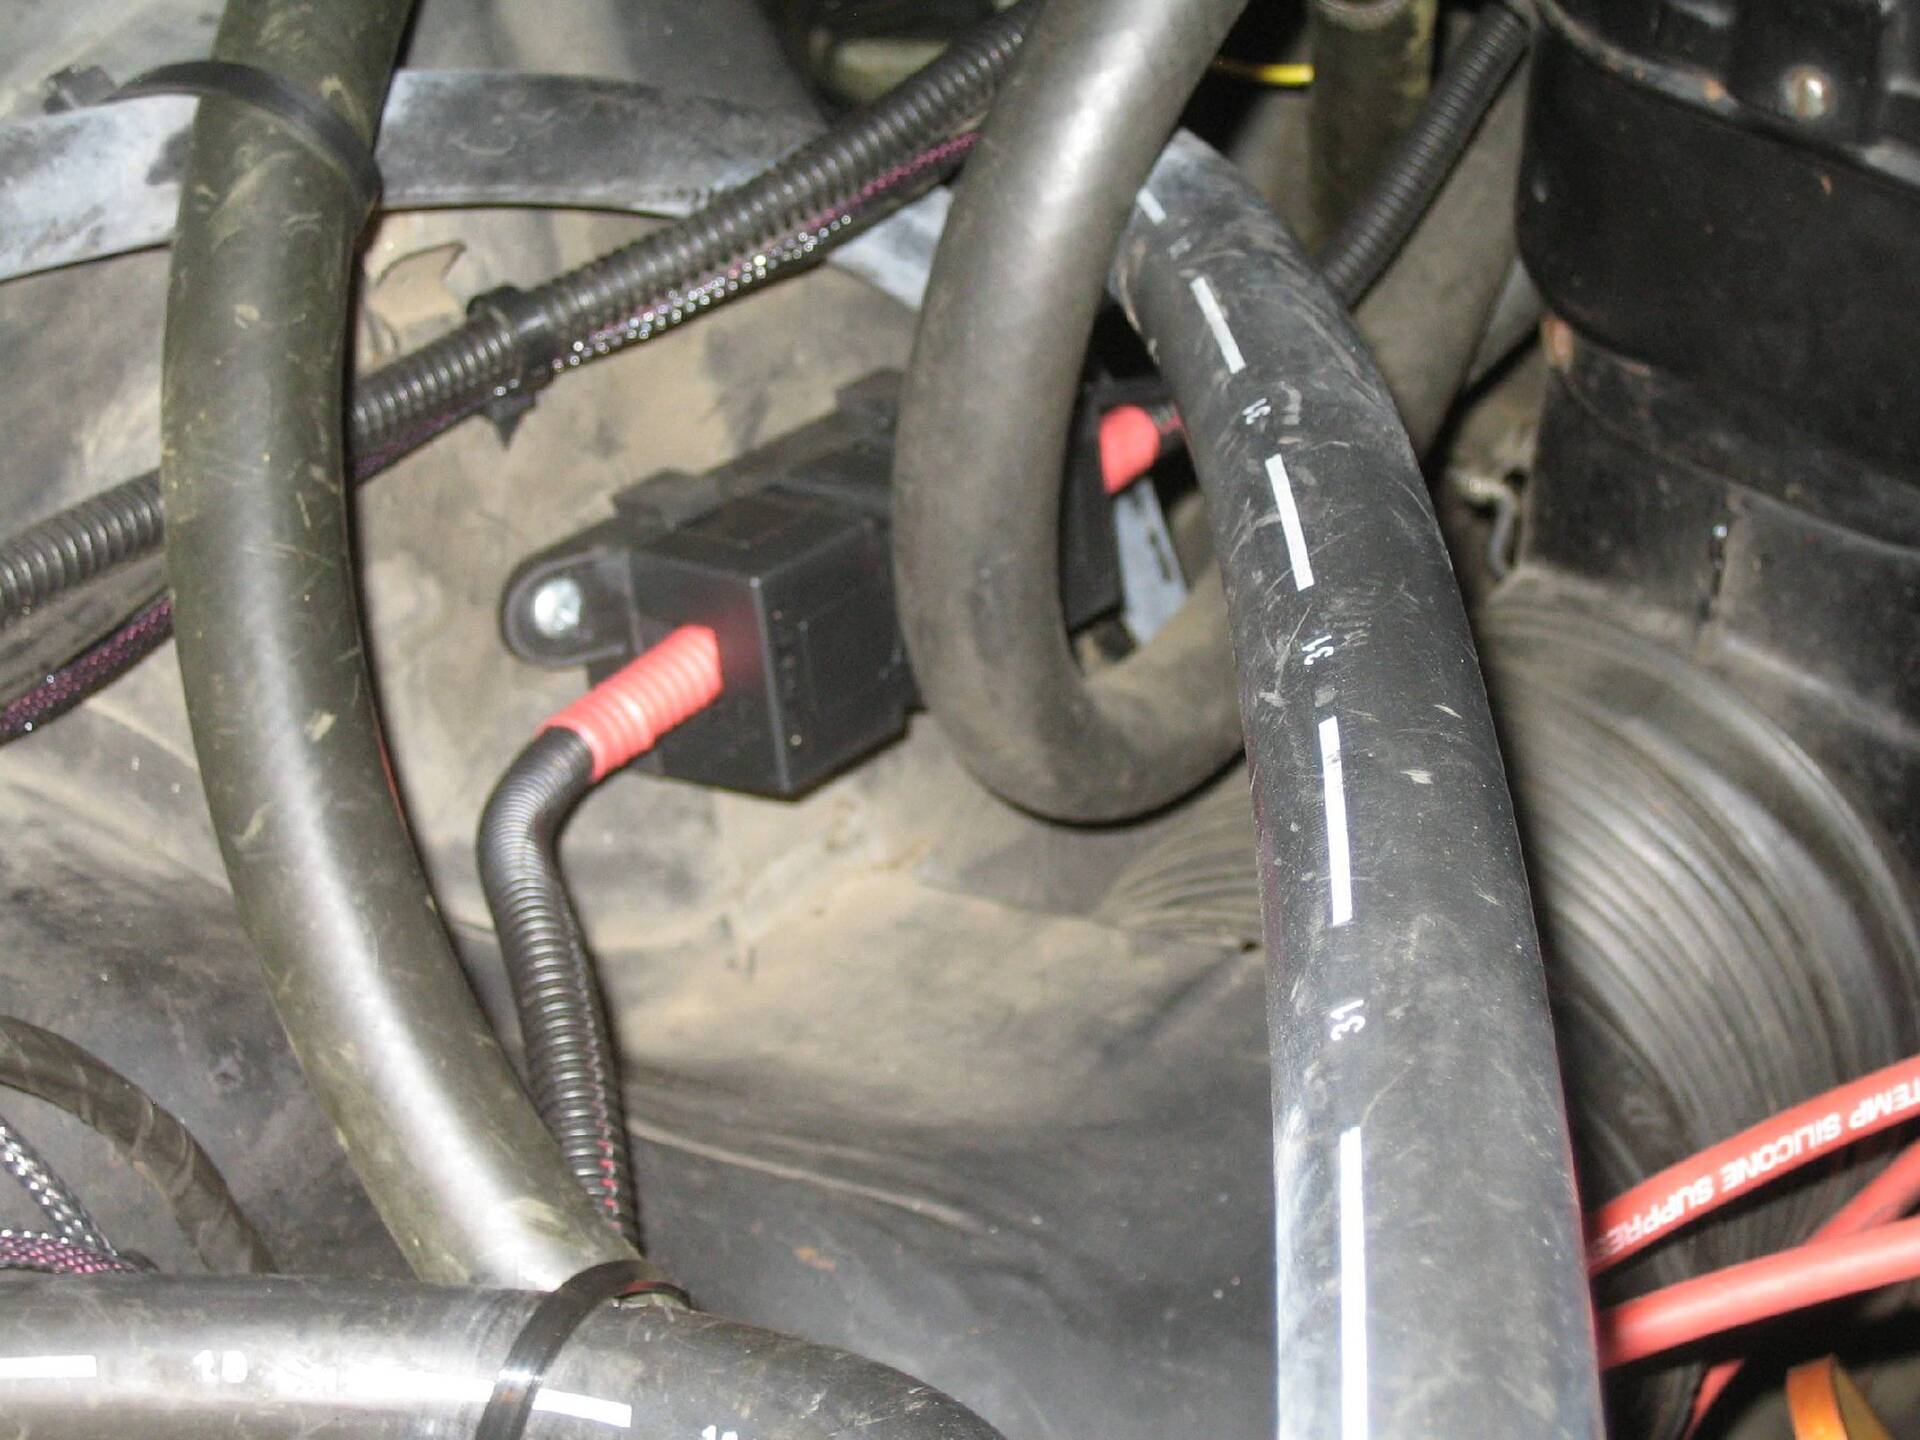 (349.68 KB) (349.68 KB)
Posted on: 2016/6/8 2:35
|
|||
|
||||
|
Re: Transmission Swap
|
||||
|---|---|---|---|---|
|
Home away from home
|
Sounds interesting. There's a good chance others over here in Aus would be interested too. The concern about the push button shift also applies to me and my '56 Patrician. I'll keep following this thread to see what develops. I hope it does become a goer as there aren't many options to consider over here if the TU dies. John
Posted on: 2016/5/13 5:15
|
|||
|
||||


