|
Re: The Duchess Project: 1940 Super 8 Convertible Sedan
|
||||
|---|---|---|---|---|
|
Home away from home

|
The plot thickens.
The 1803 rear drum/hub assembly sample at Max Merritt for 351423 matches the one sent by the flackmaster. 2" shoes are correct for the 1803. According to the book, the 1803 and the 1806 share the same hub/drum assembly. There's a logical syllogism here that would tell me what hub/drum assembly is on my car. (Where is Guscha?) My shoes are 2" supposedly correct for an 1803. The drum depth on my drum and the flackmaster's drum both measure 2-9/16". The inside diameter is a full 1/8" bigger on my hub. The only larger axle, and therefor larger hub hole, is the ambulance one, which takes larger shoes. But it seems a 2-9/16 depth drum would accommodate shoes larger than 2". Is it possible I have an ambulance axle and ambulance hub/drum, but 1803 differential/ axle housing and brake backing plates and shoes? I have a vague recollection that my axle was changed in the 1970s. I will check with that person, who for the moment will remain anonymous and see if he remembers anything about this. It might be a good idea to record the specs on these hub and drum for the future. Axle 340110 is for 1800 323143 is for 1801,1803, 1804,1806,1807 338693 is for 1808,1801A,1803A ambulance Hub/Drum Assembles 347048 is for 1800 341982 is for 1801 351423 is for 1803 (my car, same as Jim Wagnon's), 1806 333931 is for 1804, 1807, 1808 333200 is for 1801A,1803A
Posted on: 2013/1/9 11:52
|
|||
|
||||
|
Re: The Duchess Project: 1940 Super 8 Convertible Sedan
|
||||
|---|---|---|---|---|
|
Home away from home
|
OD, just to clarify the welding, we simply cut studs that screw into the hub, same thread as an original lug bolt, and welded them to the back side of the hub.
Then we used large lug nuts to hold the rim. The reason we did this on all wheels was because over decades of driving the Duchess, air-tool tightening kept making the holes in the wheels bigger and the lug bolts worn until 1 wheel when twisted against the curb on a hill pulled out part way. We solved this by going heavy-duty. The threads in all my hubs are just fine, we just could not find lug bolts with as big a head as the lug nuts we found. We didn't weld the face of the drum back on to the bell rim of the drum. I agree, many issues in doing something like that. JW, Max Merritt is looking for a used drum with the correct hub for me. One that's not too worn. In the meantime, I'll cut some new studs for it. I would have thought that reaming this small hub out would be straight forward, but I guess you need a special fixture to taper it correctly.
Posted on: 2013/1/7 14:02
|
|||
|
||||
|
Re: The Duchess Project: 1940 Super 8 Convertible Sedan
|
||||
|---|---|---|---|---|
|
Home away from home
|
Exactly right, JW. The hubs are different. I may be readu=ing the parts book incorrectly, but in the 12.000 section, it shows this:
Axle 340110 is for 1800 323143 is for 1801,1803, 1804,1806,1807 338693 is for 1808,1801A,1803A ambulance Hub/Drum Assembles 347048 is for 1800 341982 is for 1801 351423 is for 1803 (my car, same as Jim Wagnon's), 1806 333931 is for 1804, 1807, 1808 333200 is for 1801A,1803A So the axle-end taper is the same for 1801-3-4-6-7 But there are 3 different hubs/drum assemblies for that axle. I wonder if the 1940 drum (that's all that was painted on the drum "Pack 1940") could have come from an 1801, 1804, or 1806? Since the flackmaster was saving it for Jim 1803, I assumed it was from a 160 or 1803. I'll check with him to see if he knows. In the melon time: My original hub inner ID is 1-5/8" and tapers down to 1-3/8" at the outer end. The new hub inner ID is 1-1/2" and tapers down to 1-1/4" at the outer end. The stock used for the hub is the same. The thickness in the outer wall is different by 1/8" between the two hubs. So it looks like, if it's possible to machine the hole on the new hub larger so it matches my original, that would be my next step, esp since the studs are already welded. At least I have the original hub for duplicating. Attach file:  (154.54 KB) (154.54 KB)
Posted on: 2012/12/22 12:58
|
|||
|
||||
|
Re: The Duchess Project: 1940 Super 8 Convertible Sedan
|
||||
|---|---|---|---|---|
|
Home away from home
|
Exactly right, JW. The hubs are different. I may be readu=ing the parts book incorrectly, but in the 12.000 section, it shows this:
Axle 340110 is for 1800 323143 is for 1801,1803, 1804,1806,1807 338693 is for 1808,1801A,1803A ambulance Hub/Drum Assembles 347048 is for 1800 341982 is for 1801 351423 is for 1803 (my car, same as Jim Wagnon's), 1806 333931 is for 1804, 1807, 1808 333200 is for 1801A,1803A So the axle-end taper is the same for 1801-3-4-6-7 But there are 3 different hubs/drum assemblies for that axle. I wonder if the 1940 drum (that's all that was painted on the drum "Pack 1940") could have come from an 1801, 1804, or 1806? Since the flackmaster was saving it for Jim 1803, I assumed it was from a 160 or 1803. I'll check with him to see if he knows. In the melon time: My original hub inner ID is 1-5/8" and tapers down to 1-3/8" at the outer end. The new hub inner ID is 1-1/2" and tapers down to 1-1/4" at the outer end. The stock used for the hub is the same. The thickness in the outer wall is different by 1/8" between the two hubs. So it looks like, if it's possible to machine the hole on the new hub larger so it matches my original, that would be my next step, esp since the studs are already welded. At least I have the original hub for duplicating.
Posted on: 2012/12/22 12:58
|
|||
|
||||
|
Re: The Duchess Project: 1940 Super 8 Convertible Sedan
|
||||
|---|---|---|---|---|
|
Home away from home
|
Thanks, OD. I'll try that to determine what's stopping it from sliding on. See if there's a high spot I can smooth down.
My son welded the 4 wheels originally and they all slipped on easily after. This time the studs were professionally spot welded (all $30 worth), so I doubt they warped the hub. I suspect the hub is warped from being loosened, and I kick myself for not ensuring it would fit before welding. It's just that the numbers stamped on both drums were the same, so I assumed it just needed cleaning up. You can see the hub was whacked pretty hard at some time in its life. Gee, The Duchess has her Christmas lights on and everything! (Battery operated from Target 30% off). Attach file: (48.05 KB)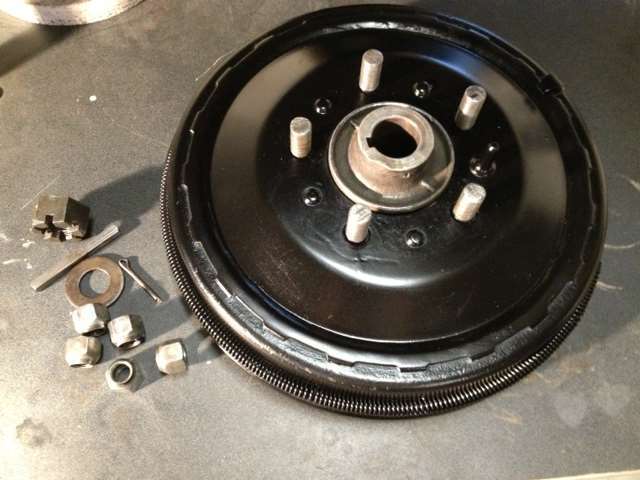
Posted on: 2012/12/22 9:41
|
|||
|
||||
|
Re: The Duchess Project: 1940 Super 8 Convertible Sedan
|
||||
|---|---|---|---|---|
|
Home away from home
|
BRAKE DRUM: The brake drum studs are welded to the inside of the drum.
Tonight I proceeded to install it so I can drive the car. Bad news. The drum won't go on all the way. Before I had it welded it wouldn't go on all the way, either, but it appeared the old hub wouldn't either. So I thought, if it's hard to get off, perhaps it's hard to get on. At first I thought the key was hanging up. Perhaps I'm installing this incorrectly. A couple of years ago when I removed and honed the brake cylinder on this wheel, I don't remember having any problems. I should have been more aware. When the new drum wouldn't go all the way on, even with some tapping, I had to use a puller to get it off. I then tried my old hub and it slipped on all the way. I couldn't find any instruction for replacing the drum. It must just slip on. Only this one doesn't. Is there a correct procedure, something I'm missing? The drum has been hit pretty hard, probably to remove it from a rusted spindle. You can see a punch mark on one side and a flattened area nearby. I could keep tapping on it. If I could get it to the thread, I might be able to press it the rest of the way. What a revolting development. Help, please. Attach file: (46.92 KB)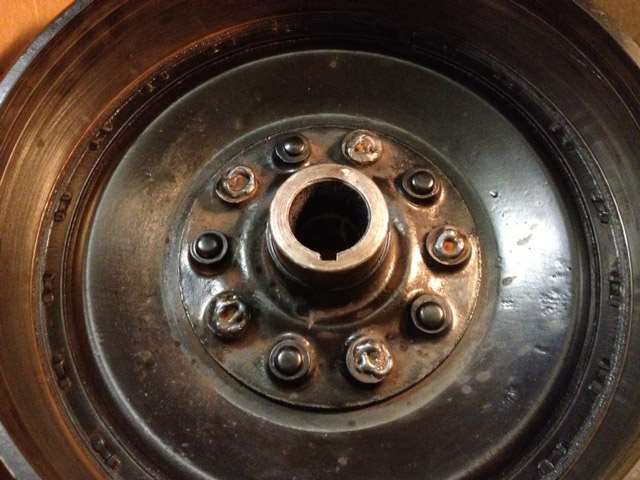 (39.34 KB) (39.34 KB)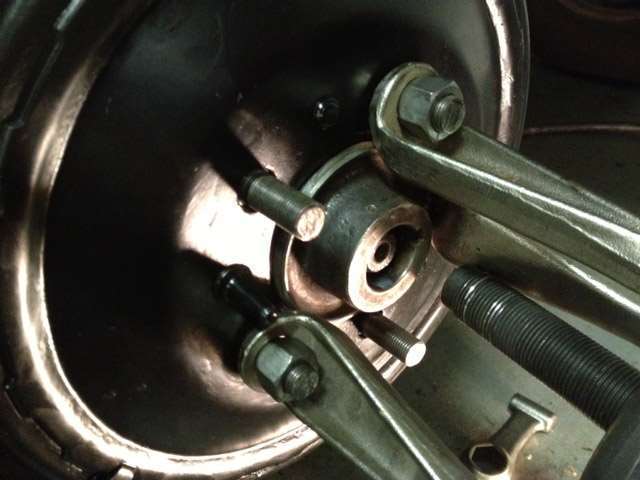 (49.70 KB) (49.70 KB)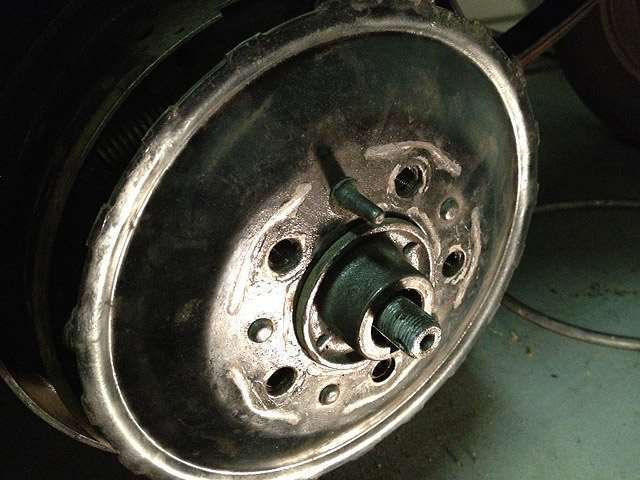
Posted on: 2012/12/21 22:58
|
|||
|
||||
|
Re: The Duchess Project: 1940 Super 8 Convertible Sedan
|
||||
|---|---|---|---|---|
|
Home away from home
|
JW,
I have my old one. Perimeter rivets already broken. I could ship it to you for a donation to Big Kev. Or maybe Jim L would like to try your recipe. JR at Oregon Drive Axle in Tigard is doing the welding this morning.
Posted on: 2012/12/20 13:30
|
|||
|
||||
|
Re: The Duchess Project: 1940 Super 8 Convertible Sedan
|
||||
|---|---|---|---|---|
|
Home away from home
|
Thanks, Jim. Our accountant just had her Tahoe repaired at Oregon Drive Axel in "downtown" Tigard. I will call them in the morning, but they probably could do this or know where to get it done. I'm on Bull Mtn so close is good. Let me know if you can actually find a welder in the area. That would be interesting.
Posted on: 2012/12/19 22:44
|
|||
|
||||
|
Re: 40 Rear Brake Drum Separated
|
||||
|---|---|---|---|---|
|
Home away from home
|
Jim W: Very clever. Merry Christmas to you and yours! Like that song on the CarTalk disc "You took a fine time to leave me, Left Wheel.
Posted on: 2012/12/19 18:39
|
|||
|
||||
|
Re: The Duchess Project: 1940 Super 8 Convertible Sedan
|
||||
|---|---|---|---|---|
|
Home away from home
|
JW: With as much discussion as there's been on difficulties popping off those rear drums after they've been on awhile, a better solution would be welcomed. The problem for me is I'm too dense mechanically or spatially to understand the solution you propose.
And I always worry that there might have been a reason for engineering it the way they did it. Like replacing the bolts with studs. We did it because over the years, esp using air tools, the original nuts kept making the holes in the wheel rims bigger and bigger, until one day in 1980, parking on a slight incline I cranked the wheel pretty tight and a few nuts pulled through the rim. With new studs we were able to use some larger nuts. I get that you could grind off and release the 5 rivets that alternate with the stud positions on the hub. Then I'm sort of lost. Jim: Right. You can have a blog, but if you have a specific problem, I think it's better to start a new thread. Problem is a lot of restoration ends up on disparate threads, so I wanted to pull them together and list their topics. I think I could search for JoeSantana and all those threads would be returned. Jim, I can't find a welder to weld those studs. My son was going to do it, but he and my daughter-in-law left for week in Cancun and won't be back til Saturday. He gave me the number of a welder whose phone is disconnected, and I've called every welder in Beaverton, Tigard and Tualatin. Some only do high-end medical and food processing welding, others huge steel structures, and the rest, their phones are disconnected. They don't return their calls. Even the primary supplier for welders is out of business. What's this world coming too? Got any suggestions?
Posted on: 2012/12/19 18:35
|
|||
|
||||


