|
Re: '55 engine back to life! Mostly worked...
|
||||
|---|---|---|---|---|
|
Home away from home
|
Installing the vibration damper (or harmonic dampener) was very easy. I rented the standard installer kit from Advance Auto parts. After cleaning the crank 'snout' and adding a little bit of anti-seize, the damper slid right on with the tool. Make sure to remove the extra pulley for the power steering if so equipped. Add it after you have the damper bottomed out. If unsure, look at it sideways and make sure the damper pully part where the V-belt goes s in plane with the generator.
Good luck, don't sweat this one. -Bob
Posted on: 2019/1/17 0:18
|
|||
|
Bob
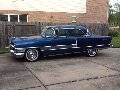
1955 Packard Patrician Sapphire Blue |
||||
|
||||
|
Re: Bob's '55 Patrician Blog
|
||||
|---|---|---|---|---|
|
Home away from home
|
The WCFB must not have been the original (vs spec'd Rochester 4G), but neither was the engine. It is a '55 352 (casting # 440275-A) with 440689 heads but stamped 5587 (for a 400) vs 5582 (Patrician), although identical in every way.
As far as carb specs: Air Horn: 6-889 Main Body: 0-986 Throttle body/base: 1-1231 Primary throttle valves 2-92 Secondary throttle valves 2-161 I infer that it is a WCFB 2232S and bought a carb rebuild kit for that. I am hoping I can find a primary shaft somewhere that can be made to work (7" long, 3/8" diam). thanks for your help
Posted on: 2019/1/4 23:03
|
|||
|
Bob
1955 Packard Patrician Sapphire Blue |
||||
|
||||
|
Re: Bob's '55 Patrician Blog
|
||||
|---|---|---|---|---|
|
Home away from home
|
DavidPackard & PackardDon:
thank you for the time in writing your posts. I have looked for a replacement shaft via the Carter part number (as you have in the provided table) 3-961S with no luck via the internet searches. But I am also hopeful that a lot of the primary shafts (7" long, 3/8" diam, 1-3/8" flats) are the same and I can just re-swage the linkage attachments, as you also state. Dp, regarding my comments: Yes, I did cut off the ends of the existing screws with a Dremel cutting wheel. Upon reassembly I used new brass 4-40 screws and not convinced I could peen the new screws without bending the shaft, I used blue or red Loctite. I was having trouble with the carb as I couldn't get the engine to idle low enough and there was noticeable suction on the secondary side of air horn. Fearing that the throttle valves weren't properly installed I removed the carb. 2 of the new brass screws came out, but I snapped the heads of 2 of them; verifying that Loctite works well and heat is needed to properly remove these screws. My Carb is likely a 2232S based on air horn (6-889) and throttle body 1-1231. 64avanti: Regarding your comment that 'parts WCFBs' are well under $100, where? I struggle to find anything but very expensive WCFBs in my internet search. I fear my attempts to drill out that last hole were counter-productive. thanks again for helping me think through all of this and hopefully get a replacement shaft. PackardDon, I appreciate the offer to see what you have have available next time you are in your shop. -Bob
Posted on: 2019/1/3 15:25
|
|||
|
Bob
1955 Packard Patrician Sapphire Blue |
||||
|
||||
|
so this happened
|
||||
|---|---|---|---|---|
|
Home away from home
|
Continuing on with rear suspension bushing replacement:
Took apart the Watts linkage today. The existing bushings (with the exception of 1) actually look pretty good. 1st pic is the 6 Center bushings along with one of the new ones. Dwight's kit provides 10 of the same bushings for all locations. Cleaned up the pieces and letting the primer dry now and will paint later. It was a pain grinding the old peened over ends of the center link and felt like they were welded, but got them out. Going to try to tap the pins tomorrow. With the Watts linkage out, I used my floor jack to raise the driver side frame to pull the tire and start on torque (support) arm bushing replacement. I noticed that the load arm separated from its stirrup. Must be with the Watts linkage out, this can occur. Not exactly sure how to get it back but there was a good discussion in "Stewarts 1955 Packard 400" blog (posts #271-#306 or so) that gives me some ideas. In my case, the body is on the frame so not as much flexibility as Stewart has. This has to be a common occurrence..(?) Since the load arm was no longer a factor, I decided there was no reason not to remove the entire torque arm. 3 easy bolts later it was out. I need to decide ASAP if I am better off taking these somewhere to have the old studs removed and new ones installed OR buy 2 from Gerry and install those instead ($45 each +shipping). Anyone done this before? Or know where to get the right studs to install?? Next picture is a comparison of the 4 old bushings and 2 of the new ones. I have to say that the old ones are in better shape than I assumed. Original? Hard to believe they are 60+ years old but I have replaced a lot of decent looking bushings on this car so maybe someone did all this within the last few decades. I'm thinking of not replacing the forward bushing of the torque arm for this reason (plus the fact that I don't have them on hand, which is the lazy reason). If I did buy 2 arms from Gerry I would order and install new fwd bushings; looks like Max has a set for ~$56 although I would also check with Dwight to see what he may have. Looking for advice here on replacing 2 arms or finding the proper studs and taking them somewhere to be properly welded. No progress on the Carb. Maybe tomorrow I will make one last attempt before I find someone to send it to to make it right. (Howard: i rebuilt the carb a few months ago and when I did I zinged off the ends of the existing screws to enable me to back them out. I then installed new brass 4-40 screws on this WCFB and was worried about properly peening them without bending the shaft so I used red Loctite instead. I didn't realize how good that works so when I tried to remove them last week, I sheared the heads off. Too many things at once, but enjoying the Christmas break to make real progress. Thanks for looking.... Attach file:  (355.80 KB) (355.80 KB)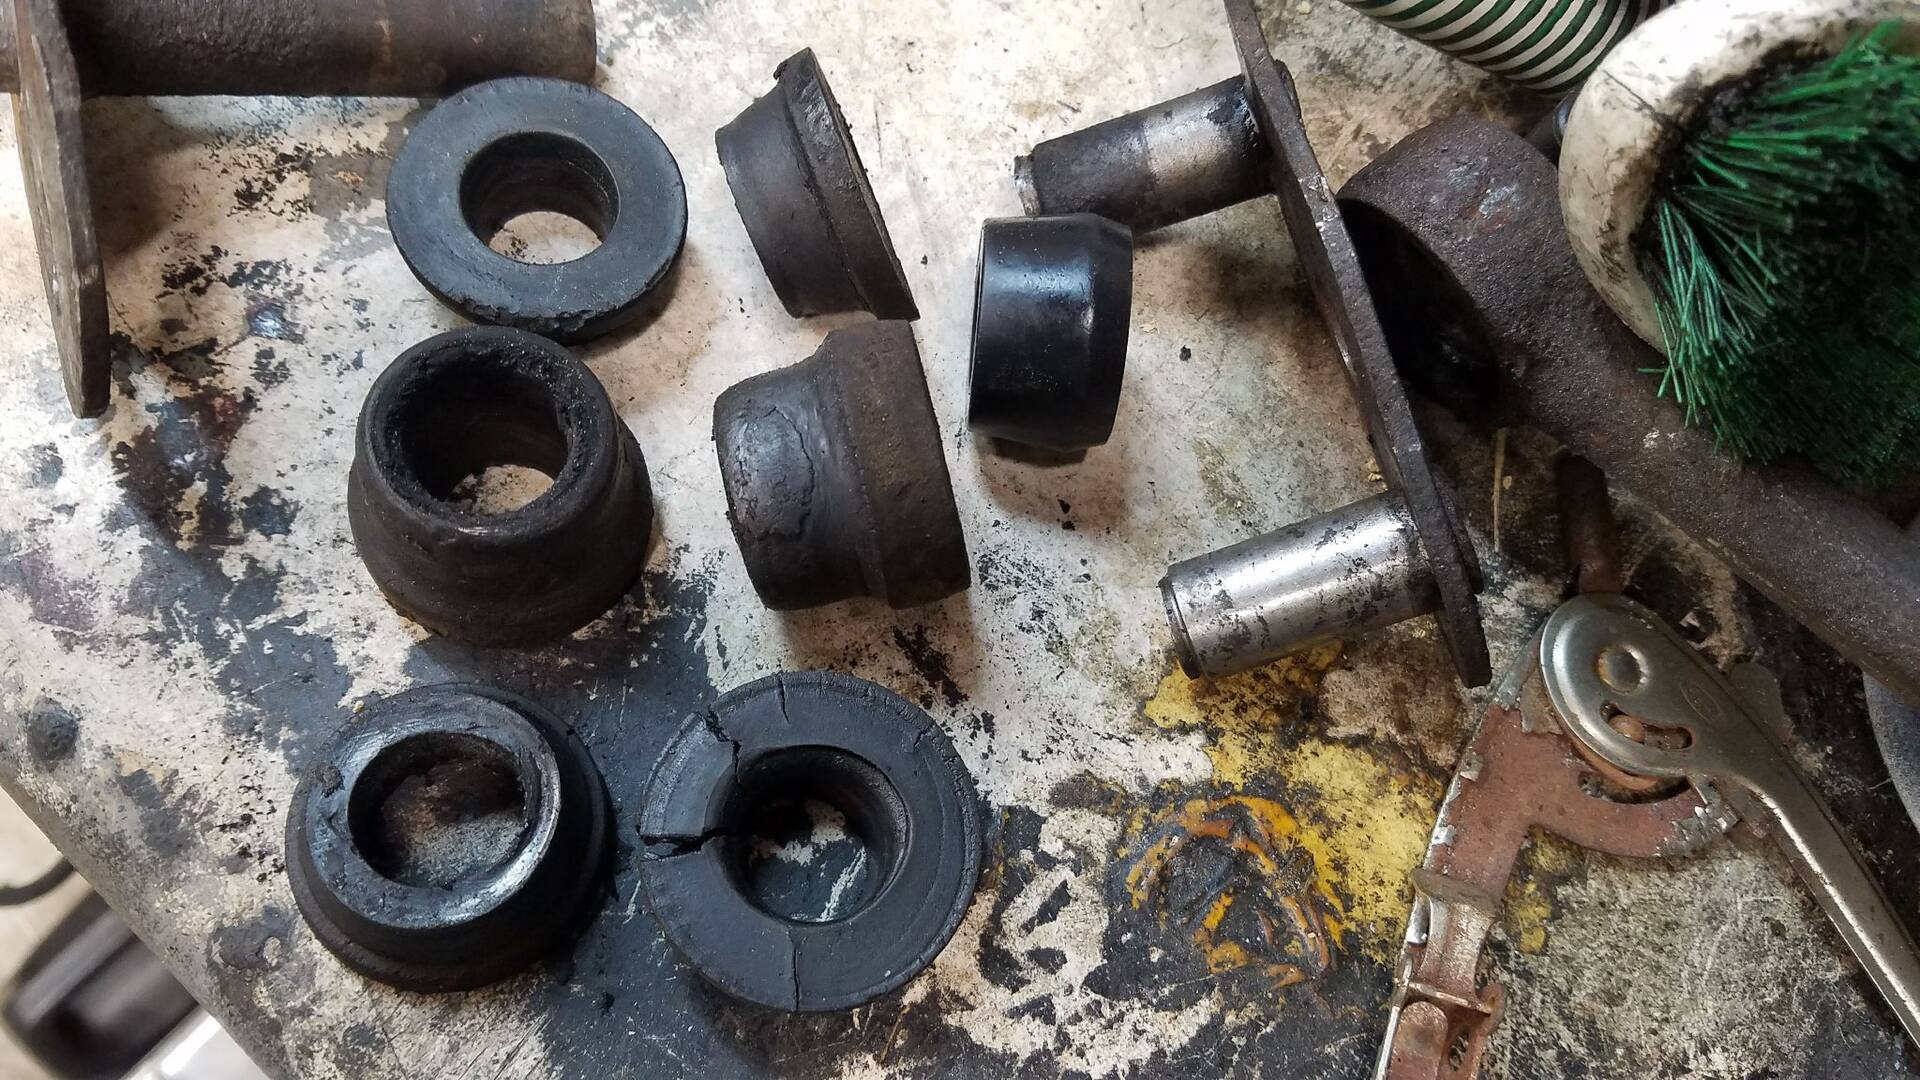 (127.60 KB) (127.60 KB)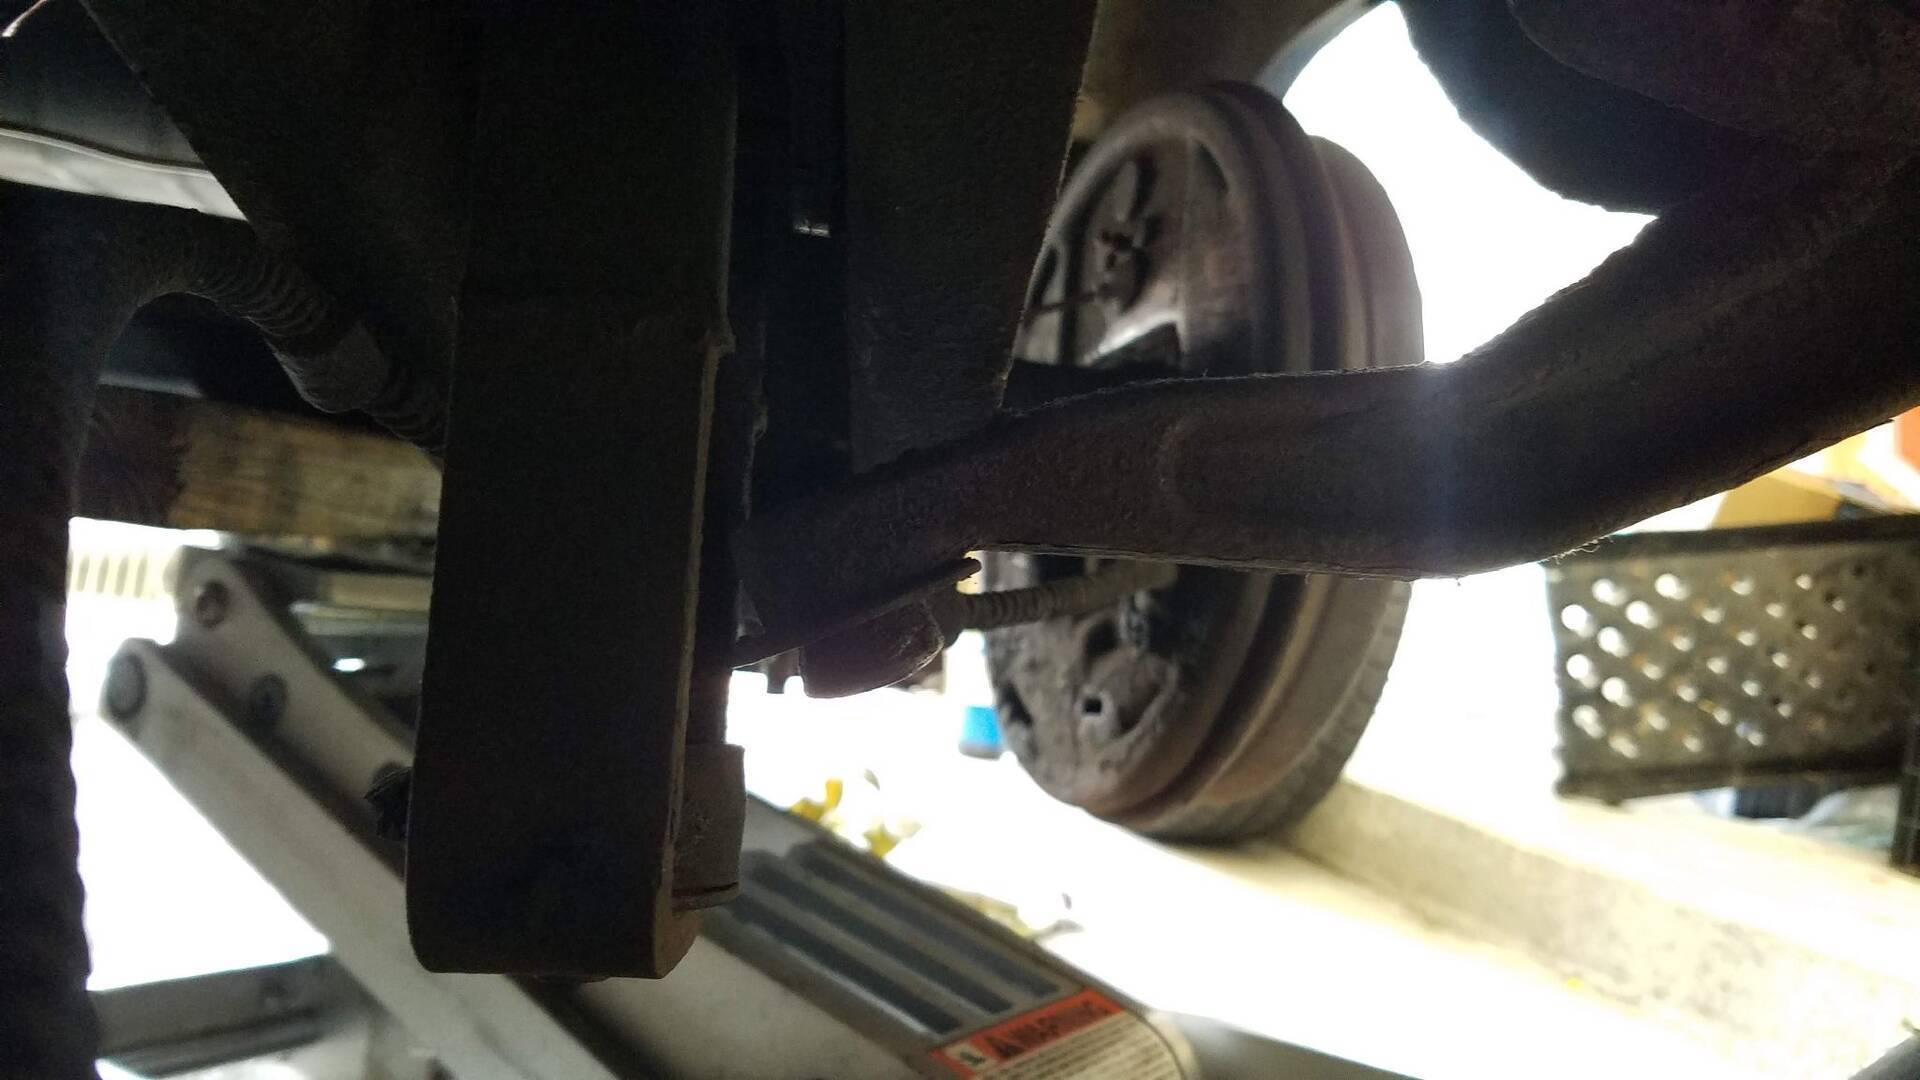 (414.21 KB) (414.21 KB)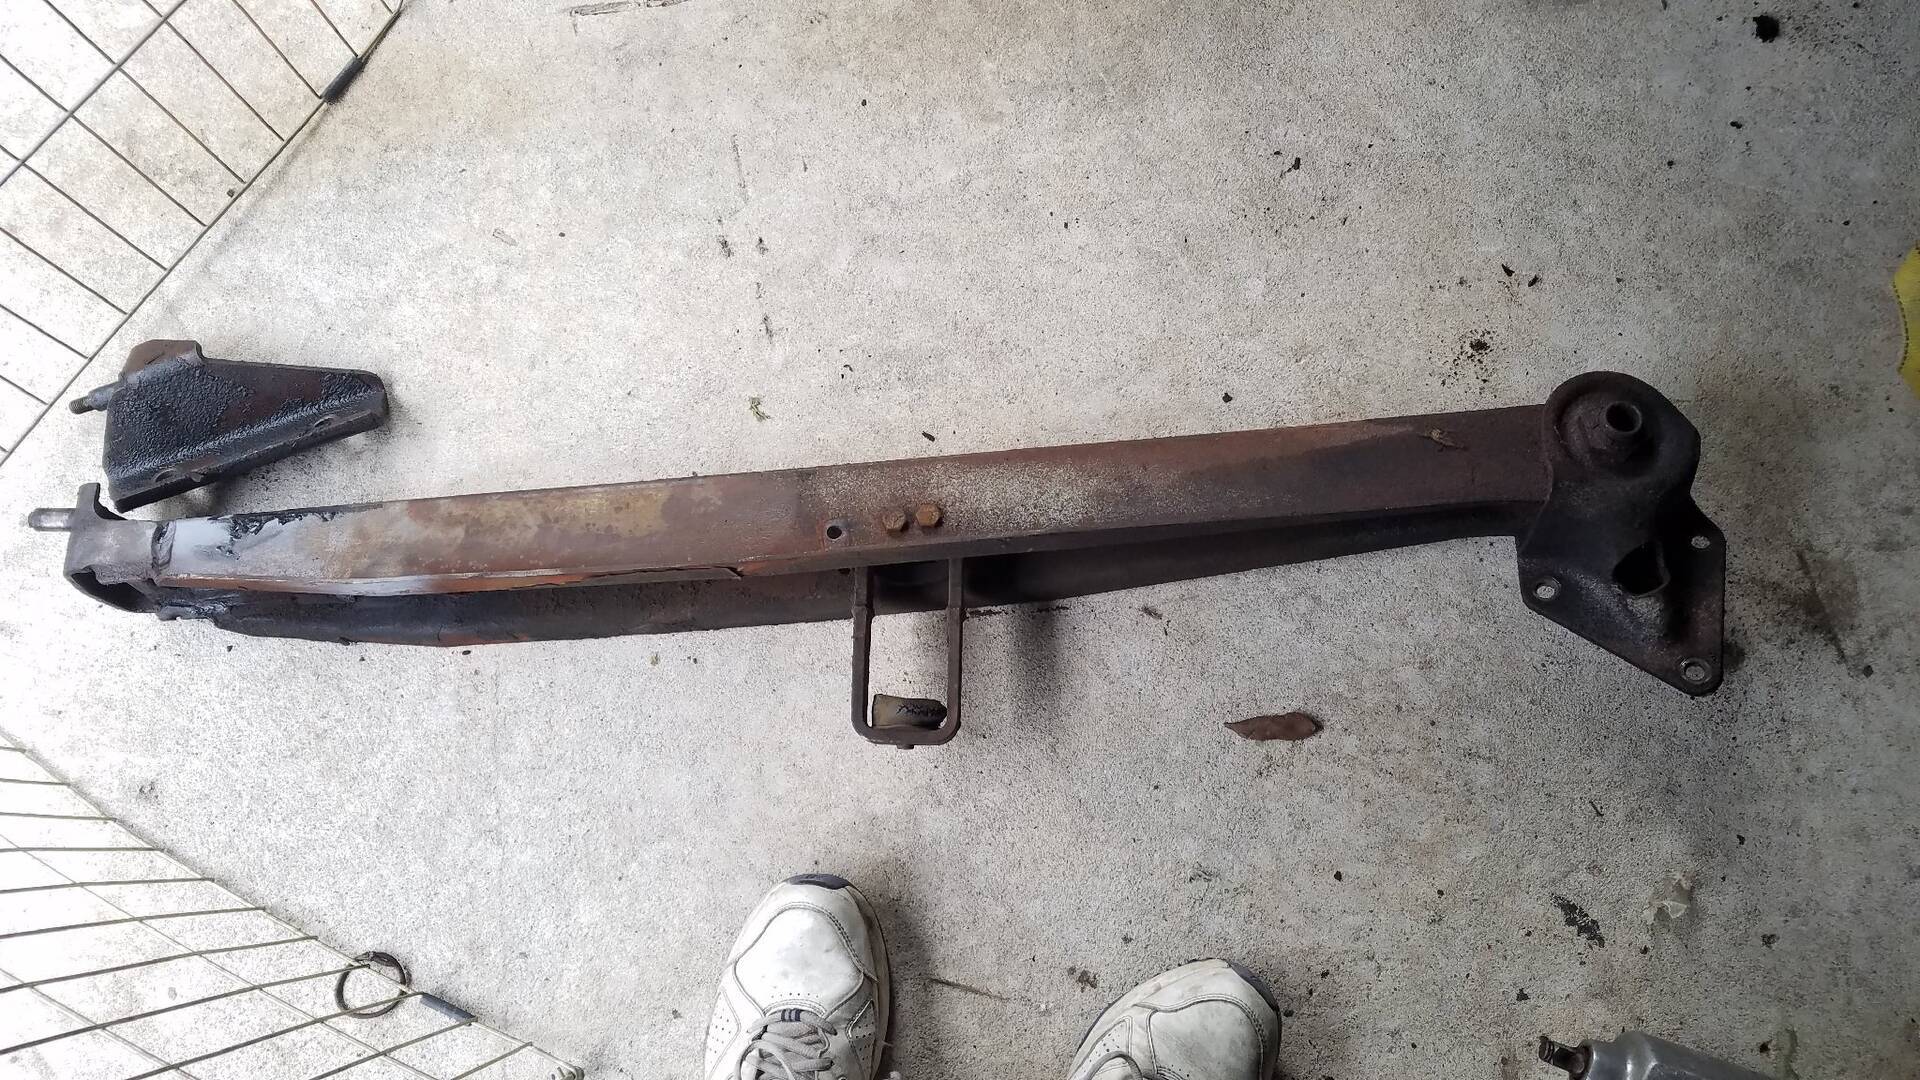 (453.90 KB) (453.90 KB)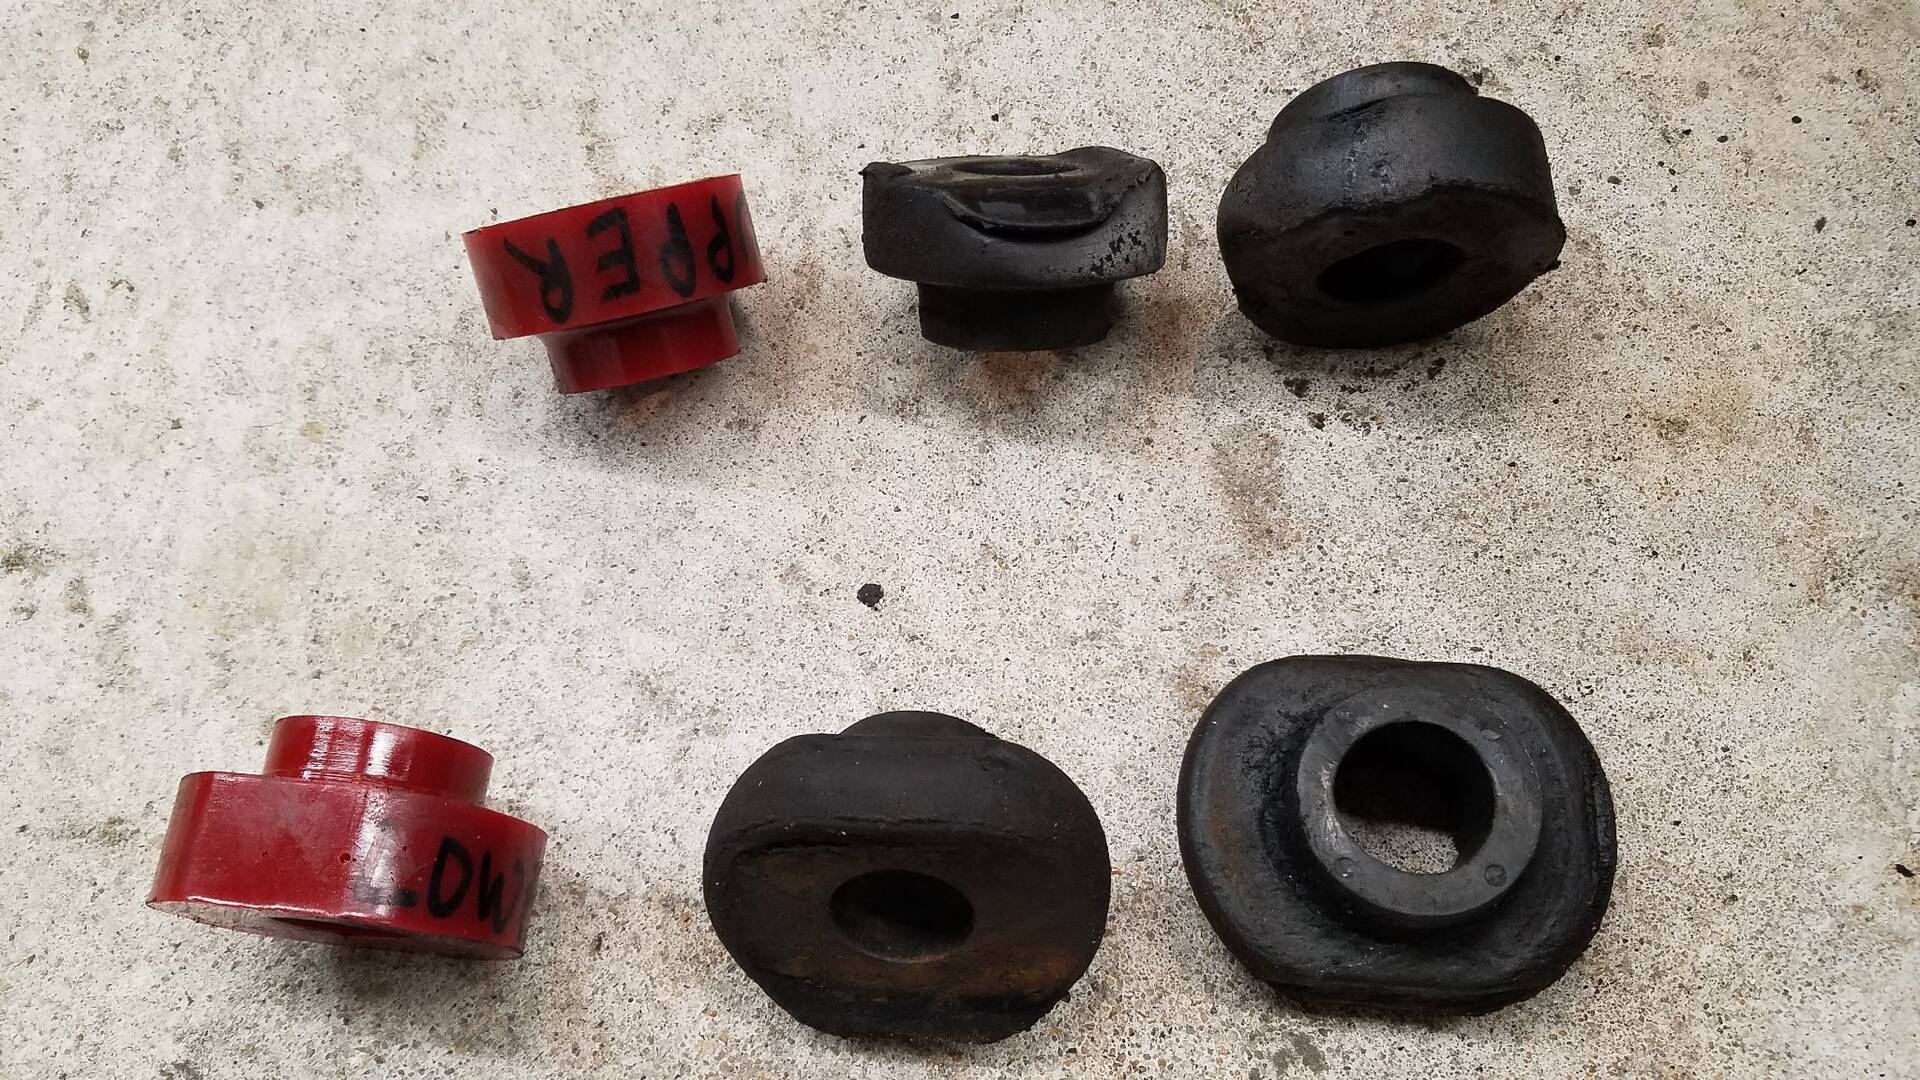 (181.33 KB) (181.33 KB)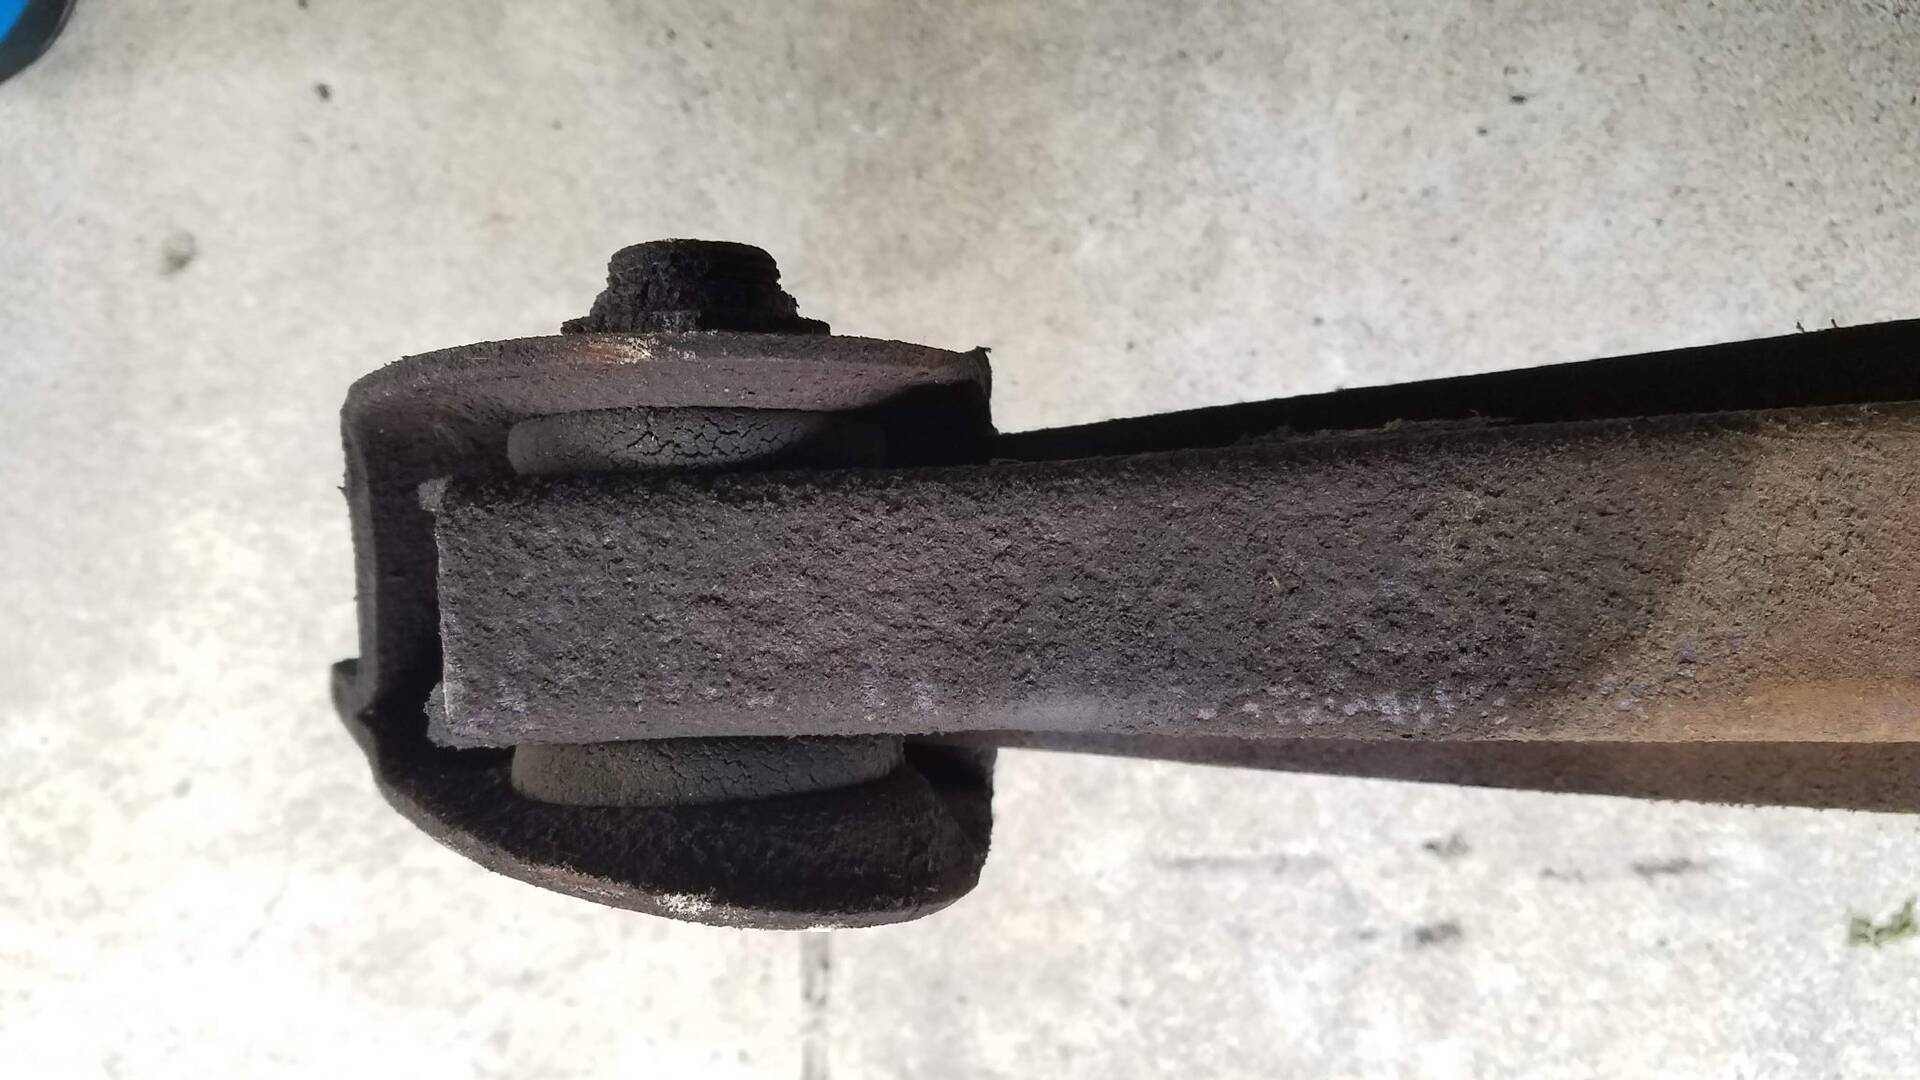
Posted on: 2018/12/28 19:35
|
|||
|
Bob
1955 Packard Patrician Sapphire Blue |
||||
|
||||
|
Moving on to Rear Bushings for now
|
||||
|---|---|---|---|---|
|
Home away from home
|
I spent a lot of time trying to remedy the broken screws in the primary throttle shaft. I was able to to drill out one and retap it successfully. But the other one is giving me fits and I am doing more damage to the throttle shaft than anything. I have a drill press but no good way to hold the shaft and to prevent the small drill bits from skating across the rounded surface. Seems like replacements are not readily available so trying to find someone to do the drilling for me or to replace/repair the shaft and maybe see if it needs rebushing etc. My reason for taking it apart was to try to reset the throttle valves to see if I could address why I couldn't get an idle below ~700rpm and that if I covered only the secondary side of the air horn, the engine would rev higher then stall (I was thinking that maybe the primaries or secondaries weren't centered properly so I was getting more of an opening at idle than proper).
Frustration has moved me to another project for now, I will get back to the carb as soon as I can figure out how/who to drill out the remaining hole. So moving on the replacing the rear bushings. I replaced all the fronts with new ones from Max. After reading Dwight's article in the Cormorant last year and talking to him on the phone, I ordered his rear-only kit to give it a go. I also decided to do something different and properly use this project blog to document what I am currently doing vs just posting when I have problems.. Here is a picture of the bushings I received. They look very nice in red. There are the 4 uppers and 4 lowers for the arm as well as 10 of the same bushings for the Watts linkage Most of the motivation to replace the bushings came from me shearing off the nut for passenger side Watts linkage stud (see post #16 in this blog). I thought I was being careful the 2nd time with judicious use of PB Blaster and heat, but I sheared off the driver's side too... My plan is to not remove the front bolt/bushings from the "rear axle torque (or support) arms" to not deal with the load arm torque and Dwight's suggestion that the forward bushings for these arms usu don't need replacing. This may simplify some things, but also makes cleaning up the arms (removing rust, prime/paint) harder and finding a way to have someone weld new Watts linkage studs on in place of the broken ones. For now, I was going to try bolts [Rubicon Express RE2051 Shock Mount Stud Kit] as an interim fix. https://www.amazon.com/gp/product/B006GJOKAU/ref=oh_aui_detailpage_o00_s00?ie=UTF8&psc=1 I'm not sure where to find just replacement studs, but if I can verify the shoulder of these Crown J5352787 pins are 5/8" and the right length, maybe they will work.... It seems like tight quarters to weld in a replacement stud. Gerry at Packards SW has entire arms for $45 each which may be worth the price to avoid having to find the right replacement stud and someone to weld them with the arms installed. I pulled the Watts linkage tonight. There has a been a fair amount of posts regarding Watts linkage bushings etc and I intend to follow the process outlined by Howard (HH56) in grinding off the rivets and tapping that sleeve for new bolts to put back together. Plan for tomorrow is to take the Watts linkage apart, wire brush it and maybe paint it while I wait for those Rubicon shock mount studs to come on Monday. Dwight provided a fair amount of instructions and pictures but any suggestions from y'all are always very appreciated. Attach file: (298.22 KB)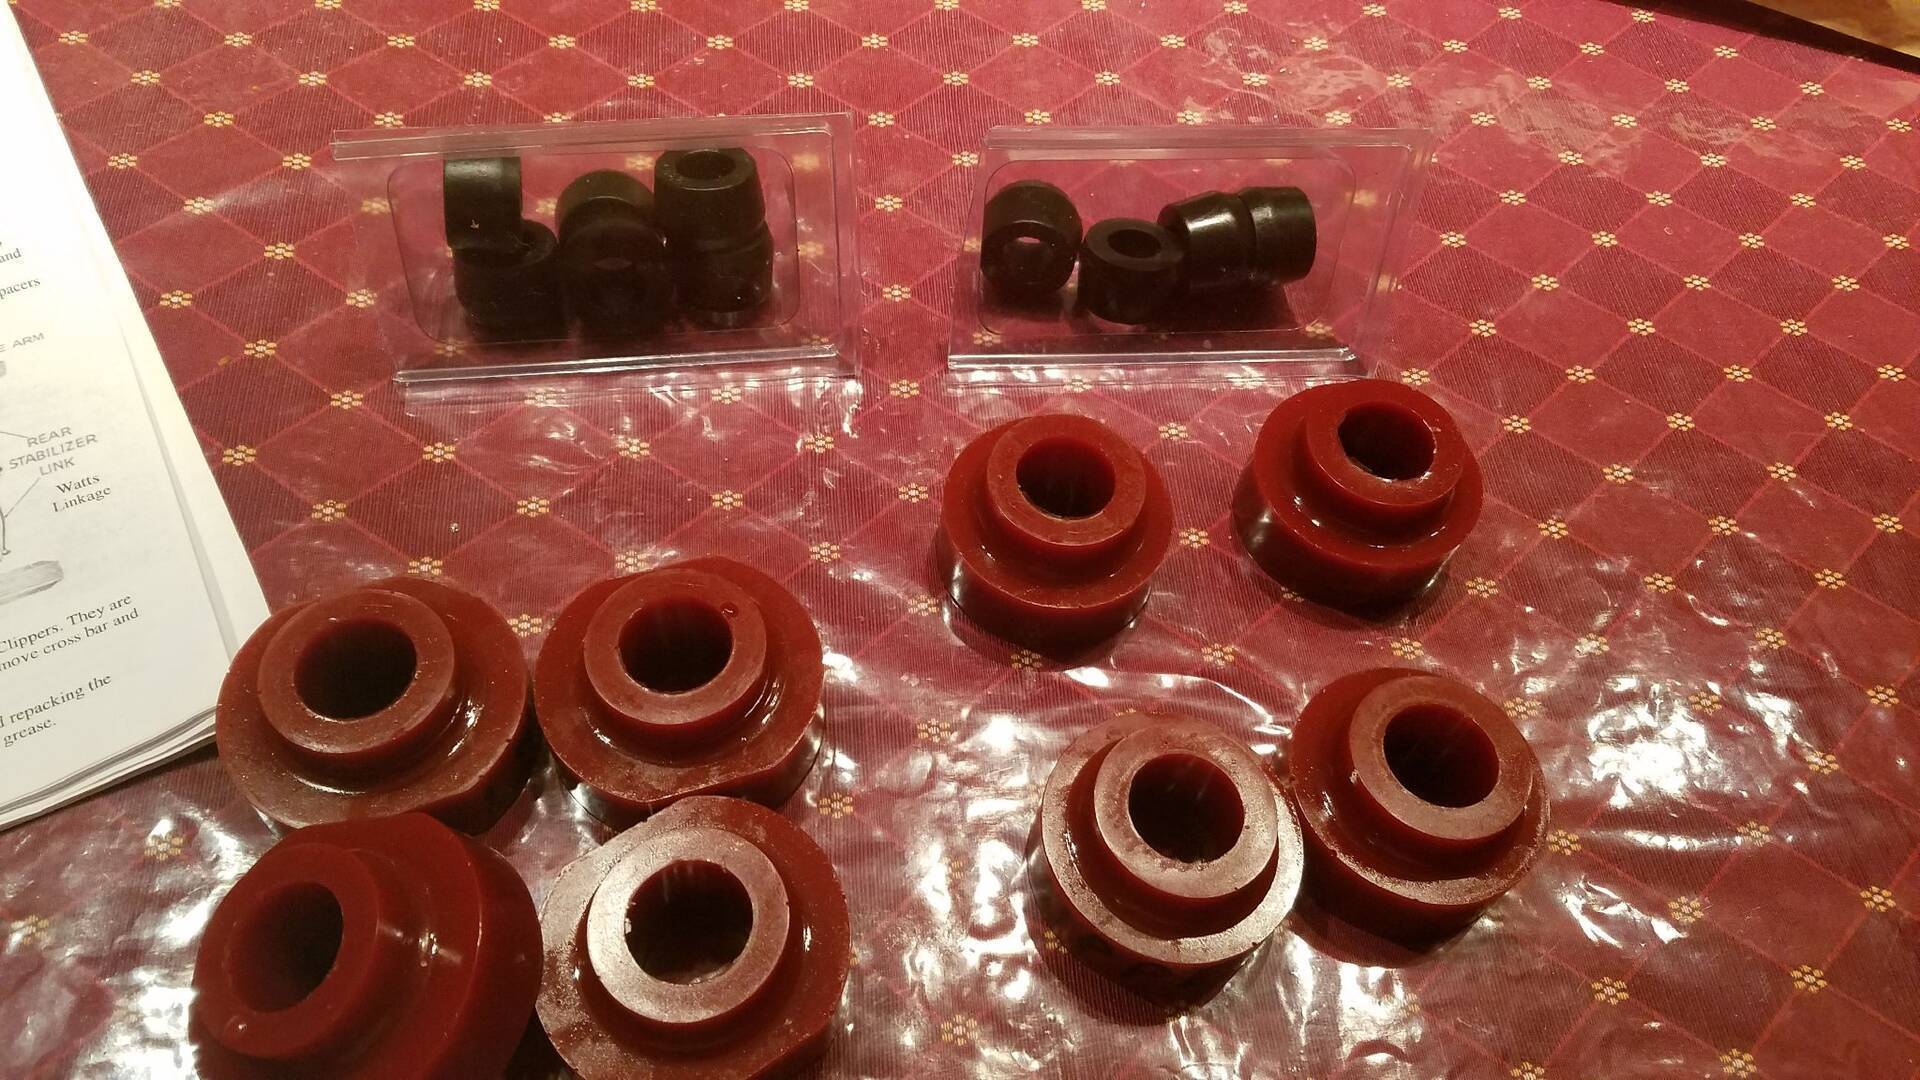 (166.58 KB) (166.58 KB)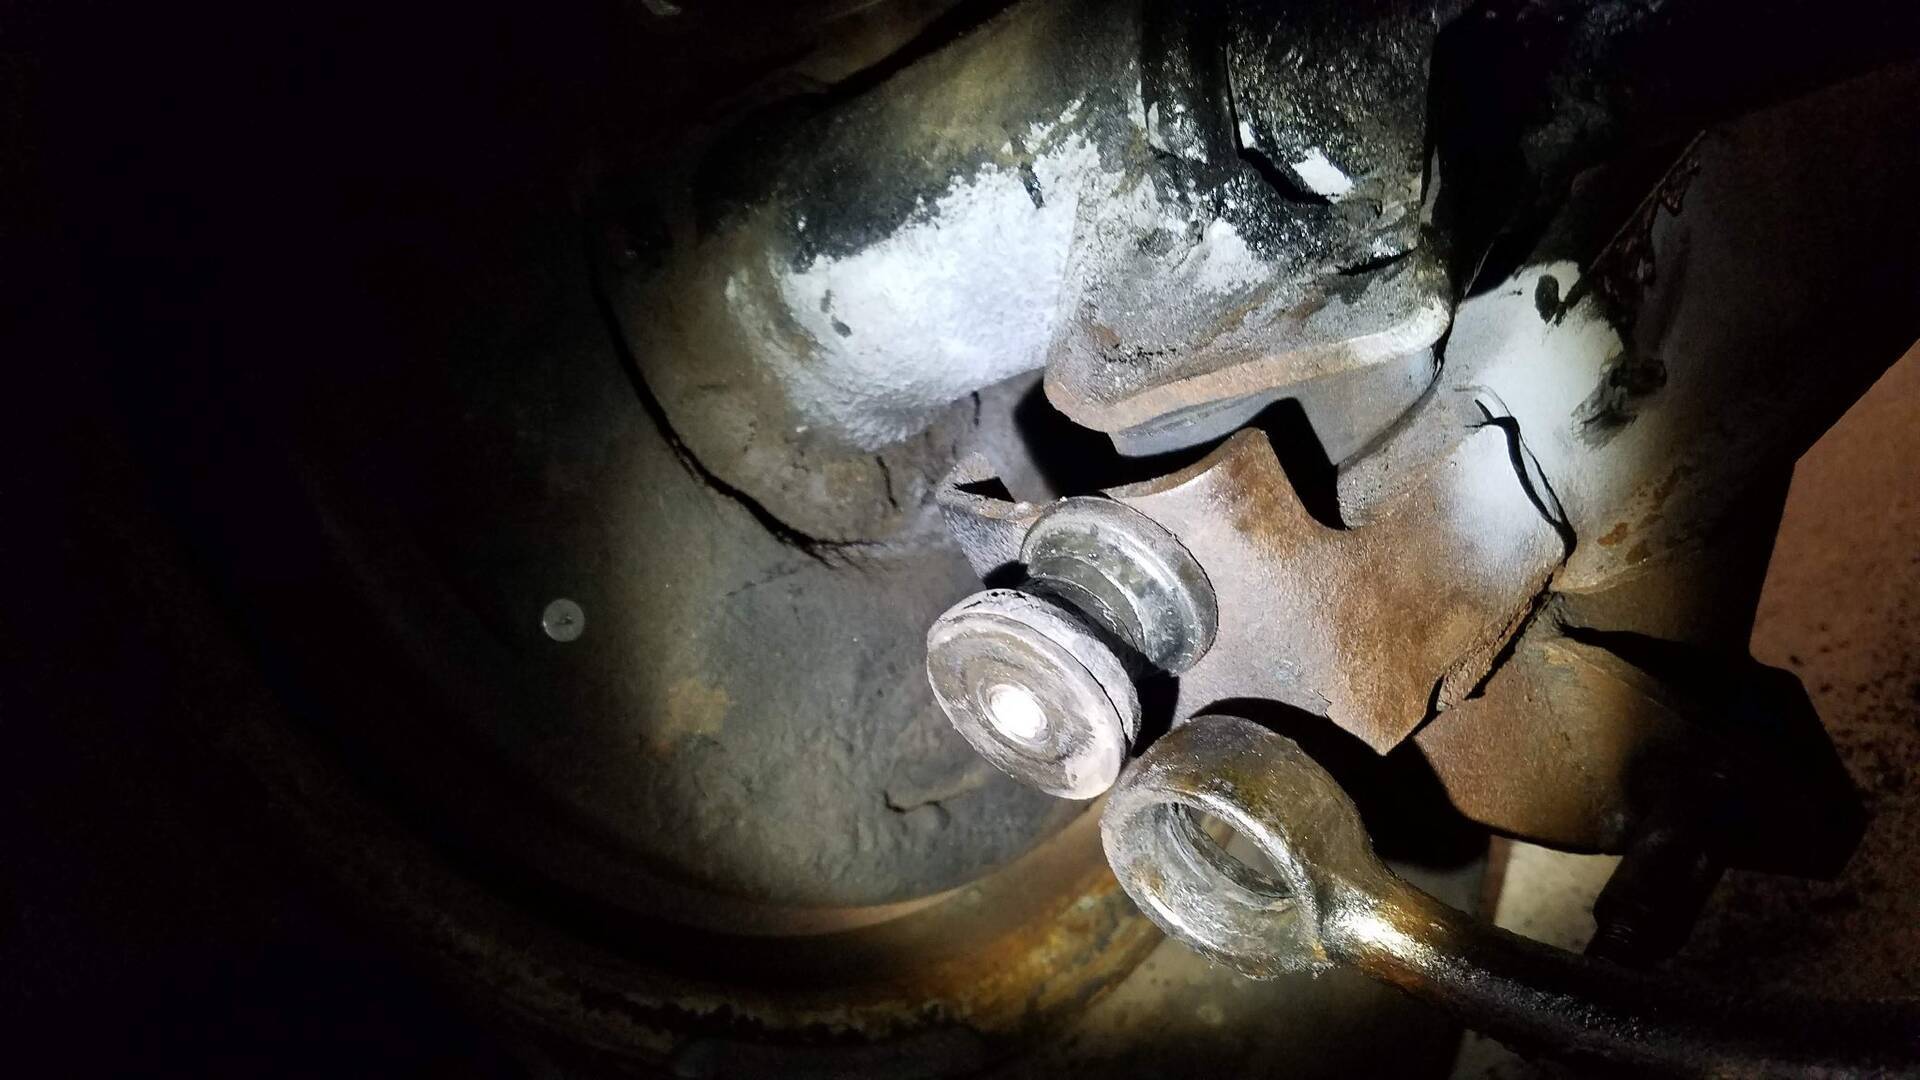  (259.31 KB) (259.31 KB)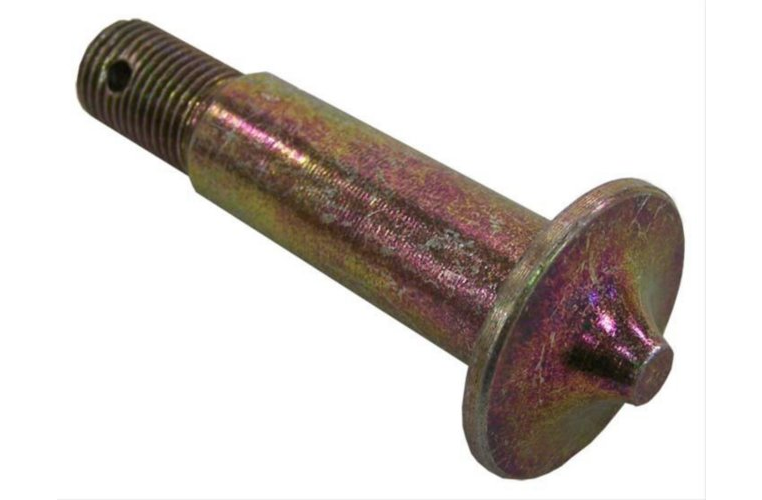 (337.07 KB) (337.07 KB)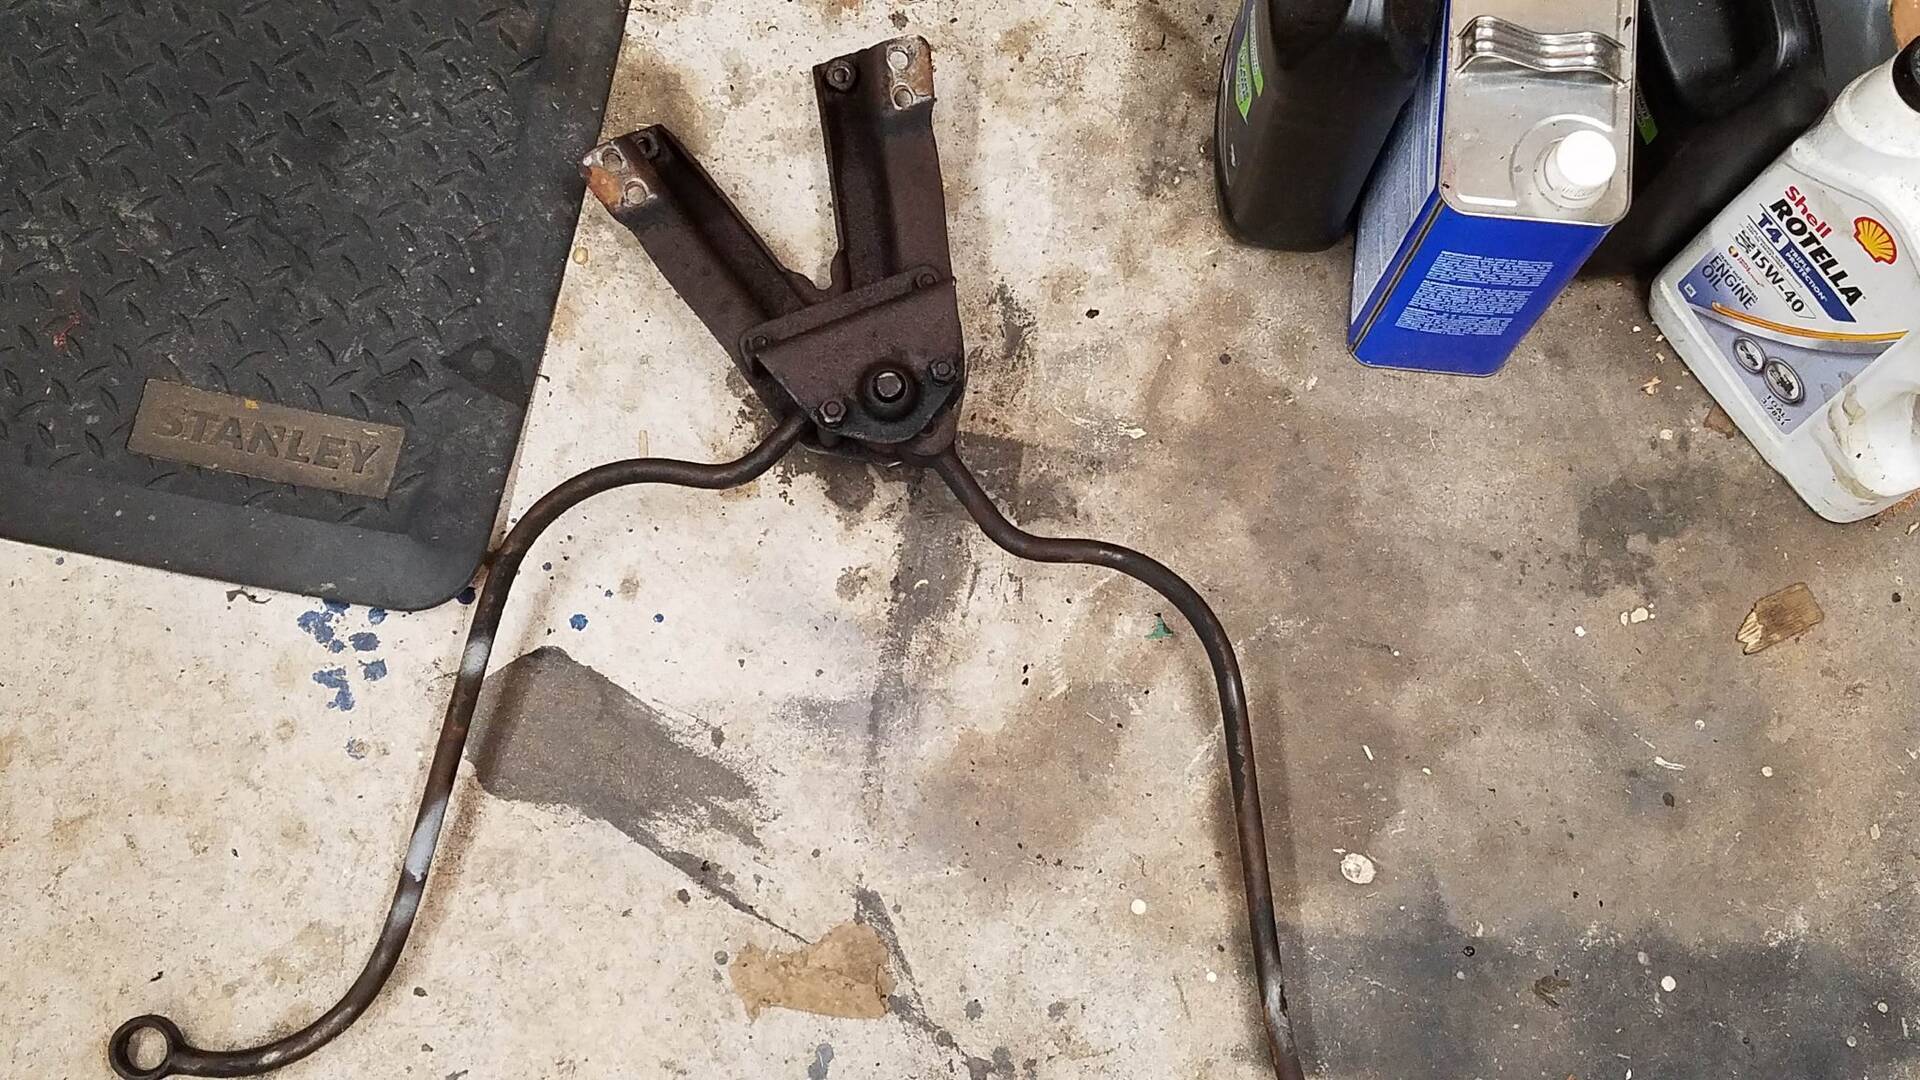 (36.84 KB) (36.84 KB)
Posted on: 2018/12/27 22:07
|
|||
|
Bob
1955 Packard Patrician Sapphire Blue |
||||
|
||||
|
1 step forward, 2 steps back
|
||||
|---|---|---|---|---|
|
Home away from home
|
So I was trying to track down why there is any suction at all at the secondary part of the air horn. Took the carb off and I seemed to convince myself that there was some play in the secondary throttle valves when closed so presumably they could be sucked to open a little when the engine is running. Also felt like the primaries were hanging up a bit. So, I decided to fix that by pulling off the throttle valve plates to reinstall. Damn that red loctite works well, as I broke off 2 of the heads of the brass screws on the primary shaft :(
Trying to now drill them out, but I really don't have much in the way of precision machining/drilling capabilities. If I can get them out, I think I may have to drill and tap from a 4-40 screw to a 6-32 screw. OR maybe I should just get another primary shaft. Are they really that expensive??? Looking on line for Corvette WCFB parts, a new primary shaft is >$140 but I don't know if they are interchangeable with our WCFBs. Anyone have any leads on where to get a replacement that will work? Just got her driving so bummer that there will be no driving for while :( Attach file: (196.95 KB)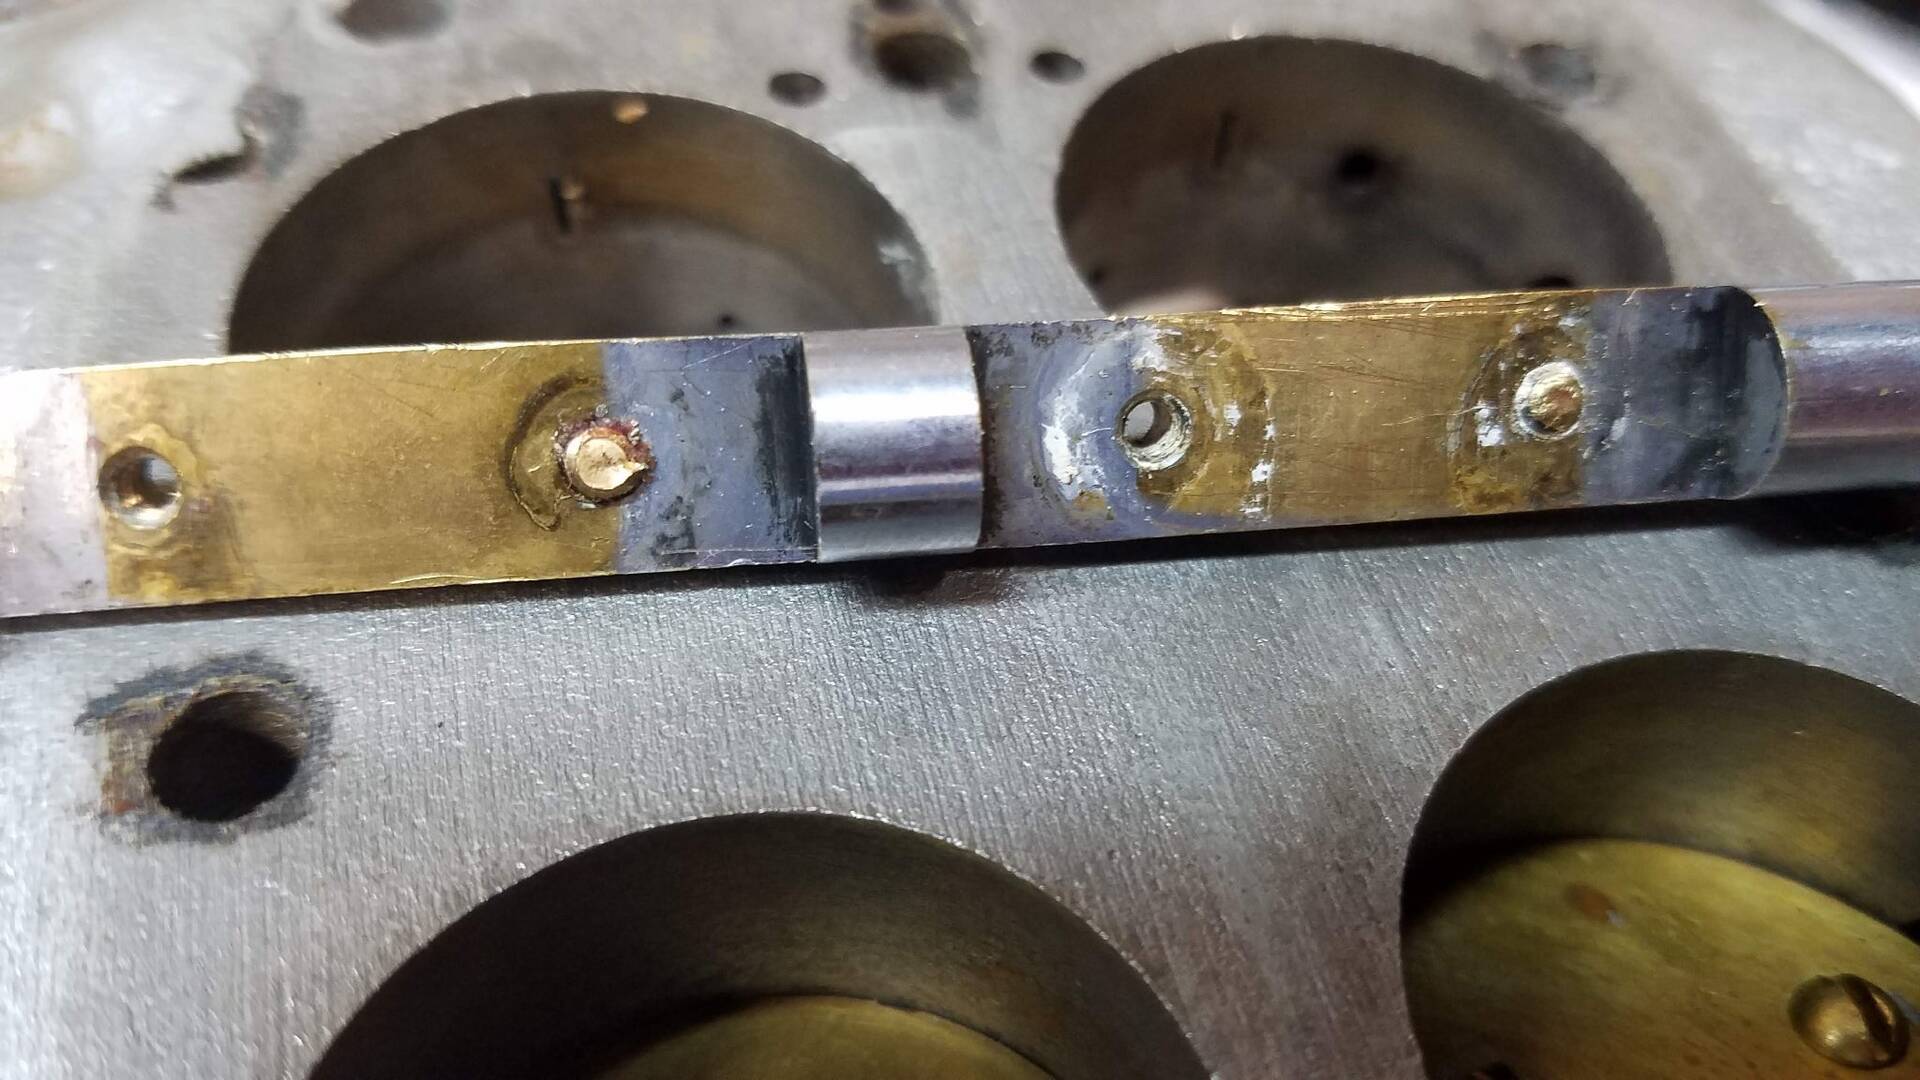
Posted on: 2018/12/21 19:26
|
|||
|
Bob
1955 Packard Patrician Sapphire Blue |
||||
|
||||
|
Taking her for a spin!
|
||||
|---|---|---|---|---|
|
Home away from home
|
After 2 years, I was able to take her out for a spin around the block!!!
It felt good to get her going again. Good trial run with nothing falling off or breaking. A few things that I noticed: 1. Transmission is not 100%. Didn't seem to know what gear it was in and at first wouldn't move in any gear. But moving the shifter around helped to remind it and it seems mostly normal now. When in Park, it will roll backwards on a very slight incline. It seems to go forward okay, but seems a little sluggish. If it is in Park and I rev the engine, the car will rock forward (doesnt move but rocks forward then back as I let off the gas). Reverse works great. 2. Various leaks: coolant, transmission/PS, and oil. Just drips of each but need to be fixed before I get the front clip back on. 3. Rough idle. Has a 'shudder' at idle like a cylinder is not firing. Smooths out at higher rpm, but rough at ~700rpm which is as low as I can get it to idle with the idle screw all the way out. I went around the engine pulling the plug wires one by one to see if I could find one that had no effect, but couldn't tell the difference between cylinders. 3a. Carb funnies (it is a Carter WCFB). If I cover the air horn secondary side opening, the engine will rev higher then stall. I can't understand why as the secondary throttle valves seem tight when I have the carb out of the car. Plugged up vacuum lines that go to dist advance and brakes with no change. Tried spraying carb cleaner all around it as well as the unlit propane torch trick. No difference. Currently working through this thread to see if I have some similar challenges with the flatness of the throttle body casting. https://www.jalopyjournal.com/forum/threads/wcfb-woes-can-you-troubleshoot.92081/ 3b. Intermittent loss of spark. I put a spark tester and seemingly randomly there will not be a spark at a plug. I have tried multiple wires and the same thing: random, intermittent lack of spark. In the last 2.5 years (with very little driving), I have replaced the dist cap, rotor, spark plug wires, and within the last month have replace the points, dist condenser, battery, and plugs with a new battery grounding strap. Not sure what is left unless there is some dist shaft wear which is causing this. 4. Brakes work, but not as touchy as I would think for power brakes. I remember the same thought when I had th BTV rebuilt by Kanter in 2016. It works, but expected it to be "touchier". All in all, good to get it going! Suggestions always appreciated. -Bob Attach file: (468.11 KB)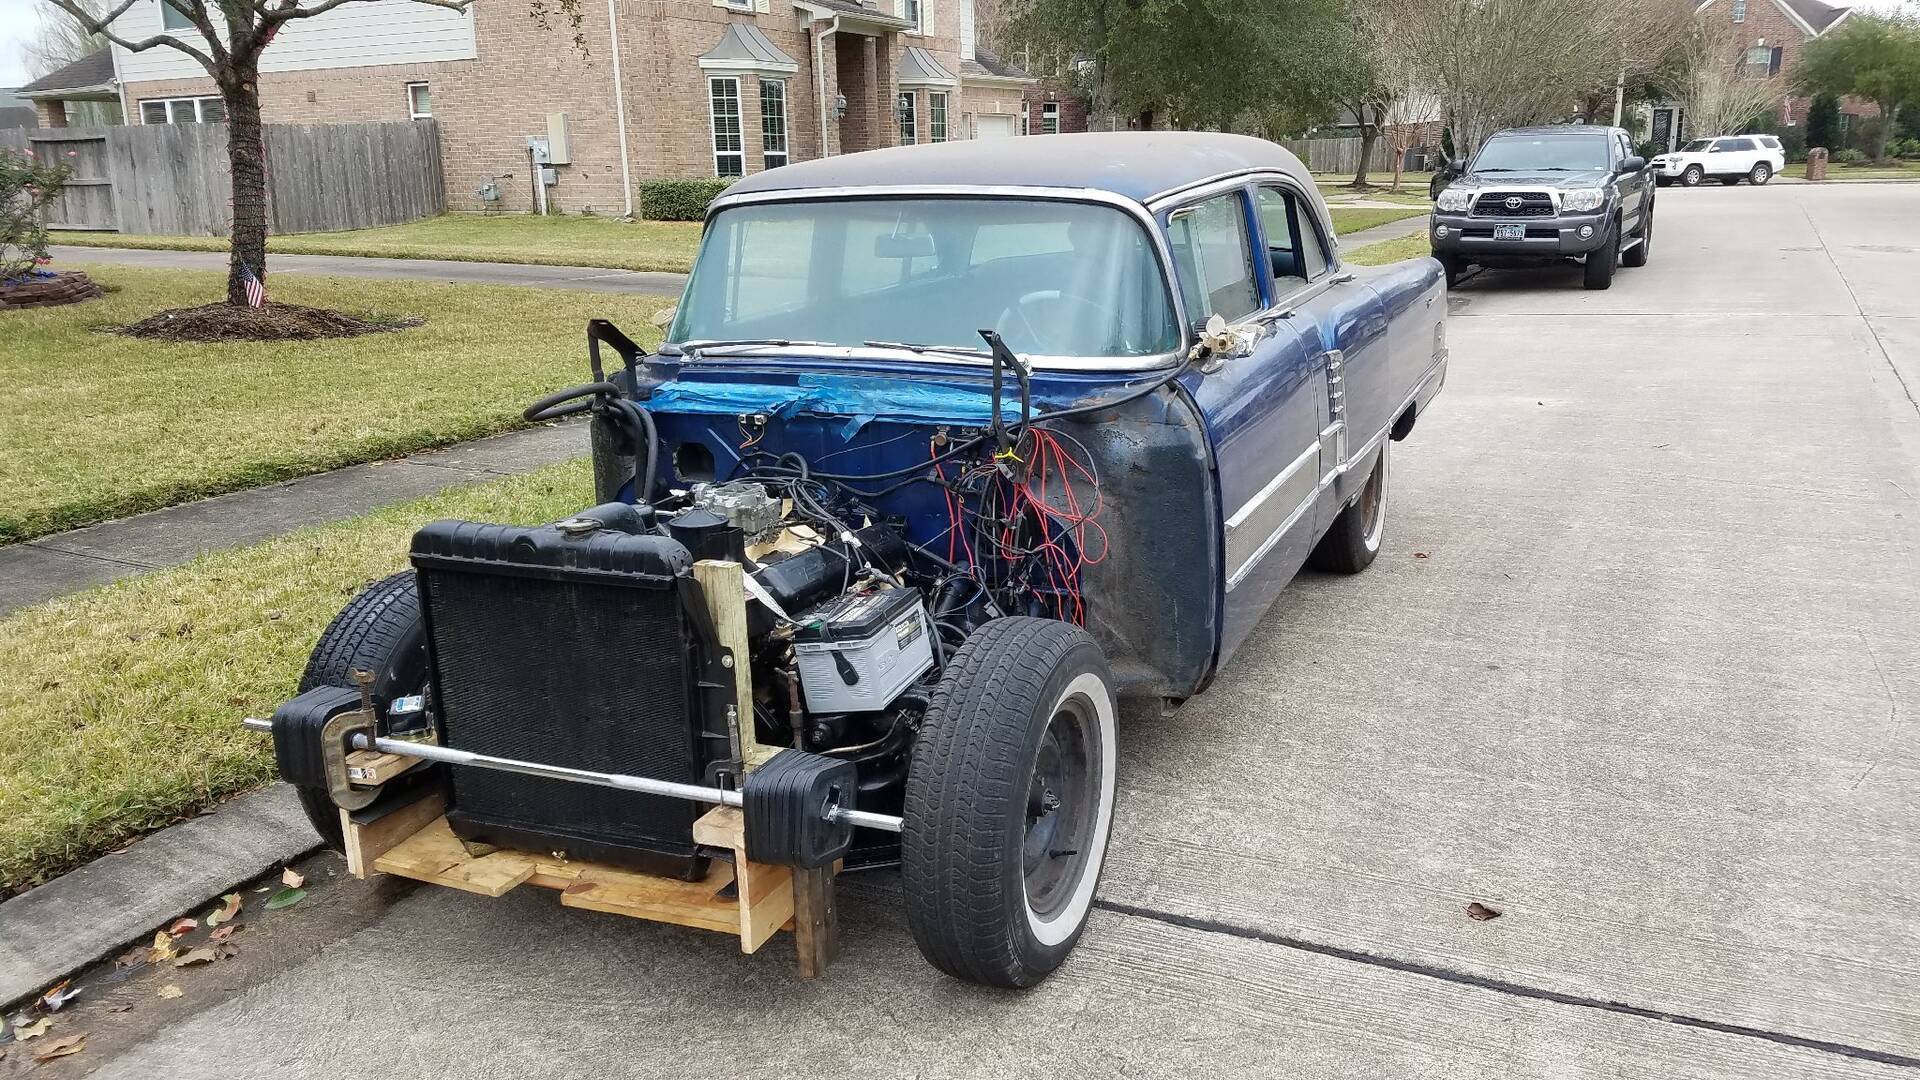 (134.23 KB) (134.23 KB)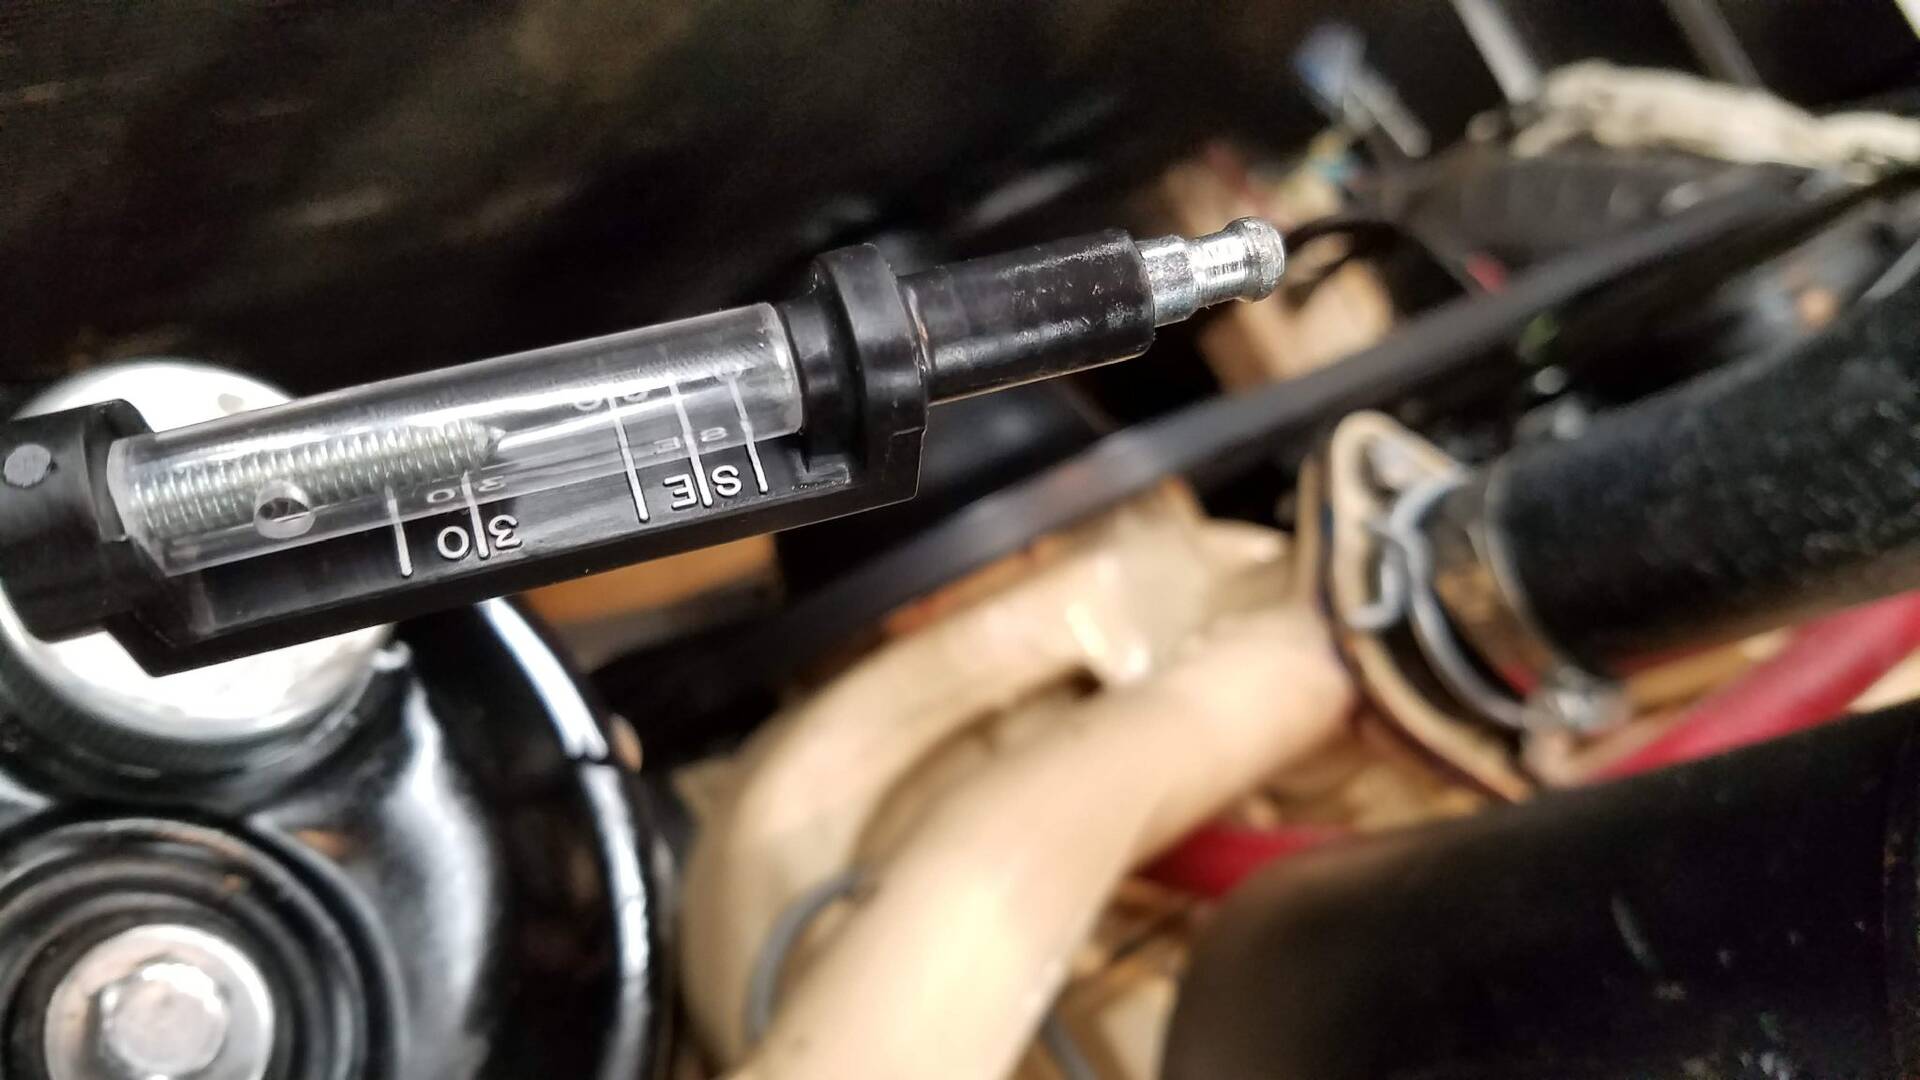
Posted on: 2018/12/17 22:17
|
|||
|
Bob
1955 Packard Patrician Sapphire Blue |
||||
|
||||
|
Re: Bob's '55 Patrician Blog
|
||||
|---|---|---|---|---|
|
Home away from home
|
thank you Ross.
I forgot to mention that I wanted to drive the car around as is for a bit to make sure it really is working. Access to everything is so much easier with the front off so I was trying to approximate the front clip weight prior to tightening all the nuts on the upper and lower control arms.
Posted on: 2018/12/6 23:36
|
|||
|
Bob
1955 Packard Patrician Sapphire Blue |
||||
|
||||
|
Tightening Front Suspension bushings
|
||||
|---|---|---|---|---|
|
Home away from home
|
So, I replaced all the front bushings (upper and lower, inside and outside) Bought them from Max. With the front clip off and therefore less front weight, the upper control arm is all the way down, squishing the rubber bumper.
I was worried that if I tighten the nuts on the control arms as is, the bushings will be in a big 'twist' preload when I do re-install the front clip. So I added some weights to the front to compress the suspension to simulate the weight of the front clip. Problem is that I can move the frame up and down a few inches and it stays in any position so not sure what level is 'neutral' when it has the front clip on and a person inside. Is this a wise course of action? Or am I overthinking this. I currently have the TLR motor wires disconnected but haven't done anything mechanical to the TLR system. Any suggestions on if there is a best way to tighten the control arm bushing nuts with the front clip off to get a proper ride? thanks Attach file: (276.06 KB) (303.51 KB) (303.51 KB)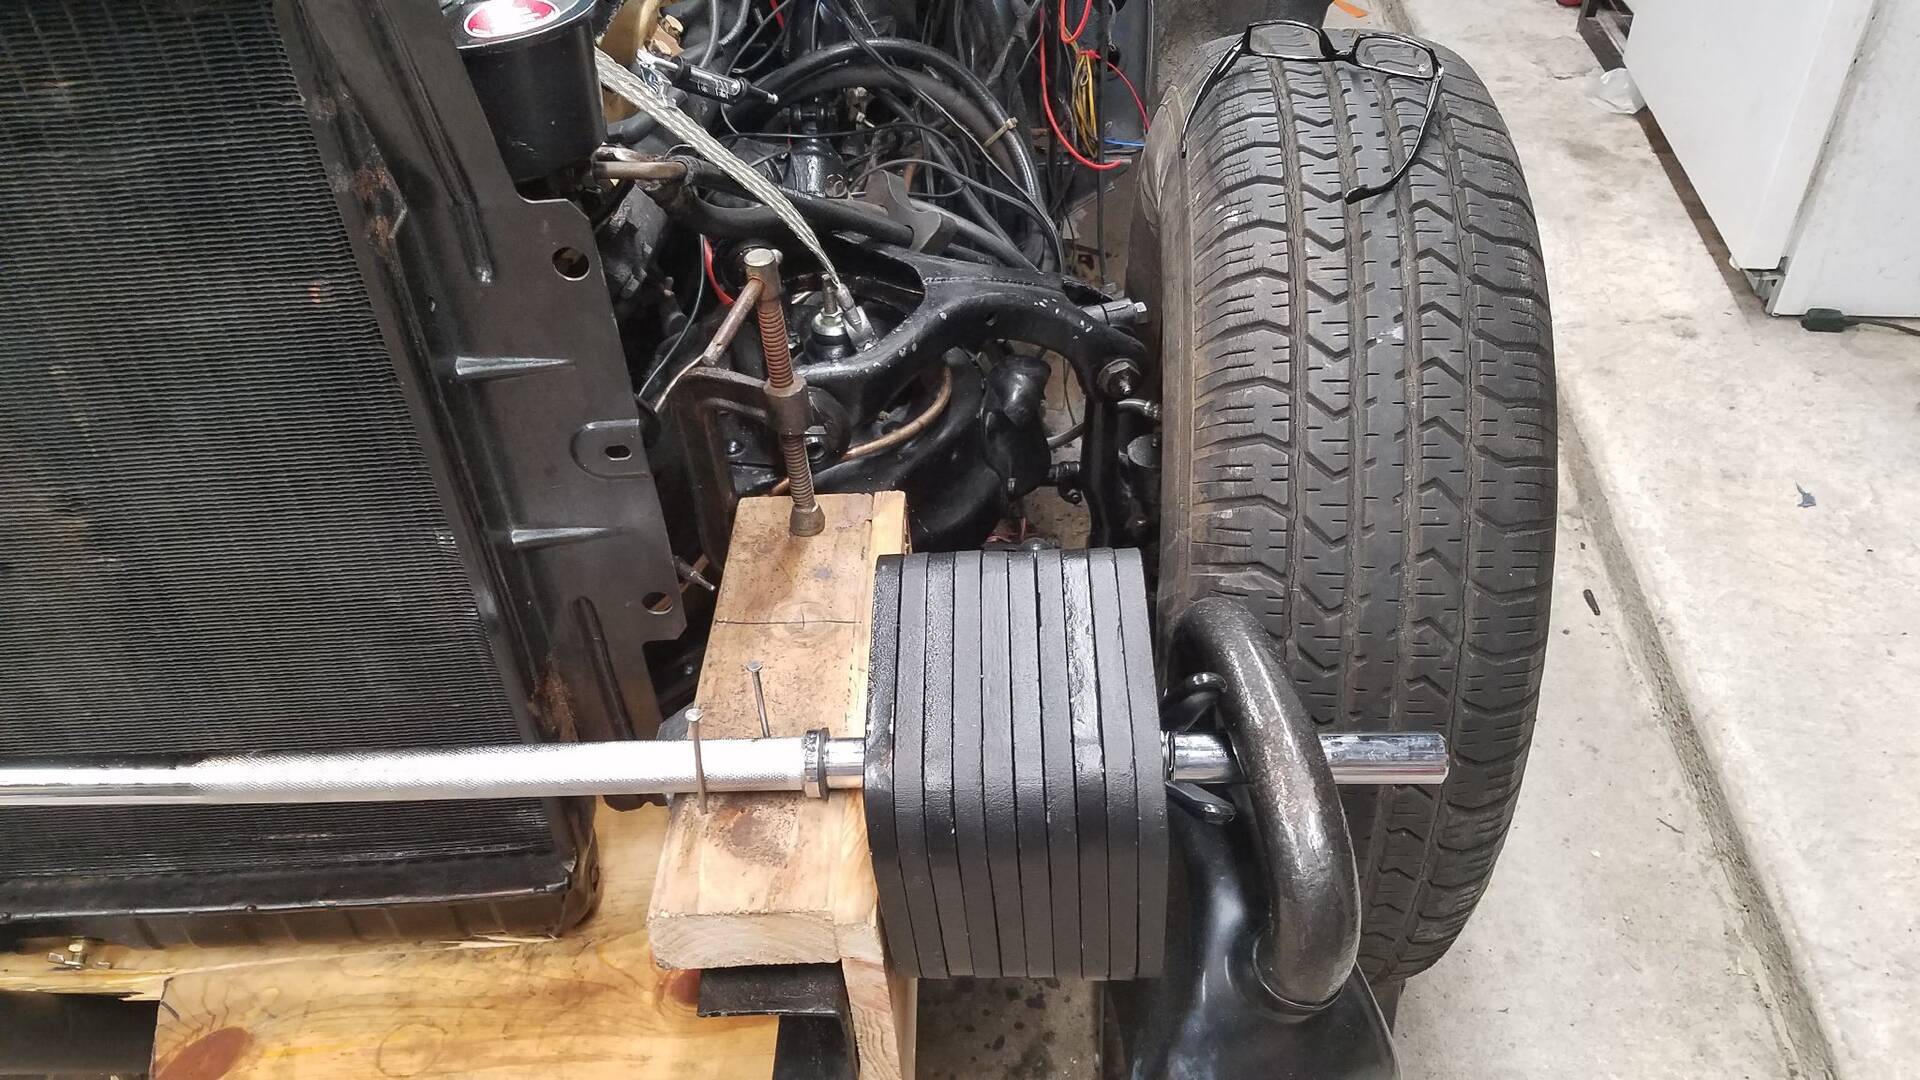
Posted on: 2018/12/6 21:58
|
|||
|
Bob
1955 Packard Patrician Sapphire Blue |
||||
|
||||
|
Re: '55 engine back to life! Mostly worked...
|
||||
|---|---|---|---|---|
|
Home away from home
|
Update for all.
Got the engine back up and running. After cleaning and checking all over, I put it all back together. Thanks to James From from Kanter for sending me a single piston ring that I broke and lots of other advice from this forum. Things I did to get it going: -replaced a slightly bent pushrod with one from Kanter -Spend extra time cleaning lifter bores -rotated the camshaft with lifters (no rods) installed to verify they all would rotate without load. -Had heads rechecked, #1 Exhaust valve was sticking, and machine shop 'bobbed' the valve stems so they were all the same installed height. -Measured all push rods as well as rocker arm socket wear. For kicks, I reinstalled the longest rods with the rocker arms with most socket wear. So I mixed and matched push rods, but got total geometry length more consistent -Replaced the 4 lifters that didnt show signs of rotating -Measured lifter preload on base cam position by releasing rocker arm bolts and marking difference in position of rod when tightened. Most pre-load distances were ~0.090", with some ~0.11 and some ~0.70. -Assembly lube on all surfaces under load (push rod to rocker arm, cam lobe/lifter face). Oil on lifter bore and lifter sides(last time I put assembly lube on sides of lifters). -New Maxima break-in oil, about to refill with Rotella -Pulled carb and cleaned out old gas etc. -New AGM battery It Started up fine and seems to run well. Ran it +/- 2000 rpm for a while to ensure good break in of new lifters. Good oil pressure and throttle response. As before I pulled it apart, you can see and hear an intermittent shudder at idle and still working on that. (very smooth at higher rpms). Tried pulling plug wires 1 by 1 to isolate but couldnt find one. Seems like random cylinder is not firing. Popping noise (at cam speed that started this whole mess) was gone!!!! But then it came back. Then it went away. Now it is there at times, but quieter. It may be a valve sticking or something but it is not as pronounced as before so I am going to monitor it, but not worry about it for now. It seems very minor now. One thing: I can't seem to adjust the idle down to 450rpm. I disconnected the throttle linkage and backed out the idle speed screw but when the throttle valves are in their closed position, it still seems to idle around 550-600rpm (admittedly with an old tach). But before I was able to dial it down to the point it was too slow to stay running. Here are pics of the throttle valves closed and at high idle. These seem like what I would expect. Any thoughts? Also found some NOS points on ebay and installed them. That helped the shudder a little and look very nice too... Glad this is running. Now time to reinstall driveshaft, figure out what to do with broken rear support arm stud, and take it for a drive! Thanks to all to help me get to this point (again)! -Bob Related threads: https://packardinfo.com/xoops/html/modules/newbb/viewtopic.php?topic_id=21047&forum=3 My blog (see end for discussion on broken stud) https://packardinfo.com/xoops/html/modules/newbb/viewtopic.php?topic_id=20490&start=10 Attach file: (135.59 KB)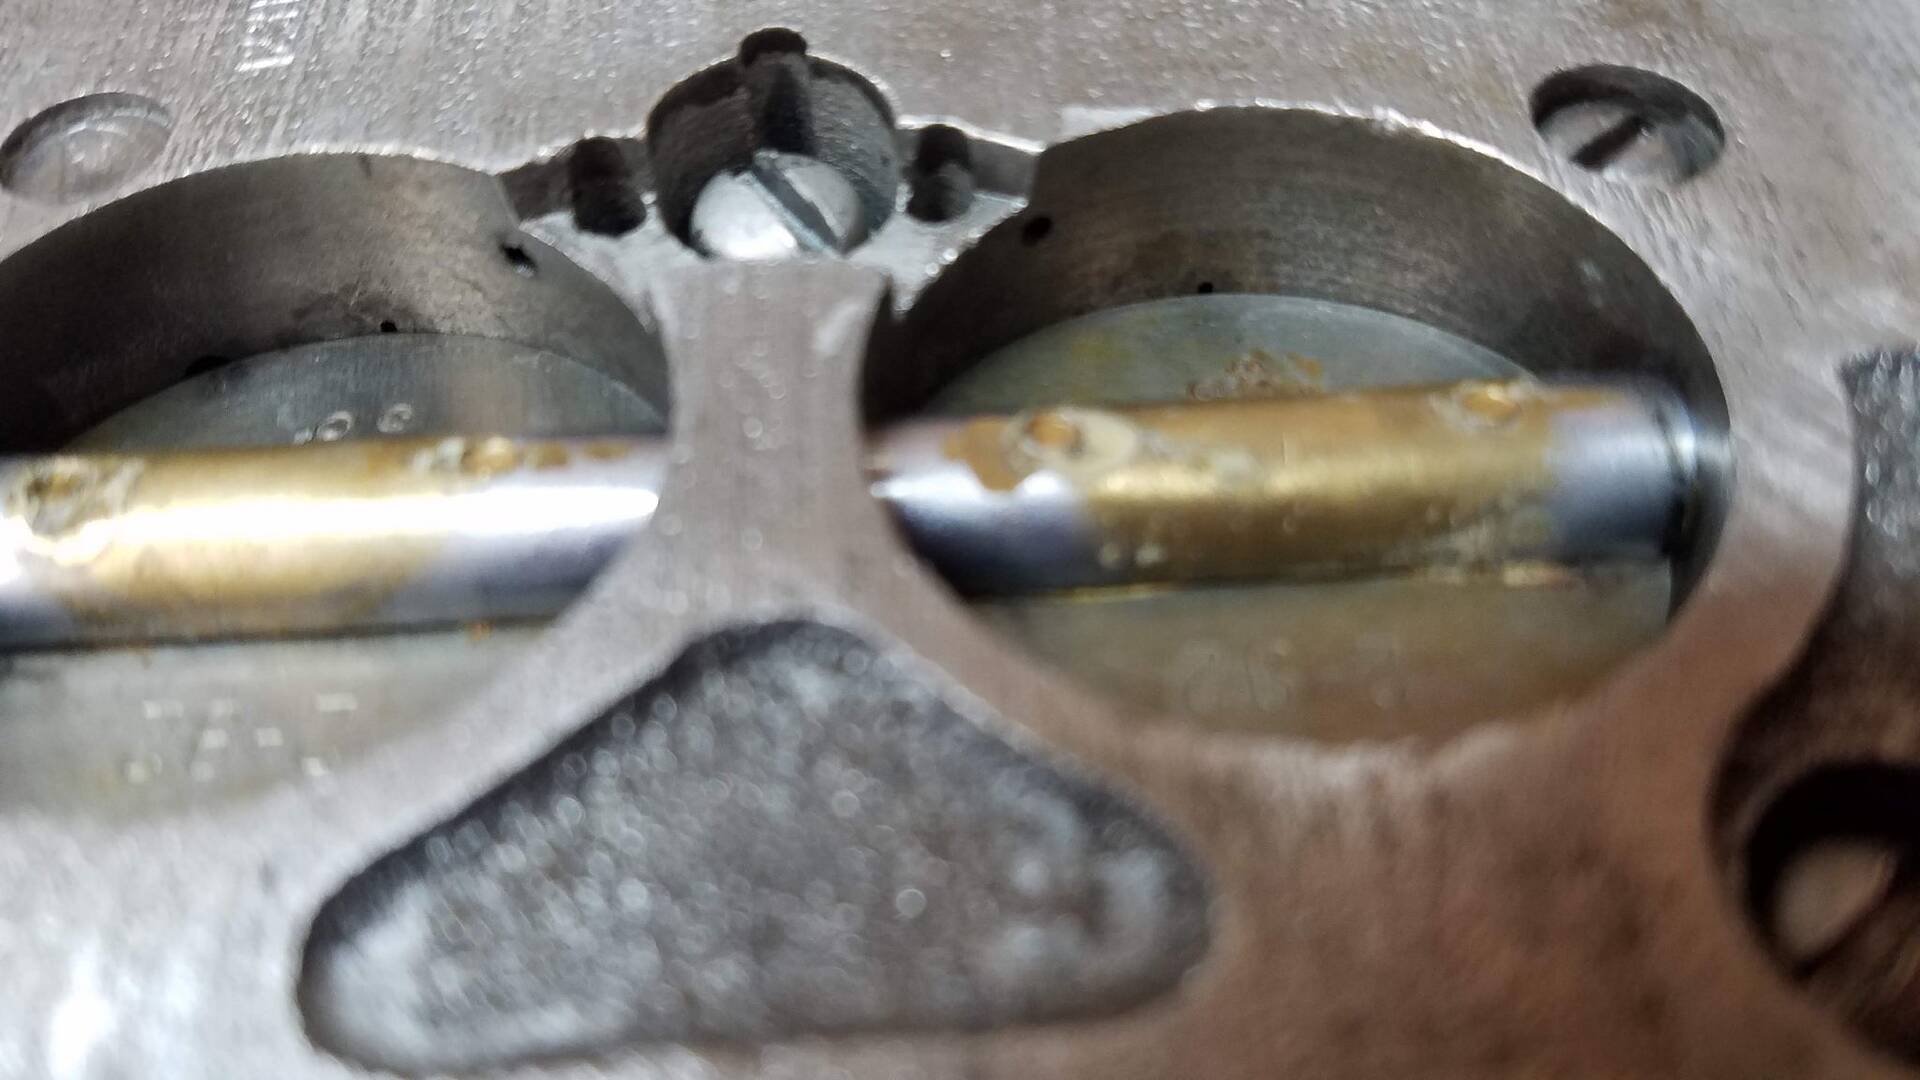 (193.38 KB) (193.38 KB)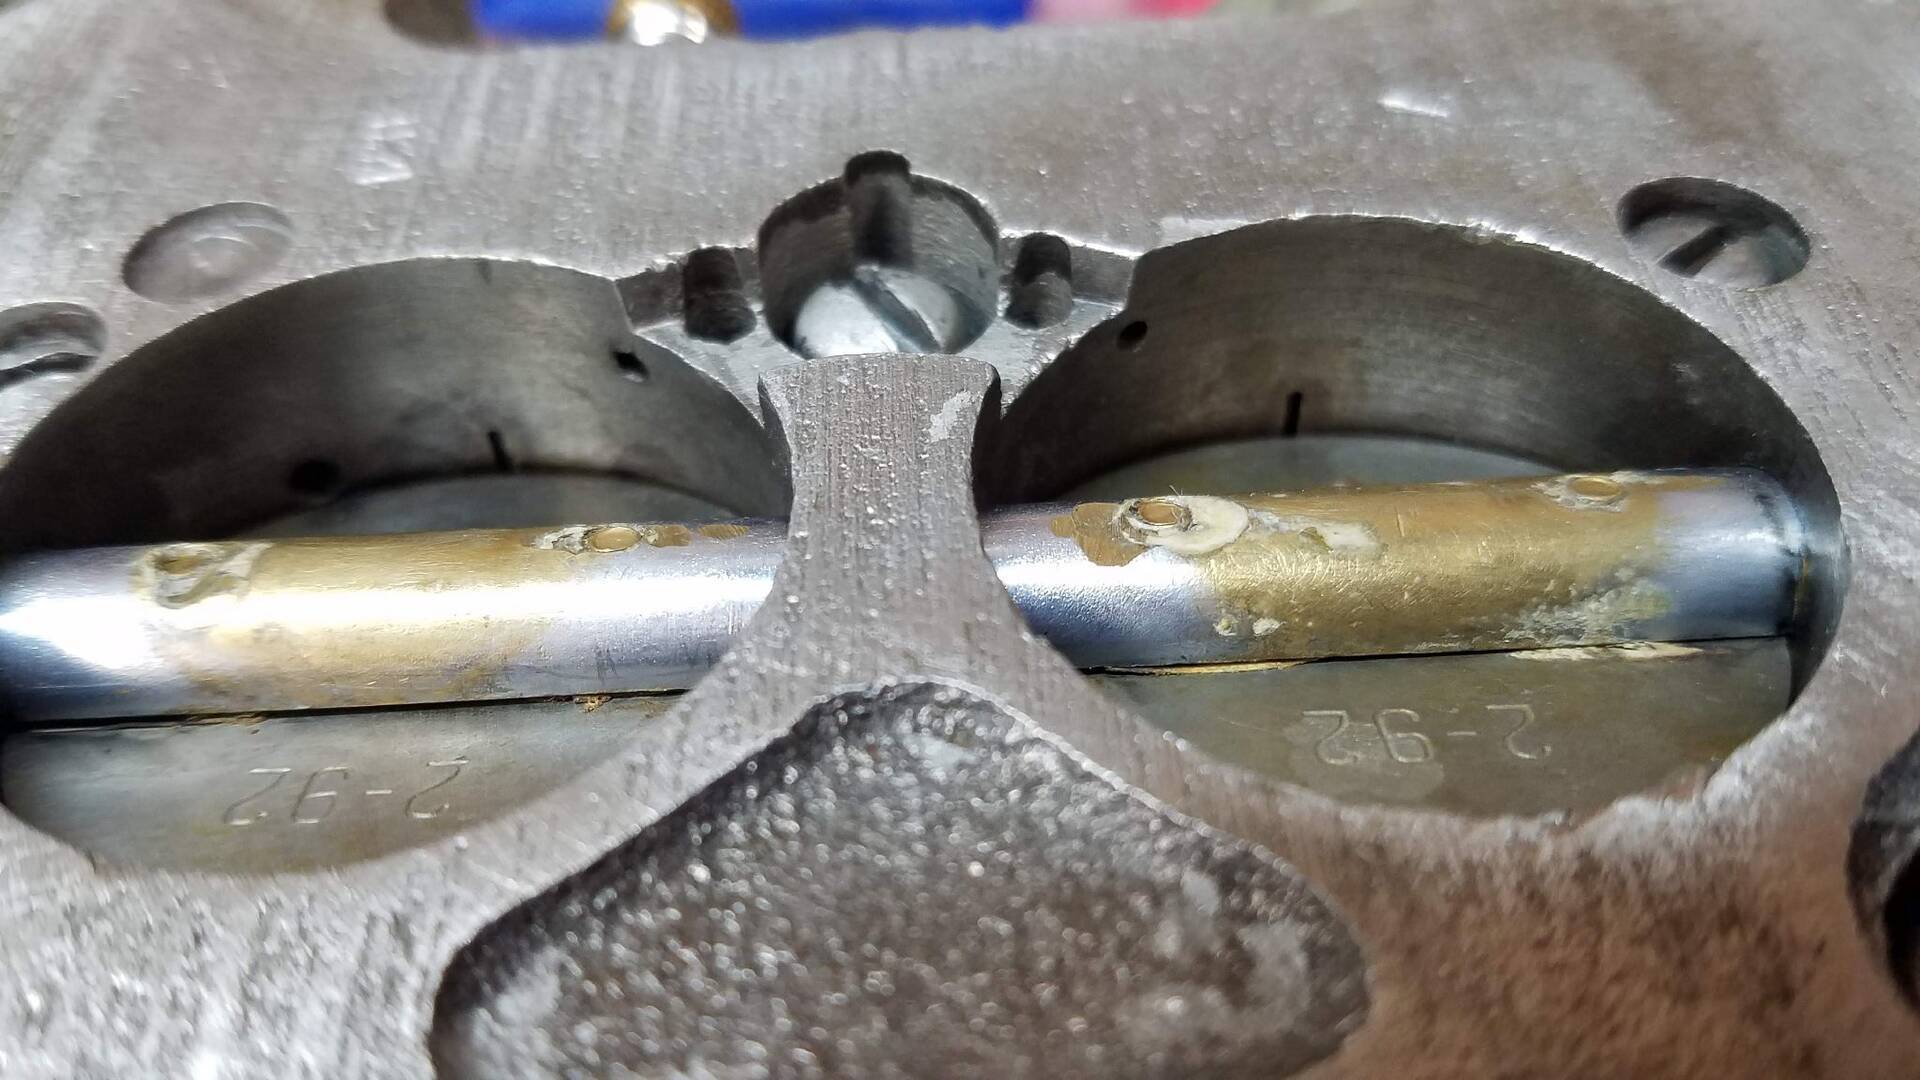 (161.25 KB) (161.25 KB)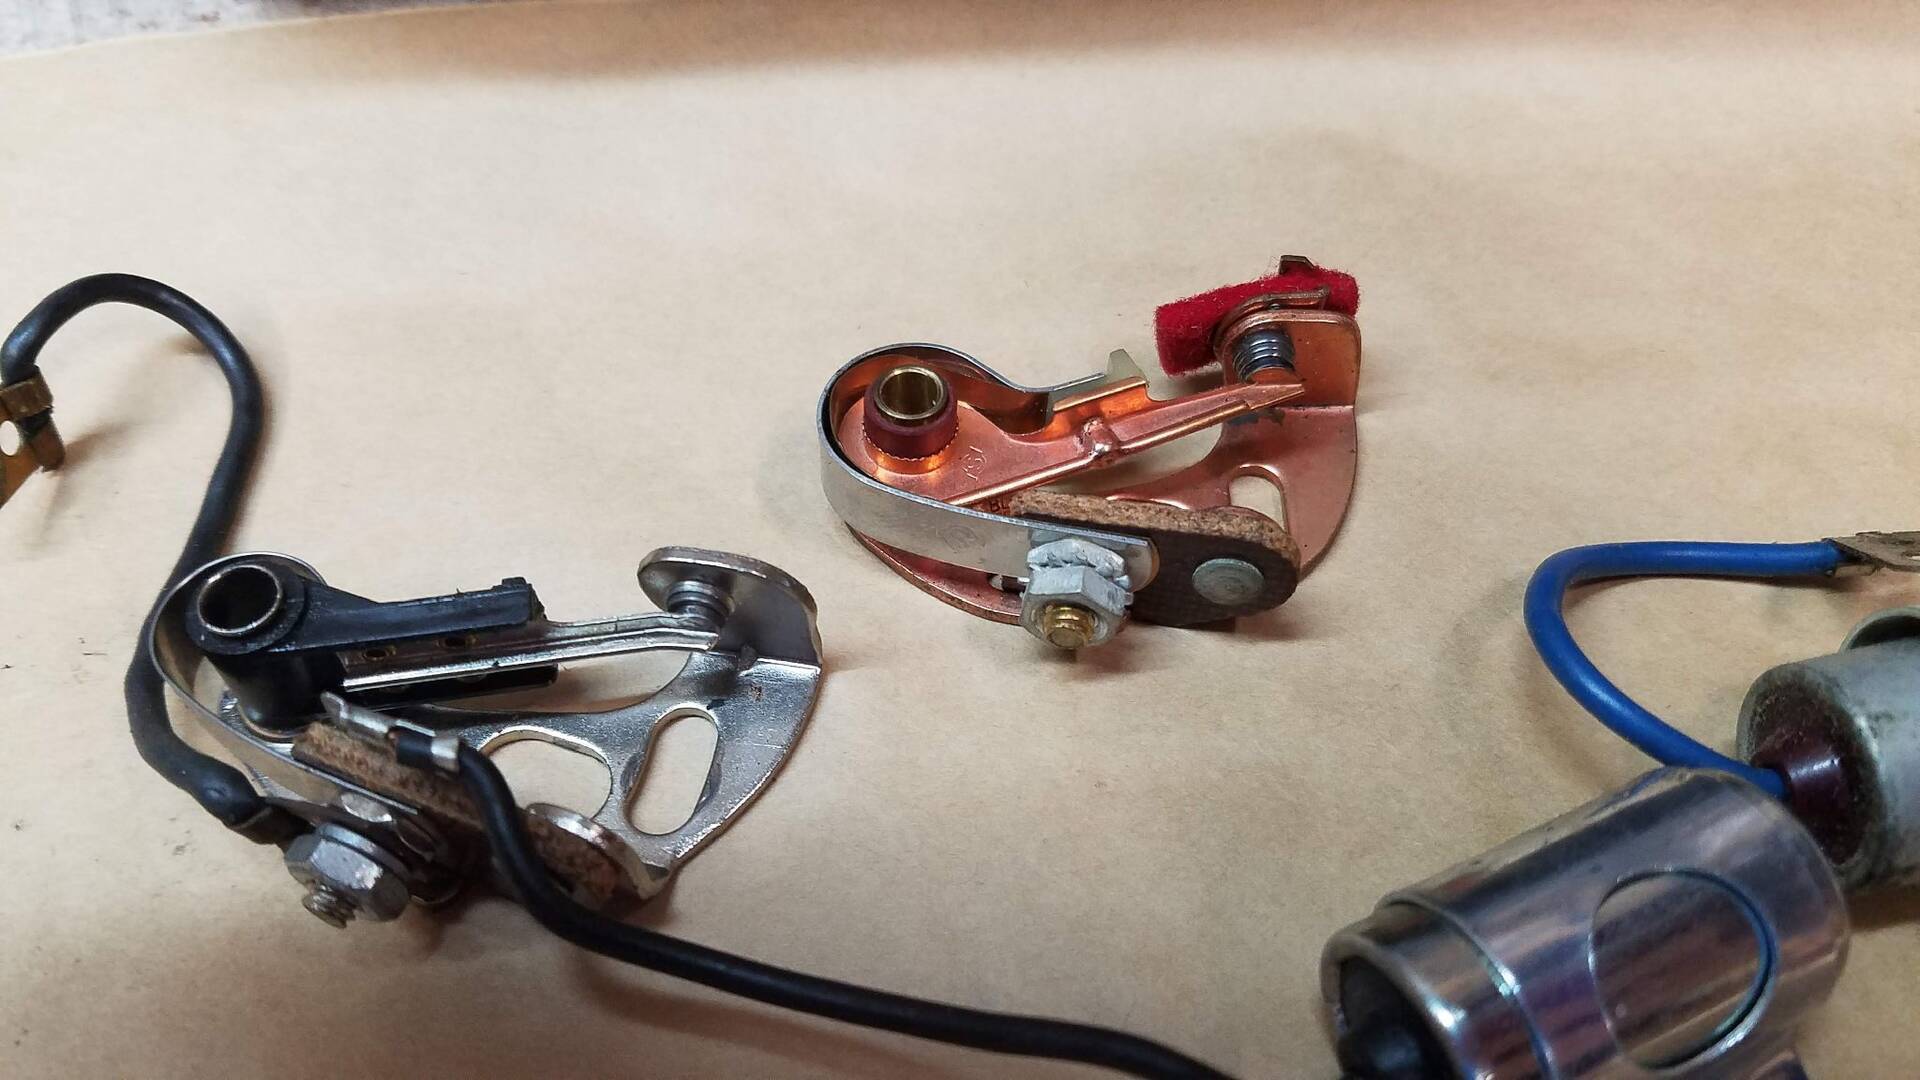
Posted on: 2018/12/3 14:22
|
|||
|
Bob
1955 Packard Patrician Sapphire Blue |
||||
|
||||


