


|
Re: Craig's Panther Project -- Brakes
|
||||
|---|---|---|---|---|
|
Home away from home
|
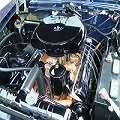
In order to get the required 4:1 pedal leverage needed by the MPB booster, I relocated the stock pivot brackets up the inside of the firewall near the external cowl lip. I cut down the pivot bar left side (Wilwood clutch pedal on the left of the picture):
I made a mockup using some bendable steel flat and duct tape. I had my local machine shop duplicate the dog-leg bends with welded 1/8IN steel "U" channel.  The pedal is in exactly the stock position and distance from the toe board. The pedal leverage is exactly 4:1.   Here is a closeup of the pivot thru bolt used to attach the MPB threaded actuator rod and heim end to the modified brake pedal arm: 
Posted on: 2015/4/17 15:07
|
|||
|
Nuke them from orbit, it's the only way to be sure! Ellen Ripley "Aliens"
Time flies like an arrow. Frui |
||||
|
||||
|
Re: Craig's Panther Project -- Brakes
|
||||
|---|---|---|---|---|
|
Home away from home
|
I decided that the firewall was too ugly to be looking at later with all the various size unused holes and patch panels:
 So I made up a pair of "skin panels" out of 16GA flat sheet stock to make it pretty. Left (driver) side shown:   The top unused hole is for the wire to the electric wiper motor and the bottom hole is for the cable to actuate the vent flap control. Later, the MPB, etc will be unmounted and the skin panel will be edge welded in place and then painted the same color as the body, whatever that is. Comments and questions welcome. Craig
Posted on: 2015/4/17 15:23
|
|||
|
Nuke them from orbit, it's the only way to be sure! Ellen Ripley "Aliens"
Time flies like an arrow. Frui |
||||
|
||||
|
Re: Craig's Panther Project -- Brakes
|
||||
|---|---|---|---|---|
|
Home away from home
|
Craig, I really like this set up and your peddle design a thousand times more than the first test cutting a 56 peddle etc. Great work
Posted on: 2015/4/17 20:35
|
|||
|
[url=https://packardinfo.com/xoops/html/modules/
|
||||
|
||||
|
Re: Craig's Panther Project -- Brakes
|
||||
|---|---|---|---|---|
|
Home away from home

|
Clever and very nice work. However, i have to ask: Does the extended pedal have enuf travel (before hitting floor board) to bottom out, or at least very nearly bottom out, the master cylinder.
Now i'm fully confident that Craig has the any pedal travel issues well considered, but maybe the removeabl toe board needs to be recessed????
Posted on: 2015/4/18 9:59
|
|||
|
VAPOR LOCK demystified: See paragraph SEVEN of PMCC documentaion as listed in post #11 of the following thread:f
https://packardinfo.com/xoops/html/modules/newbb/viewtopic.php?topic_id=7245 |
||||
|
||||
|
Re: Craig's Panther Project -- Brakes
|
||||
|---|---|---|---|---|
|
Home away from home
|
PackardV8 Quote:
Does the extended pedal have enuf travel (before hitting floor board) to bottom out, or at least very nearly bottom out, the master cylinder. Keith, a good question. I will not know for certain until I get the correct disc/disc MC installed, plumbed and system bled, but I am very confident my arrangement will have sufficient pedal travel. The reason is my experience with the MPB #1001 (#1007 predecessor) booster in my 55 Pat and how much travel it has to fully engage. Also, the height of the pedal above the floor is adjustable with the threaded actuator rod in the MPB booster and threaded heim end, so that could provide more travel, if needed. I will not be using the original toe plate, but I will fab one up out of 16GA flat sheet metal. Craig
Posted on: 2015/4/18 12:28
|
|||
|
Nuke them from orbit, it's the only way to be sure! Ellen Ripley "Aliens"
Time flies like an arrow. Frui |
||||
|
||||


