|
Re: Map light bulb replacement
|
||||
|---|---|---|---|---|
|
Home away from home

|
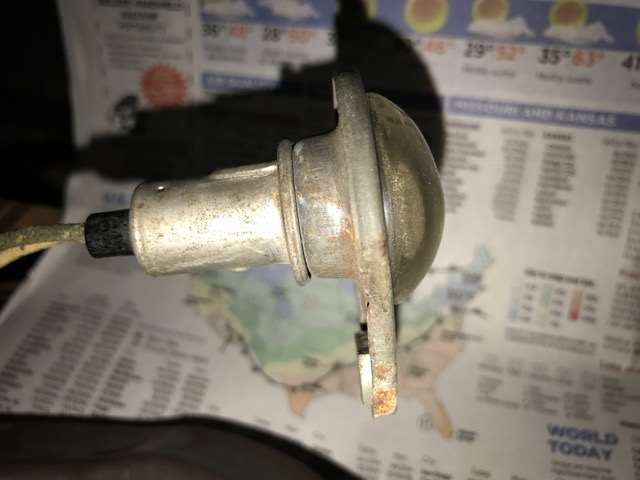
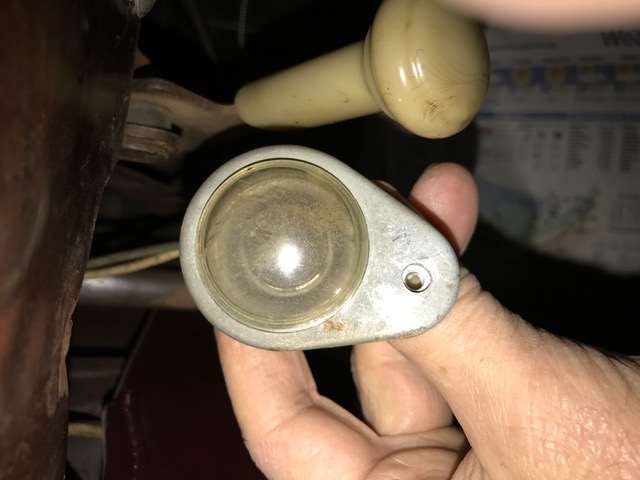
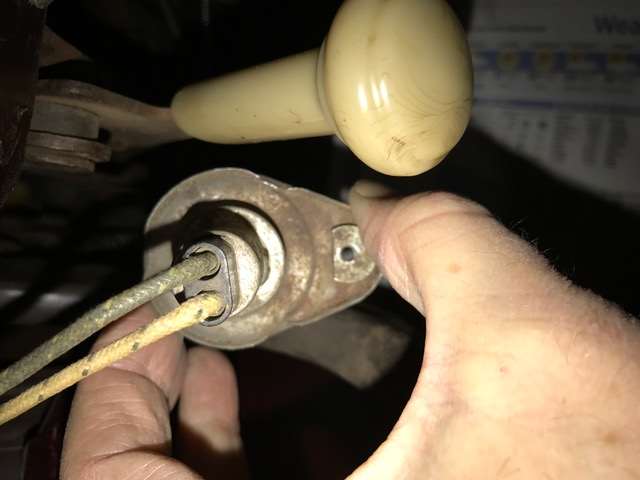
The barrel at the back simply pulls out along with bulb. After changing the bulb simply push it straight back into the holder.
Posted on: 2017/2/14 4:15
|
|||
|
||||
|
Re: Map light bulb replacement
|
||||
|---|---|---|---|---|
|
Forum Ambassador

|
As Ross said, they pull apart. The two are held together by small bumps on one piece which fits into depressions in the other. They will separate but if yours are as tight as mine were you may need to insert a small screwdriver or the like in the seam where the arrow points and work it around or give it a slight twist as persuasion. Be careful to have them come apart as straight and gently as possible. Otherwise, if the socket piece tilts appreciably as it comes out the glass of the bulb may catch on the cover piece and break.
Attach file:  (16.33 KB) (16.33 KB)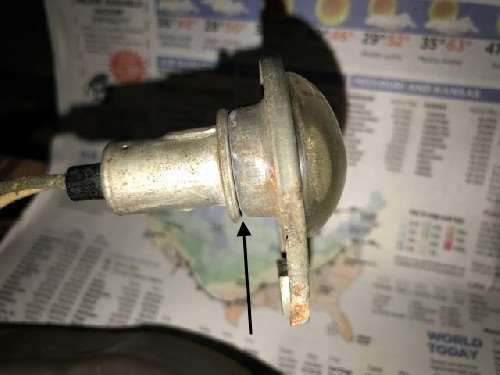
Posted on: 2017/2/14 9:41
|
|||
|
Howard
|
||||
|
||||
|
Re: Map light bulb replacement
|
||||
|---|---|---|---|---|
|
Home away from home

|
Beautiful! Thanks, guys.
Posted on: 2017/2/14 12:08
|
|||
|
||||
|
Re: Map light bulb replacement
|
||||
|---|---|---|---|---|
|
Home away from home

|
On my 50 sedan, both under dash courtesy lamps like these are also not working. Nor do any of the other interior lamps that I would suppose have circuitry through the door plunger switches. Therefore, without looking at a diagram, if this were a "normal" modern car, the first place I would check would be an under dash fuse panel. But it appears that these cars have their fuse panel on the reverse side of the instrument cluster, where older eyes cannot easily see what's going on, or easily pull the fuses. What is the easy way out of this dilemma?
Posted on: 2017/2/14 18:51
|
|||
|
||||
|
Re: Map light bulb replacement
|
||||
|---|---|---|---|---|
|
Forum Ambassador
|
If it is wired per factory there is no fuse but rather a self resetting circuit breaker. On a 23rd series it is located on the cluster approximately in the bottom middle under the gauges. If there is a problem, the breaker should cut the current and then reset after a few seconds and then trip again. It will keep this up until the problem is fixed or breaker finally fails.
There should be power all the time on one side of the breaker. The clock fuse should also be connected to that side. The other side of the breaker feeds the courtesy lights and other items such as the glove box light and brake light. If you have brake lights then the CB should be OK and the problem with the courtesy lights is somewhere else. If no brake lights then you are going to have to get under and use a meter at the breaker and see what is going on. Here is a photo of the cluster taken by BDeB with some arrows pointing to the breaker and power in and out terminals to check with the meter. Attach file: (77.01 KB)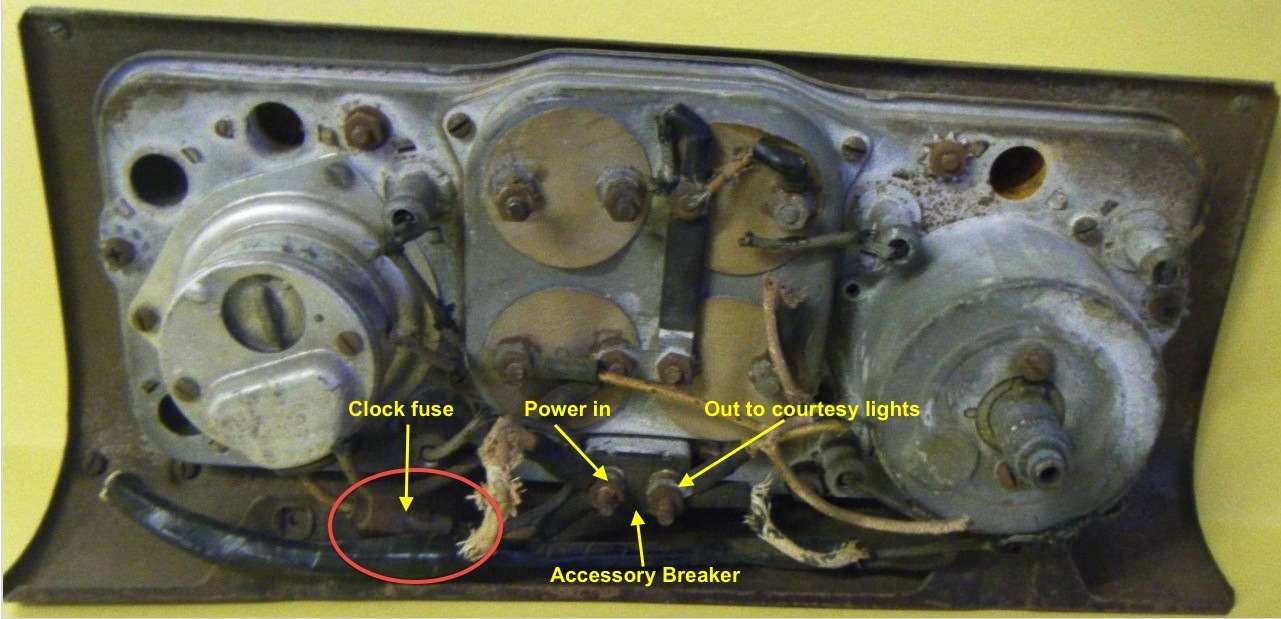
Posted on: 2017/2/14 19:11
|
|||
|
Howard
|
||||
|
||||
|
Re: Map light bulb replacement
|
||||
|---|---|---|---|---|
|
Home away from home

|
One can only imagine what it'll be like when the current generation of last of the breed doesn't exist...
All this common knowledge of the day stuff / know how needs documented.
Posted on: 2017/2/15 10:02
|
|||
|
||||
|
Re: Map light bulb replacement
|
||||
|---|---|---|---|---|
|
Home away from home
|
Thanks for the guidance. I agree with Jim that if my grandkids ever preserve any of my Packards, years from now, good technical help like this may no longer exist. Would that Google, Wiki and YouTube could keep up with the advice in the future.
My first reaction to your helpful photo was "So that's what it looks like!" My second thought involved the condition of the wires might make a fire extinguisher a handy thing to have nearby.
Posted on: 2017/2/15 10:35
|
|||
|
||||
|
Re: Map light bulb replacement
|
||||
|---|---|---|---|---|
|
Forum Ambassador
|
Quote:
My second thought involved the condition of the wires might make a fire extinguisher a handy thing to have nearby. That cluster appears to have been knocked around a bit and is a bit worse for wear. I doubt yours is anything like it but you do bring up a good point about wiring condition. The old fabric wiring does have issues with the fabric and rubber drying and coming off in chunks if the wire is disturbed and handled roughly. If anyones wiring looks anything like that then that car definitely has more than a problem of just not having some function. Keeping a fire extinguisher handy would be a good start but probably would not help much if the worst should happen. New harnesses are not cheap but definitely a good idea if anyone has a car with wiring where the insulation has broken off and left very many bare spots. Some visible spots can be repaired with tape but the problem is the insulation can crack in hidden spots too and flexing can expose a bare spot somewhere inside the braided portions. When that happens it is a whole new ball game.
Posted on: 2017/2/15 12:02
|
|||
|
Howard
|
||||
|
||||
|
Re: Map light bulb replacement
|
||||
|---|---|---|---|---|
|
Home away from home

|
These issues were the same ones I got on my Series 23 with original wiring. After developing wire to wire shorts in the big bundle thru the firewall I decided to replace all the wires. I got an excellent harness from Rhode Island Wiring. I did the rewiring myself. The installation is a major job which takes months..
A couple things I did while the wiring was in work: 1. I added a 50 amp kill switch that cuts off all the power except the battery cables. 2. I could not rewire the turn signal wiring in the steering column, but it works OK. 3. I did not rewire the overhead wires inside the car because it would require removing the brand new headliner. 4. I did not rewire the fuel tank sending unit and later I had to. This means dropping the tank. 5. I added fog lights, cooling fan, backup lights, and some other electrical accessories and used original type wires that I got the from Restoration Supply Co. 6. I bought a 'genernator' to finally fix the lack of current from the original generator. My added accessories caused this problem. 7. I restored the heater while it was out of the car. 8. A big help during installation was removing the old wiring complete and labeling all the terminals. 9. Before starting take lots and lots of photos that show how the original wires were routed. Rewiring the Packard was a huge job. It would be multiple thousands of dollars if you paid a shop to do it. Patching up old wiring is possible but be ready for trouble inside the big bundle of wires. The wires are nice, but the insulation gets brittle and crumbles.
Posted on: 2017/2/16 14:03
|
|||
|
Fred Puhn

|
||||
|
||||


.jpg")


