|
Re: Temperature Gauge 1939 120
|
||||
|---|---|---|---|---|
|
Forum Ambassador

|
Can't help on the specifics of taking the dash part out but the entire temp unit should be in one piece to be sent to an instrument repair shop for calibration or repair etc.
39 models are probably the same as most other years and share a mounting plate with another instrument. That plate unscrews from the cluster from the back and the pair of instruments remove. Once the plate is off, the temp gauge is held by a nut and can be separated from the other instrument by pulling the tube and sensor bulb thru the plate. The opening in the cluster may be odd shaped so the plate with instruments can need a bit of sliding and rotating for the instrument faces to clear. Just be careful so the needle or face isn't damaged during the maneuvering. Most often it seems the bulb portion in the head is stuck and twists off when trying to remove is the main reason the parts become separated. John Wolf Instrument Repair is one company that has worked on many Packard gauges and comes recommended. They can install a new bulb or do whatever is needed on yours.
Posted on: 2018/2/28 9:57
|
|||
|
Howard
|
||||
|
||||
|
Re: Temperature Gauge 1939 120
|
||||
|---|---|---|---|---|
|
Home away from home
|
Curious on this one as to how easy it is to get the sender unit out of the head?? I have toyed with the idea of removing mine and 'tee-ing' in a 'proper gauge' to see the 'real numbers', but shudder at the possible 'can of worms' I'd be opening?? I would think it quite easy to shear the threaded stub off in the head what with all the heat the union has been exposed to. Also thinking the gauge and line must be removed first so the tube doesn't get twisted with the unthreading motion. Is there another way to install a numbers calibrated hot water gauge??
Posted on: 2018/3/2 14:52
|
|||
|
'If you think you can, or you think you can't - you're right!' Henry Ford.
1939 Packard Six, Model 1700 |
||||
|
||||
|
Re: Temperature Gauge 1939 120
|
||||
|---|---|---|---|---|
|
Home away from home
|
Curious on this one as to how easy it is to get the sender unit out of the head?? I have toyed with the idea of removing mine and 'tee-ing' in a 'proper gauge' to see the 'real numbers', but shudder at the possible 'can of worms' I'd be opening?? I would think it quite easy to shear the threaded stub off in the head what with all the heat the union has been exposed to. Also thinking the gauge and line must be removed first so the tube doesn't get twisted with the unthreading motion. Is there another way to install a numbers calibrated hot water gauge??
Posted on: 2018/3/2 14:53
|
|||
|
'If you think you can, or you think you can't - you're right!' Henry Ford.
1939 Packard Six, Model 1700 |
||||
|
||||
|
Re: Temperature Gauge 1939 120
|
||||
|---|---|---|---|---|
|
Forum Ambassador
|
The bulb and tube has to fit thru the hole in the instrument cluster mounting plate so bulb must be removed from the head and the entire length of tubing and bulb pulled into the passenger compt and thru the mounting plate before the gauge can be separated and taken away for repair.
Your instincts for caution are spot on. The nut is not fixed to the tube and bulb so with a bit of penetrating fluid and a lot of patience and care it will come free and spin while the tube and bulb is stationary. The issue is the bulb could be surrounded by sediment and effectively cemented into the head. If it has never been removed since new almost guaranteed. I don't believe anyone has found a surefire way to dissolve the sediment or calcium or whatever to free the bulb reliably and that is where the problem arises. I believe some of the sediment removal products and acid etches have been tried with varying to no success. There is no place to grab and remove the bulb other than pulling the tube so tube is frequently pulled or twisted off while the bulb stays put. Some have managed to install a tee in the heater water out port on the head for a temp sensor but the downside there is if the heater is shut off there is no water flow so all you have is conduction and are not able to get an accurate reading. There are some metal hose adapters that will tee into the upper radiator hose that are made for modern cars needing extra sensors. I have looked but so far haven't found one large enough for the Packard hose diameter. I did a variation on that approach by making an adapter out of 1" aluminum to fit under the thermostat housing. It will sense accurate water temp as flow goes thru but until the thermostat opens and water can flow past the sensor it lags a bit. Attach file:  (106.77 KB) (106.77 KB) (107.14 KB) (107.14 KB)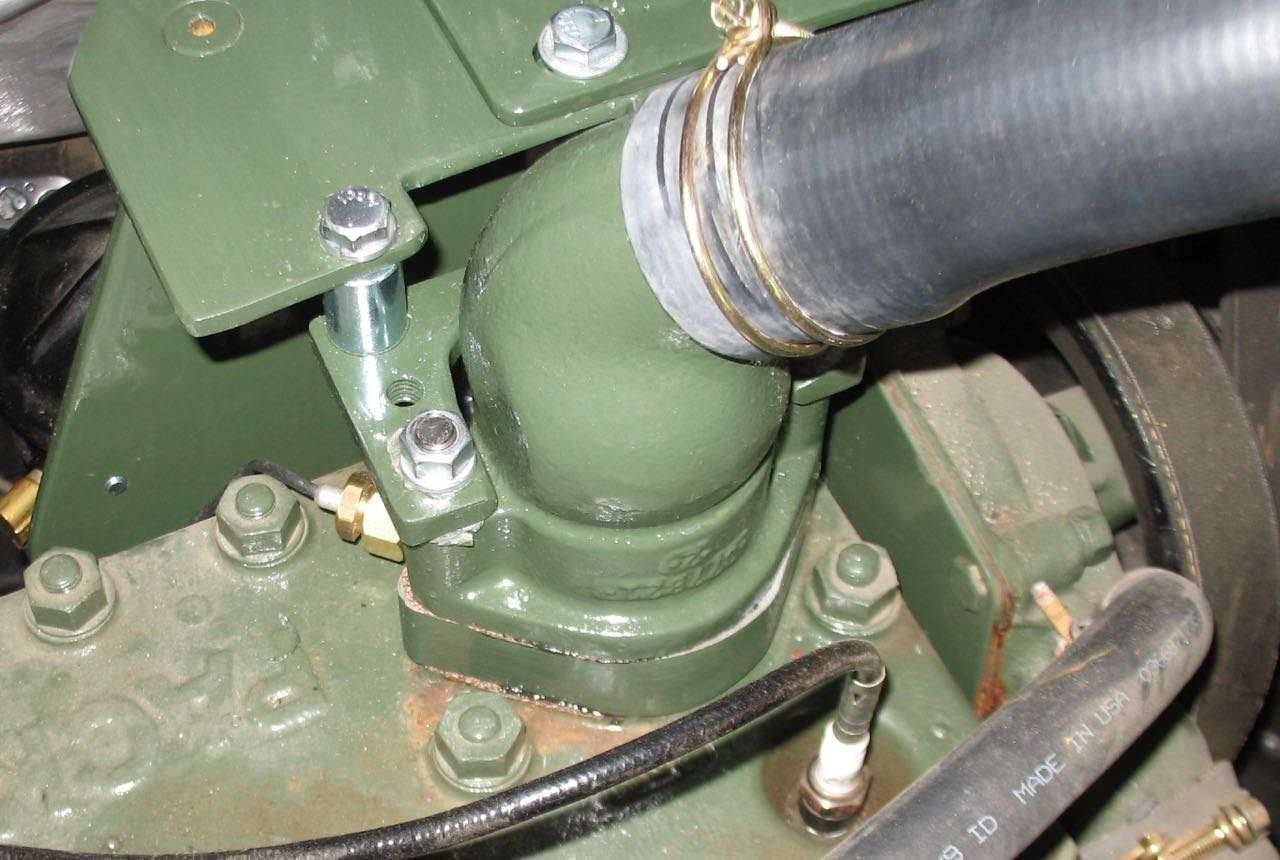
Posted on: 2018/3/2 16:04
|
|||
|
Howard
|
||||
|
||||
|
Re: Temperature Gauge 1939 120
|
||||
|---|---|---|---|---|
|
Just can't stay away

|
Thank you for your reply on removing the gauge from the backing plate. I was able to get the bulb removed from the head by heating the head and applying Kroil penetrate to the bulb insert.
My problem now is getting that portion of the dash removed that houses the backing plate .
Posted on: 2018/3/2 23:25
|
|||
|
1939 - 120 ,4 dr / overdrive
|
||||
|
||||
|
Re: Temperature Gauge 1939 120
|
||||
|---|---|---|---|---|
|
Home away from home
|
Thanks Howard - that's an excellent tutorial, as usual with your incredible knowledge of these cars. Also, that is a nifty bit of engineering to add the sensor in at the T-stat housing; looks factory.
Posted on: 2018/3/5 22:56
|
|||
|
'If you think you can, or you think you can't - you're right!' Henry Ford.
1939 Packard Six, Model 1700 |
||||
|
||||
|
Re: Temperature Gauge 1939 120
|
||||
|---|---|---|---|---|
|
Just can't stay away
|
Howard,
"the entire length of tubing and bulb pulled into the passenger compt and thru the mounting plate". Can that be done without removing a portion of the dash? I seem to be missing the obvious.
Posted on: 2018/3/6 11:05
|
|||
|
1939 - 120 ,4 dr / overdrive
|
||||
|
||||
|
Re: Temperature Gauge 1939 120
|
||||
|---|---|---|---|---|
|
Forum Ambassador
|
I wish I could help on the specifics of the 39 but don't have personal experience taking one apart.
I can say that probably starting with the 120 and maybe earlier then going thru 47 the instruments were attached to mounting plates which in turn were attached to the cluster and were accessed from the rear. Taking an entire dash panel or cluster out is possible on some models but the amount of wiring you would need to disconnect in order to pull it out very far would vary and with some switch and component locations protruding behind the dash even accessing the screws holding the panels could be an adventure. The shape of the plates and pairing of gauges varied with models and years but all were typically 2 gauges mounted on one plate and the plate was held to the cluster by screws in the corners. In 48 they started using single gauges individually mounted to the cluster but still accessed from the rear. Here are some photos of a 42 gauge pair and a 47 cluster. It shows the typical mounting plates used 40 and beyond and probably 39 too but I cannot say for sure on 39. In the case of the 42 someone has already destroyed the instruments by cutting the tubing to remove the plate rather than pulling the tubing thru into the passenger compartment and then removing the complete assy. The gauges can probably be repaired but note the single nut holding each gauge to the plate. By undoing the nut the gauge frees from the plate and can be removed. That is what I was mentioning when saying the entire bulb and tubing needs to be pulled inside and then thru the mounting plate. Attach file: (173.66 KB)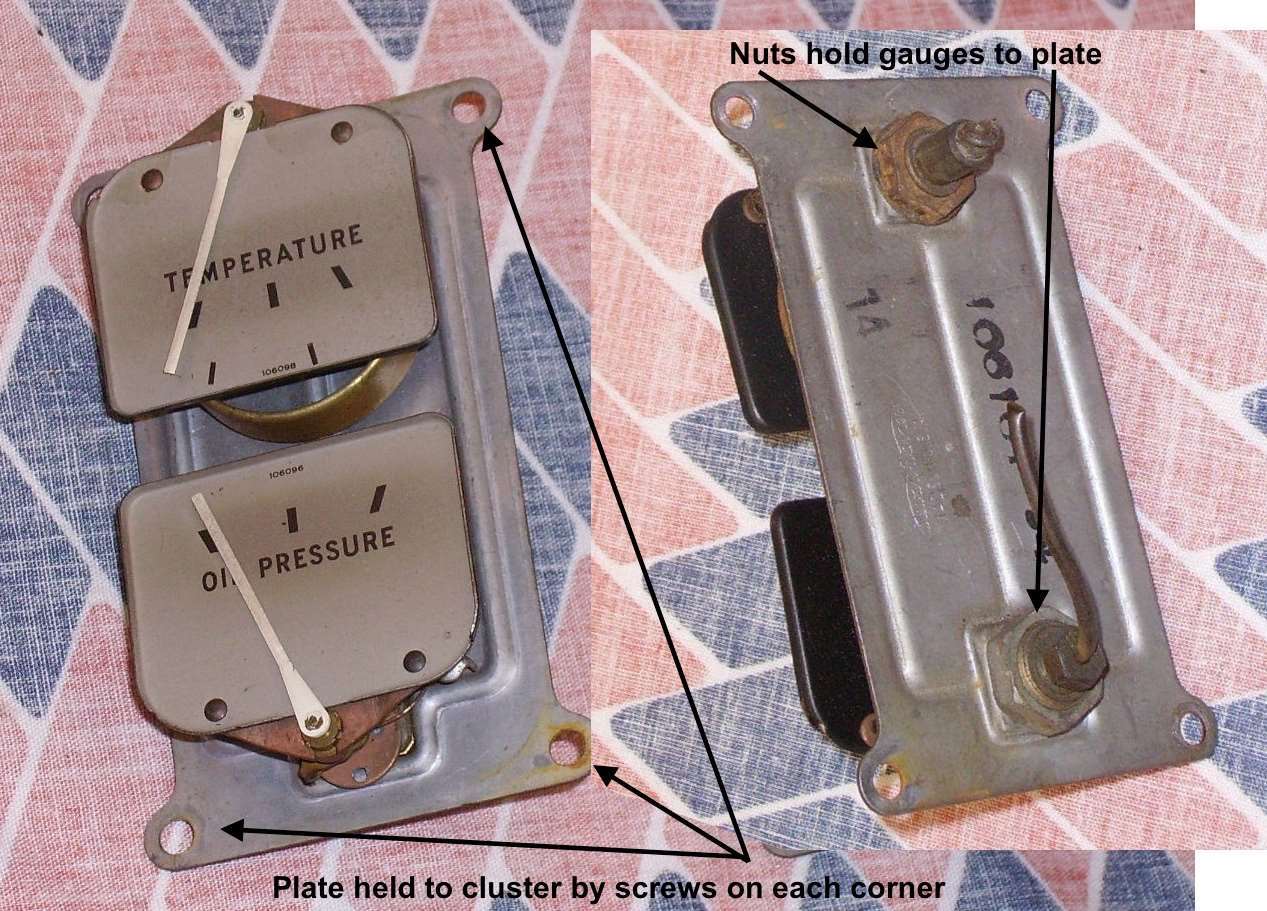 (88.85 KB) (88.85 KB)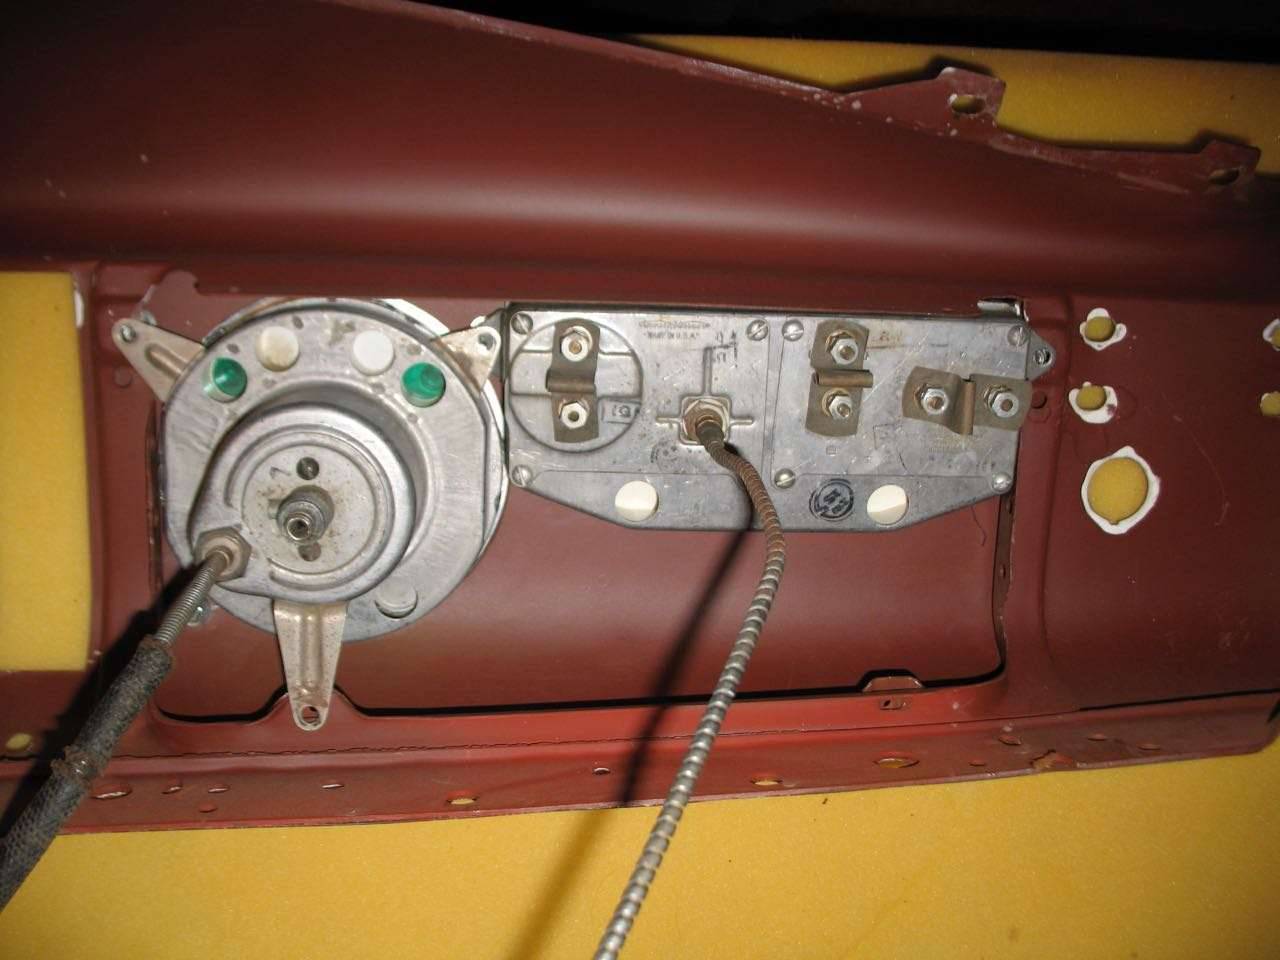
Posted on: 2018/3/6 12:16
|
|||
|
Howard
|
||||
|
||||
|
Re: Temperature Gauge 1939 120
|
||||
|---|---|---|---|---|
|
Just can't stay away
|
I am starting to realize I may have to remove the "plate" from the rear of the dash - with the dash in place; a task I don't relish . My knuckles are just healing up from my struggles with mirrors and neck cramps in dealing with the fuel gauge.
Posted on: 2018/3/6 20:48
|
|||
|
1939 - 120 ,4 dr / overdrive
|
||||
|
||||


