|
Re: 47 Rear Axel Nut Torque
|
||||
|---|---|---|---|---|
|
Forum Ambassador

|
This is the chart from the 51-4 SM and it is for all practical purposes the same axle as the 47.
Attach file:  (86.72 KB) (86.72 KB)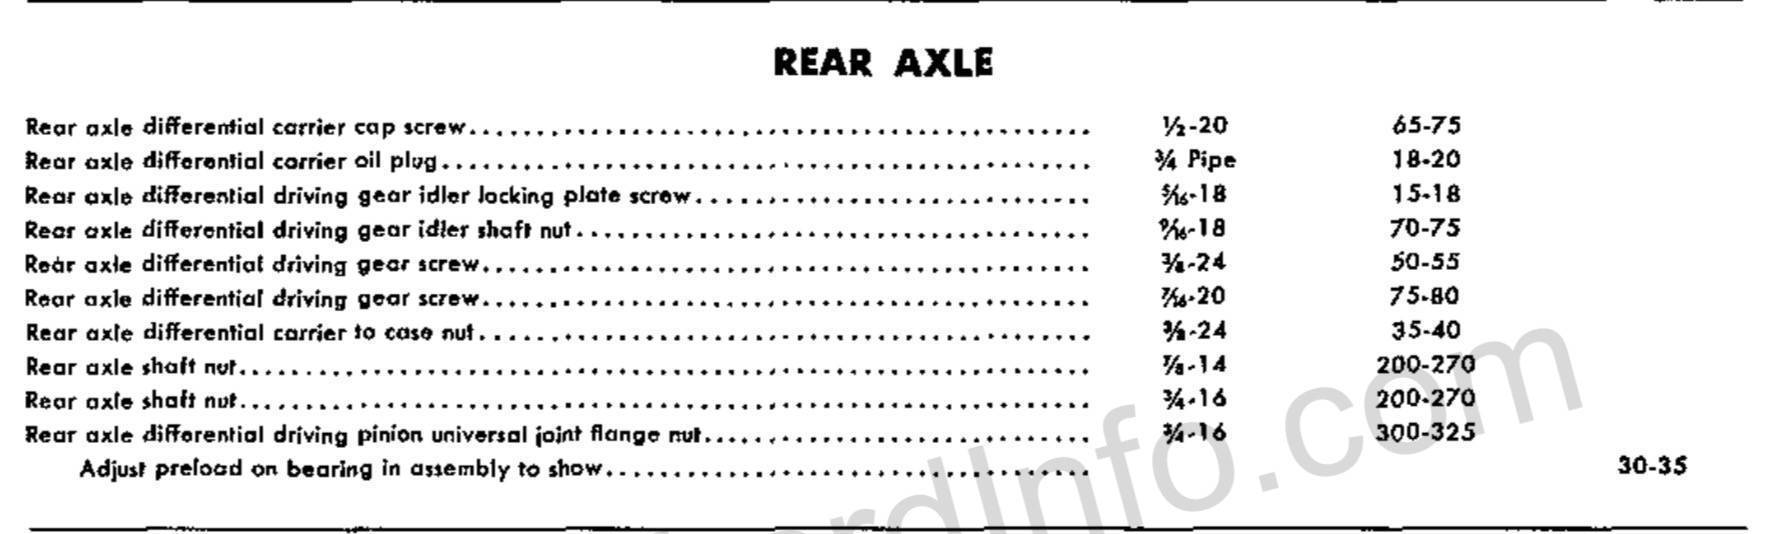
Posted on: 2019/9/28 18:20
|
|||
|
Howard
|
||||
|
||||
|
Re: 47 Rear Axel Nut Torque
|
||||
|---|---|---|---|---|
|
Home away from home
|
Thanks Howard!
Wes
Posted on: 2019/9/28 18:30
|
|||
|
||||
|
Re: 47 Rear Axle Nut Torque
|
||||
|---|---|---|---|---|
|
Home away from home

|
Wes;
When I torqued the axle nuts on my '48 I set-up a jack stand, the same height as the axle, to react out the vertical force of the wrench. I used an extension about 9 inches long, so the end where the breaker bar would be attached rested on the jack stand. The breaker bar was marked at the location where I would step on it with one foot to apply the torque. By use on a short kitchen step stool I was able to slowly transfer from the stool to the breaker bar . . . again only stepping on the marked area. During the process I had to reset the set-up several times to make sure the breaker bar was level . . . that is, my weight was being applied at right angles to the bar. I shot for the lowest torque on the first attempt, and at that torque the cotter pin hole was in alignment, so I stopped, but only after I hit the hub a couple of dozen times with a light ballpeen. The tapping did not result in a reduction of torque, so I was truly finished. About 200 miles later I 'double checked' the torque. What I found was that most of the torque had dissipated, and I could advance the nut about 1/6 of a turn. This time the cotter pin would not align at the lowest torque, but did at a torque less than the maximum allowed. 'Double checking' again after another 200 miles revealed the axle nut torque was at least the minimum allowed. There are some that think the relaxation of the nut torque is the mechanism that allows alternating bending stresses at the axle thread fillet which ultimately results in a broken axle. My experience suggests that the hub could be loose on the axle if the torqueing procedure is treated as a 'one and done' event. I do know that the reason I was torqueing the axle nut in the first place was the previous axle had failed shortly after I bought the car. I have no idea the miles since last axle service before I bought the car. Maybe rear axle nuts should be treated like head bolts (nuts) . . . that is, you're never done checking the torque. While I assembled with everything dry, I did try to 'scotch brite' the axle taper to something less than a bright shine, but clean of rust (fretting) and goo. I used a new grade 8 flat washer, as the one on the car was heavily galled. Even with a broken axle the key I removed was not heavily worn, and under normal circumstances I would have reused it, but I replaced it anyway. The business of using tabulated torque values also assumes whether a lubricant, and type, is to be used during assembly. I've always be led to believe the rear axle area is assembled dry, but don't remember where I picked that up. By the way, I used ? inch drive tools and the weight of the breaker bar equated to 12 foot pound of torque all by itself without any additional weight applied. The bar is at least 36 inches long, and was bought to remove the harmonic balancer bolt when changing cam belts. Those buggers are drawn to something like 270 ftlbs and fortunately positioned so I could use the jack stand gimmick and stand on the end of the breaker bar to break the bolt loose. dp
Posted on: 2019/9/29 0:06
|
|||
|
||||
|
Re: 47 Rear Axle Nut Torque
|
||||
|---|---|---|---|---|
|
Just can't stay away

|
thank you all for the reply. i will try to fix it. It looks like i didn?t not make it proper. I did not tight the castle nut enough. It is still too loose. I hope i did not damage something by driven around my yard. for me it still not 100% clear how deep i must push the key inside the axle. Or if this does not matter something, because the key will find his position by itself.
Posted on: 2020/4/23 11:03
|
|||
|
Packard Super Clipper 1947

|
||||
|
||||
|
Re: 47 Rear Axle Nut Torque
|
||||
|---|---|---|---|---|
|
Home away from home

|
Does the 1955 instructions apply?
https://www.packardinfo.com/xoops/html/downloads/servicemanual5556/Sect15_RearAxle.pdf 1951 -1954 instructions https://www.packardinfo.com/xoops/html/downloads/servicemanual5154/RearAxle_XV.pdf 1946 - 1950 instructions https://www.packardinfo.com/xoops/html/downloads/servicemanual4650/Section2.pdf
Posted on: 2020/4/23 11:47
|
|||
|
||||
|
Re: 47 Rear Axle Nut Torque
|
||||
|---|---|---|---|---|
|
Forum Ambassador
|
Quote:
As you said, it will find where it needs to be as long as a couple of things are kept in mind. As I recall the slot cutter leaves a sort of slope at the back of the slot. The key must not be inserted far enough to start to ride up the slope because it will then extend above the taper enough the hub will not be able to slide fully onto the axle. I would insert the key so the key end is just flush or slightly extending from the axle slot. Farther in is OK as long as extra slot length permits it not to start up on the slope. If the key extends out from the end of the slot then no big deal because when the nut, felt seal, and washer are threaded on and pressure reaches the key as the nut tightens, the washers will push the key farther into the slot as needed.
Posted on: 2020/4/23 12:04
|
|||
|
Howard
|
||||
|
||||
|
Re: 47 Rear Axle Nut Torque
|
||||
|---|---|---|---|---|
|
Home away from home
|
Josef
With the hub off the axle I would first start by test fitting the square key into the two slots. It should fit into either slot without slop. During assembly I would place the key into the axle clocked such that the key is at 12 o'clock (pointing up), but the key not slid fully toward the differential. Let it overhang the threaded area of the axle by about ? inch (6 mm). Install the hub/brake drum sliding the slot in the hub in engagement with the key. Continue installing the hub until it 'bottoms' on the tapper. The brake shoes need to be adjusted loose such that they will not impede the installation of the hub. Once you have the hub in intimate contact with the axle, then slide/push/tap the key inward until it is just inboard of the area where the washer will bear on the hub. The hub bore and axle are assembled clean and dry. Before you assemble spend some time inspecting and cleaning both surfaces. Install the washer (I replace those with grade 8 items if the original washer is gouged) and nut. If you have not previously marked the location of the cotter pin hole then use a marker on the end of the axle to do that. Re-adjust the brakes so the parking brake will provide a good amount of resistance, and tighten the nut to a good amount. The goal here is to begin the process of drawing the axle and hub together before the weight of the car is on the axle. Release the parking brake, install the wheels, and lower the car. The final axle torque may now be applied (brakes off, wheels chocked). I start with the minimum axle nut torque and try to figure-out how close the cotter pin hole is to alignment. Then without exceeding the maximum torque align the cotter pin. You could also start by drawing the nut to the maximum torque first, and then backing off to a low torque level to begin the process. No harm will be done cycling between a low torque and maximum torque several times. You might also tap the hub several times when at maximum torque . . . some think this helps. Please bear in mind that this tapered assembly has been known to loosen after 100-200 miles (actually the taper interface has become more intimate which relaxes the torque). Plan on rechecking. dp
Posted on: 2020/4/23 14:58
|
|||
|
||||
|
Re: 47 Rear Axle Nut Torque
|
||||
|---|---|---|---|---|
|
Just can't stay away
|
thank you for all this datas, this manuals are what i have already found.
for me was not clear the old days describtion in chapter "11. install the axle shaft nut washer and nut tighten securely install and bend cotter pin" this was not enough clear to me, because i never had done a job on this kind of break drum fixations before. nothing with key and notch. i felt not safe in my work. i was afraid to tighten to strong. now it was to loose. i will see tomorrow if this caused now maybe some damage on key, notch or whatever. many thanks to you all! Josef
Posted on: 2020/4/23 15:17
|
|||
|
Packard Super Clipper 1947
|
||||
|
||||
|
Re: 47 Rear Axle Nut Torque
|
||||
|---|---|---|---|---|
|
Just can't stay away
|
after check the shaft, the notch, the key i have found no damage. I degreased everything, assembled again and tighten the castle nut like described with the right torque.
i will check the nut after some miles. thank you again, BR Josef
Posted on: 2020/4/27 15:35
|
|||
|
Packard Super Clipper 1947
|
||||
|
||||


.jpg")


