|
Re: BigKev's 1954 Packard Clipper Deluxe Sedan
|
||||
|---|---|---|---|---|
|
Webmaster

|
Thanks HH, that is the original color (according to the sticker on my glove box). Either the color that is on the car has badly oxidized even in the hidden areas, or the car was repainted at some point.
The rim color matches the my original color chip pages, but the the color on the car doesnt match any of the chips. The valve covers and timing cover were also painted the same color. If I sand down the paint a little bit then the color that matches my paint chips comes back to the surface. So I think it just some weird oxidation. Perhaps something particular to the Metali-Chrome Bikini Blue. I will also take a good look at the heater valve. The rubber grommets were the hose connections enter and leave the heater box just came apart in my hands. So I will have to find a good replacement for those also. I didnt see them in the SteeleRubber catalog. Perhaps they just need a standard grommet that is large enough to fit.
Posted on: 2008/2/25 23:36
|
|||
|
-BigKev
1954 Packard Clipper Deluxe Touring Sedan -> Registry | Project Blog 1937 Packard 115-C Convertible Coupe -> Registry | Project Blog |
||||
|
||||
|
Re: BigKev's 1954 Packard Clipper Deluxe Sedan
|
||||
|---|---|---|---|---|
|
Forum Ambassador

|
Don't remember the exact difference where hoses are but will the 55-6 grommets fit or maybe be trimmed to shape. Steele has those.
Posted on: 2008/2/26 10:04
|
|||
|
||||
|
Re: BigKev's 1954 Packard Clipper Deluxe Sedan
|
||||
|---|---|---|---|---|
|
Webmaster
|
Well a little more work on the car yesterday. I removed the Wiper Motor, drivers side air vent inlet, and parking brake assembly. I still need to get the heater box, and the hood hinges taken off, then the firewall will be clear to start the refinishing process.
I also took a drive over to NAPA today and bought all the steel tubing to replace all the hardline under the hood (Vacuum, Oil, and Fuel). I bought the tubing with the fittings already on them. I figure I can just cut the end off one side and shorten where needed and reuse the fitting. So it was 5/8 Fuel, 1/4 Vacuum and Oil, and 3/16 vacuum. I also bought some rubber fuel hose to replace the vacuum hose with where required. I had already bought all the brake lines a few months ago as a set. The only other line I still need to buy is the fuel hardline that runs along the length of the frame rail.
Posted on: 2008/3/18 22:17
|
|||
|
-BigKev
1954 Packard Clipper Deluxe Touring Sedan -> Registry | Project Blog 1937 Packard 115-C Convertible Coupe -> Registry | Project Blog |
||||
|
||||
|
Re: BigKev's 1954 Packard Clipper Deluxe Sedan
|
||||
|---|---|---|---|---|
|
Forum Ambassador
|
If you're talking about the odd-shaped pieces that cover the brass tubes coming out of the heater box, I made two out of plumbing pipe insulation. It comes in three?? foot lengths and has a slit cut the length to slip over copper plumbing to eliminate sweating.
It looked better than Steele's repro - IMO.
Posted on: 2008/3/18 23:14
|
|||
|
||||
|
Re: BigKev's 1954 Packard Clipper Deluxe Sedan
|
||||
|---|---|---|---|---|
|
Webmaster
|
Randy,
Thats a great idea, and yes that is the part I am talking about!
Posted on: 2008/3/18 23:20
|
|||
|
-BigKev
1954 Packard Clipper Deluxe Touring Sedan -> Registry | Project Blog 1937 Packard 115-C Convertible Coupe -> Registry | Project Blog |
||||
|
||||
|
Re: BigKev's 1954 Packard Clipper Deluxe Sedan
|
||||
|---|---|---|---|---|
|
Webmaster
|
Well I finally got back in the garage this evening to get a little bit of work done. Taking that autobody class on Saturday's really cuts into my free time. But the class itself is pretty good. I MIG welded up all the holes in the hood of the project truck (emblem and hood ornament holes). Then I bumped out a few dents. Also a Uni-Spotter rocks! So it was good practice for some of the stuff I need to do on the Packard.
So on the Packard I bent up a new pump to carb fuel line, and also a new vacuum line between the carb and the distro. I also did a little website development work for a tool distribtion company in trade for a small oxy-acet. gas welding kit. I will use this to assist with the body work on the Packard. I am also going to try to source a MIG welder that I will use to put in the new floor pans. Current pics of the new hardlines and the new torch: Attach file:  (35.29 KB) (35.29 KB)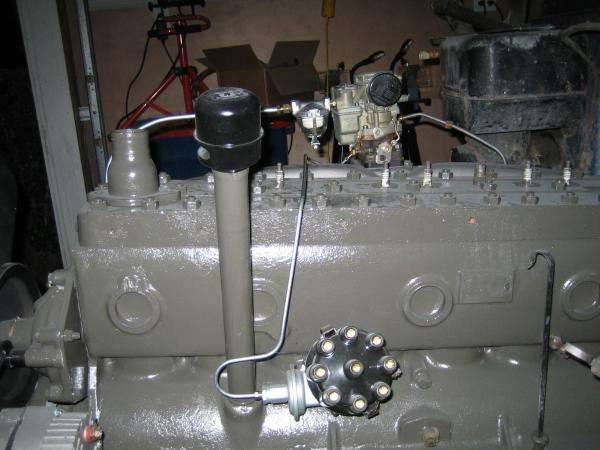 (34.01 KB) (34.01 KB)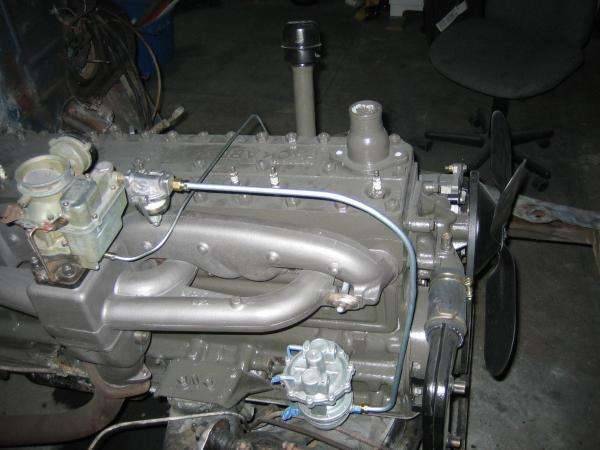 (46.80 KB) (46.80 KB) (61.18 KB) (61.18 KB)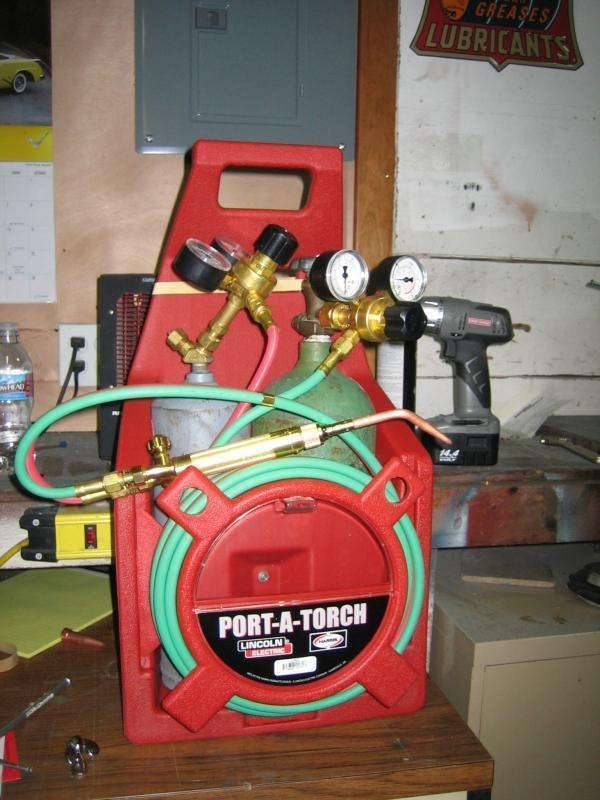
Posted on: 2008/3/30 22:09
|
|||
|
-BigKev
1954 Packard Clipper Deluxe Touring Sedan -> Registry | Project Blog 1937 Packard 115-C Convertible Coupe -> Registry | Project Blog |
||||
|
||||
|
Re: BigKev's 1954 Packard Clipper Deluxe Sedan
|
||||
|---|---|---|---|---|
|
Webmaster
|
Well had about an hour or so to get a little work done on the car.
So I painted the lower splash pan. I had this pan media blasted at the same time as the rims as it was completely rusted. As you can see it has lots of surface pits in it. So I painted it with semi-gloss frame paint. No one will really see it up under the car, and the frame paint should do its just for quite a while. I also broke the bolts loose on the sway bar and removed it from the so I can finish clearing all front frame. After the frame is painted, then I will put the refinished swaybar back on with the new end rubber, and my newly designed brackets. Also I bent up the first of the oil lines. I still need to remount the oil filter, then I can bend those lines. The original oil lines on my car were not run correctly and the filter was set up in a full flow configuration instead of a by-pass configuration. When I got the car it just had a 2 way "T". One side went to the sender, and the other side to the filter inlet. Then from the filter outlet back to the block inlet that feeds the upper gallery. So I bought the proper 3 way "T". Now the sender is in the middle as you see now, the right side of the "T" line feeds the Block inlet for the upper gallery, and the left side of the "T" line goes to the Filter Inlet, and the Filter outlet line goes back to a inlet in the lower crankcase that dumps back into the pan. On my car that inlet had a plug in it. So I am not sure if the filter was an add on that was just not plumbed correctly, so someone decided to replumb the filter in a full-flow configuration. Attach file: (84.70 KB) (40.44 KB) (40.44 KB) (43.84 KB) (43.84 KB)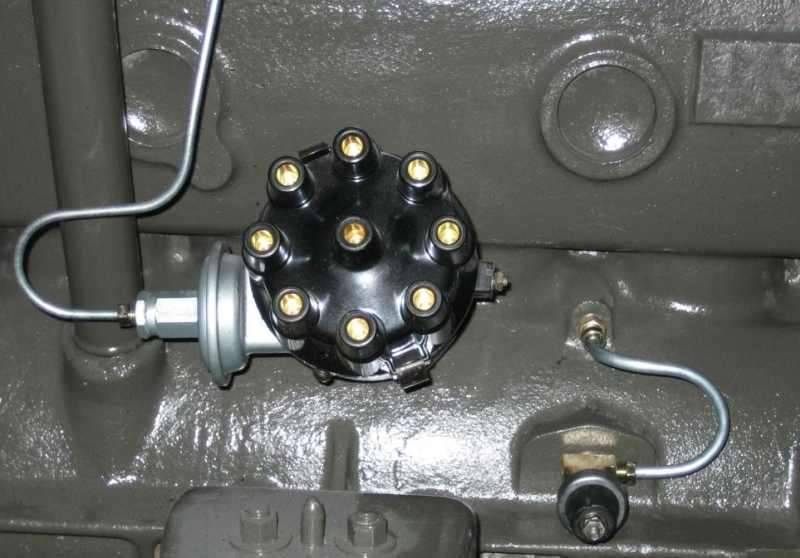
Posted on: 2008/4/3 22:34
|
|||
|
-BigKev
1954 Packard Clipper Deluxe Touring Sedan -> Registry | Project Blog 1937 Packard 115-C Convertible Coupe -> Registry | Project Blog |
||||
|
||||
|
Re: BigKev's 1954 Packard Clipper Deluxe Sedan
|
||||
|---|---|---|---|---|
|
Webmaster
|
Well I got some more of the front frame scraped and wire brushed. I still need to crawl under the front end and do all the bottom side. I am sure that will be the worst part.
I also prepped the front drums for paint, but before I do that I am going to take them to get them turned as there are a couple of grooves in them. Once I was done with that I degreased, and cleaned up the parking brake ratchet assembly, and then repainted it with some Eastwood Silver Cadium paint. This is the same paint I used on the Fuel Pump and the vacuum advance. The last thing I did was start to remove the big dent that is in the rear driver side door. The dent was a pretty good one, and was an area about 3/4 the size of the door scallop. The dent was deep enough in the front scallop area that leading edge of the dented scallop was level with the regular part of the door. So now I have the scallop body line bumped back into place. So by hammering down the ridge caused by the dent from the front side, backed up with a dolly (off dolly technique), that raised about 3/4 of total dent. I still have some low areas in the middle along the line of the deepest part of the dent, and I had to heat the dent with a torch to shrink it a little bit where the metal was stretched. The remainder of the dent is too hard to work out from the inside of the door skin because of the limited access because the inner door shell. So I will need to finish the rest with a Unispotter. Once I get all the dent raised, then I will go back over it and metal finish it as good as I can, and then skim coat it.
Posted on: 2008/4/14 0:22
|
|||
|
-BigKev
1954 Packard Clipper Deluxe Touring Sedan -> Registry | Project Blog 1937 Packard 115-C Convertible Coupe -> Registry | Project Blog |
||||
|
||||
|
Re: BigKev's 1954 Packard Clipper Deluxe Sedan
|
||||
|---|---|---|---|---|
|
Webmaster
|
Well I got most of the rear door dent out now. I still need to do a little smoothing as there is still a some lumpiness to it right across the middle line of the dent where the metal got stretched. But it basically up to correct level.
I went and bought a Stud Welder (uni-spotter) from Harbor Freight. It made it so much easier to pull those dents out where access to the back side of the panel is limited. If you have never used one, I highly recommend it. I have been using one in my auto-body class, and now I am spoiled by it. I also have soaked the front drums in some Evapo-Rust. The are looking pretty good. I just need to take them and get them turned, and then I can put them in paint. Hopefully I can get some pics posted soon, just had almost no time with all this business travel.
Posted on: 2008/4/19 15:43
|
|||
|
-BigKev
1954 Packard Clipper Deluxe Touring Sedan -> Registry | Project Blog 1937 Packard 115-C Convertible Coupe -> Registry | Project Blog |
||||
|
||||


.jpg")


