 (84.96 KB)
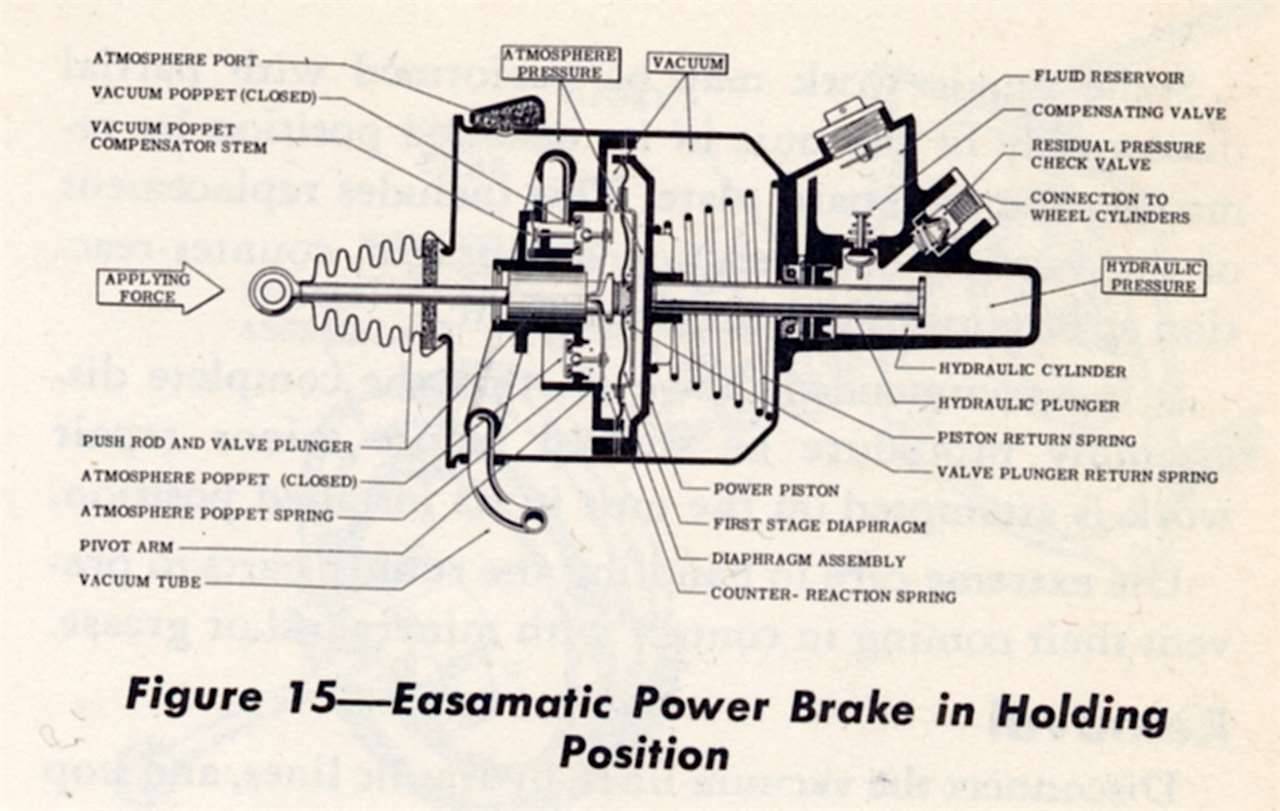
|
Re: Successful Packard Hunt
|
||||
|---|---|---|---|---|
|
Forum Ambassador

|
Quote:
I focused on the compensator valve because it would be the lesser of two evils, being a possibly fixable part, rather than requiring a complete rebuild. That's just me, always looking for the least invasive procedure-- I just hate replacing good parts-- and wasting good money. The compensator valve is "fixable", but only by replacement of parts, but the only serviceable parts for it come in an overhaul kit. Otherwise, Packard furnished the valve as a complete (drop-in) assembly. The overhaul kit that's commonly available is actually a minor kit - no parts for the vacuum section except those gaskets that must be disturbed to service the hydraulic section. Even if you only needed to service that valve, I doubt if it could be done on-car. Then, if you've gotta buy an overhaul kit to get the required parts and if you;re gonna service it on the bench, then you might as well replace all the parts provided int he kit. As Howard mention much earlier in this thread, be careful about your supplier. NOS kits are NLA, and all repro kits are NOT created equal. There have been some past complaint, here and other forums past, regarding failure of brand-new compensator valves. Though some cases were the result of installer error (that is, by NOT following the assembly procedures provided in the shop manual), there appear to be some variations in replacement compensator valves these days. Kanter Auto Products claims to have the correct part in their kits, but I haven't overhauled one of these units in well over a decade. Quote: Speaking of pistons, the most confusing part of this discussion for me has been to get the idea into my head that there are TWO pistons operating here (correct me if I'm wrong): The "power" piston (or rod) and the vacuum piston which gets sucked down by the vacuum in the "SHELL" (a term that I've never run across before in power brake descriptions)and pushes on the "power" piston (which could just as well be called a piston or a rod, since it doesn't contribute anything to the "power" which is all vacuum power along with some leg power. Still some confusion, there. The power piston is in the vacuum section of the unit; it's the large round plate assembly, with the leather seal, that moves up and down the vacuum cylinder (shell) to assist with application of the hydraulic plunger. A push rod is connected directly to the brake pedal arm and pushes a piston-shaped valve through a cylinder in the greater power piston assembly, to regulate vacuum assist. Part of the confusion in terminology may arise from a change in the design of the BTV over the years. Originally, that small piston at the end of the push rod worked as a sliding valve to control the application of atmospheric pressure (against and vacuum) to move the power piston. In a subsequent design for 55-56, that push rod and plunger valve moves a pivot arm to open/close a pair of poppet valves. You car should have the "sliding valve" type. Also, the push rod in the power brake system never actually contacts the hydraulic plunger, but only helps to move the power piston. It is the power piston that pushes against the hydraulic plunger, which some (including me) casually refer to as a rod or piston. In the event that vacuum assist should fail, the valve at the end of the push rod plunger quickly bottoms out in the bore of the power piston, which then moves under (much greater) foot pressure, to move the hydraulic plunger into its bore.
Posted on: 2012/11/13 9:48
|
|||
|
||||
|
Re: Successful Packard Hunt
|
||||
|---|---|---|---|---|
|
Forum Ambassador
|
Quote:
Now I'm a little confused again with the statement that the rod "does not touch the master cylinder walls and push fluid ahead of it" While it's true that the rod itself doesn't do this, the piston at the end of the rod, which includes a valve, does apply pressure to the fluid in the master cylinder, correct? The BTV's hydraulic plunger doesn't work like a piston in an engine, let alone a conventional master cylinder, but applies displacement through a different perspective. For example, if you take a bucket and fill it with water right up to the rim, and then make a fist and slowly plunge your arm into the bucket, that water spills over the top. Same thing applies in the BTV. With compensator valve closed (and no other leaks), the entry of the plunger into the confined space displaces the brake fluid (albeit under much greater pressure) out into the lines to push the pistons in the wheel cylinders. Quote: Unfortunately, I printed out the pages of the '55 manual that Brian mentioned and couldn't read the darn part labels on the illustrations. The PDF files at PackardInfo were not scanned to replace printed manuals, but only to provide a quick on-screen reference. High print quality would require much higher scan resolution, which - in turn - means even larger file size. When you open the PDF file in Adobe Reader, you can zoom in on the image. At 200-300%, it's a bit more readable, but if you click on the image provided in Howard's post, above, you may find the results (in a new window) more to your liking. Yet, keep in mind that there are some differences WRT to details of the vacuum section between your unit and the 55-56 version. A detailed cross-section of your unit is provided in the illustration of the 48-54 parts book - see Plate No. 43 in the Part Diagram Plates section, but with components labelled by group numbers. Refer to the Group 1 - Brake section to decode those. For a little background on Packard's offering of the BTV (referred to as Easamatic Power Brakes), look to the site's live 51-54 Service Index, under the Brakes section.
Posted on: 2012/11/13 10:16
|
|||
|
||||
|
Re: Successful Packard Hunt
|
||||
|---|---|---|---|---|
|
Forum Ambassador

|
As mentioned, the illustration is of the later poppet valve type unit because it was a better quality image to start with. I can post the sleeve valve type but it wouldn't add anything.
The major pieces, form, layout and basics of operation are identical between the two -- just a few pieces in the center of the power piston barely visible in the illustration are different. The power piston changes made the unit a bit more responsive and somewhat simpler. While they did change how the power section operates, they did not change the hydraulic section and items pertinent to this discussion at all.
Posted on: 2012/11/13 11:10
|
|||
|
Howard
|
||||
|
||||
|
Re: Successful Packard Hunt
|
||||
|---|---|---|---|---|
|
Home away from home
|
So, I've got the "sleeve valve" type which does not include the wider, flattened "poppet" end. No big deal either way, really, they both apparently work by "displacing" rather than pushing fluid as a piston would inside of a tight-fitting cylinder. They basically take up space, the fluid is prevented from leaking back by a the... I think I've got this right... the "compensator valve and it has nowhere to go except out into the brake lines.
The theory is good to know, but in practice this probably all mostly translates into money ($$) so that's where I have to leave it. No extra dollars for a rebuild or a rebuilt, and no reason to do that until Spring. Why take it out and leave the lines hanging when I know what needs to be done, and don't have scratch to pay for it now. However, I still plan to drive the car a bit, and here's how I rigged that: My self-manufactured "manual power" brakes are working. So far, the fluid level has remained steady with the vacuum line disconnected at the regulator on the manifold and the regulator "capped" with a piece of plugged hose. I now know just how hard I have to stomp to make this so-called brake system work in a predictable manner. So, no worries mate! "Starts and runs great!" but just don't "drive it anywhere." My solution is to go to a small industrial park that's only a block from me. It's very sleepy at night, with wide streets made for trucks, zero traffic and plenty of places to turn around. I'll probably have a few more of my private "cruise nights" until I absolutely have to park it for the winter. Winter "storage," as I think I mentioned, will be outside. I plan to fasten down four 15 foot pieces of asphalt roofing over the backyard dirt, park on top of them, and cover the front, top, and trunk with plain old blue plasic tarp, NOT a car cover that traps moisture under the car. I also put a can of STP in the crankcase. Here's my reasoning: probably the most important (or only?) advantage of STP is it clings to metal parts without running off after the motor is shut down. I figure having a can of it in the oil will help to make occasional cold starts a little more gentle on the internals. (I don't think I'll be able to resist a few startups over the winter!) My observations on startups in current chilly but not cold weather are as follows: It starts right up after one depression and release of the gas pedal and hitting the key for a second. Hardly gets a chance to crank. It's almost like it had 'lectronic ignition! Then it kind of loads up with a rumpety-rump idle for a while until the choke starts to pull off. I think the choke could be set a bit leaner. After a few minutes it smooths out to a nice fast idle. Giving the accelerator a tap after the thermostat opens results in a nice smooth idle, with a few skipped beats now and then that could be due to tuneup needs or just normal. Pretty civilized overall. When I ease out the clutch at idle it backs itself down the driveway with no hesitations or complaints. Quite a stately ride down the street, too. No fuss as long as I take my time on shifts and am light on the gas pedal. Man, does it have TORQUE if I hit it hard! With the overdrive, it probably has 4.1 rear gears (take that 4.11's) so lightin' 'em up is very easy (not that I'd ever do such a thing  ). Learning the finesse to drive it smoothly on surface streets is really a better use of my time, though--and fun! Pretending to be the midnight cruiser gumshoe in an old movie has its attractions. Sure wish the radio worked, though, 'cuz maybe it would only get stations that played appropriate old '50s tunes, like Christine's radio did... ). Learning the finesse to drive it smoothly on surface streets is really a better use of my time, though--and fun! Pretending to be the midnight cruiser gumshoe in an old movie has its attractions. Sure wish the radio worked, though, 'cuz maybe it would only get stations that played appropriate old '50s tunes, like Christine's radio did...
Posted on: 2012/11/15 23:40
|
|||
|
Guy
[b]Not an Expert[/ |
||||
|
||||
|
Re: Successful Packard Hunt
|
||||
|---|---|---|---|---|
|
Home away from home
|
Brian,
These points were very helpful and I wanted to re-post them here in condensed form, with a little feedback... BH wrote: Quote: The power piston is in the vacuum section of the unit; it's the large round plate assembly, with the leather seal, that moves up and down the vacuum cylinder (shell) to assist with application of the hydraulic plunger. A push rod is connected directly to the brake pedal arm and pushes a piston-shaped valve through a cylinder in the greater power piston assembly, to regulate vacuum assist. That explains a lot in a little space. Quote: Even if you only needed to service that valve, I doubt if it could be done on-car. Dang! That was exactly what I was trying to do! And once it's out of the car... abolutely dumb not to go through the whole thing. Quote: Originally, that small piston at the end of the push rod worked as a sliding valve to control the application of atmospheric pressure (against and vacuum) to move the power piston. In a subsequent design for 55-56, that push rod and plunger valve moves a pivot arm to open/close a pair of poppet valves. You car should have the "sliding valve" type. To make it even more interesting, the diagram above shows two parts called "plungers." The illustration lables the piston-shaped piece on the end of the push rod as the "Valve Plunger" in a caption that reads as though they are one piece: "Push Rod and Valve Plunger" Then, on the other side of the diagram, it shows the "Hydraulic Plunger" that we've been talking about as just the "plunger." Two plungers on one toilet! Quote: ...the push rod in the power brake system never actually contacts the hydraulic plunger, but only helps to move the power piston. This is a great piece of information. It was is easy for me to get confused seeing a picture of that rod, which connects to the pedal, and assume it to be a continuous piece that contacts the plunger on the end of it. That incorrect view of it threw me off, and raised an unanswerable question: how the vaccum piston could assist this rod assembly without being connected to it in some way. Maybe this is a "duh" realization for some, but it was very important for my understanding. Quote: It is the power piston that pushes against the hydraulic plunger, which some (including me) casually refer to as a rod or piston. In the event that vacuum assist should fail, the valve at the end of the push rod plunger quickly bottoms out in the bore of the power piston, which then moves under (much greater) foot pressure, to move the hydraulic plunger into its bore. I can attest to the "much greater foot pressure" needed, but stomping hard enough will apply the breaks. If anyone experiences this kind of failure, it is important to know that you still have brakes -- however, but it's good to remember that unless you have a lot of practice with this application, it will not be a gentle application. When the brakes do take hold they will probably lock up, so if you're moviing at any rate of speed, you need to be ready to slide quite a ways, or, if you're quick (foollish?) enough you can realease and re-engage them a few times. (I have had practice at this due to necessity and stubborness, I wouldn't recommend disconnecting your vacuum assist just to practice!) PLEASE NOTE: It is important to know that there is another, much-discussed type of failure where the pedal goes to the floor and there is zero engagement of brakes. This, I'm sure, is obvious when it happens and you're only hope is to grab the hand brake and pull hard. You'll be glad if you've practiced this maneuver several dozens of times before this. In fact, I would urge any and all Packard owners wiith the Crash-O-Matic BTV system to get practice making the hand brake maneuver. It's easy enough to do it in town at stop signs, or on the highway when there's no traffic. Get used to how it acts applying it at different speeds. Start experimenting in a parking lot if you're hesitant to do it on the road. I believe that no one should ever drive a BTV equipped car of any make without a good-functioning, regularly-tested hand brake. In these cars, the hand brake is truly an Emergency Brake!
Posted on: 2012/11/17 14:53
|
|||
|
Guy
[b]Not an Expert[/ |
||||
|
||||


.jpg")


