|
Re: Headlight switch wiring question
|
||||
|---|---|---|---|---|
|
Forum Ambassador

|
The dash lights wire should be at the middle of the ceramic portion on one of the double terminals. If there are two wires at that location the second should be for the Ultramatic quadrant light. You would remove the dash light wire and place it on the double tail light connector located on the switch body in place of the short jumper wire. The dash sockets are grounded via the cluster and just need the hot side. As long as the dash light circuit is intact and the wire is not shorted as it enters the hole in the shell, with the wire connected to the tail light location as soon as you turn on the lights the dash lights should be at full brilliance.
The switched courtesy lights were an option on some models. If there is another wire on a ceramic terminal at end of the ceramic opposite the short jumper wire end, that is for the courtesy lights. Those lights need a ground to turn on which is provided by another wiper affair on the side of the ceramic opposite the rheostat.
Posted on: 2014/7/25 16:45
|
|||
|
Howard
|
||||
|
||||
|
Re: Headlight switch wiring question
|
||||
|---|---|---|---|---|
|
Home away from home
|
I had a problem last year when driving home in my 54 Cavalier due to a short in the lighting.
The short turned out to be the little wire that goes to the transmission indicator light on the steering column. The wire was petrified and broke off at the light socket. This was enough current draw to trip the automatic circuit breaker which stays tripped long enough to cause fear factor. When I took out the switch I managed to break off the headlight contact on the rotten switch. My car has the ability to turn on the interior lights when the switch is turned all the way counter-clock-wise. Anyway thanks to Epoxy I managed to restore the switch but I now plan to put in a relay for the headlights to get the load of the feeble switch. Please tell me about the replacement you found. I have a scribble drawing of how mine was wired if you need it Jim
Posted on: 2014/7/25 18:32
|
|||
|
||||
|
Re: Headlight switch wiring question
|
||||
|---|---|---|---|---|
|
Not too shy to talk
|
Hooray! Dash lights are back on but still not sure if my headlight switch is bad. Here's what happened... Last week, when I first pulled down my headlight switch with all wires attached, one of the black wire plugs pulled out and was hidden up there near the dash. It's wire is too short and not like all the others with lots of play. I made a diagram of the switch and all wire locations. Mind, I didn't know about that hidden plug wire yet. There were two open plugs on the headlight switch with no wire in them: one in the tail light Vee pair and one in the dash light vee pair. (on my car, the tail light wire is actually two wires going into one plug with a jumper to the dash light feed plug. This leaves its neighboring plug vacant) Anyway, Now that I discovered that dangling plug, I attached a jumper wire to it, connected my battery with headlight switch "on" and touched the unoccupied dash female plug and started to see smoke. Next, touched the unoccupied tail light plug and voila' the dash lights came "on". I'm puzzled, because the guidance I got said this was a way to bypass the rheostat but that unattached plug I found should really go in the dash plug where it was smoking.
Posted on: 2014/7/26 9:29
|
|||
|
||||
|
Re: Headlight switch wiring question
|
||||
|---|---|---|---|---|
|
Not too shy to talk
|
btw, answer to Jim about my replacement switch. I simply ordered a new '53 Clipper headlight switch from Max Merritt Packard Parts in IN. They do an exchange credit, so when new switch arrives, you send them the old one. It's not cheap at $175. Hope this is what you were asking.
Posted on: 2014/7/26 9:32
|
|||
|
||||
|
Re: Headlight switch wiring question
|
||||
|---|---|---|---|---|
|
Forum Ambassador
|
I'm puzzled, because the guidance I got said this was a way to bypass the rheostat but that unattached plug I found should really go in the dash plug where it was smoking.
That is one of the problems with Packard wiring. None of the dash wires are labeled and many are the same size and color. Even if they started out different colors, by now some are so faded they all blend together. If you don't watch out things can get crossed. The wire you picked that started smoking was most likely the one for courtesy lights. It is spliced to the two door switches which work by connecting to ground. In operation three switches are in parallel so opening either door or turning the headlight switch all the way left can turn on the courtesy lights. When you tried to power that wire, because one of the doors was open the wire was already connected to ground thru a door switch so you had a direct short.
Posted on: 2014/7/26 9:52
|
|||
|
Howard
|
||||
|
||||
|
Re: Headlight switch wiring question
|
||||
|---|---|---|---|---|
|
Home away from home
|
So I understand from the above that the forward courtesy lights ground to the headlight switch terminal. Any reason that they cannot just go to a common ground somewhere else behind the dash? I ask this because my switch doesn't seem to provide a ground at the specified position that I could measure with a meter. Or is it only when the knob is turned all the way to the left? That would seem to defeat the option of the door pillar switches?
Attach file:  (42.68 KB) (42.68 KB)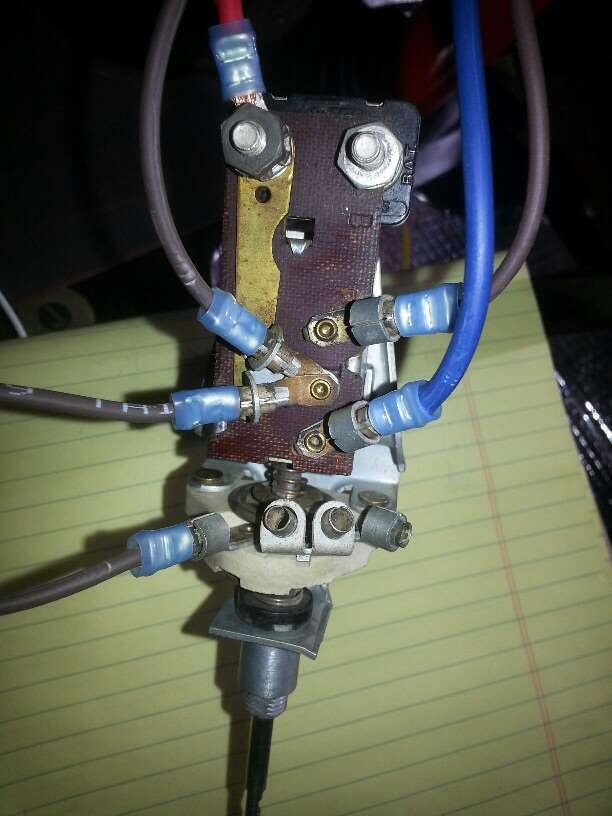
Posted on: 2015/6/24 20:35
|
|||
|
1952 Model 200 Deluxe Touring Sedan
HA's 52 Grey Ghost "The problem with quotes on the internet is you never know if they're true" - Abraham Lincoln |
||||
|
||||
|
Re: Headlight switch wiring question
|
||||
|---|---|---|---|---|
|
Forum Ambassador
|
The door pillar switches and the headlight switch position for courtesy light are in parallel so all will turn on the light. The headlight switch does have to be all the way to the left to be in the on position. Second notch of switch is all off and third notch is dash lights on and then further turning the knob will dim them until they go out.
If a door happens to be open the headlight switch does nothing as the light is already on but if the headlight switch is in the light position the courtesy lights will stay on when the door is closed. Here is a disassembled switch. The rheostat and courtesy light portion are on opposite sides of the ceramic operated by the same rotation parts but isolated from one another. The courtesy light portion has a large round plate with a notch which fits over the actual wire terminal. The round plate connects to ground via the case and various portions of the mounting arrangement. When you turn on the courtesy light the wiper that rides against the contact plate goes into the notch area to touch the wire terminal and short it to ground. If you are unable to read a ground with the switch in on position there is an excellent chance the plates have oxidized or corroded -- a very common problem with the switches as you can see from the condition of the plates in this disassembled switch. EDIT: I just noticed I grabbed the wrong wiper in my second and third photos. They look the same except the courtesy light portion has a small hole and the one with a large hole goes over the insulator piece on the rheostat side. Attach file: (95.54 KB)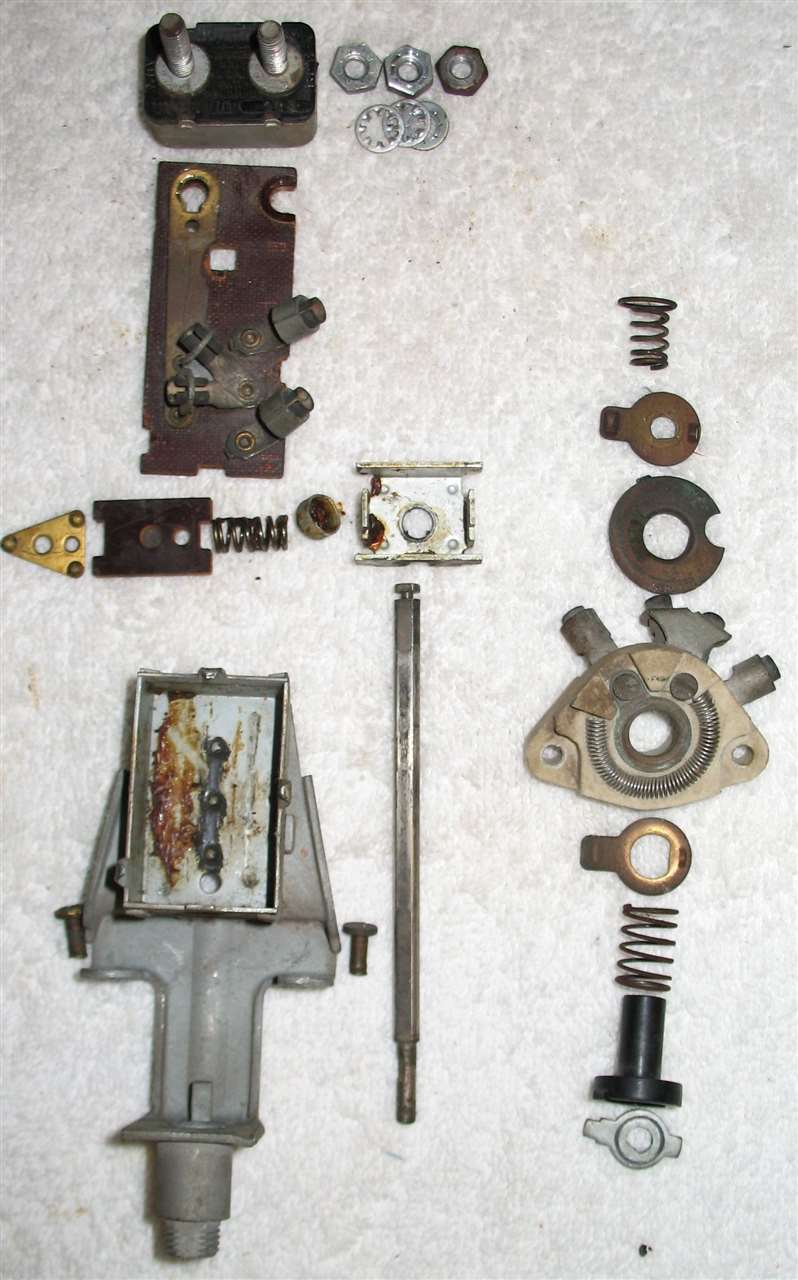 (35.86 KB) (35.86 KB)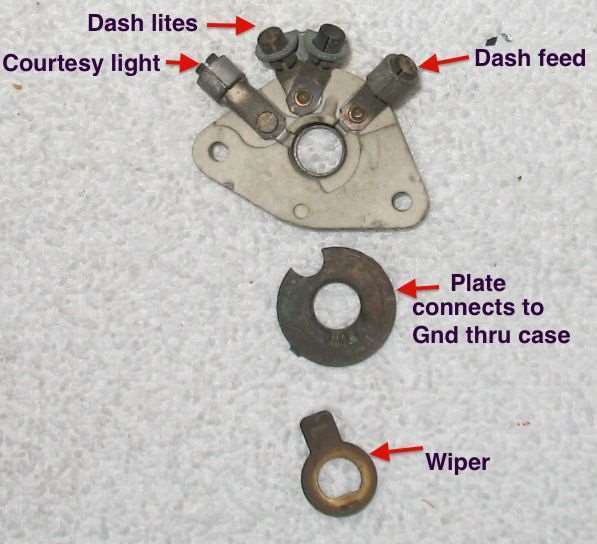 (22.07 KB) (22.07 KB)
Posted on: 2015/6/24 21:25
|
|||
|
Howard
|
||||
|
||||
|
Re: Headlight switch wiring question
|
||||
|---|---|---|---|---|
|
Home away from home
|
I wonder if I could clean up the rotating plates by putting a little valve grinding compound in there and moving things around, then washing it all out with some solvent. I am not sure I want to temp fate by taking the switch apart, although it doesn't seem too tough. What holds the shaft to the inner workings?
Posted on: 2015/6/24 21:49
|
|||
|
1952 Model 200 Deluxe Touring Sedan
HA's 52 Grey Ghost "The problem with quotes on the internet is you never know if they're true" - Abraham Lincoln |
||||
|
||||
|
Re: Headlight switch wiring question
|
||||
|---|---|---|---|---|
|
Forum Ambassador
|
Once you bend the tabs straight and remove the phenolic piece holding the terminals the contact plate and that U shaped piece of metal will lift out. (There is a spring under the rectangle and triangular pieces so if you are not careful, those will fly out) That U shaped piece fits over the slot in the end of shaft. Once U shaped piece is out of the slot the shaft pulls out the end and the courtesy light contact pieces around the back side of ceramic will come out but not the rheostat pieces. To remove those I believe the ceramic piece has to be off the switch. You can drill out the rivets to remove the ceramic piece but replacement needs to be done with small nuts and screws unless you are far more proficient in riveting around ceramic than I am.
Posted on: 2015/6/24 21:55
|
|||
|
Howard
|
||||
|
||||


.jpg")


