
|
Re: Mark's 1950 Super Eight
|
||||
|---|---|---|---|---|
|
Forum Ambassador

|
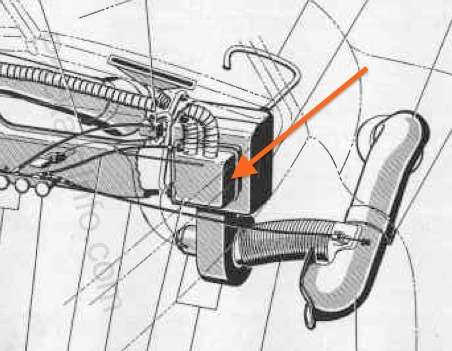
Though it will certainly make the job easier, there is no necessity to remove either the manifolds or the heater box to do a valve job on a 22nd/23rd series 8-cyl.
With the manifolds off, it's an opportune time to have the gasket face surfaces checked and surfaced if needed. If resurfacing is needed, obviously do it with the manifolds assembled to each other, not as individual pieces.
Posted on: 2015/3/3 13:32
|
|||
|
||||
|
Re: Mark's 1950 Super Eight
|
||||
|---|---|---|---|---|
|
Home away from home

|
I agree with O_D, installed new rings, replaced all 16 valves, a few cam followers and a hydraulic lifter on my '50 Custom several years ago... with the engine in the car, heater and manifolds in place. Had to remove the grill of course to pull the camshaft.
Posted on: 2015/3/3 14:30
|
|||
|
||||
|
Re: Mark's 1950 Super Eight
|
||||
|---|---|---|---|---|
|
Just can't stay away
|
Another day, another problem...today I drained the oil and prepared to pull the pan...3 of the front 4 bolts seem to have been cross threaded when someone else installed them and although they turn freely, they wont come out. I'll try getting some leverage on them and see if I can get them to budge. Of course, they have to be the ones that are the hardest to get to. Figures.
Posted on: 2015/3/6 19:17
|
|||
|
||||
|
Re: Mark's 1950 Super Eight
|
||||
|---|---|---|---|---|
|
Home away from home

|
If you mean the 4 right across the front of the pan here might be the problem: they do not thread into the block, but into a steel bar that lays across a flange on the timing cover. This bar is not retained to the timing cover once the bolts are out and mechanics seemed to lose them--I have had several cars through over the years where the steel bar was gone and the previous mechanic had substituted 4 individual nuts. Of course you can't see this under the car and with 65 years of mung in the way. Anyway, I believe you will find some nuts under there spinning hopelessly.
Oh, and there is no necessity to remove the heater for the work you are planning unless it also needs service.
Posted on: 2015/3/7 5:30
|
|||
|
||||
|
Re: Mark's 1950 Super Eight
|
||||
|---|---|---|---|---|
|
Just can't stay away
|
I pulled the radiator yesterday and you were right, the 4 bolts have nuts on top. I'll get to pulling the pan today while the weather holds.
Here is a photo of the removed parts waiting for cleanup. Attach file:  (121.55 KB) (121.55 KB)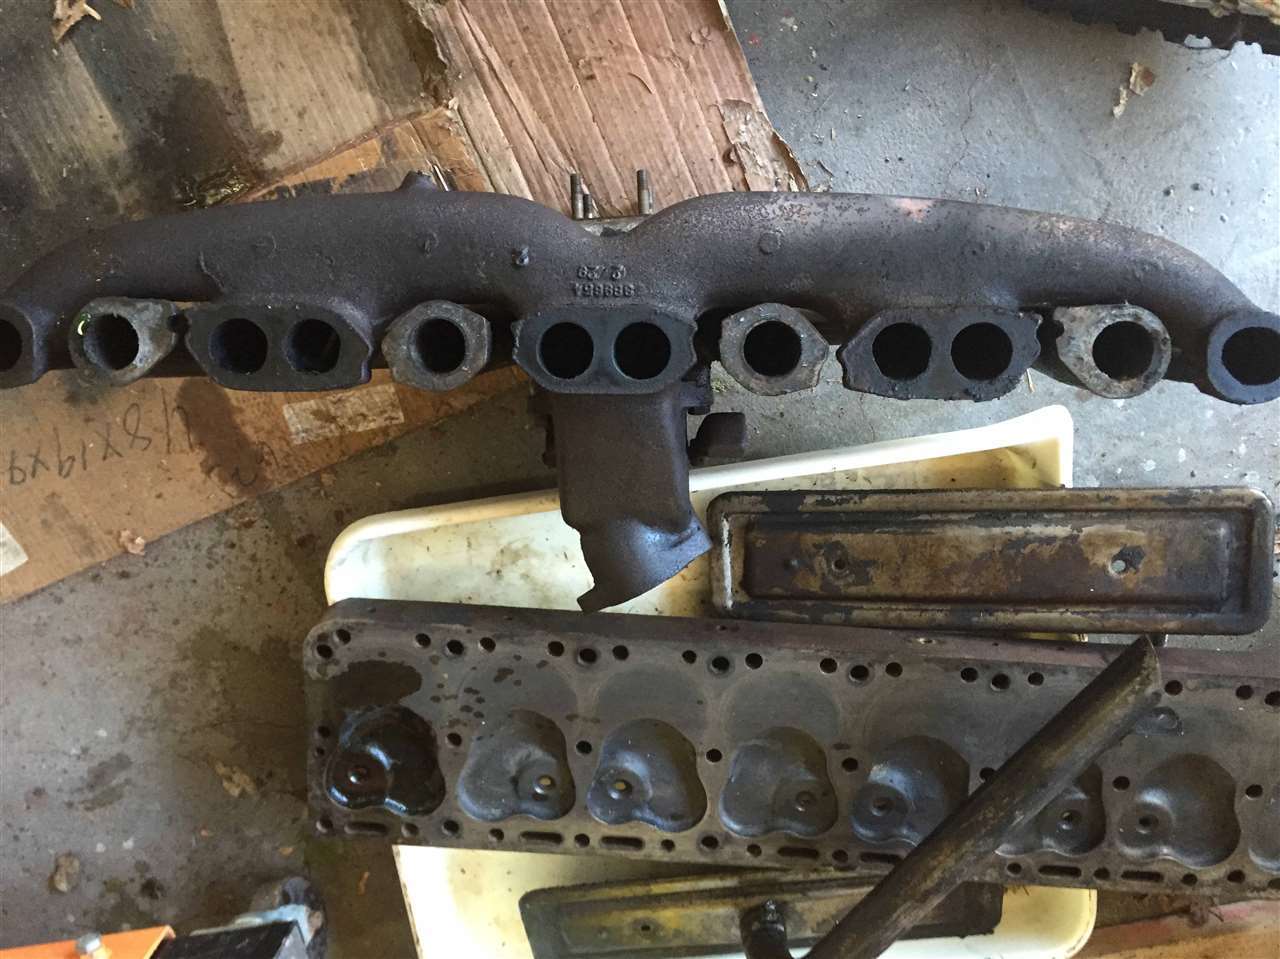 (95.74 KB) (95.74 KB)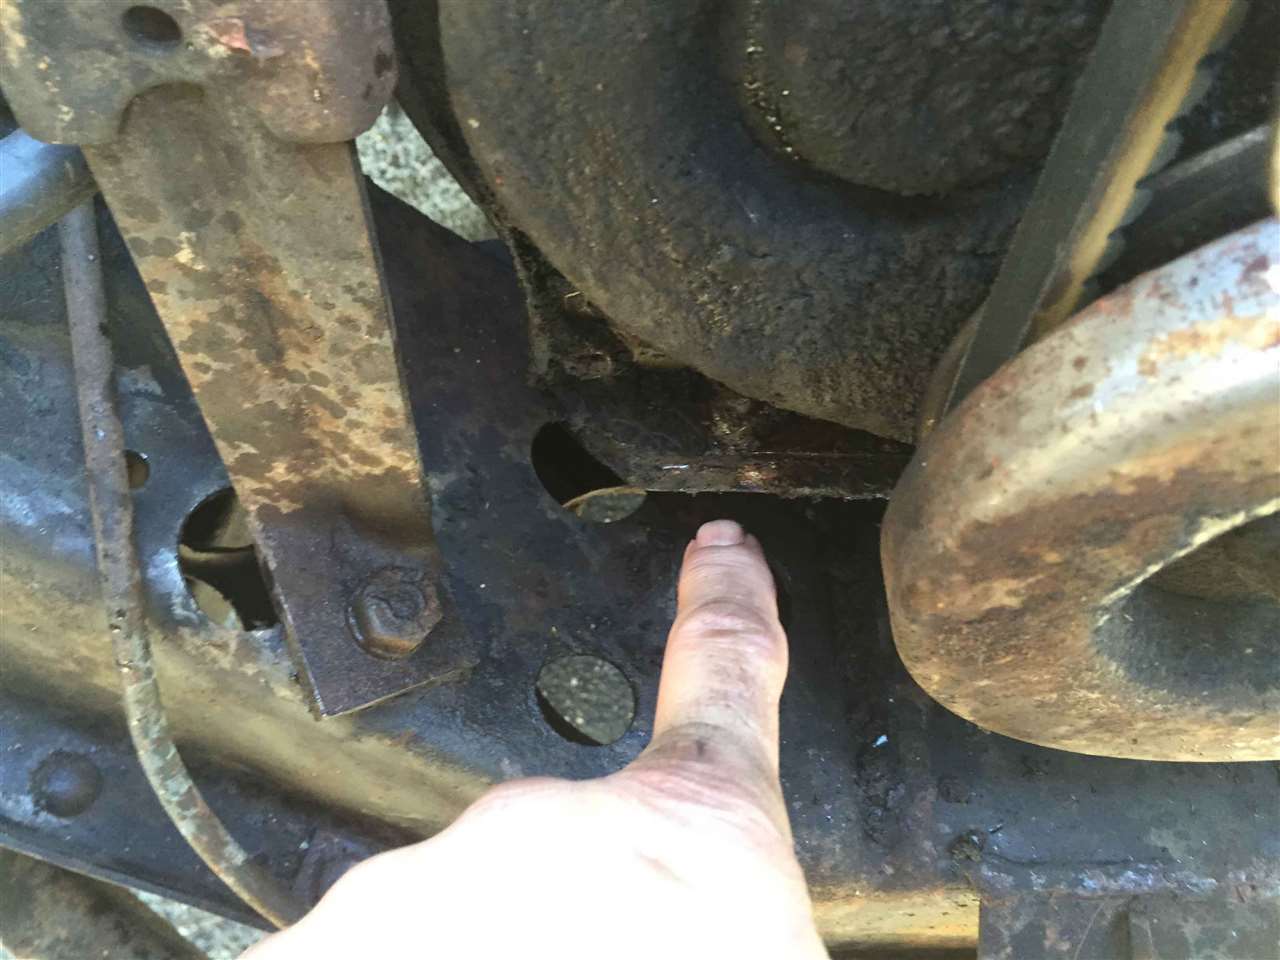
Posted on: 2015/3/9 13:22
|
|||
|
||||
|
Re: Mark's 1950 Super Eight
|
||||
|---|---|---|---|---|
|
Just can't stay away
|
well it's been almost a year since I started my 50 project and then no further along than I was in the last post. It seems that the engine in my car just doesn't like me. I pulled the head and discovered that there was an excessive carbon in the cylinders and on the valves. I used a ridge Reamer and cut the ridges on the cylinders, dropped the oil pan, disconnected the rod caps, checked the bearings, and told the Pistons from the cylinders. I replaced the rings after measuring the cylinders within standard. I removed the valves one at a time and cleaned each one and replace them and ground the valves in place. I hooked up the valvetrain put a new head gasket on, torqued everything down twice, and here's where it got nasty, I put water in the radiator and walked away for five days. When I returned to start the engine I discover water leaking out around the head gasket. I tried rolling the engine over with the starter, which it would do before, and it was stuck.
So, once again I pulled ahead and found water and everything. I cleaned up the water, coded everything with mystery oil and broke the engine loose. I checked the oil and did not find any water, lucky the new rings kept the seal. I cleaned out the cylinders surface rust, cleaned out the valves again and put the engine back together again. Now I try to start the engine. And guess what, it won't run. Once again another compression check no improvement at all so now I definitely know the valves need to have the valve seats reground, and have new ground valves needed to the new seat. so now it's time to jerk the engine and look for a machine shop who knows how to work on a big Flathead. It turns out that most if not all of the shops in my area have no clue how to work on a large Flathead and the ones that do want a fortune. Finally, I have found a local shop who knows how to do this work and charges a reasonable price. I'm in the process of disassembling the engine down to the block for transport to my new shop. Will let you know how things come out and how much it costs should be another month.
Posted on: 2015/10/26 14:57
|
|||
|
||||
|
Re: Mark's 1950 Super Eight
|
||||
|---|---|---|---|---|
|
Just can't stay away
|
it's been a long time since I posted on this thread. But there has been a lot of work going on. Since my last post I have attempted and in the car rebuild of the 288 that has no compression. I pulled the head and the oil pan, remove the ridge on the cylinder, and push the Pistons out the top. I opened the valve covers and remove the valves one at a time, and they came out easily although they were covered with carbon and the seats were pitted slightly. I installed new rings after honing cylinders of course and refitted the Pistons. Then I ventured into an area that I wasn't really sure of which was how to grind the valves. I read all of the things I could on this site and then proceeded to hand grind the seats and valves with lapping compound. Identical motor back together and discovered that my effort was in vain. Somewhere I missed that when you put the head gasket on you need to put sealer on both sides. So after I filled up. Radiator in preparation to start the motor water filled up the cylinders. Well hike for their motor down again cleaned everything up remove the rust that started cleaned up the valves again and put the motor back together for a second time. Much to my dismay after all of that work still no compression or at least only a very slight improvement to 50 pounds.
So anyway I gave up on this motor when I found another 288 that was supposed to run and decided I would buy it clean it up install it and then work on the one in the car. And of course, the motor I bought didn't run and had three cylinders dead three cylinders with 85 compression and two more in the 30s. The good news I guess is that I found the machine shop that knows how to build these engines. And I am in the process now tearing down the engine that I bought in order to have the block looked at and cleaned and if this is a good motor new cam bearings installed and the valves and seats fixed properly. What prompted me to write all of this up is things have been going well except for the removal of the water distribution tube that was stuck tight. I read again all of the threads I possibly could hear the try and figure out how to get that stock sucker out. I finally did manage to get it out without completely destroying it but I thought you would like to see the tool I made to slip between the tube and the water jacket free up the stuck tube. Working my tools back and forth very carefully over three days, I only work about an hour each day, I was finally able to get the tube out. Now of course I'm having second thoughts about this block based on the amount of rust I found into adjoining intake runners. It quite possibly would be just water getting into the intake manifold while the engine sat in the previous owners yard outside. Or worse, it might be a cracked block. But I won't know until the block gets dipped that the machine shop, getting the chance to look at it clean block. So, more to come hopefully it won't be quite so long I sure would like to have a running vehicle someday real soon. Attach file: (226.88 KB)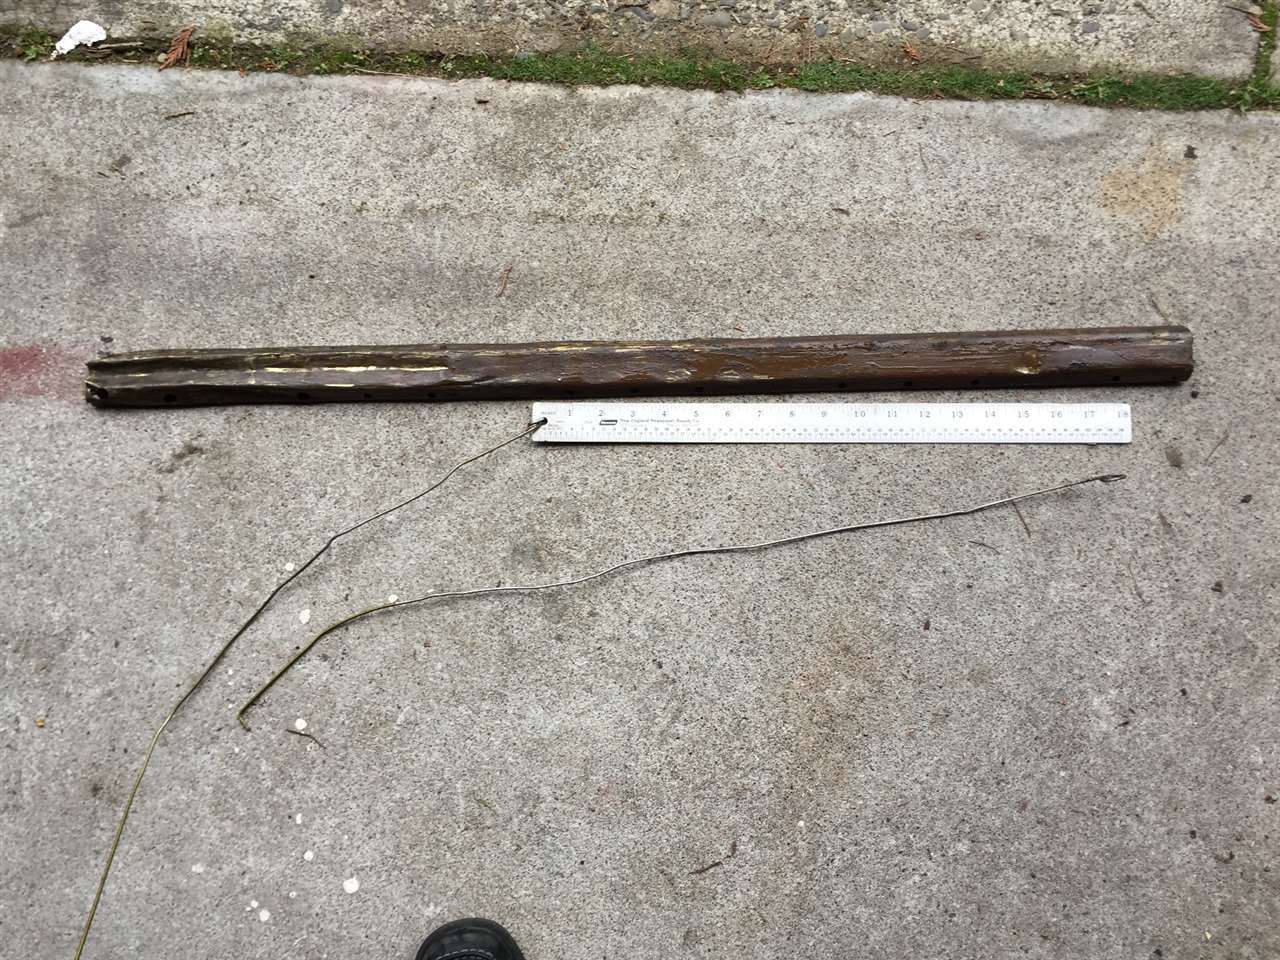 (172.54 KB) (172.54 KB) (188.63 KB) (188.63 KB)
Posted on: 2015/11/6 18:20
|
|||
|
||||
|
Re: Mark's 1950 Super Eight
|
||||
|---|---|---|---|---|
|
Just can't stay away
|
Well, my replacement engine that I hauled home that was "running when removed" never ran. I broke it down and took it to my machine shop and sure enough it was cracked from and exhaust seat way into the cylinder...so junk.
After reading all the posts about engine removal I broke down and hauled out the "good" engine yesterday. Some things I learned about the 23rd series engine removal. You can and should take out the engine and trans together. I removed the OD solenoid but I don't think that was necessary considering how easily the engine came out. You pull the grill and the radiator. You drill out the upper radiator support and remove. You strip as much as you can off the engine while it is in the car. Intake manifold, etc. Disconnect the wires from the OD and mark them so you will know where they go later. Disconnect the OD linkage from the OD and the engine and carefully move it clear of the engine. I disconnected the clutch rod from the clutch and disconnected the shift linkage from the engine and trans. Take good pictures because later it will be confusing how the shift linkage goes back. Use a good stable lift, mine is a 2 ton with extendable legs. I set the arm at 1 ton that is what would easily reach the balance bar. Use a 1.5 ton leveling arm, I got mine at Harbor Freight. I located the balance arm on the second set of head nuts on the rear and where ever it fell forward. The balance arm easily fits under the head nuts so no need to pull the head. Support the rear of the engine with a jack under the clutch inspection plate not the oil pan. I used a 2x6 to cushion the engine from the jack. Now that the rear of the engine is supported you take up tension on the lift with the balance arm slightly aft of center. You drop the cross members in the back, 2 if you have overdrive, while supporting the engine with a jack in the rear. I opened up the trans tunnel to get at the bolts on the rear motor mounts, this saves a lot of time. My carpet was shot anyway. Disconnect the rear motor mounts from the cross member and then disconnect the large rear cross member and drive it down and out. Remove the two bolts that mount the front of the engine to the frame and the engine will be free. At this point I raised the engine slightly to get it free and check around it to make sure it can come all the way out. Now relieve the rear jack pressure slightly to see how the engine swings on the lift. Adjust the balance arm to hold the engine slightly tail down. Now move the engine forward and raise it so as to clear the bumper with the front mount. Continue raising the engine and moving it forward paying careful attention to the tail of the transmission. Adjust the balance as necessary to clear the oil pan and the rear of the transmission. Continue slowly moving things forward until the engine is clear of the car. Carefully lower the engine onto the stand or support it with tires to remove the transmission. I made a stand out of 4x4's and HD casters. This seems to hold the whole assembly well enough to move it to where I can lift it onto an engine stand after removing the transmission and clutch. I didn't have help so moving the lift on concrete was not possible alone. I used a $15 cable lift to pull the engine forward and hooked it to the back of my car as an anchor. No, I didn't pull it with the car just the ratchet. Photos below. Attach file: (302.28 KB)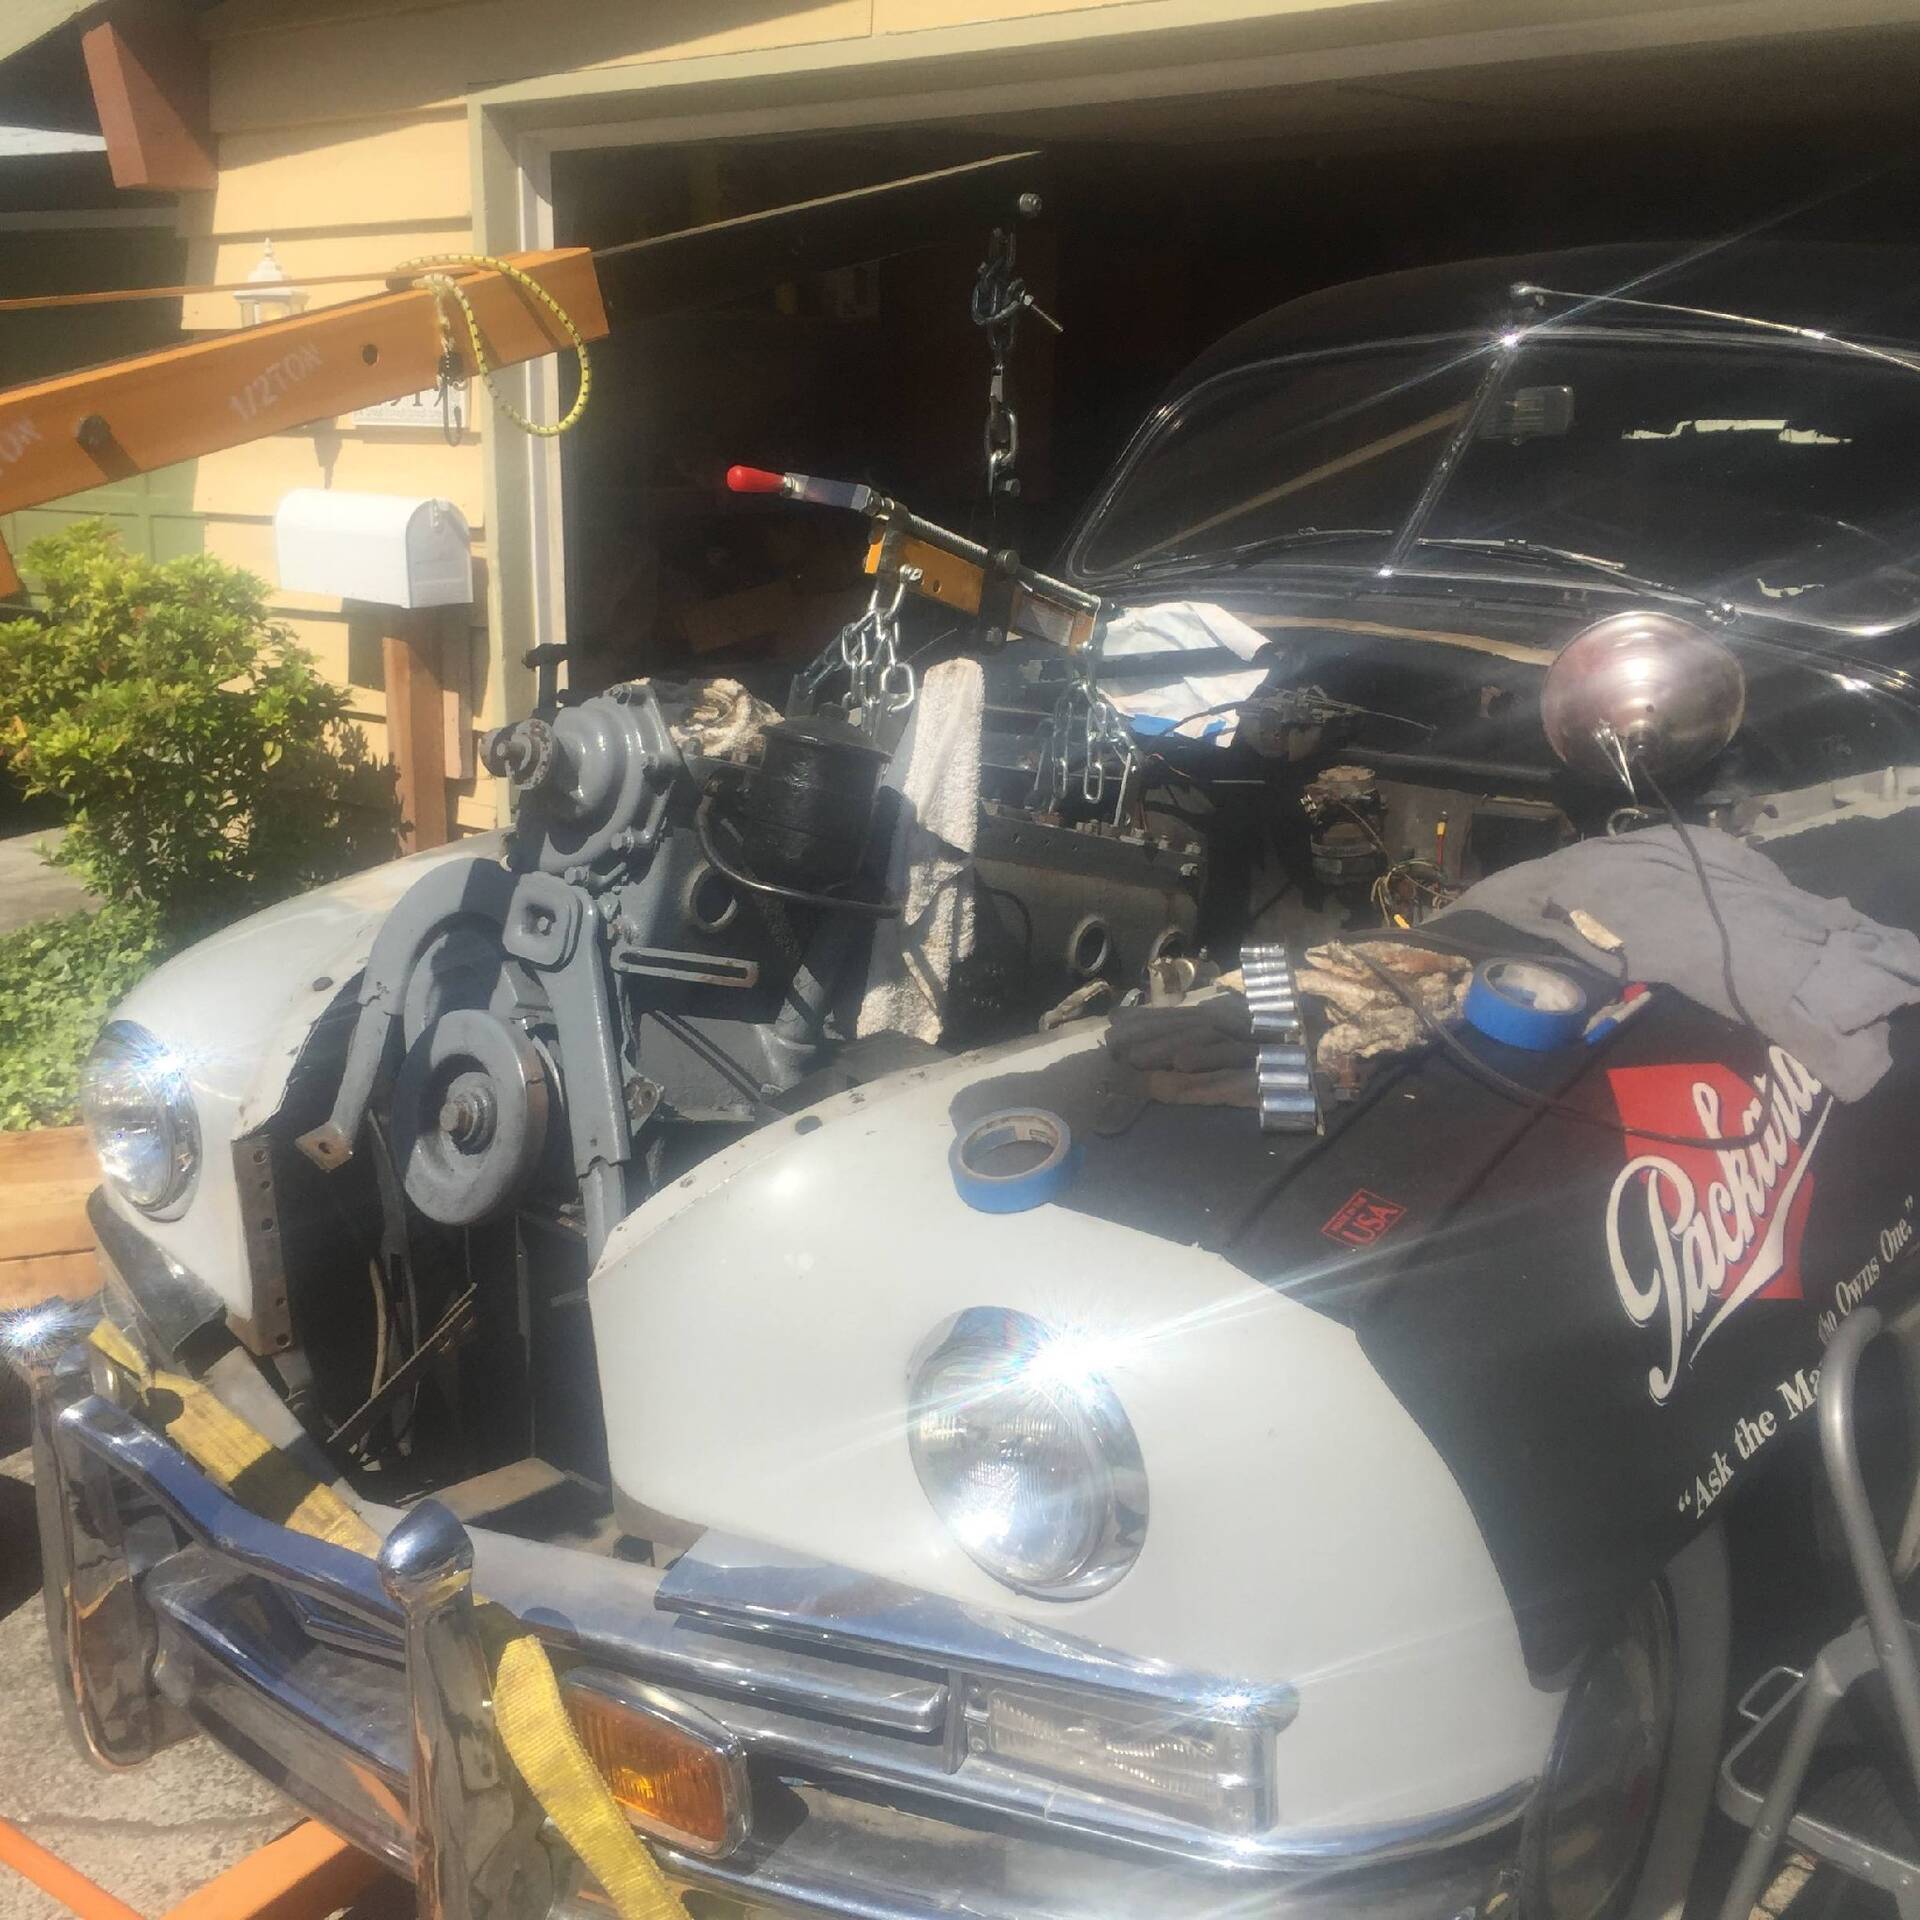 (310.04 KB) (310.04 KB) (222.04 KB) (222.04 KB)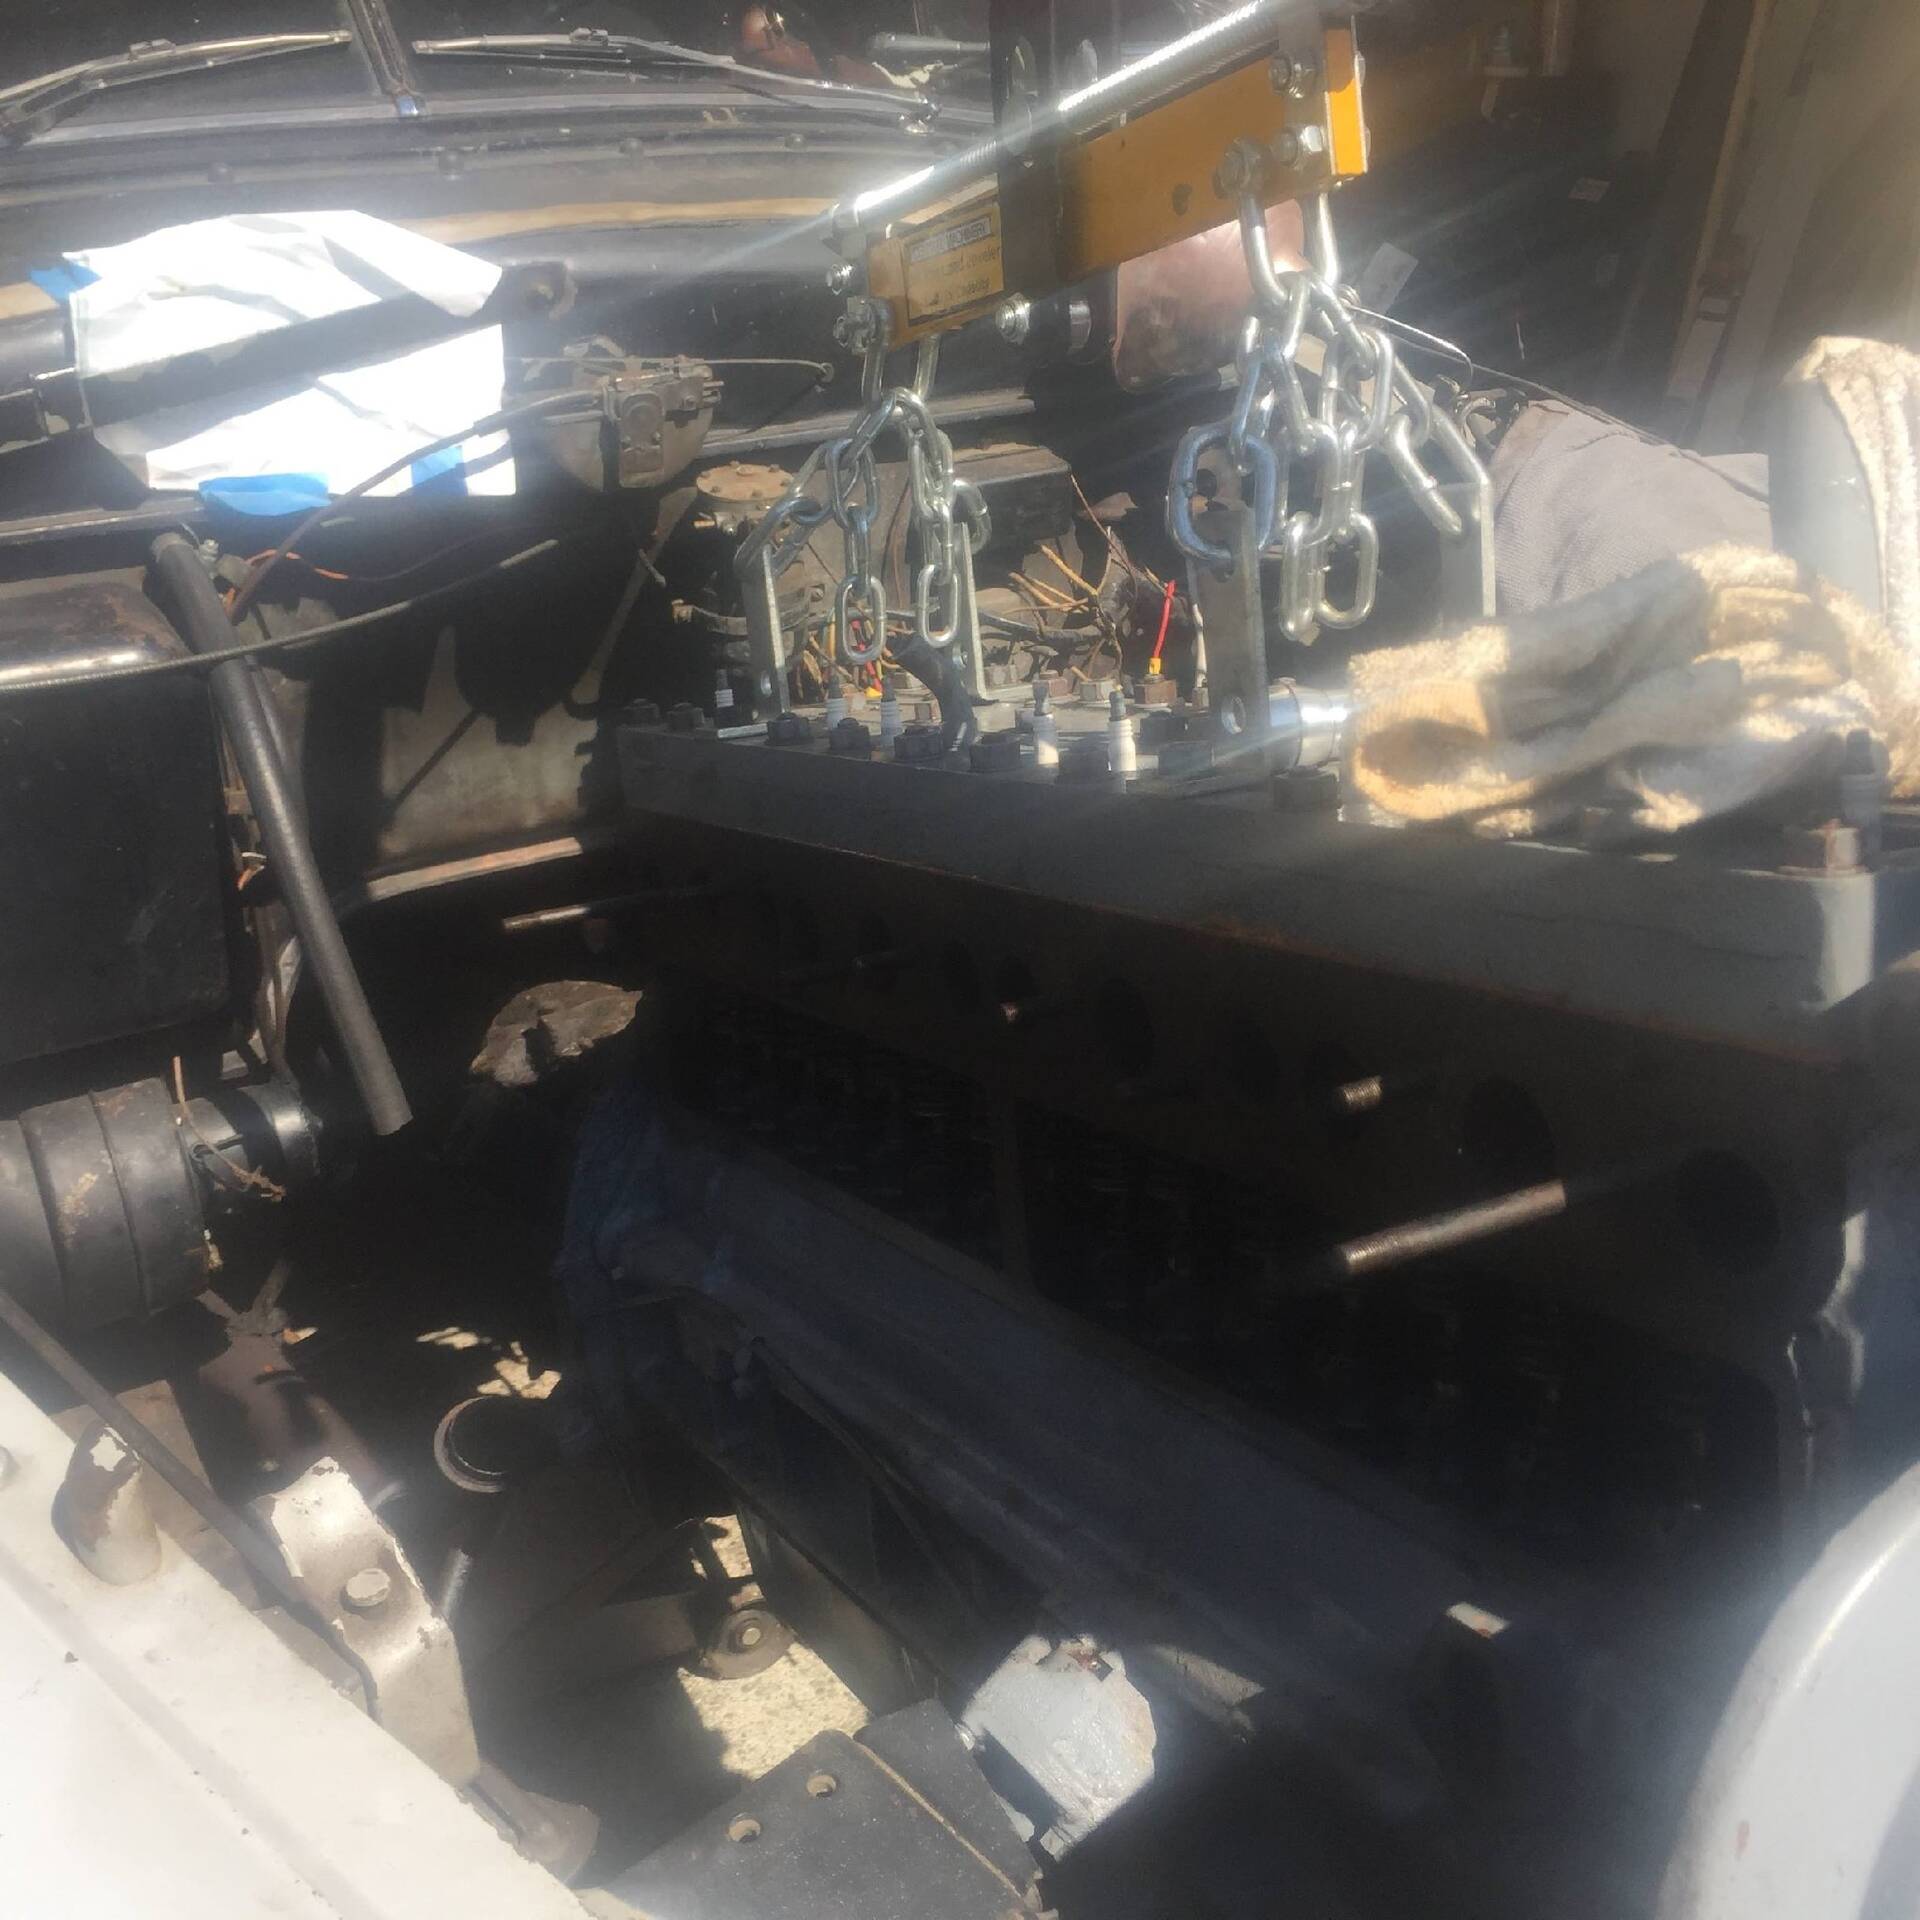
Posted on: 2016/7/22 18:10
|
|||
|
||||


.jpg")


