|
Re: Larry's 1951 Club Sedan Project
|
||||
|---|---|---|---|---|
|
Home away from home

|
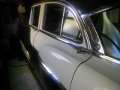
Before I went away some months ago my son helped me put the dash in and also the rear windscreen. I didn't have time to post before leaving so this is a couple of months back.
Had not been looking forward to the windscreen job, and true to form it was very labour intensive. Took a couple of hours because we were being very careful to not put any strain on it. Very difficult to get Packard windscreens here in Oz and it costs a fortune in shipping to bring one over from the States. It went in eventually after some incantations were offered up and loads of soap was applied to the new rubber seal. It might have been an easier job if we had used the string loop method. The old labels on two screens tend to confirm the 'last driven' date for my car, being mid-1970's or earlier. The screens with labels are off two different 24rh series cars. The new front screen is being installed by a mobile installer(- earlier post). Don't mind trying it myself but it's a 2 person job and I am on my own here at present, plus what it I break it? It's a new one bought locally. The company had it in stock for many years and I was fortunate to discover they had it, because they didn't know what year / model Packard it was for. I measured one of my old scratched screens and it turned out to be the same one, complete with tint. My old screens (- have three) are all either cracked or very deeply scratched. The best of them has been scratched deeply by the ends of the wipers, which I noted is mentioned in a Tech Bulletin. Packard altered the style of the blades and rounded off the metal blade ends, which were prone to doing damage to screens. Dashboard was a very tight fit. It eventually went in with no scratching, but I was surprised at how tight the fit was, horizontally. Might be tooled a little differently because it's a RHD dashboard. Or my coupe has shrunk! Then connected all the new wiring harness and fed it through the firewall grommet for the engine bay tributaries. I had the most difficulty connecting the Neutral Switch wires to the Ultramatic. Better name might be "Ultra-Traumatic". In hindsight it would have been sensible for me to change the connectors from the original screw type to push-on. Quite a tight place to get to with a screwdriver, and you are trying to hold the wire in position at the same time. Anyway, I did succeed in getting the wires in and tightened. Rear screen fitted . . . a two man job and great exercise for the fingers and thumbs  Restored dash fitted  The 'best old' windscreen I have is badly scratched. Old 1974 Registration label still attached is of interest  Another badly cracked screen with original Registration label 
Posted on: 2014/7/4 18:42
|
|||
|
1951 Packard Club Sedan | [url=ht
|
||||
|
||||
|
Re: Larry's 1951 Club Sedan Project
|
||||
|---|---|---|---|---|
|
Home away from home
|
Just a small job but an important one I think . . . .
Holes drilled for rustproofing access, and I drilled drain holes at ends of the rockers (sills) as well. My choice for 1) making a mess, and 2) stopping rust very effectively is Dynax S-50. It's truly filthy stuff, but works well. The spray pack comes with a long application tube to help you get into the difficult places easily, but I've found that tube is not quite long enough. There are still places where you can't get to without a longer one, so holes and plugs where necessary. Hole with plug drilled in middle of the rocker (sill)  Yesterday I got under and fitted the new shock absorbers which were a breeze to fit. They are Delco ones and apparently same look and rating as the original Packard shocks.
Posted on: 2014/7/6 18:34
|
|||
|
1951 Packard Club Sedan | [url=ht
|
||||
|
||||
|
Re: Larry's 1951 Club Sedan Project
|
||||
|---|---|---|---|---|
|
Home away from home
|
Yesterday I spent some time doing a major brake adjustment and got the two RHS wheels done before deciding it was too darned difficult trying to use a screwdriver as a tool to rotate the adjuster (star wheel) on the front LHS wheel. After a lot of fairly futile 'ratcheting' with my screwdriver and getting nowhere it was time to go and buy the proper tool.
So I went and bought an adjusting tool for $12 today to make it easier. . . . . Biggest problem was trying to decide which way to rotate the star wheel and also where to stick the feeler gauge to measure the gaps. Tomorrow I should be Ok because I've checked my old photos of the brakes. I don't have any pics of the RHS brakes, so here's hoping that I got it right on the RHS drums. Had to do some mental gymnastics and figure out if the same direction was correct for the LHS drums (- before I looked at my photos). Hoping that I got everything correct with the primary and secondary shoes back when I installed them. I reconditioned the brakes years ago and can't remember the details too well regarding primary and secondary shoes. (I put them back on the same orientation they were when I took them off). Manual says go by the colour of the springs and the direction that the adjustment nut is facing. - Orange spring is used on the primary shoe, yellow the secondary - On the left side brakes the adjusting screw NUT is facing towards the secondary shoe, and on the right wheel brakes it faces towards the primary shoe. (Guess these adjusters can't be reversed - or can they? That would tend to stuff things up, but would it cause any braking problems I wonder??) So by my photos I can tell which are primary and which are secondary (- at least, I can for the LHS brakes. I don't have any pics of the RHS brakes). Manual says the primary and secondary linings are of different material, having a different coefficient of friction. So you would want to get it all correct. Rear LHS brake before reconditioning  Rear LHS brake after reconditioning  Front LHS brake 
Posted on: 2014/7/12 7:13
|
|||
|
1951 Packard Club Sedan | [url=ht
|
||||
|
||||
|
Re: Larry's 1951 Club Sedan Project
|
||||
|---|---|---|---|---|
|
Home away from home
|
I have read alot of great info on the threads here and want to add a little info on brakes that I have not seen in the prior 2 or3 threads but may have been stated before in threads over the years. It may help some of the hobbyists, back yard warriors and retired mechanics alike. Road test vehicle before disassembly if possible. I cannot emphasize enough, if there is any question as to the condition of the brake "hard lines" (steel brake pipes) replace them all. Use new steel (not stainless) unless you can buy pre flared stainless as the stainless is much more difficult to double flare with out splitting. Do not cut tubing with a pipe or tubing cutter as the wheel rolls and hardens the tube. cut with cutoff wheel and square off with same or a file and clean and flush and DEBUR inside and outter lips and you will see how professional, consistant and leak free they will be. Dont forget to put the fitting on first! Replace the brake hoses always- always in pairs if they are not brand new. Rebuild, have rebuilt or replace all wheel cylinders,master,calipers etc. Shake down entire front end for loose or worn parts and replace as necessary and check tire condition and tire pressure.
Besides all the other good info stated prior on shoes and backing plates such as axle seals,brake fluid contamination,parking brake cable adj, shoe material etc, I would like to bring to light a few other issues I have come across and the problems they may cause. Always disassemble the threaded star adj and lube the socket end and the threaded collar end with wht high temp lubriplate/lith grease and inspect backing plates for rust,grooves,gouges in the contact pads and lube with same. I have seen antisieze dry,harden slightly, and get stickey over time in high heat situations so i use it on bolt threads,not brake parts. It was stated here to not cut drums each time. I agree if they are not scored, heat checked, and there was no pulsation on the initial test drive, dont cut. I have seen thin drums cause warping and pulsation when hot due to the inability to dissipate heat. I have experienced thin drums cause a spongy pedal feel at low speeds to stop and a pulsation while driving due to drum flex. Drums should be measured for discard diameter but before a trip to the part store/machine shop or buying the drum caliper on ebay, visually check the lip of the drum for thickness and the remnants of the lead in chamfer. Then, take the new primary shoe and lay it in the drum with the new lining in contact with the drum. If it is hitting on a small spot in the middle of the shoe and can be rocked dramatically from end to end ie the arc of shoe way off from arc of drum this is an indication the drum has had too many cuts, This can cause shoe chatter, noise,squeal, hard pedal/reduced braking with cut drums, or grabbing/lock up at low speeds with bedded drums before the shoes are broken in. It can cause the shoe lining to crack or separate from the core on hard brake apply before they are bedded in and worn to the drum. If this is the case replace drums with new if available or take a new shoe with you and lay it in a drum if purchasing used. Adjust and bed in new brake jobs properly. Inspect and repl if nec all springs and hardware. It will be valuable if we have any new replacement drums and hardware and misc brake parts in the xref. I have had brand new drums out of the box warp after the first few heat cycles so I believe seasoned parts if not cut past spec are the best but if new are necessary this is not an area to skimp on. Shoes used to be ground to index to the drums however in this area I do not know of anyone who will do it for the last 10 years or more.I would hate to be in that shop breathing the air. Even on your cloths if wearing a respirator! In contrast to other opinions, I was informed to perform several medium to hard stops from 45 to almost 0 safety permitting of course followed by driving time above 25 sufficient to cool then repeated again if nec until bedded and good pedal feel. You do not want to overheat new brakes as this may cause the binding resins and glues to separate and migrate to the surface causing issues.and lets not forget wheel bearing adj and grease seals.
Posted on: 2014/7/12 14:21
|
|||
|
||||
|
Re: Larry's 1951 Club Sedan Project
|
||||
|---|---|---|---|---|
|
Home away from home
|
Thanks for a great detailed report on what to do and not to do for good brakes. I see bits and pieces of good info in various posts so it is good to have most of what's needed in a single summary.
The adjusters all are RH thread and as far as I can tell, were interchangeble. As I mentioned, was wondering if they could be installed reversed or not. Looks like that is possible. I am sure I got that right anyhow. In some ways I wish that my car came as a driver and not in pieces because a test drive to check brakes / tranny and a dozen other things would surely have helped me. So now when I take my first drive in it who knows what problems might show up. There are a few 'unknowns' with the brake recon I did. I had a lot of drums from maybe three different cars (- all 1951 /52 juniors so the same) so I picked what appeared to be the best drums / shoes. None of them had been cut as far as I could tell. The first drive will tell me whether I got it right! Most of he hardware was renewed (- all cylinders / hoses / lines) so thinking that it should only be drum to shoe fit that could possibly give me grief.
Posted on: 2014/7/12 17:55
|
|||
|
1951 Packard Club Sedan | [url=ht
|
||||
|
||||
|
Re: Larry's 1951 Club Sedan Project
|
||||
|---|---|---|---|---|
|
Home away from home
|
The pictures look great. keep up the good work! good luck with the project and get the family members involved too if there are any interested lads. winter down under so i hope the garage is heated.
dan
Posted on: 2014/7/12 19:46
|
|||
|
||||
|
Re: Larry's 1951 Club Sedan Project
|
||||
|---|---|---|---|---|
|
Home away from home
|
Thanks Dan for the good wishes. We are coping with the cold down here - not too bad - only gets to about minus 3degrees C at night where we live, so a bit below freezing. Nothing like the kind of cold you get in the US!
Well, the seat springs and frames were much in need of a good clean-up and some paint. There was a little rust here and there but nothing very serious. The reddish colour seems to be the glue colour as far as I can tell . . . it just scrapes off and is very powdery. There is a lot of work to replicate the way the seats were done originally. The upholsterer reckons he can do everything the same as it was, including using the large plastic squares from the back of the front seat squabs, that were a feature. These seem to be in very good condition and are plastic, not vinyl. He reckons vinyl would not have lasted 60 years but the plastic has done well and is still ok to use. I stripped all gunk and surface rust off (stripper disks) and then treated the whole frames with phosphoric acid. Didn't prime the springs, just painted them, but primed the frames and used black zinc coating (gloss paint) rattle can on everything. Was assured the paint has lots of zinc in it despite it being black(?). Can't figure out why it isn't gray or silver if it contains zinc . . . . Took the frames and springs to the upholsterer over a week ago and just got the first pieces back from him. Below also are first pics of my reupholstered seats, but not all of them. The upholsterer ran out of the gray broadcloth so I've just ordered more from SMS Fabrics. I thought I had enough of the gray because I ordered an extra yard, but am a yard short. Guess it was a bad estimate. Very pleased with the job, and the dark blue and light gray combo (- which is exactly as original) go well together IMO. There is nothing fancy, like pleating etc but by being plain and basic it kinda looks like a true 1951 car interior I think. Front seat frame of fold forward seat  Frame with remains of the glue used way back when  Springs just needed a touch-up with black zinc spraypaint  Primed, ready for the cloth  The first of the reupholstered bits to be done.  Another view 
Posted on: 2014/7/15 8:43
|
|||
|
1951 Packard Club Sedan | [url=ht
|
||||
|
||||
|
Re: Larry's 1951 Club Sedan Project
|
||||
|---|---|---|---|---|
|
Forum Ambassador

|
The seat looks pretty decent. Along with the door panels that will be one nice car.
There is a lot of work to replicate the way the seats were done originally. I guess there must be some truth to my upholsters comment that Packards method of doing upholstery was different. My guy said the same thing about the work involved when he did the 54 some years back. Said that car had multiple layers of underlaying structural fabric on the bias and criss-crossed to prevent the outer show fabric from bunching or shifting. He had not seen that done to the extent Packard took it on any other car. I have asked him to come over and look at the 47 to give me an estimate of how much fabric to order. Said he would gladly do that much but when it came to Packards, he had learned his lesson on giving an estimate for labor in advance the first time.
Posted on: 2014/7/15 9:25
|
|||
|
Howard
|
||||
|
||||
|
Re: Larry's 1951 Club Sedan Project
|
||||
|---|---|---|---|---|
|
Home away from home
|
Thanks Howard for comments. Let's hope my fabric behaves itself for many years to come! I'm a bit of a Scrooge, always looking for the best deal, but since starting on the '51 I've had to just grin and accept that cost blowouts are the norm.
I consider whether to get a quote, or just let work proceed and foot the bill. I worry about quotes for labour-intensive jobs like upholstery. Seems to me if the company is determined to make a profit they could hurry the work / take shortcuts and you get a poor quality result. Especially with a job on a car that is different, like ours. Anyway, you would rarely restore a Packard expecting to eventually make money! (Unless of course it was a rare one).
Posted on: 2014/7/15 19:45
|
|||
|
1951 Packard Club Sedan | [url=ht
|
||||
|
||||


