|
Re: R9 Overdrive Solenoid Spacer direction
|
||||
|---|---|---|---|---|
|
Home away from home

|
Try again.
I may have to remove the solenoid one more time to get the red light on the dash to work. But otherwise the OD works perfectly and doesn't leak after 2 days of use. So after all this I thought I would backtrack for posterity's sake with pix. 1. View from rear of 40 R9 OD solenoid. 2. View from rear showing two holes on the spacer. 3. View of OD lever and switch cable clevis. 4. Bottom of OD solenoid and cable 5. Solenoid 2 cap screws removed, hanging by wires 6. Solenoid opened showing contacts, spacer. 7. Pushing out washer and old seal. 8. Old seal out. 9. New seal 10. How a professional mechanic sealed the shaft. I'm thrilled the OD is working again. Last night drove around the lake here as people gathered to watch fireworks. Just so quiet and solid because there were 5 people in the car and the top was down. So back to the books to check that light circuit. Joe Attach file:  (23.93 KB) (23.93 KB)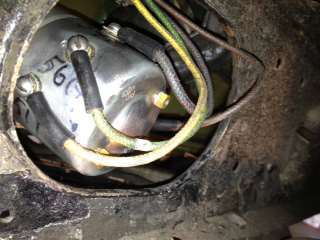 (15.51 KB) (15.51 KB)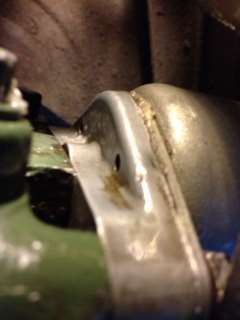 (21.14 KB) (21.14 KB)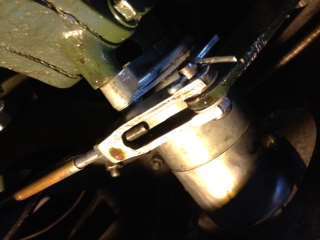 (30.85 KB) (30.85 KB)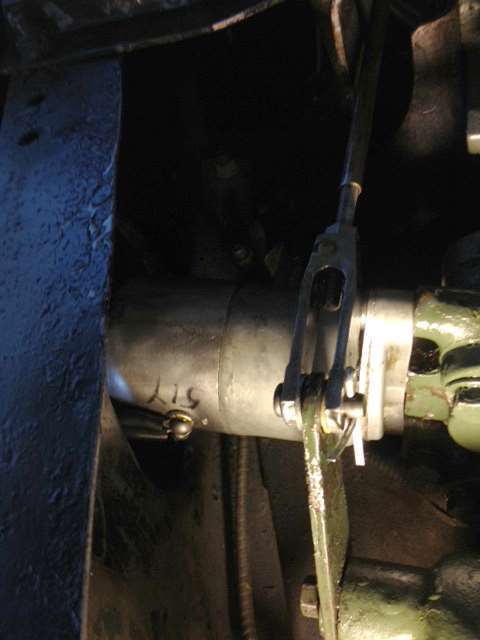 (42.11 KB) (42.11 KB)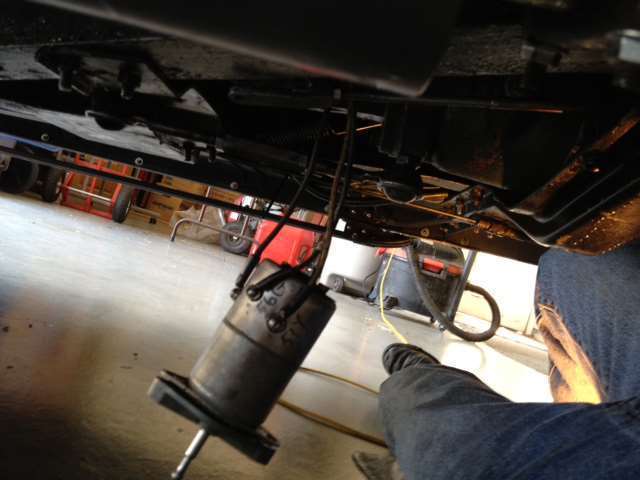 (25.88 KB) (25.88 KB)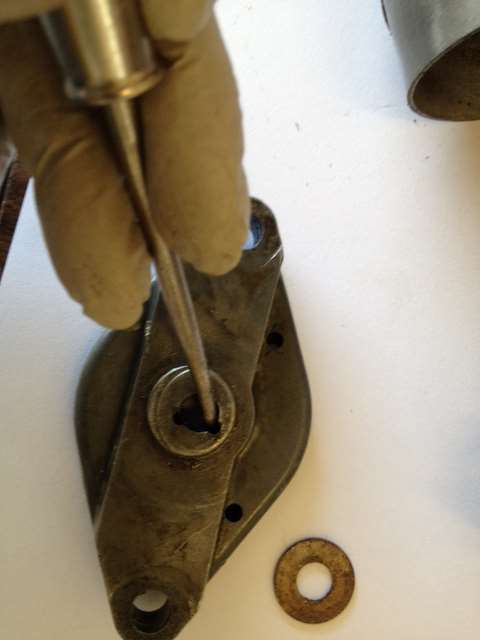 (15.80 KB) (15.80 KB)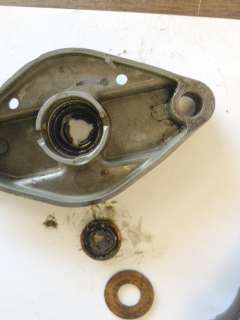 (22.24 KB) (22.24 KB) (18.08 KB) (18.08 KB)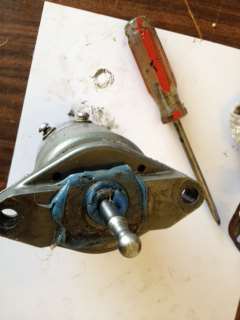
Posted on: 2012/7/5 21:43
|
|||
|
||||
|
Re: R9 Overdrive Solenoid Spacer direction
|
||||
|---|---|---|---|---|
|
Home away from home
|
In the end, the mechanic was right.
The new oil seal helped, but I had to pull off the solenoid one more time and use a rubber gasket plus silicone, as the previous mechanic did, to stop all leaking. There is a good 1/16" space between the spacer and the overdrive housing after the cap screws are completely tight. Anyway, it's sealed now. Not even one drop.
Posted on: 2012/7/12 9:49
|
|||
|
||||
|
Re: R9 Overdrive Solenoid Spacer direction
|
||||
|---|---|---|---|---|
|
Forum Ambassador
|
Glad to hear of a successful solution to a problem
 And thanks for the pics - someone down the road will be grateful also.
Posted on: 2012/7/12 11:25
|
|||
|
||||
|
Re: R9 Overdrive Solenoid Spacer direction
|
||||
|---|---|---|---|---|
|
Home away from home

|
I am in the middle of trying to sort out Issues with my 1947Packard OD unit. I maybe facing pulling the solenoid. One bolt is basically starring me in the face-any tips on removing the one 180 deg from it? Also when yor reinstalled the solenoid any trouble getting the end of the shaft in the pawl?
Also the dash light does it go out when OD is engaged? thks David
Posted on: 2012/7/29 20:30
|
|||
|
||||
|
Re: R9 Overdrive Solenoid Spacer direction
|
||||
|---|---|---|---|---|
|
Home away from home
|
David,
I was able to lie under the car, feet out toward the driver's side, put a 1/2" socket on the upper cap screw, and loosen it 1-5 clicks at a time with the handle in a hollow area of the frame. Then I removed the wrench. put my right hand thru a hole in the frame and my left hand up on the other (rear) side of the solenoid, and with the fingers of both hands helping each other, loosen it the rest of the way. You can move the lever forward and back. That might release the shaft if it won't come out. Putting it back in, there is some resistance. You have to hold the solenoid with a little pressure in order to start the cap screws. I marked my solenoid with a Sharpie with the wire number and the color for the wires, even though the housing is stamped with numbers. Then sprayed it with clear for posterity. Be sure to put your wires on, before you replace the cap screws. Two of the wires are very tough to tighten if you don't. Yes, the dash light goes out when the OD is engaged. The most common problem are the lower set of contacts needing a little cleaning. My OD didn't work, wouldn't actually go into OD until I cleaned them. Then it worked fine until I had a lead. The other problem was a leak after I replaced it. Also when my wires were loose, something touched something, and activated the cut out switch in the relay on the firewall. Then I had no ignition and didn't know why.
Posted on: 2012/7/30 13:17
|
|||
|
||||
|
Re: R9 Overdrive Solenoid Spacer direction
|
||||
|---|---|---|---|---|
|
Home away from home

|
Quote:
From above. You'll have to pull up your carpet. Quote: Also when yor reinstalled the solenoid any trouble getting the end of the shaft in the pawl? There's a specific procedure. 39Packard may be able to chime in here and give you some direction.
Posted on: 2012/7/30 13:49
|
|||
|
West Peterson
1930 Packard Speedster Eight Runabout (boattail) 1940 Packard 1808 w/Factory Air 1947 Chrysler Town and Country sedan 1970 Camaro RS https://packardinfo.com/xoops/html/modules/newbb/viewtopic.php?topic_id=4307&forum=10 http://aaca.org/ |
||||
|
||||
|
Re: R9 Overdrive Solenoid Spacer direction
|
||||
|---|---|---|---|---|
|
Home away from home
|
Joe-Thks for the info-What was your OD unit doing before pulling the solenoid? My unit-the light comes on but will not go into OD. I can hear a clicking in the unit when the relay comes in. Electrically eveything appears to be doing what it is suppose to do. I am interested to know what your symtoms were and what you did to fix them. If possible pls respond to my email dyproctor3@comcast.net. I will need more info if it is ok?
David
Posted on: 2012/7/31 7:43
|
|||
|
||||
|
Re: R9 Overdrive Solenoid Spacer direction
|
||||
|---|---|---|---|---|
|
Home away from home

|
Packard1949,
When you reinsert the solenoid plunger, you'll need to tilt the outer end of the solenoid toward the front of the car such that the ball on the end of the plunger can engage the socket feature of the pawl. ALthough this is possible without energizing the solenoid, it can be very tricky. I recommend energizing the solenoid to make this easier. However, instead of relying on the normal electrical ground connection of the upper and lower bolts, I use a two foot piece of 10 gauge wire to make a reliable ground and have used this on many solenoid installations. I do this because it is difficult to maintain the ground connection while jostling the solenoid around and therfore difficult to keep the solenoid engaged. There is another reason, but I'll put that at the end of my rambling. The cable I created has an eyelet on each end: one that can attach to one of the two small threaded posts that hold the cap of the solenoid top cap; the other end can be whatever you choose to get a good ground to the car frame. As I wrote, I used a large eyelet to bolt to one of the crossmember bolts, but you could also use a large aligator clip that will carry the necessary current. I suppose you could strip enough wire and find a way to ground it, but I recommend making sure it will not come loose and that it can carry lots-O-current. Once you've done this and you have the other wires connected (or at least terminals 3 & 4), reach over to the governor (other side of the OD) and disconnect the lead (for cars with electromatic clutch, but sure to disconnect the correct wire). If you then ground this harness lead to any clean exposed metal of the frame, you can engage the OD so long as the OD dash knob is in and all other electrical components are working. You may wish to use an aligator clip or other means to hold this lead securely grounded. THis process will keep the solenoid engaged, giving you time to insert it and bolt it on with little frustration (make sure the adapter is not 180 degrees off). ALso, I highly recommend this method along with good connections since the solenoid, if quickly engaged and disengaged, has such windings that it can act like an ignition coil and shock you with a voltage high enough to get your attention and bust a few knuckles and perhaps illicit some unwanted vocal outbursts (not that I have ever done that). Good Luck. Let me know if you have any questions. Pat
Posted on: 2012/8/4 9:09
|
|||
|
||||
|
Re: R9 Overdrive Solenoid Spacer direction
|
||||
|---|---|---|---|---|
|
Home away from home
|
Thanks for all the great info and pictures . I know someday it will be helpful when I reinstall the solenoid in my 48.
Posted on: 2012/11/4 11:33
|
|||
|
||||


.jpg")


