Re: The wiper,washer and vacuum leak saga (journey)
Posted by d c On 2014/12/4 20:46:52
Hehttps://packardinfo.com/xoops/html/modules/newbb/viewtopic.php?post_id=154032#forumpost154032 Here is a link for all the vacuum hose lengths and IDs.
This is in no way meant to be an all inclusive manual for 1955 Packard wiper vacuum actuators and there will be considerable differences in option, years etc, It is only a synopsis of what some common issues and the tips and tricks that were used to restore a sixty year old part to very good servicable condition. This is meant for those who have a good mechanical backround with good DIY skills and the shade tree mechanics with basic skills and hand tool selection. The novice who will have to purchase tools and may break or damage the fragile parts in the unit will be better served to pay the cost of a rebuild and shipping from one of the professionals listed above. You may need a gasket set- 5.95(classicmuscle.com or danchuk), needle nose pliers, screw drivers,razor blade,file, a rivet gun, and a hand held vacuum pump or in a pinch a fuel primer bulb(out board motor hand primer bulb). A phone book cover and a laminated take out menu from your favorite wing joint and a very small piece of 1/16 in rubber gasket material and short lengths of3/32, 3/16,7/32 and 5/32 vac hose.
(though you will be replacing all of the vacuum and washer hose in the car as it will be hard and cracked from the years as mine was)
This info will address weak operation,no movement,movement to only 1 side, vacuum leaks and assumes you are starting with a complete motor with no heavy corrosion,pitting, water damage etc. It will not address broken housings, pitted, heavily scored housings, loose or missing gallery cup plugs and or broken plastic internals or crumbling paddle rubbers as these parts seem to be unavailable and these issues are beyond the scope of this refirb. If the plastic parts are intact and the paddle has at least slight drag on the SIDES(narrow ends) as you pull it out and has no chunks or gouges along its 4 rubber edges the unit should be servicable.
I removed the coordinator and this is the only component you need the hand vacuum pump to test. Quickly squeezing the hand pump should get the diaphram to react and as you stop, it should slowly return. For all else, the primer bulb will do. Even a final test of the motor.
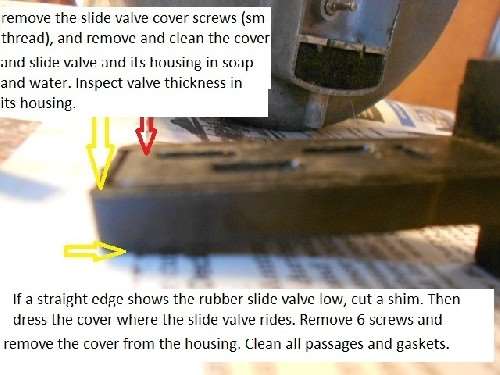
The screws are special oval head so use the proper tool if available but if not they may be loosened with needle nose pliers and I used a 1/8 vac tube to run them in and out quickly to save time (ie rubber hose on spark plug). Carefull-the 8 top cover screws are the same but the 2 slide valve cover screws are sm fine thread and the 2 front cover screws are different yet. Reinstall them in the proper position do not mix. Remove the front cover screws and CAREFULLY and slowly lift the cover 1/16 in and guide the cover downward slightly(some units) and out so as not to disturb the shuttle valve or toggle rocker. If you yank the toggle with the cover spring you can break the toggle rocker spring guide. Carefully remove the rocker pivot and the spring and plastic guide straight out at the same time. Remove the shuttle valve and small spring and inspect all parts for cracks,breaks etc. Remove the 2 slide valve cover screws and remove the cover,slider guide plastic housing, blade spring, and slide valve rubber and set aside. Remove the 8 screws and tap the cover and remove( the coordinator should already be off if equipped). Carefully remove the cover gasket with a slow insertion of the razor blade underneth if reusing or just scrape off if using new gaskets. Pull the paddle up and out checking side clearance as above and remove the other gasket. You will note the gasket has tabs that curve in and sit between the housing and the paddle shaft bushings . Dont worry if these tabs break as we will not be using them even if reusing the old gaskets (if they are intact). Clean the housing of all old lube,dirt and grime and buff the inside with a scotchbrite pad or 1000 grit and inspect for scoring and pitting. the inside where the paddle runs should be clean and smooth. At this point you will decide to procede if all looks reasonable or cut losses and purchase a reman.
A good cleaning of the case and cover as well as cleaning all passages with spray cleaner and blowing them clear is in order as well as cleaning the gasket surfaces . This is the point where multiple issues became apparent on my motor.The surface of the cover where the slide valve rode on was quite rough with burs drawn up along 1 edge and slight pitting on the surface. I also noticed the slide valve dry and rough and its thickness was thinner than the plastic slide valve body. It is unclear if these issues were there since manufacture or were due to corrosion and wear but a simple dressing of the surface with very fine sand paper laid over a machined flat surface in a few minutes the surface is perfect. (I used my carpenters slide square with the blade removed). The shrinkage (or wear) of the slide valve was corrected with 2 or 3 light swipes of the valve on the 1000 grit and a piece of the glossy menu cut to sit on top of the valve inside the plastic slide valve carrier. This will ensure a good seal and eliminate the "slop" and floating of the rubber valve. (see pix). A visual on the shuttle valve and a few swipes (if nec) will ensure a good seal to the housing.
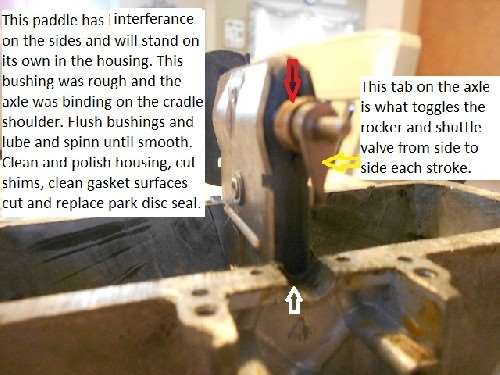
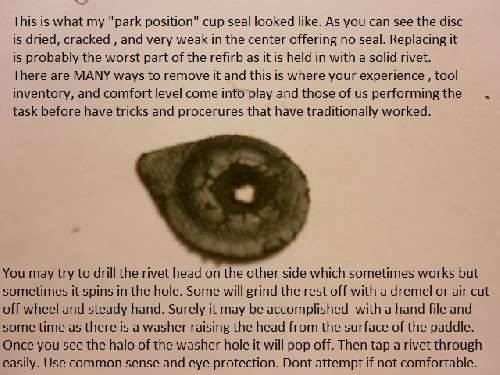
The 2 other problems were the small seal on the paddle which is "park position off" and has to seal to the cup on the cover so there is no large vacuum leak when off however I did notice trico built in a safety position if the slide is controlled just off of the park position toward the run position there is a small setting where there is no vacuum past the slide valve to any chamber. I removed the old "park seal"(mine was dried,cracking and falling apart-see pic) and simply cut with scissor a new disc from the 1/16 (.060-.062 thou) rubber and riveted it on and dressed the cup lip on the cover same as above. Then lay the paddle in the case straight down and pass a feeler gauge or cut strips from the phone book cover and menu and pass them under the paddle to ck paddle seal to case clearance.(Note:skip this step if the paddle has alot of play on the shaft as some do.cut thin bushing strips as the paddle will find its own center) Upon assembling the paddle,case and cover as a dry run pre assem check, you may notice the hardened gasket material in the curved areas of the cover were quite petrified and somewhat thicker than the compressed outer edges of the cover gasket. This causes the paddle bearings and paddle tosit away from the case and the cover also and the cover did not want to sit down flush on the case without flexing/straining. A micrometer check of the old gasket showed approx a .022 in thickness in the uncompressed areas and about . 019 in the compressed areas. (phone book cover=.013, menu paper.009. It seemed to me that by decreasing the gasket material only here in the bushing seat area in the case, I could move the paddle closer to the case and reduce the paddle tip clearance for better sealing and stronger action. There is a limit to this adj as seen when the parts are dry fitted- no gaskets installed the paddle shaft will hit and bind on the stepped shoulders of the bushing cradles (see pic) as evidenced by being able to spin the bushings with your finger tip with the paddle installed in the case. This would render the bushing useless and possibly cause a bind in the axle shaft to case and cover. At this point I cut the tabs off the used gaskets, cleaned and scraped carefully the bushing cradles in the case and cover with a tiny screw driver and cut strips of menu to use as gaskets in this area. Now the perimeter gaskets can both be laid on the case during assem and with 2 sm strips of menu placed under the bushings and the paddle installed ck the clearance of the paddle to the case bottom. You want as close as poss without hitting or binding. Cut your homemade tabs flush with a razor to the case face while holding slight pressure downward on the paddle, install the perimeter gaskets and dry fit the cover making sure there is no binding and the cover laid flat. This resulted in a super smooth operation and close fit of the paddle in the case. The upper sweep area of the top of the paddle to cover clearance would only be adjustable with thinner perimeter gasket material to bring the cover down lower though I did not have an issue here and it was not necessary for me. This one works with enough force now on as little as 5-6 in vac and at 18 it will sweep a dry windshield with authority, Before final assem dont forget to clean the bushings out with wd 4o spray and lube with sewing machine oil and coat the entire paddle rubber,case,lid and slide valve with a lube of your choice.(There are differing opinions on this.) I put a dab of lube on each bushing as well as on the gaskets in this area. . If you used a solid rivet for the park seal you are good to go. With a regular rivet I drove the center stud out so as not to create an interference problem later on and put a rubber plug as cut with my sheet metal hole punch with 1/8 die-or a dab of ultra gray in the holes on both sides will do in lieu of. Remember the paddle must be sealed rt side from left. Don't forget to ck and lube your "fast sweep" cup seal if equipped, clean and dry the vent filter pad and lube the shuttle valve and toggle pivot with lubriplate and install it and and the rocker and springs and frt cover with gasket. Detail exterior to your satisfaction and that's it. Good luck.
Attach file:
 (100.75 KB)
(108.63 KB)

(88.06 KB)

(99.18 KB)
(107.82 KB)
This is in no way meant to be an all inclusive manual for 1955 Packard wiper vacuum actuators and there will be considerable differences in option, years etc, It is only a synopsis of what some common issues and the tips and tricks that were used to restore a sixty year old part to very good servicable condition. This is meant for those who have a good mechanical backround with good DIY skills and the shade tree mechanics with basic skills and hand tool selection. The novice who will have to purchase tools and may break or damage the fragile parts in the unit will be better served to pay the cost of a rebuild and shipping from one of the professionals listed above. You may need a gasket set- 5.95(classicmuscle.com or danchuk), needle nose pliers, screw drivers,razor blade,file, a rivet gun, and a hand held vacuum pump or in a pinch a fuel primer bulb(out board motor hand primer bulb). A phone book cover and a laminated take out menu from your favorite wing joint and a very small piece of 1/16 in rubber gasket material and short lengths of3/32, 3/16,7/32 and 5/32 vac hose.
(though you will be replacing all of the vacuum and washer hose in the car as it will be hard and cracked from the years as mine was)
This info will address weak operation,no movement,movement to only 1 side, vacuum leaks and assumes you are starting with a complete motor with no heavy corrosion,pitting, water damage etc. It will not address broken housings, pitted, heavily scored housings, loose or missing gallery cup plugs and or broken plastic internals or crumbling paddle rubbers as these parts seem to be unavailable and these issues are beyond the scope of this refirb. If the plastic parts are intact and the paddle has at least slight drag on the SIDES(narrow ends) as you pull it out and has no chunks or gouges along its 4 rubber edges the unit should be servicable.
I removed the coordinator and this is the only component you need the hand vacuum pump to test. Quickly squeezing the hand pump should get the diaphram to react and as you stop, it should slowly return. For all else, the primer bulb will do. Even a final test of the motor.
The screws are special oval head so use the proper tool if available but if not they may be loosened with needle nose pliers and I used a 1/8 vac tube to run them in and out quickly to save time (ie rubber hose on spark plug). Carefull-the 8 top cover screws are the same but the 2 slide valve cover screws are sm fine thread and the 2 front cover screws are different yet. Reinstall them in the proper position do not mix. Remove the front cover screws and CAREFULLY and slowly lift the cover 1/16 in and guide the cover downward slightly(some units) and out so as not to disturb the shuttle valve or toggle rocker. If you yank the toggle with the cover spring you can break the toggle rocker spring guide. Carefully remove the rocker pivot and the spring and plastic guide straight out at the same time. Remove the shuttle valve and small spring and inspect all parts for cracks,breaks etc. Remove the 2 slide valve cover screws and remove the cover,slider guide plastic housing, blade spring, and slide valve rubber and set aside. Remove the 8 screws and tap the cover and remove( the coordinator should already be off if equipped). Carefully remove the cover gasket with a slow insertion of the razor blade underneth if reusing or just scrape off if using new gaskets. Pull the paddle up and out checking side clearance as above and remove the other gasket. You will note the gasket has tabs that curve in and sit between the housing and the paddle shaft bushings . Dont worry if these tabs break as we will not be using them even if reusing the old gaskets (if they are intact). Clean the housing of all old lube,dirt and grime and buff the inside with a scotchbrite pad or 1000 grit and inspect for scoring and pitting. the inside where the paddle runs should be clean and smooth. At this point you will decide to procede if all looks reasonable or cut losses and purchase a reman.
A good cleaning of the case and cover as well as cleaning all passages with spray cleaner and blowing them clear is in order as well as cleaning the gasket surfaces . This is the point where multiple issues became apparent on my motor.The surface of the cover where the slide valve rode on was quite rough with burs drawn up along 1 edge and slight pitting on the surface. I also noticed the slide valve dry and rough and its thickness was thinner than the plastic slide valve body. It is unclear if these issues were there since manufacture or were due to corrosion and wear but a simple dressing of the surface with very fine sand paper laid over a machined flat surface in a few minutes the surface is perfect. (I used my carpenters slide square with the blade removed). The shrinkage (or wear) of the slide valve was corrected with 2 or 3 light swipes of the valve on the 1000 grit and a piece of the glossy menu cut to sit on top of the valve inside the plastic slide valve carrier. This will ensure a good seal and eliminate the "slop" and floating of the rubber valve. (see pix). A visual on the shuttle valve and a few swipes (if nec) will ensure a good seal to the housing.
The 2 other problems were the small seal on the paddle which is "park position off" and has to seal to the cup on the cover so there is no large vacuum leak when off however I did notice trico built in a safety position if the slide is controlled just off of the park position toward the run position there is a small setting where there is no vacuum past the slide valve to any chamber. I removed the old "park seal"(mine was dried,cracking and falling apart-see pic) and simply cut with scissor a new disc from the 1/16 (.060-.062 thou) rubber and riveted it on and dressed the cup lip on the cover same as above. Then lay the paddle in the case straight down and pass a feeler gauge or cut strips from the phone book cover and menu and pass them under the paddle to ck paddle seal to case clearance.(Note:skip this step if the paddle has alot of play on the shaft as some do.cut thin bushing strips as the paddle will find its own center) Upon assembling the paddle,case and cover as a dry run pre assem check, you may notice the hardened gasket material in the curved areas of the cover were quite petrified and somewhat thicker than the compressed outer edges of the cover gasket. This causes the paddle bearings and paddle tosit away from the case and the cover also and the cover did not want to sit down flush on the case without flexing/straining. A micrometer check of the old gasket showed approx a .022 in thickness in the uncompressed areas and about . 019 in the compressed areas. (phone book cover=.013, menu paper.009. It seemed to me that by decreasing the gasket material only here in the bushing seat area in the case, I could move the paddle closer to the case and reduce the paddle tip clearance for better sealing and stronger action. There is a limit to this adj as seen when the parts are dry fitted- no gaskets installed the paddle shaft will hit and bind on the stepped shoulders of the bushing cradles (see pic) as evidenced by being able to spin the bushings with your finger tip with the paddle installed in the case. This would render the bushing useless and possibly cause a bind in the axle shaft to case and cover. At this point I cut the tabs off the used gaskets, cleaned and scraped carefully the bushing cradles in the case and cover with a tiny screw driver and cut strips of menu to use as gaskets in this area. Now the perimeter gaskets can both be laid on the case during assem and with 2 sm strips of menu placed under the bushings and the paddle installed ck the clearance of the paddle to the case bottom. You want as close as poss without hitting or binding. Cut your homemade tabs flush with a razor to the case face while holding slight pressure downward on the paddle, install the perimeter gaskets and dry fit the cover making sure there is no binding and the cover laid flat. This resulted in a super smooth operation and close fit of the paddle in the case. The upper sweep area of the top of the paddle to cover clearance would only be adjustable with thinner perimeter gasket material to bring the cover down lower though I did not have an issue here and it was not necessary for me. This one works with enough force now on as little as 5-6 in vac and at 18 it will sweep a dry windshield with authority, Before final assem dont forget to clean the bushings out with wd 4o spray and lube with sewing machine oil and coat the entire paddle rubber,case,lid and slide valve with a lube of your choice.(There are differing opinions on this.) I put a dab of lube on each bushing as well as on the gaskets in this area. . If you used a solid rivet for the park seal you are good to go. With a regular rivet I drove the center stud out so as not to create an interference problem later on and put a rubber plug as cut with my sheet metal hole punch with 1/8 die-or a dab of ultra gray in the holes on both sides will do in lieu of. Remember the paddle must be sealed rt side from left. Don't forget to ck and lube your "fast sweep" cup seal if equipped, clean and dry the vent filter pad and lube the shuttle valve and toggle pivot with lubriplate and install it and and the rocker and springs and frt cover with gasket. Detail exterior to your satisfaction and that's it. Good luck.
Attach file:
(100.75 KB) (108.63 KB)
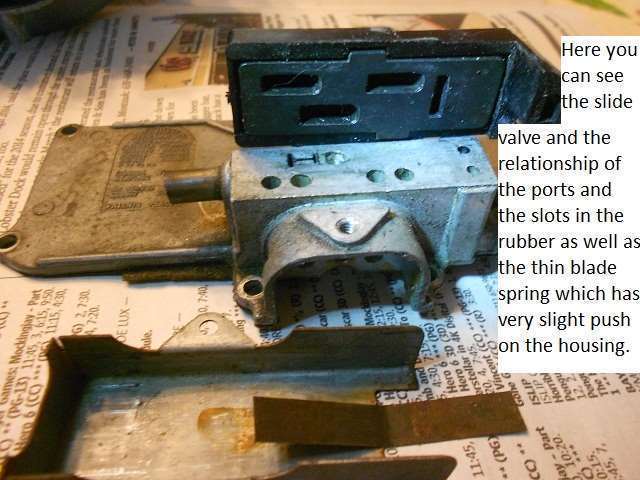 (88.06 KB)
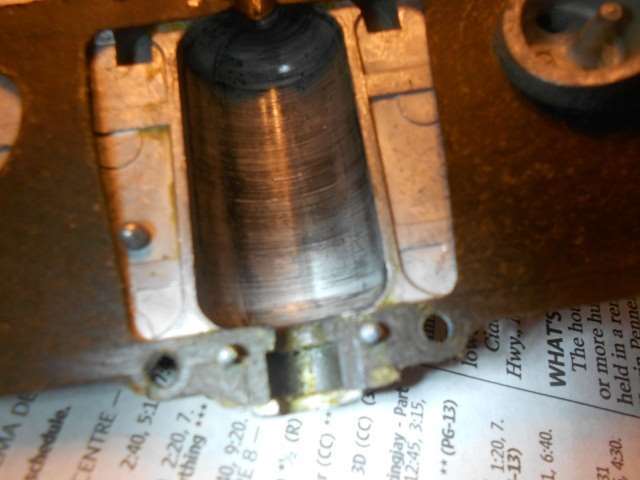 (99.18 KB)
 (107.82 KB)
This Post was from: https://packardinfo.com/xoops/html/modules/newbb/viewtopic.php?post_id=154242