Re: Howard's 47 Custom project
Posted by HH56 On 2016/1/17 11:17:17
Been a few months since the last update in this thread. Haven't been very motivated to actually do real work so not much to report on the car itself. As reported last time, about the most exciting physical thing that has happened was moving it from outside into the garage. Haven't done any more with the headliner. Been mostly playing with ancillary stuff which by virtue of some of the work should be in the modification forum but here goes anyway.
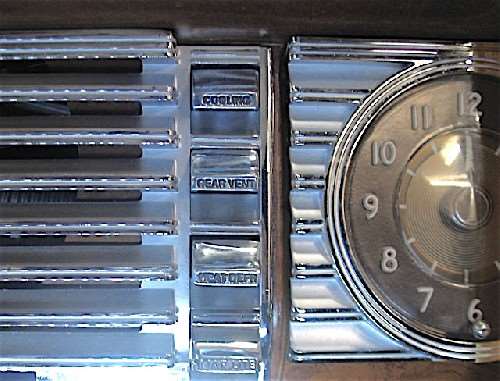
As mentioned, finished my version of the prewar AC vent and custom dash knobs so that part is out of the way. Looks decent but vent was done from photos and made to fit my modern interpretation of the original AC unit. That it does nicely but as it turns out my vent is about 1/2 inch higher and narrower than the factory version. Been corresponding with another poster who is looking for original style vents to go with his repro units so will try and modify my pattern to more replicate the original size. If successful and the fellow he found to do lost wax castings can use the wax patterns I can make then he might make some more vents.
Was going to have my steering wheel recast but just happens a deluxe K wheel in excellent condition at not much more than the recasting would have cost came up for sale. Bought that but do have a question as to how Packard finished the center. Since this hub has obviously been repainted and there seems to be photos showing different treatments, I posted a question in the general forum as to the color the metal center hubs might have been -- all in dark brown to match the dash bracket, in a color chosen by the operator, in a color specific to a model, or in a color to more closely match the plastic rim. Any comments or knowledge on the wheel would be appreciated.
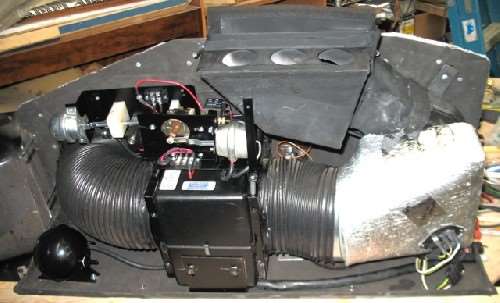
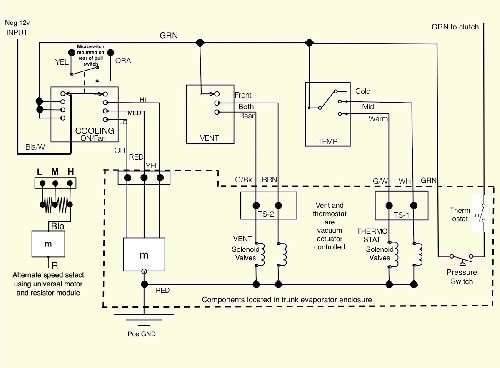
And now for the mods. Since some late changes were made to the AC controls, needed to revise the AC units electrical supply -- again. Am fairly sure unless something serious was overlooked it will be for the last time. Originally it was a module and small battery to provide extra to run just the 12v clutch. Finally decided to go 12v for all because of a lack of 6v solenoids to control the vacuum actuators used for the vent and thermostat. Being able to use the more powerful 12v blower motor was also a consideration because the long run to my added front vents need the best airflow possible.
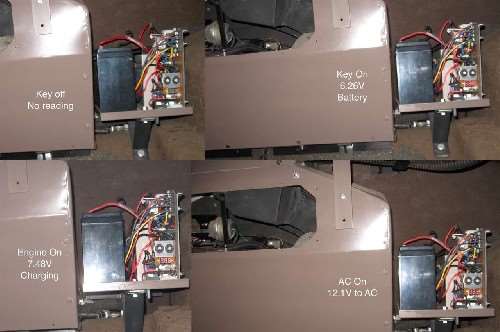
Others have used stand alone 12v batteries or a second alternator plus battery with their modern AC installs. Didn't want to have a separate 12v battery which needed special periodic charging or a second alternator so decided to use two 6 volt batteries in parallel to enable them to be charged by the generator when AC was off. When AC is turned on the module switches the batteries to a series configuration and provide 12v to run the AC. Haven't had it on the road yet but have had the engine running with AC on and off and all seems to work as planned. Will be some time before the car is on the road for a real test but if anyone wants to build the circuit and try it in real life be my guest.
Module was designed around the stock 6v positive ground electrical and in my particular car, a master battery disconnect. There is a constant current drain equivalent to a trunk light thru the reverse polarity protection relay if the module is used in a car without the disconnect so that needs to be taken into consideration. A different relay having an extra contact will prevent that drain but was not used in this version. The circuit should work any modern unit that DOES NOT use servos or an electronic speed or temp control setup. Those units are polarity specific and won't work with positive ground cars. Depending on the basic no frills modern unit chosen there may need to be a minor wire change at the motor or if the compressor clutch has a diode across the coil, that will need to reverse. Otherwise, almost all the hang on units should work.
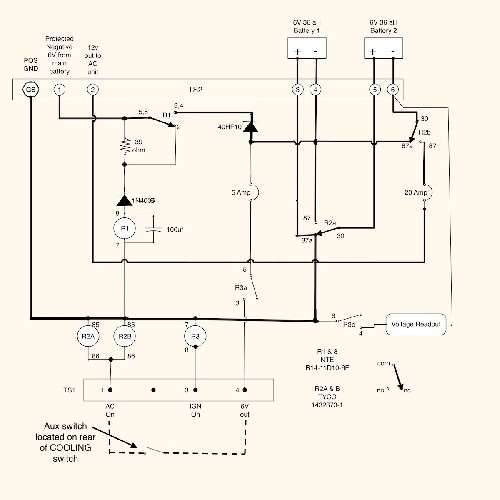
For anyone curious or following along, here are photos of the final AC unit, repro vent and knob work plus the module in various operational stages along with the schematic. For grins, will also show the schematic of the custom made AC unit and in dash mounted controls.
Attach file:
 (33.67 KB)
(28.18 KB)

(51.02 KB)
(84.19 KB)
(71.74 KB)
(77.69 KB)
As mentioned, finished my version of the prewar AC vent and custom dash knobs so that part is out of the way. Looks decent but vent was done from photos and made to fit my modern interpretation of the original AC unit. That it does nicely but as it turns out my vent is about 1/2 inch higher and narrower than the factory version. Been corresponding with another poster who is looking for original style vents to go with his repro units so will try and modify my pattern to more replicate the original size. If successful and the fellow he found to do lost wax castings can use the wax patterns I can make then he might make some more vents.
Was going to have my steering wheel recast but just happens a deluxe K wheel in excellent condition at not much more than the recasting would have cost came up for sale. Bought that but do have a question as to how Packard finished the center. Since this hub has obviously been repainted and there seems to be photos showing different treatments, I posted a question in the general forum as to the color the metal center hubs might have been -- all in dark brown to match the dash bracket, in a color chosen by the operator, in a color specific to a model, or in a color to more closely match the plastic rim. Any comments or knowledge on the wheel would be appreciated.
And now for the mods. Since some late changes were made to the AC controls, needed to revise the AC units electrical supply -- again. Am fairly sure unless something serious was overlooked it will be for the last time. Originally it was a module and small battery to provide extra to run just the 12v clutch. Finally decided to go 12v for all because of a lack of 6v solenoids to control the vacuum actuators used for the vent and thermostat. Being able to use the more powerful 12v blower motor was also a consideration because the long run to my added front vents need the best airflow possible.
Others have used stand alone 12v batteries or a second alternator plus battery with their modern AC installs. Didn't want to have a separate 12v battery which needed special periodic charging or a second alternator so decided to use two 6 volt batteries in parallel to enable them to be charged by the generator when AC was off. When AC is turned on the module switches the batteries to a series configuration and provide 12v to run the AC. Haven't had it on the road yet but have had the engine running with AC on and off and all seems to work as planned. Will be some time before the car is on the road for a real test but if anyone wants to build the circuit and try it in real life be my guest.
Module was designed around the stock 6v positive ground electrical and in my particular car, a master battery disconnect. There is a constant current drain equivalent to a trunk light thru the reverse polarity protection relay if the module is used in a car without the disconnect so that needs to be taken into consideration. A different relay having an extra contact will prevent that drain but was not used in this version. The circuit should work any modern unit that DOES NOT use servos or an electronic speed or temp control setup. Those units are polarity specific and won't work with positive ground cars. Depending on the basic no frills modern unit chosen there may need to be a minor wire change at the motor or if the compressor clutch has a diode across the coil, that will need to reverse. Otherwise, almost all the hang on units should work.
For anyone curious or following along, here are photos of the final AC unit, repro vent and knob work plus the module in various operational stages along with the schematic. For grins, will also show the schematic of the custom made AC unit and in dash mounted controls.
Attach file:
(33.67 KB) (28.18 KB)
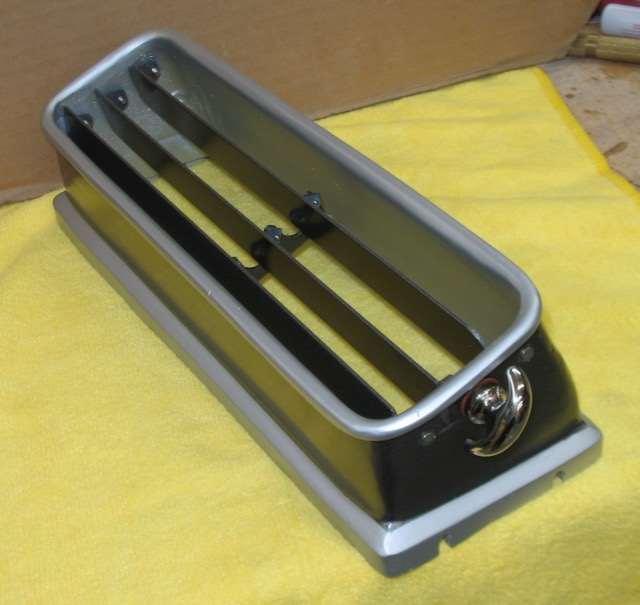 (51.02 KB)
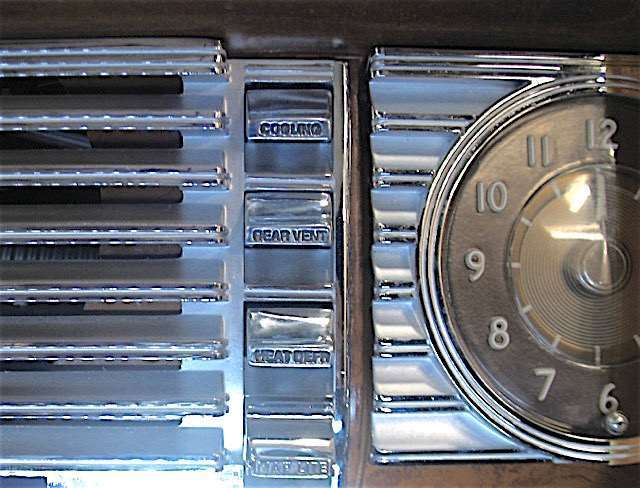 (84.19 KB)
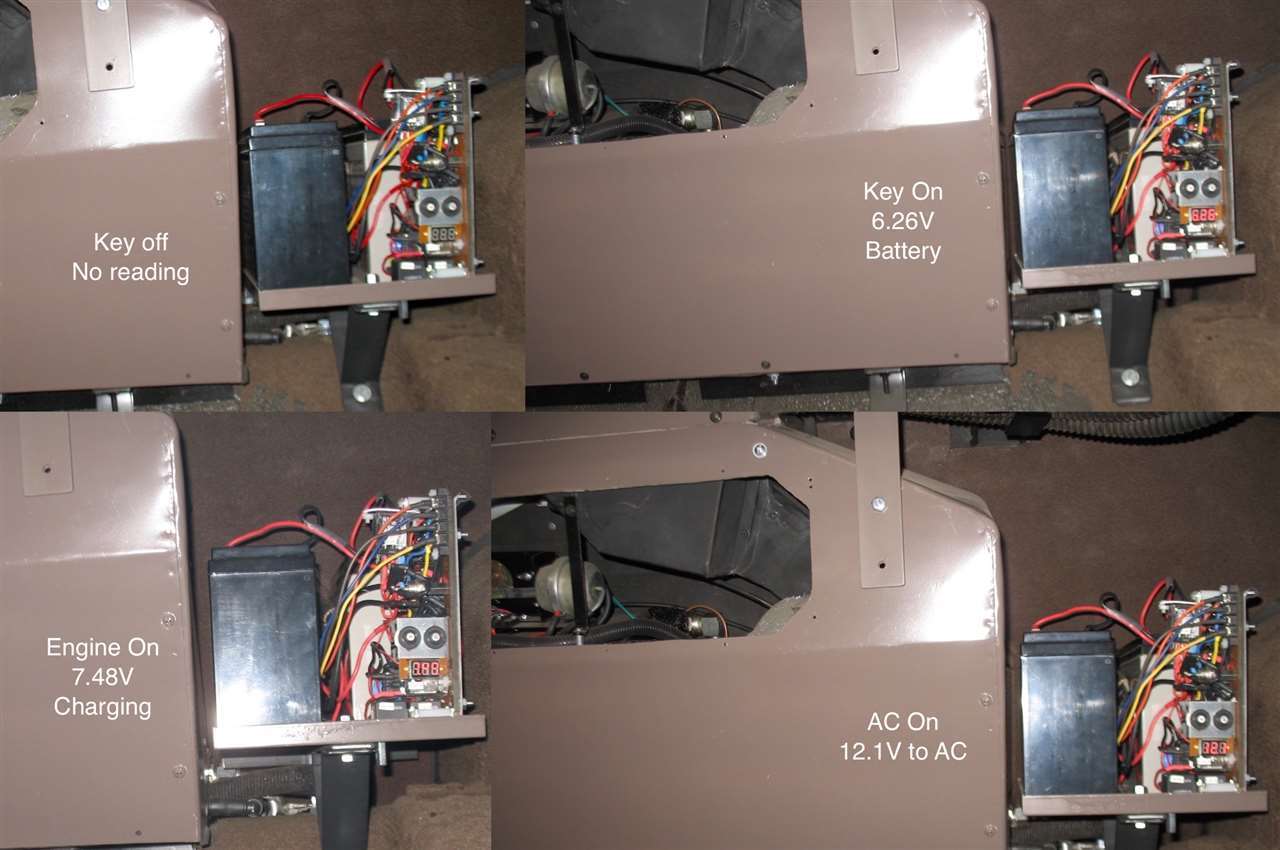 (71.74 KB)
 (77.69 KB)
This Post was from: https://packardinfo.com/xoops/html/modules/newbb/viewtopic.php?post_id=170815