Re: Laurie's 1938 Club Coupe project
Posted by Thomas Wilcox On 2011/6/12 15:13:28
In the last entry, I forgot to mention that the battery was replaced with a 6V optima and the highly corroded battery tray was replaced with a newly fashioned tray designed for the thinner optima. Now, on to stages 2 and 3.
I also said that the project was completed in three stages. I lied. It was really completed in 4 stages. Today I go through the second and third stage.
The second stage was repair of the body sheet metal. So, the car went off to a blaster to get the exterior blasted with plastic beads, after the bumpers and other chrome bits were either taped or removed. We also removed the front clip and hood for separate blasting. Upon return from the blaster, several areas of old bondo repair were found, including:
-Driver's side door and A pillar
-Driver's side front fender
Both of which appear to have been the result of an accident that was mentioned in the paper work we got with the car.
Rust deterioration of the metal requiring patching was found on:
-bottom of rear tub extending the entire width of car
-bottom of the doors
-rear fenders
We also discovered:
-the mud guard/fender support on the right rear had been replaced with a hack.
-cracks were found in the doors at the corner of the window reveals
-passenger door was warped
-many small dings and dents
All of the above was repaired and corrected by Riley, the master fabricator at Colvin's. He did a very good job.
The car then was thoroughly sanded smooth and given a coat of high-build primer.
It was then over to the mechanical side the third stage of the restoration.
During the time the car was driven, we noticed that it would, after warming up, periodically stumble upon acceleration and run fairly rough (for a Packard) during normal driving.
So, the first step was a thorough tune-up, including:
-first, remove the front clip, then
-new points and condensor
-new plug wires and plugs
-new coil and correct mounting bracket installed
-timing adjusted
-valves then adjusted
Steering and ride were not great, so:
-all bushings replaced
-badly worn center link replaced
-shocks topped off with new hydraulic oil and checked
-absent lateral stabilizer (Panhard rod) found and installed
-new wheel bearings and seals for front and rear axles
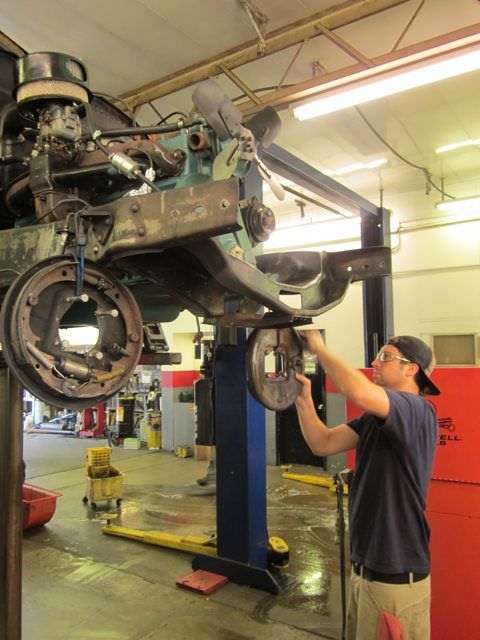
The front motor mount was badly deteriorated, so it was replaced. We also took the opportunity to pull the water pump and check the water distribution tube. It was clean. We also dropped the pan to clean out oil sludge. Very little was found. This plus the uniformly high compression readings makes me think the engine was rebuilt fairly recently.
We also took this time to replace the deteriorated spacers under the radiator and clean and paint the underside of the radiator.
The source of the mysterious current draw as identified as coming from the radio. Radio was removed for restoration. We are now trying to find someone to restore it.
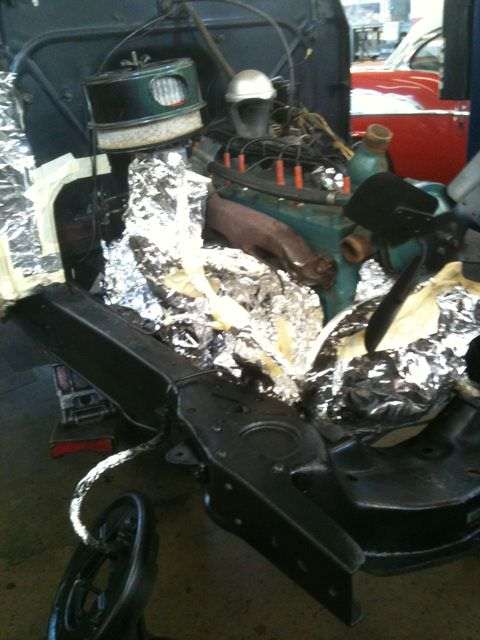
As items were removed, they were blasted and/or scraped and painted. The engine was repainted the correct Packard green. The frame, where exposed, and other under-carriage items were also painted.
Once the car was tuned, under carriage and motor painted, etc, it went back over to the body shop for final prep and paint.
Attach file:
 (42.57 KB)
(39.32 KB)
I also said that the project was completed in three stages. I lied. It was really completed in 4 stages. Today I go through the second and third stage.
The second stage was repair of the body sheet metal. So, the car went off to a blaster to get the exterior blasted with plastic beads, after the bumpers and other chrome bits were either taped or removed. We also removed the front clip and hood for separate blasting. Upon return from the blaster, several areas of old bondo repair were found, including:
-Driver's side door and A pillar
-Driver's side front fender
Both of which appear to have been the result of an accident that was mentioned in the paper work we got with the car.
Rust deterioration of the metal requiring patching was found on:
-bottom of rear tub extending the entire width of car
-bottom of the doors
-rear fenders
We also discovered:
-the mud guard/fender support on the right rear had been replaced with a hack.
-cracks were found in the doors at the corner of the window reveals
-passenger door was warped
-many small dings and dents
All of the above was repaired and corrected by Riley, the master fabricator at Colvin's. He did a very good job.
The car then was thoroughly sanded smooth and given a coat of high-build primer.
It was then over to the mechanical side the third stage of the restoration.
During the time the car was driven, we noticed that it would, after warming up, periodically stumble upon acceleration and run fairly rough (for a Packard) during normal driving.
So, the first step was a thorough tune-up, including:
-first, remove the front clip, then
-new points and condensor
-new plug wires and plugs
-new coil and correct mounting bracket installed
-timing adjusted
-valves then adjusted
Steering and ride were not great, so:
-all bushings replaced
-badly worn center link replaced
-shocks topped off with new hydraulic oil and checked
-absent lateral stabilizer (Panhard rod) found and installed
-new wheel bearings and seals for front and rear axles
The front motor mount was badly deteriorated, so it was replaced. We also took the opportunity to pull the water pump and check the water distribution tube. It was clean. We also dropped the pan to clean out oil sludge. Very little was found. This plus the uniformly high compression readings makes me think the engine was rebuilt fairly recently.
We also took this time to replace the deteriorated spacers under the radiator and clean and paint the underside of the radiator.
The source of the mysterious current draw as identified as coming from the radio. Radio was removed for restoration. We are now trying to find someone to restore it.
As items were removed, they were blasted and/or scraped and painted. The engine was repainted the correct Packard green. The frame, where exposed, and other under-carriage items were also painted.
Once the car was tuned, under carriage and motor painted, etc, it went back over to the body shop for final prep and paint.
Attach file:
(42.57 KB) (39.32 KB)This Post was from: https://packardinfo.com/xoops/html/modules/newbb/viewtopic.php?post_id=79040