Re: BigKev's 1954 Packard Clipper Deluxe Sedan
Posted by BigKev On 2011/11/25 22:09:05
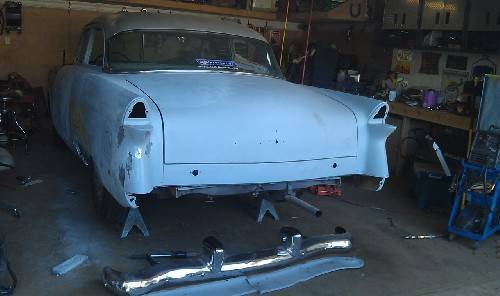
Back at work on the Clipper today. First the rear of the car was disassembled (again) so I could throughly block sand everywhere. Also the bumper filler panel in the rear needs to come off the car for body work and needs to be painted separately much like the wheel shirts.
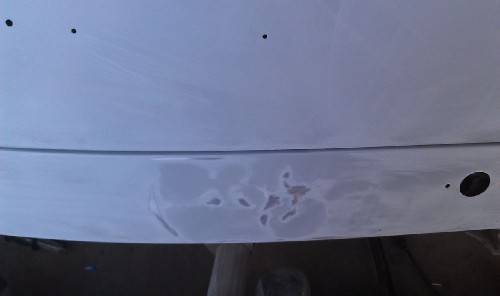
For those that have never done any body work here are a couple of pictures to illustrate why you block sand with a long sanding block. The first picture is the trunk filler panel under the trunk lid. Here you had see the high spots (bare metal), the low spots (untouched darker primer), and the level sanded areas (lighter color primer). The second picture show low spots (darker primer) on the trunk lid crown, but no high spots.
This first primer coat is really a sacrificial one that you use to see where all the high and low spots are. A lot of these of these are almost impossible to see, but will for sure show up when the glossy top coat goes on. This is also the reason why you use a guide coat once you think you have all even leveled out, as it will show you all the little spots you missed.
High spots need to get leveled out with a body hammer pick or shrinking hammer. Low spots need to get raised with either hammer and dolly work, or a bullseye pic to get them as level as possible. Better to be to low, then to high. As a skim coat of light weight body filler, or high build primer will fill in very shallow low spots, but will never mask a high spot.
Attach file:
 (72.20 KB)
(36.12 KB)
(31.84 KB)

For those that have never done any body work here are a couple of pictures to illustrate why you block sand with a long sanding block. The first picture is the trunk filler panel under the trunk lid. Here you had see the high spots (bare metal), the low spots (untouched darker primer), and the level sanded areas (lighter color primer). The second picture show low spots (darker primer) on the trunk lid crown, but no high spots.
This first primer coat is really a sacrificial one that you use to see where all the high and low spots are. A lot of these of these are almost impossible to see, but will for sure show up when the glossy top coat goes on. This is also the reason why you use a guide coat once you think you have all even leveled out, as it will show you all the little spots you missed.
High spots need to get leveled out with a body hammer pick or shrinking hammer. Low spots need to get raised with either hammer and dolly work, or a bullseye pic to get them as level as possible. Better to be to low, then to high. As a skim coat of light weight body filler, or high build primer will fill in very shallow low spots, but will never mask a high spot.
Attach file:
(72.20 KB) (36.12 KB)
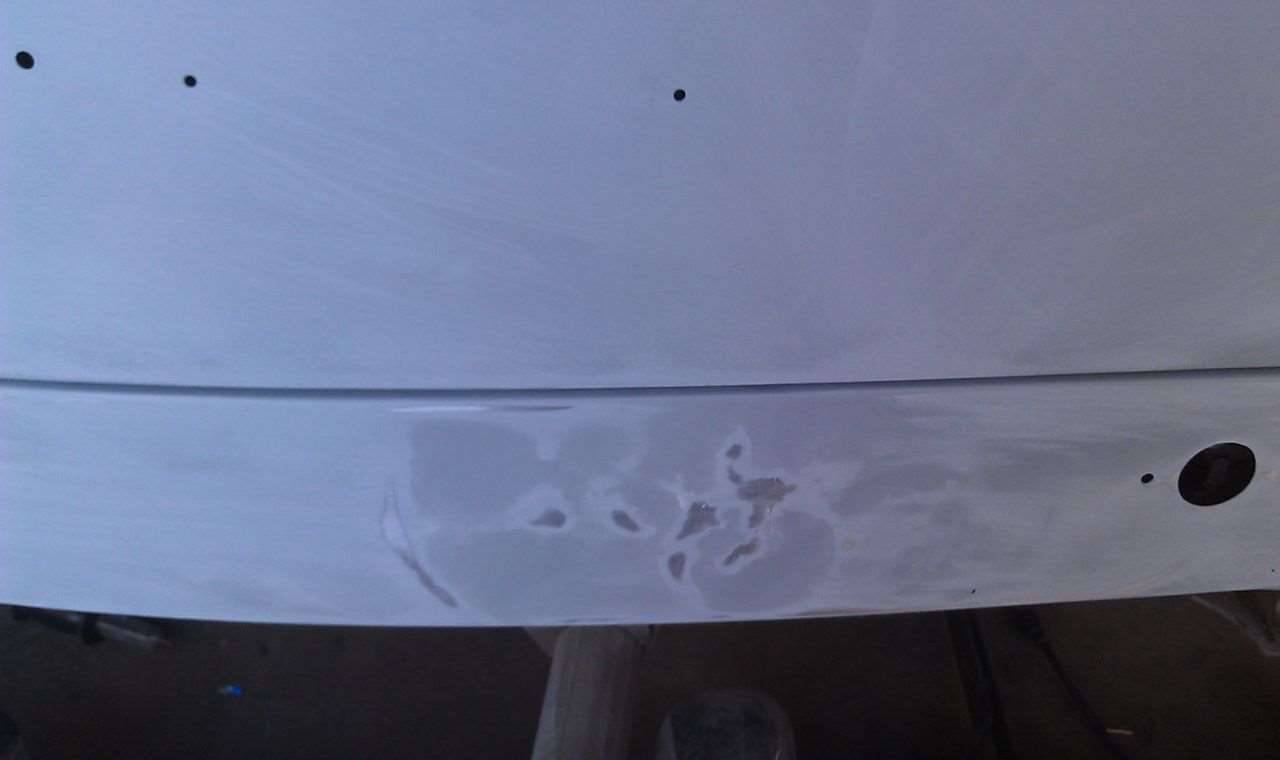 (31.84 KB)
This Post was from: https://packardinfo.com/xoops/html/modules/newbb/viewtopic.php?post_id=90117