Re: The Duchess Project: 1940 Super 8 Convertible Sedan
Posted by Joe Santana On 2018/10/22 13:38:06
On my original diagnosis that led me to believe the Relay needed replacing, I later discovered the meter I used was faulty.
Fortunately I had another larger, more sophisticated multimeter with a beeper that went off when I had continuity. Sometimes it's awkward to be touching wires and trying to look at the meter needle, too, so this was an advantage over the dinky one I was using.
I switched off the battery.
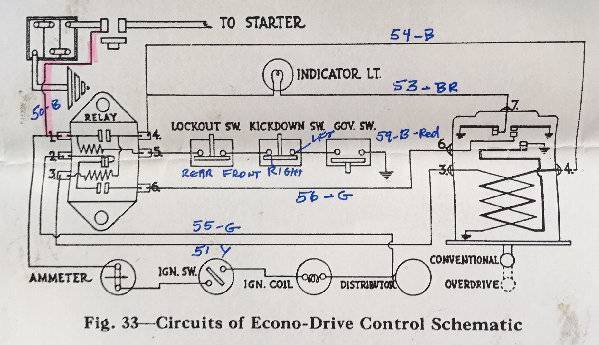
1. I checked for continuity of the Black #50 wire from the starter to Teminal #1 of the Relay.
2. I checked Green Wire #55 between Relay #1 and Relay#2, with the ignition switch turned to ON (battery OFF still)
I cut a jumper wire several feet long to reach from the relay to the solenoid. One end has a standard fork connector, the other the female half of a spade connector with rounded sides I could shove a needle of the multimeter test wire into.
3. I checked Yellow wire #51 between Relay #3 to Solenoid #3 (The number 3 is embossed in the solenoid cover).
4. Wire #54 Brown from Relay #4 to Solenoid #4.
5. Wire #53 Brown from Relay #4 to Solenoid #7.
6. Wire #59 Black with Red Thread from Relay #5 to Rear Terminal of Lockout Switch (that sits on top of the overdrive cable under the dash to the right of the steering wheel)
7. I pushed the Overdrive cable in and checked for continuity through the switch.
8. With the cable pushed in, I checked from Relay #5 to the Right terminal of the Kickdown switch.
9. Then from Relay #5 to the Left Terminal of the Kickdown switch. (To figure out which was "right" and "left," my daughter held the pedal all the way down (which she has plenty of practice doing) to open the circuit at the kickdown switch. Terminal With Continutity is "right" and with No Continuity is "left."
10. Then using the jumper wire again, from the Left Terminal of the Kickdown (gas pedal released) to the Governor terminal.
11. Then from the Governor to the ground.
12. Finally wire #56 Green from Relay #6 to Solenoid #6.
All the wires checked out, so the next step is to pull the solenoid. The problem with my solenoid is that the spacer between it and the overdrive needs to have a fair amount of sealant, or it leaks, so I hate pulling it because it will have to be sealed up again which is tricky to get right. To avoid that, I decided to disconnect all 4 solenoid wires and the 2 nuts retaining the cap to see if I could clean the contacts.
What I found inside was an electrical device soaked in oil. The O-ring or seal on the shaft must be shot because oil coming into the electrical part of the solenoid from the mechanical part of the overdrive. I sprayed a bunch of electrical cleaner on it and ran a contact file over the 3 sets of contacts.
On the test run, it actually clicked in and immediately clicked out. So It has to come out and be replaced.
PortlandDon: That referral seems to be only for a 2-wire solenoid. Mine is marked Delco and has 4 connections.
I've asked the flackmaster to send one if he has one.
West: Wish I'd thought of that at the time, instead of figuring the 25 MPH (caravan was moving at 20) would end. As it turns out, soaking the solenoid with oil from a bad seal did it in.
Attach file:
 (205.79 KB)
Fortunately I had another larger, more sophisticated multimeter with a beeper that went off when I had continuity. Sometimes it's awkward to be touching wires and trying to look at the meter needle, too, so this was an advantage over the dinky one I was using.
I switched off the battery.
1. I checked for continuity of the Black #50 wire from the starter to Teminal #1 of the Relay.
2. I checked Green Wire #55 between Relay #1 and Relay#2, with the ignition switch turned to ON (battery OFF still)
I cut a jumper wire several feet long to reach from the relay to the solenoid. One end has a standard fork connector, the other the female half of a spade connector with rounded sides I could shove a needle of the multimeter test wire into.
3. I checked Yellow wire #51 between Relay #3 to Solenoid #3 (The number 3 is embossed in the solenoid cover).
4. Wire #54 Brown from Relay #4 to Solenoid #4.
5. Wire #53 Brown from Relay #4 to Solenoid #7.
6. Wire #59 Black with Red Thread from Relay #5 to Rear Terminal of Lockout Switch (that sits on top of the overdrive cable under the dash to the right of the steering wheel)
7. I pushed the Overdrive cable in and checked for continuity through the switch.
8. With the cable pushed in, I checked from Relay #5 to the Right terminal of the Kickdown switch.
9. Then from Relay #5 to the Left Terminal of the Kickdown switch. (To figure out which was "right" and "left," my daughter held the pedal all the way down (which she has plenty of practice doing) to open the circuit at the kickdown switch. Terminal With Continutity is "right" and with No Continuity is "left."
10. Then using the jumper wire again, from the Left Terminal of the Kickdown (gas pedal released) to the Governor terminal.
11. Then from the Governor to the ground.
12. Finally wire #56 Green from Relay #6 to Solenoid #6.
All the wires checked out, so the next step is to pull the solenoid. The problem with my solenoid is that the spacer between it and the overdrive needs to have a fair amount of sealant, or it leaks, so I hate pulling it because it will have to be sealed up again which is tricky to get right. To avoid that, I decided to disconnect all 4 solenoid wires and the 2 nuts retaining the cap to see if I could clean the contacts.
What I found inside was an electrical device soaked in oil. The O-ring or seal on the shaft must be shot because oil coming into the electrical part of the solenoid from the mechanical part of the overdrive. I sprayed a bunch of electrical cleaner on it and ran a contact file over the 3 sets of contacts.
On the test run, it actually clicked in and immediately clicked out. So It has to come out and be replaced.
PortlandDon: That referral seems to be only for a 2-wire solenoid. Mine is marked Delco and has 4 connections.
I've asked the flackmaster to send one if he has one.
West: Wish I'd thought of that at the time, instead of figuring the 25 MPH (caravan was moving at 20) would end. As it turns out, soaking the solenoid with oil from a bad seal did it in.
Attach file:
(205.79 KB)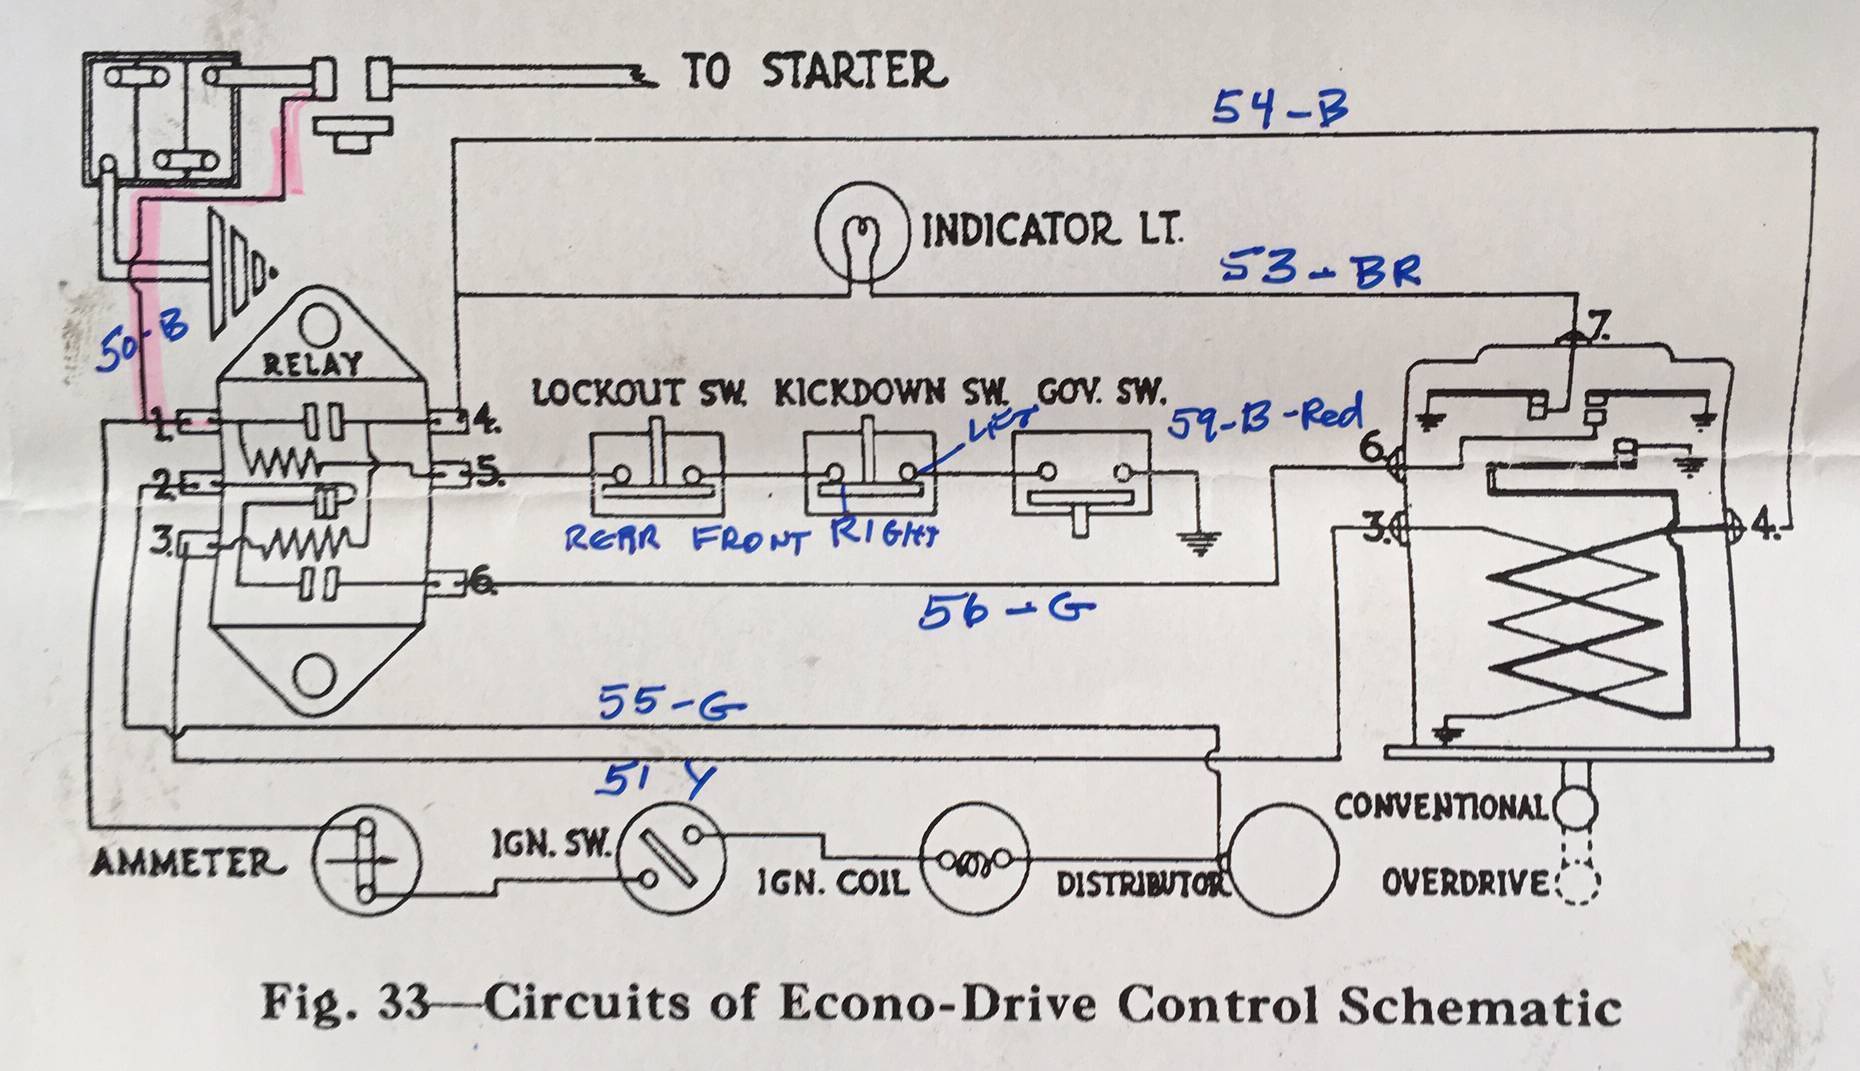
This Post was from: https://packardinfo.com/xoops/html/modules/newbb/viewtopic.php?post_id=206835