Re: Disc brake install
Posted by sanddoc On 2017/8/23 9:28:37
Hello All
OK, here it goes. It's the best I could do, to give the most info and make
it a little easier for others.
Installing Ford Front Disc brakes on a 1956 Packard, Senior
I just finished the "Paul's" install of Ford disc brakes on my 1956 The 400.
Let me start with the parts list first
1. The spindle from a 1972 - 1979 Ford F100\F150
2. The (Splash shield) and bolts.
3. From Ebay buy a pair of Front rotor (get one for a
1973 Galaxie 500. they are 5 x 5" where the Truck would be
5 x 5.5"
4 Off Ebay Timken bearings, set 12, set 13, and seals #6815 Timken, National
5. Calipers, pads, and assorted mounting brackets, spindle dust caps
6 King Pin set (Moog)
All these can be bought on Ebay although I did buy the calipers and pads
at a local parts store
7 If you are planning to replace the spindle lock nut kit, don't use a
Doman #05919 not the correct one...
This is what makes this a good way to install Disc Brakes, all parts
right off the shelf.
You will need have some machine work done
The machine shop will slightly enlarge the bore in the steering knuckle
the will also install new bushing, and make sure they cut a new key way
What I did was install the King Pin, then screwed in the end caps,
then I took a punch and put it in the locking keep hole and hit it pretty
hard. When I pulled the pin out there was a very faint mark on the Pin
I put the edge of a piece of tape at that mark and wrapped it around
the Pin. Next I took a eye view of the the mark and the whole to make sure
the width of the cut.
My machinist forgot to do this part, so I did that at home
Now for the suspension. As we know that Torsion bar is dangerous
and since not many of us has the Packard tool I devised my own method
of keeping the torsion arm in place
I had the car jacked up about 18" at the bumper. I then took two
jack stands and placed on either side of the lower A arm. I then took a
1" galvanized pipe and placed it under the Torsion arm held up by the jack stands I then lowered the. (I would use a schedule 80 black pipe, about 20" long)
car, this cause the arm to stay in place and the A arm come free.
The rest was just removing the steering Knuckle, I did it with the
drum in place as I could not move the locking pin. I undid the upper
bolt first, that allowed the knuckle to be brought our and down onto the
floor. Then I undid the lower bolt. The A arm is held by 4 bolts on the
cross member.. watch out when you take them out, and keep them right there.
The upper control arm is ver easy.
If you decide to do this, you will probably want to clean the lower and upper
control arm, just make sure that you install the lower control arm on the
correct side of the car, they look the same but are different. It took me about 3 hrs for the removal and install.
If I did not mention this, I had a spare Packard 400 and I dismantled it
so I took the upper and lower control arms and cleaned, acid washed
primed and painted all those parts. Those are now on my car.
Pictures
1. is the Sway bar, the 2 support brackets, the 2 clips that hold the rubber
bushing to the lower A arm and a splash shield.
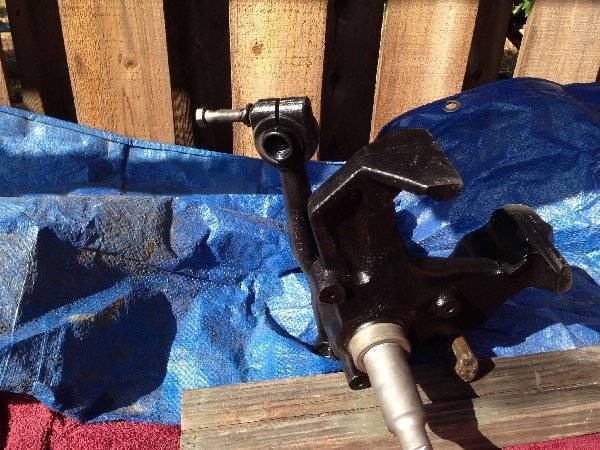
2. Is the left front spindle from the 79 F150 with the Packard steering knuckle
attached.
3 The drop light gives a good view of the 2 jack stands, with the 1" pipe
holding up the Torsion arm, and that (mid) piece has fallen away.
4. Shows the Packard drum laying out from the car. still attached on the
bottom to the steering knuckle
5. is the lower control arm, with the jack stands and the 1" pipe
6. Is looking through the upper control arm opening. shows the shock
mount
7. The upper control arm laying on some cardboard
8. The spindle mounted to the upper and lower control arms
the the jack stands are not supporting the Torsion arm now.
9. Splash shield mounted
10. Rotor installed
11 Caliper and pads installed
Addendum:
The upper control Arm Bolt head is 1"
the nut is also 1"
The locking bolt head is 5\8
These are fully threaded as is the steering knuckle
The lower bolt head is 1 1\4"
the nut is 1 1\8"
The lower control Arm to cross member is 11\16 both head and nut.
Rotor studs are 1\2" 20 same as Packard
the splash guard bolts are 1\2 heads
Total cost for me,
spindle $50
Machine work $325.00
New King Pin set (moog) $67
Pads (wagner Z50) $18
Calipers $25
Bearings (Timken) $30
Wheel bearing seal $7.00
New spindle lock nut kit $15.00
and about 7 hrs labor (Mine)
I'm going to place pictures in another post...there is about 10 or so
Attach file:
 (428.23 KB)
OK, here it goes. It's the best I could do, to give the most info and make
it a little easier for others.
Installing Ford Front Disc brakes on a 1956 Packard, Senior
I just finished the "Paul's" install of Ford disc brakes on my 1956 The 400.
Let me start with the parts list first
1. The spindle from a 1972 - 1979 Ford F100\F150
2. The (Splash shield) and bolts.
3. From Ebay buy a pair of Front rotor (get one for a
1973 Galaxie 500. they are 5 x 5" where the Truck would be
5 x 5.5"
4 Off Ebay Timken bearings, set 12, set 13, and seals #6815 Timken, National
5. Calipers, pads, and assorted mounting brackets, spindle dust caps
6 King Pin set (Moog)
All these can be bought on Ebay although I did buy the calipers and pads
at a local parts store
7 If you are planning to replace the spindle lock nut kit, don't use a
Doman #05919 not the correct one...
This is what makes this a good way to install Disc Brakes, all parts
right off the shelf.
You will need have some machine work done
The machine shop will slightly enlarge the bore in the steering knuckle
the will also install new bushing, and make sure they cut a new key way
What I did was install the King Pin, then screwed in the end caps,
then I took a punch and put it in the locking keep hole and hit it pretty
hard. When I pulled the pin out there was a very faint mark on the Pin
I put the edge of a piece of tape at that mark and wrapped it around
the Pin. Next I took a eye view of the the mark and the whole to make sure
the width of the cut.
My machinist forgot to do this part, so I did that at home
Now for the suspension. As we know that Torsion bar is dangerous
and since not many of us has the Packard tool I devised my own method
of keeping the torsion arm in place
I had the car jacked up about 18" at the bumper. I then took two
jack stands and placed on either side of the lower A arm. I then took a
1" galvanized pipe and placed it under the Torsion arm held up by the jack stands I then lowered the. (I would use a schedule 80 black pipe, about 20" long)
car, this cause the arm to stay in place and the A arm come free.
The rest was just removing the steering Knuckle, I did it with the
drum in place as I could not move the locking pin. I undid the upper
bolt first, that allowed the knuckle to be brought our and down onto the
floor. Then I undid the lower bolt. The A arm is held by 4 bolts on the
cross member.. watch out when you take them out, and keep them right there.
The upper control arm is ver easy.
If you decide to do this, you will probably want to clean the lower and upper
control arm, just make sure that you install the lower control arm on the
correct side of the car, they look the same but are different. It took me about 3 hrs for the removal and install.
If I did not mention this, I had a spare Packard 400 and I dismantled it
so I took the upper and lower control arms and cleaned, acid washed
primed and painted all those parts. Those are now on my car.
Pictures
1. is the Sway bar, the 2 support brackets, the 2 clips that hold the rubber
bushing to the lower A arm and a splash shield.
2. Is the left front spindle from the 79 F150 with the Packard steering knuckle
attached.
3 The drop light gives a good view of the 2 jack stands, with the 1" pipe
holding up the Torsion arm, and that (mid) piece has fallen away.
4. Shows the Packard drum laying out from the car. still attached on the
bottom to the steering knuckle
5. is the lower control arm, with the jack stands and the 1" pipe
6. Is looking through the upper control arm opening. shows the shock
mount
7. The upper control arm laying on some cardboard
8. The spindle mounted to the upper and lower control arms
the the jack stands are not supporting the Torsion arm now.
9. Splash shield mounted
10. Rotor installed
11 Caliper and pads installed
Addendum:
The upper control Arm Bolt head is 1"
the nut is also 1"
The locking bolt head is 5\8
These are fully threaded as is the steering knuckle
The lower bolt head is 1 1\4"
the nut is 1 1\8"
The lower control Arm to cross member is 11\16 both head and nut.
Rotor studs are 1\2" 20 same as Packard
the splash guard bolts are 1\2 heads
Total cost for me,
spindle $50
Machine work $325.00
New King Pin set (moog) $67
Pads (wagner Z50) $18
Calipers $25
Bearings (Timken) $30
Wheel bearing seal $7.00
New spindle lock nut kit $15.00
and about 7 hrs labor (Mine)
I'm going to place pictures in another post...there is about 10 or so
Attach file:
(428.23 KB)
This Post was from: https://packardinfo.com/xoops/html/modules/newbb/viewtopic.php?post_id=195199