Re: Vacuum Antenna
Posted by HH56 On 2014/9/11 14:29:54
This is a continuation of the vacuum antenna repair question and, right or wrong here is what I did on the 47 version. Because it appears this antenna is somewhat different than the 48-50 versions things I did or made may not be applicable to the later units.
I had been trying to figure out how to get the top bakelite piece out to change the seals. In that process a little ring came loose and fell out the end. Upon careful examination and judicious cleaning of the cavity I found the seals. They can be accessed without taking that inner piece out. A word of caution -- if seals are not bad already, they are extremely thin and probably hard & brittle so will likely be destroyed taking the rings off to get them out. I wish I could say the 48-50 version is the same but since the neck appears to be smaller on those units they may be of a different size. Most likely in the same location though.
Since the cavity on this antenna is an odd size, nothing I could find in a standard size would fit. I used a homemade hone to enlarge the cavity slightly -- about 1/16" -- so a readily available 5/8 OD seal could be used. Followed that with a 5/8 endmill to make sure the seat was clean and square to the cavity. The overall diameter on this antenna neck is 1" but on the smaller necks, the process may still work as long as there is enough thickness left. Debated about using two seals but decided on a single plus a sealing washer on the outside instead. The washer will work as kind of a scraper before the mast hits the seal. Since the cavity is old and brittle bakelite I didn't want things to be a really tight fit so while the seal is snug, it is not a press fit. Because of that "looseness" I used a length of thinwall tube as a retainer to go between the chrome bezel/washer and top of seal to keep everything locked in place.
On the piston end, this cylinder tube is also an odd size. Had planned on using wheel cylinder piston cups but 1 3/16 was too small and 1 1/4 was too large. Had to make my own piston by turning a piece of delrin to size, making a recessed center area and wrapping that area with a leather piston rod seal material. It is snug and sealing well but how long it lasts is unknown -- but for the moment it is working.
Here are a few photos.
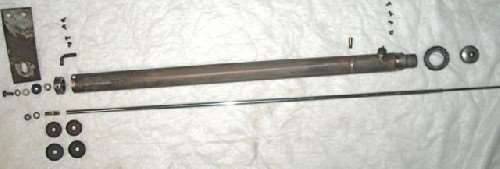
#1 is my 47 version antenna disassembled.
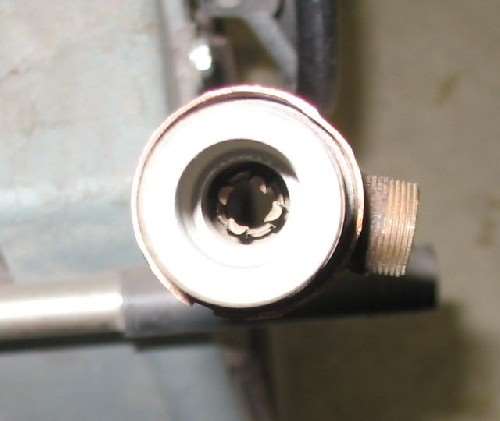
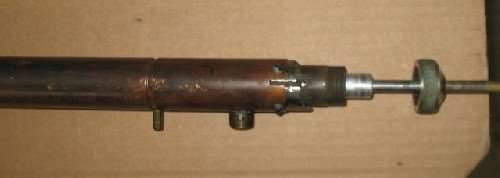
#2 is the seal cavity with seals removed. The 4 sided protrusions visible is the cable contact assy the mast slides against.
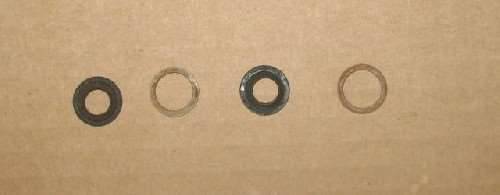
#3 and #4 are the original rings and seals. The order from the top was ring, seal, ring , seal
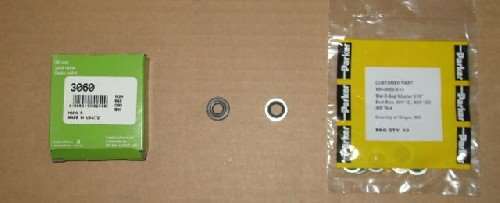
#5 is the 5/8 OD x 5/16 ID seal and washer I used for replacements.
#6 is a thin wall tube used as a sort of retainer. Note: in the photo tube is aluminum but decided delrin would be a better choice and is the final.
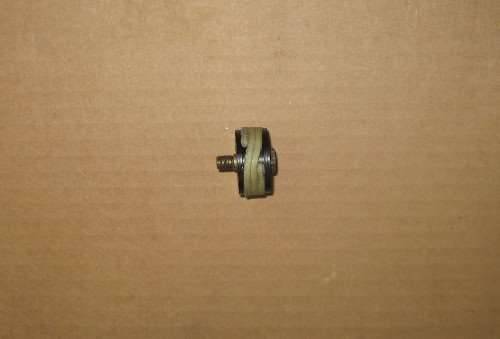
#7 is the replacement piston
I am curious if anyone has one working & how fast they move. I used my mightyvac and after a few pumps, the initial resistance was overcome and the thing shot in or out. With a solid vacuum source it should move equally fast so am wondering if perhaps there was a leak or bleed built into the thing to kind of lessen the vacuum for a more controlled movement.
EDIT: Interesting photo of the piston. It is a solid cylinder of Delrin with a hole thru the center. Has the circumference wrapped with leather but the camera appears to make it look like a cutaway showing the center as open
Attach file:
 (16.00 KB)
(21.29 KB)
(13.49 KB)
(14.56 KB)

(16.64 KB)
(12.79 KB)
(54.70 KB)
I had been trying to figure out how to get the top bakelite piece out to change the seals. In that process a little ring came loose and fell out the end. Upon careful examination and judicious cleaning of the cavity I found the seals. They can be accessed without taking that inner piece out. A word of caution -- if seals are not bad already, they are extremely thin and probably hard & brittle so will likely be destroyed taking the rings off to get them out. I wish I could say the 48-50 version is the same but since the neck appears to be smaller on those units they may be of a different size. Most likely in the same location though.
Since the cavity on this antenna is an odd size, nothing I could find in a standard size would fit. I used a homemade hone to enlarge the cavity slightly -- about 1/16" -- so a readily available 5/8 OD seal could be used. Followed that with a 5/8 endmill to make sure the seat was clean and square to the cavity. The overall diameter on this antenna neck is 1" but on the smaller necks, the process may still work as long as there is enough thickness left. Debated about using two seals but decided on a single plus a sealing washer on the outside instead. The washer will work as kind of a scraper before the mast hits the seal. Since the cavity is old and brittle bakelite I didn't want things to be a really tight fit so while the seal is snug, it is not a press fit. Because of that "looseness" I used a length of thinwall tube as a retainer to go between the chrome bezel/washer and top of seal to keep everything locked in place.
On the piston end, this cylinder tube is also an odd size. Had planned on using wheel cylinder piston cups but 1 3/16 was too small and 1 1/4 was too large. Had to make my own piston by turning a piece of delrin to size, making a recessed center area and wrapping that area with a leather piston rod seal material. It is snug and sealing well but how long it lasts is unknown -- but for the moment it is working.
Here are a few photos.
#1 is my 47 version antenna disassembled.
#2 is the seal cavity with seals removed. The 4 sided protrusions visible is the cable contact assy the mast slides against.
#3 and #4 are the original rings and seals. The order from the top was ring, seal, ring , seal
#5 is the 5/8 OD x 5/16 ID seal and washer I used for replacements.
#6 is a thin wall tube used as a sort of retainer. Note: in the photo tube is aluminum but decided delrin would be a better choice and is the final.
#7 is the replacement piston
I am curious if anyone has one working & how fast they move. I used my mightyvac and after a few pumps, the initial resistance was overcome and the thing shot in or out. With a solid vacuum source it should move equally fast so am wondering if perhaps there was a leak or bleed built into the thing to kind of lessen the vacuum for a more controlled movement.
EDIT: Interesting photo of the piston. It is a solid cylinder of Delrin with a hole thru the center. Has the circumference wrapped with leather but the camera appears to make it look like a cutaway showing the center as open
Attach file:
(16.00 KB)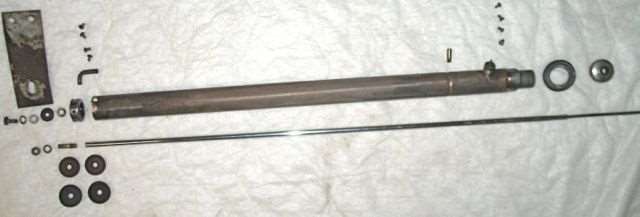 (21.29 KB)
 (13.49 KB)
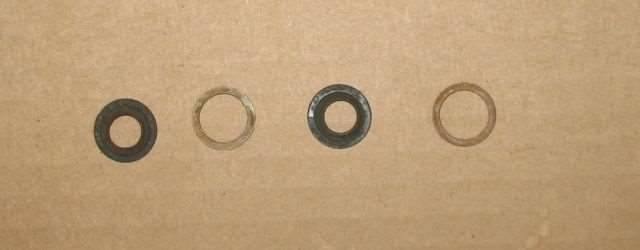 (14.56 KB)
 (16.64 KB)
 (12.79 KB)
 (54.70 KB)
This Post was from: https://packardinfo.com/xoops/html/modules/newbb/viewtopic.php?post_id=149829