Re: Ultramatic Disassembly
Posted by humanpotatohybrid On 2024/1/28 11:12:11
I stumbled on this post. The OP says the "previous owner" that rebuilt a lot of Twin Ultra's had this list of modifications. I am attaching the list here, and I transcribed it below.
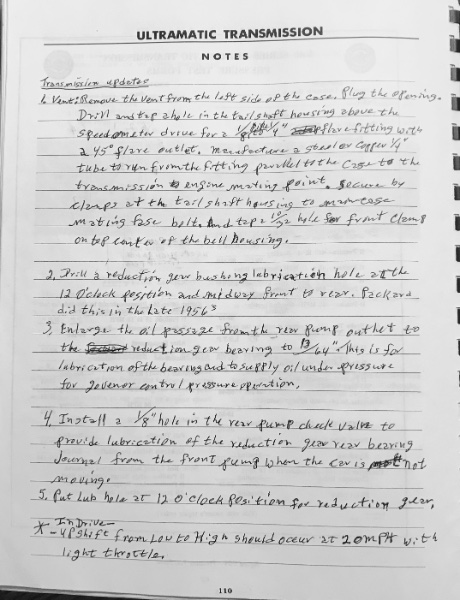
- Remove the vent from the left side of the case. Plug the opening. Drill and tap a hole in the tail shaft housing above the speedometer drive for a 1/8 inch pipe to 1/4 inch flare fitting with a 45° flare outlet. Manufacture a steel or copper quarter inch tube to run from the fitting parallel to the case to the transmission to engine mating point. Secure by clamps at the tail shaft housing to main case mating ?? bolt. And tap a 10–32 hole for front clamp on top center of the bell housing.
- Drill a reduction gear bushing lubrication hole at the 12 o’clock position and midway front to rear. Packard did this in the late 1956’s.
- Enlarge the oil passage from the rear pump outlet to the reduction gear bushing to 13/64”. This is for lubrication of the bearing and to supply oil pressure for governor control pressure operation.
- Install an ⅛” inch hole in the rear pump check valve to provide lubrication of the reduction gear rear bushing journal from the front pump when the car is not moving.
- Put lubrication hole at 12 o’clock position for reduction gear.
The first line appears to be the "breather relocation" as described in the SB's, i.e.:https://packardinfo.com/xoops/html/downloads/SC/SB-319.pdf
For the two notes on a "reduction gear bushing lubrication hole", it sounds the same as something Ross mentioned earlier in this thread. Though I am unsure of the exact location in question.
Attach file:
 ultramatic notes from some guy.jpg (108.83 KB)
- Remove the vent from the left side of the case. Plug the opening. Drill and tap a hole in the tail shaft housing above the speedometer drive for a 1/8 inch pipe to 1/4 inch flare fitting with a 45° flare outlet. Manufacture a steel or copper quarter inch tube to run from the fitting parallel to the case to the transmission to engine mating point. Secure by clamps at the tail shaft housing to main case mating ?? bolt. And tap a 10–32 hole for front clamp on top center of the bell housing.
- Drill a reduction gear bushing lubrication hole at the 12 o’clock position and midway front to rear. Packard did this in the late 1956’s.
- Enlarge the oil passage from the rear pump outlet to the reduction gear bushing to 13/64”. This is for lubrication of the bearing and to supply oil pressure for governor control pressure operation.
- Install an ⅛” inch hole in the rear pump check valve to provide lubrication of the reduction gear rear bushing journal from the front pump when the car is not moving.
- Put lubrication hole at 12 o’clock position for reduction gear.
The first line appears to be the "breather relocation" as described in the SB's, i.e.:https://packardinfo.com/xoops/html/downloads/SC/SB-319.pdf
For the two notes on a "reduction gear bushing lubrication hole", it sounds the same as something Ross mentioned earlier in this thread. Though I am unsure of the exact location in question.
Attach file:
ultramatic notes from some guy.jpg (108.83 KB)This Post was from: https://packardinfo.com/xoops/html/modules/newbb/viewtopic.php?post_id=267321