Re: Holley RetroBright LED Headlamps for Positive Ground Cars
Posted by HH56 On 2022/8/26 13:17:41
Some have changed car polarity on 55s and if you wanted to do that, as long as the rest of the car is stock and you have no solid state replacements such as radio vibrator or TL switch it is usually a relatively easy thing to do. Normally it only requires swapping cables along with a small procedure and couple of minor wire swaps but if you have a polarity sensitive voltage regulator that might need to be changed too.
I am generally in favor of adding relays to the headlight circuit to take the heavy light current out of, and hopefully prolong life of, the old switches. An added benefit is you can use heavier wire for the headlight feed and that combined with eliminating about 10 ft of smaller gauge wire would give a brighter light. Obviously there would not be nearly as much current with LEDs but the principle holds so if you want to keep polarity stock, relays are another option.
Since you could reverse wires at the lights and have one beam work it would appear a modification of a basic relay circuit would do the job on your lights. As long as the LED internal headlight functions are not interconnected in some way and they have a separate normally negative ground wire and that wire is not connected to any body metal via some kind of bracket It would be a simple matter to make a couple of changes in the relay wiring to swap how voltage and ground enters the headlights to maintain the Hi-Lo function.
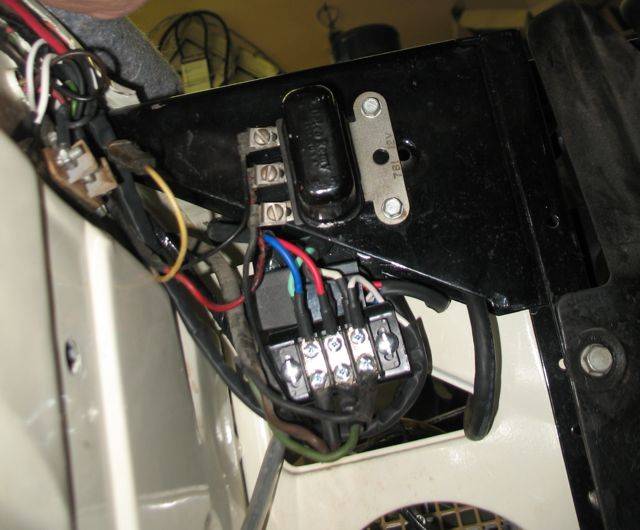
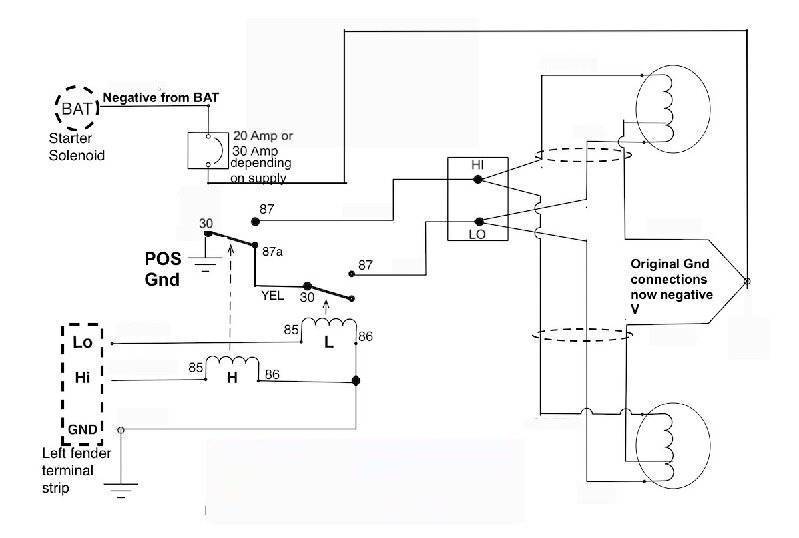
Here is a modification of a basic relay diagram and a photo of a relay module. Changing relays to use 6v or 12v relays it could be used on most years. In place of the circuit breaker normally connecting to the relay, for the negative ground LEDs wiring was changed so it now has the breaker carrying negative battery voltage connecting directly to the LED bulb negative ground wires. The relays now switch the Hi and Lo leads to ground for the Hi-Lo function.
For my 56, on the relay module shown the terminal strip is a bit different from the diagram because I decided to also have the ground wire connect there. It was placed on the Left side with a new cable running across to the right side headlight. Left light connects directly to the new relay terminal strip along with the new wire to the right. I added a new Right side terminal strip but the original head light wires from the loom to the old right terminal block could be disconnected and protected so that terminal strip could be used instead. The functions in the parking light housing are still connected on the old right strip.
There is a way to keep the original loom and terminal strips in use but it would mean disconnecting wires at the dimmer switch, finding a splice point for the wire going to the brite indicator lamp and then adding relays down at the dimmer switch. I think it would be easier to just add relays in front and a length of 3 wire cable to the right light. Run that cable under the upper splash panel and clamp to the cradle in front of the radiator.
Attach file:
 IMG_1299.jpg (45.49 KB)
HeadLight Relay.JPG (57.87 KB)
I am generally in favor of adding relays to the headlight circuit to take the heavy light current out of, and hopefully prolong life of, the old switches. An added benefit is you can use heavier wire for the headlight feed and that combined with eliminating about 10 ft of smaller gauge wire would give a brighter light. Obviously there would not be nearly as much current with LEDs but the principle holds so if you want to keep polarity stock, relays are another option.
Since you could reverse wires at the lights and have one beam work it would appear a modification of a basic relay circuit would do the job on your lights. As long as the LED internal headlight functions are not interconnected in some way and they have a separate normally negative ground wire and that wire is not connected to any body metal via some kind of bracket It would be a simple matter to make a couple of changes in the relay wiring to swap how voltage and ground enters the headlights to maintain the Hi-Lo function.
Here is a modification of a basic relay diagram and a photo of a relay module. Changing relays to use 6v or 12v relays it could be used on most years. In place of the circuit breaker normally connecting to the relay, for the negative ground LEDs wiring was changed so it now has the breaker carrying negative battery voltage connecting directly to the LED bulb negative ground wires. The relays now switch the Hi and Lo leads to ground for the Hi-Lo function.
For my 56, on the relay module shown the terminal strip is a bit different from the diagram because I decided to also have the ground wire connect there. It was placed on the Left side with a new cable running across to the right side headlight. Left light connects directly to the new relay terminal strip along with the new wire to the right. I added a new Right side terminal strip but the original head light wires from the loom to the old right terminal block could be disconnected and protected so that terminal strip could be used instead. The functions in the parking light housing are still connected on the old right strip.
There is a way to keep the original loom and terminal strips in use but it would mean disconnecting wires at the dimmer switch, finding a splice point for the wire going to the brite indicator lamp and then adding relays down at the dimmer switch. I think it would be easier to just add relays in front and a length of 3 wire cable to the right light. Run that cable under the upper splash panel and clamp to the cradle in front of the radiator.
Attach file:
IMG_1299.jpg (45.49 KB) HeadLight Relay.JPG (57.87 KB)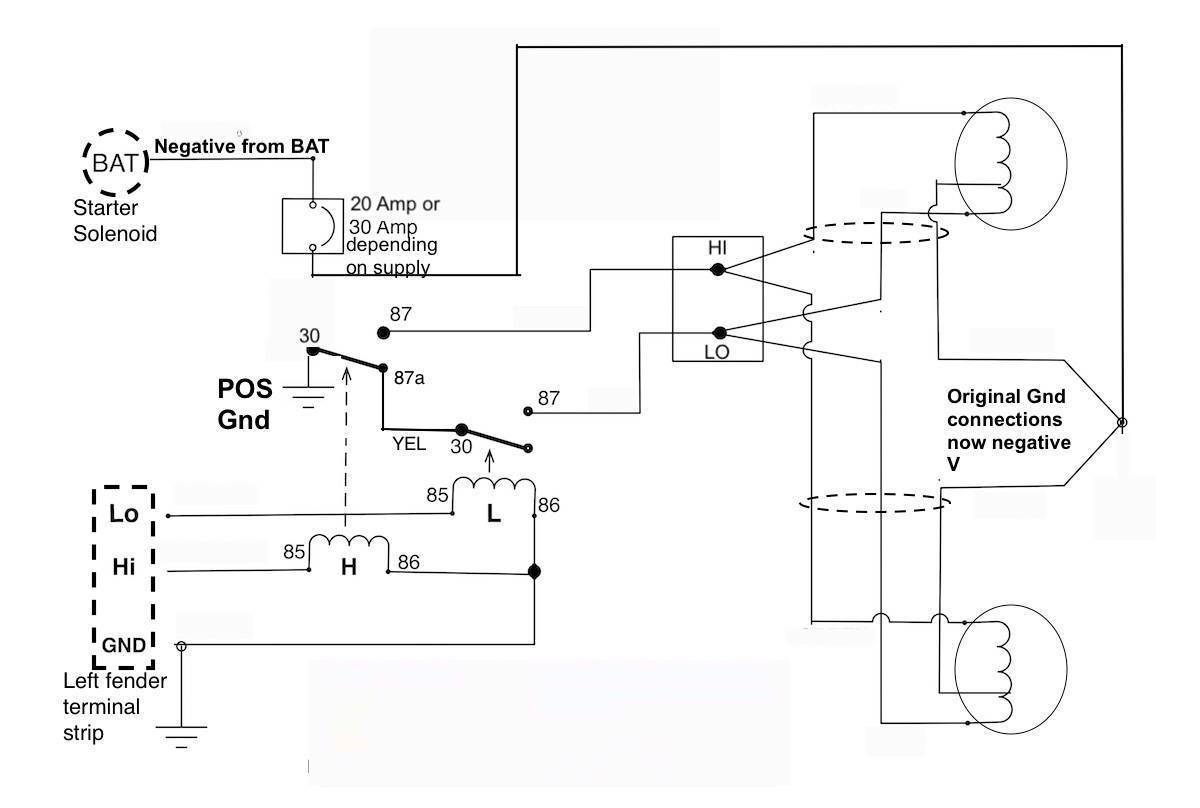
This Post was from: https://packardinfo.com/xoops/html/modules/newbb/viewtopic.php?post_id=247455