|
Re: 359 Straight Eight Engine
|
||||
|---|---|---|---|---|
|
Home away from home

|
Thanks Mal, for help. Will decide when Ross returns and gives me some feedback about engine. I did not know all 359's were Automatic.
Were the Automatics good for it's year?
Posted on: 2011/1/3 14:49
|
|||
|
||||
|
Re: Rusty Nuts and Bolts
|
||||
|---|---|---|---|---|
|
Home away from home
|
Thanks Bobt, for great hints. I will for sure try it. Great idea about the Chroming.
Yes I have earmarked that book in Packardinfo book list( Packard Restoration Book ). Looking out for simular in DVD.
Posted on: 2011/1/3 14:29
|
|||
|
||||
|
Re: Rusty Nuts and Bolts
|
||||
|---|---|---|---|---|
|
Home away from home
|
Well Dep5, it maybe Drivel to you, but its not to me. I am sure there is plenty beginners like me, and so hence the drivel like questions. You may be a pro, but I'm not.
Happy New year anyway. When learning you have to ask the very basic questions to gain the knowledge. I bet most do. Most understand i am learning, and so put up with my simple type questions.
Posted on: 2011/1/3 13:43
|
|||
|
||||
|
Re: Interior restoration question
|
||||
|---|---|---|---|---|
|
Home away from home
|
10 Steps to re dye your leather seats.
How To Change The Colour Of Leather Car Seats http://www.furnitureclinic.co.uk/How-To-Change-The-Colour-Of-Leather-Car-Seats.htm This guide will show you how to change the colour of a leather car seat. We will be changing the colour of this car interior from red to cream, but it is possible to change to any colour you want. A colour change can be made from any colour to another, i.e. black to white, or white to black, with just as successful results. The leather colourant kit used in this guide can be used to change the colour of all leather, vinyl, plastic, PVC & leather cloth car interiors. Pic one. This photo shows a red leather car seat from a Rolls Royce. This guide will show you how to change the colour of the leather car interior. Products Required Heavy Filler - To fill cracks Leather Colourant Kit - Used to change the colour of leather The first stage is to prep the leather using an abrasive pad. This process removes the transparent manufactured finish applied to leather. Removing the finish allowing colour to properly adhere to the leather. As shown in the photo, as the finish is removed, so is the colour (but not all the colour). Basically, when you remove some colour form an area, that indicates the finish has been removed, and so, you can move onto the next area. Pic 2 Once you have prepped an area with the abrasive pad, you often get a lot of prep and colour sitting on the surface. This is very common with old Rolls Royce, jaguar, Bentley, Aston Martin and other cars that used Connolly leather. So, we wipe the leather with a cloth to remove the excess prep & colour. This tends not to happen as much with modern cars (1980's +) as the way leather was made changed, becoming more resilient against the prep. Not to worry though, it doesn't affect the end result! Pic 3 The photo to the left shows what the leather should look like after being prepped. You can see where the colour has almost completely been removed in the middle flutes of the seat. This is indicated by the light tan/brown colour that is showing through - the original leather. Notice that the shine has also gone making the leather look more matt. This is the main indicator of correctly prepped leather (no shine), as the colour will not always be removed. Pic 4 Important Note: Leather is painted, that is how a wide variety of colours are achieved. When leather becomes old, it looks as though it cracks, but most of the time it is actually the paint that is cracked, not the leather itself. So, when you prep the leather, the painted layer is either removed or reduced greatly (as shown in the above picture) and so all the cracks are removed as well. This makes for a very smooth finish and excellent end result. Pic 5 Using a cloth, wipe the leather down with the alcohol cleaner. This process removes any waxes, oils or silicones that may be on the leather. Removing these gives better adhesion of colour. As you can see so far, like any job, preparation is the key to success. Take your time when doing it and your end results will be great. Its not a hard job to do - it can just be quite time consuming! Pic 6 After prepping the leather, there were still a few small cracks in the leather. These are fixed by spreading the heavy filler over the leather with a pallete knife. The filler only sits in the cracked leather. The leather is then sanded smooth using fine 1200 grit sand paper. Pic 7 Once the leather has been properly cleaned and all repairs have been made, it is then time to apply the colour. The first coat is applied by sponge. This is done to work the colour into hard to reach areas and to also minimise later spray applications. As you can see by the photo, the colourant used is highly concentrated and so, changes the colour of the leather quickly. Pic 8 This photo shows roughly what the leather should look like after one base coat of colour has been applied. When applying the base coat do not rub too hard for too long. Instead, applying gentle pressure, wipe the colourant onto the leather with a sponge. To speed up drying use a hair drier and it should take no more than 5 minutes to be thoroughly dry. Pic 9 The next step is to spray the leather colourant onto the leather using the airbrush in the kit. To start with, spray the colour around the edges of the piping and in between the seat flutes. This is covering the harder to reach areas first, which in the end, makes the job easier, and uses less colourant. Then proceed to spray the colour all over the seats until it looks nice and uniform. Always let the colourant dry before spraying more on top. Finished Result Pic 10 This photo shows the two front seats from the car, totally colour changed. We changed them to a specially selected cream by our customer and applied satin finish. The finish is applied in the exact same way as the colour. The benefit of a finish is, it makes the leather look & feel softer and more natural, as well as offering protection from wear & tear. Attach file:  (8.05 KB) (8.05 KB)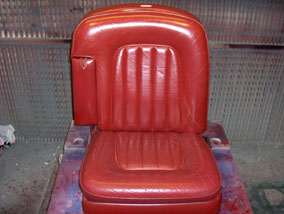 (7.25 KB) (7.25 KB) (7.63 KB) (7.63 KB)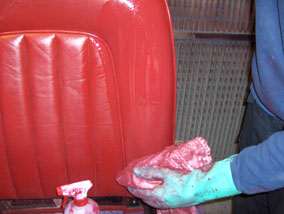 (6.09 KB) (6.09 KB)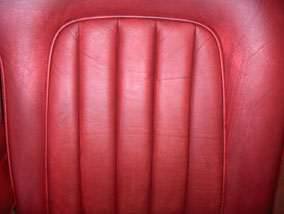 (6.46 KB) (6.46 KB)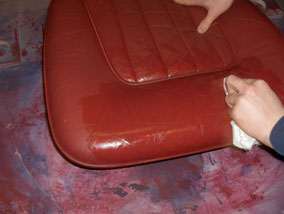 (6.03 KB) (6.03 KB)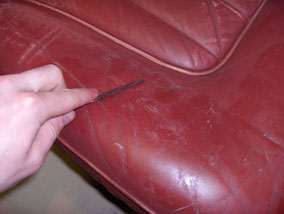 (6.63 KB) (6.63 KB)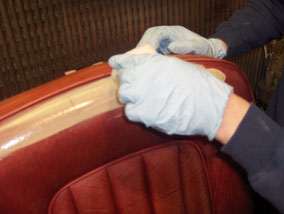 (7.85 KB) (7.85 KB)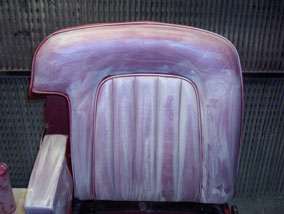 (6.78 KB) (6.78 KB)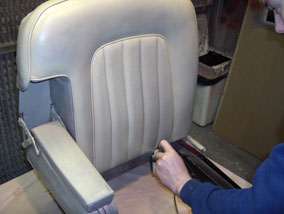 (8.89 KB) (8.89 KB)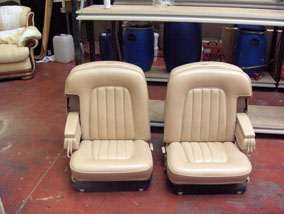
Posted on: 2011/1/3 13:23
|
|||
|
||||
|
Inproving 6 Volt Tail Lights making them Brighter
|
||||
|---|---|---|---|---|
|
Home away from home
|
Many have said that the lights on a 6 Volt car are much more dimmer. I read this little trick helps!
your taillight bucket assemblies. Remove the taillight door (bezel) and the bulb(s). Have in hand some heavy duty aluminum foil. Press it into the back reflective surface of your taillight bucket, shinny side out. Take care not to get any foil inside of the bulb receptacle. The secret is to not smooth the foil out too much. The foil needs that "crinkled" surface to act as hundreds of tiny reflectors, directing the light rays toward the red lens of your taillight. Now is the time to test your bold experiment! Replace the lens, turn the taillights on and step back.
Posted on: 2011/1/3 13:15
|
|||
|
||||
|
Re: 54 Battery and Solar
|
||||
|---|---|---|---|---|
|
Home away from home
|
They seem to have 3 types, you mean something like this one?
This also a nice looking Solenoid. Attach file: (6.76 KB)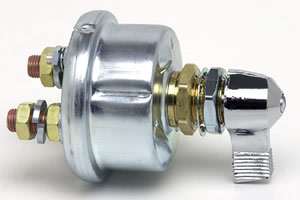 (5.71 KB) (5.71 KB)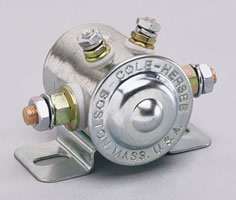
Posted on: 2011/1/3 12:58
|
|||
|
||||
|
Re: Rusty Nuts and Bolts
|
||||
|---|---|---|---|---|
|
Home away from home
|
Quiet Right Roger. No more straying .
Will soaking parts like rusty nuts and bolts in Parafin, remove alot of the rust, dirt and grease ?
Posted on: 2011/1/3 12:48
|
|||
|
||||
|
Re: 54 Battery and Solar
|
||||
|---|---|---|---|---|
|
Home away from home
|
I have noticed advertized alot, this battery cut off switch, i have never seen this before, is it often used? or just a gimick thing?
Attach file:  (13.14 KB) (13.14 KB)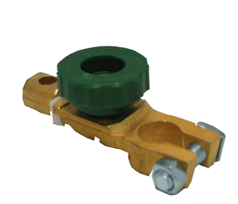
Posted on: 2011/1/3 11:25
|
|||
|
||||
|
Re: 54 Battery and Solar
|
||||
|---|---|---|---|---|
|
Home away from home
|
Saw some interesting spark plug wires, were they really like this many years ago in cars
Attach file: (9.19 KB)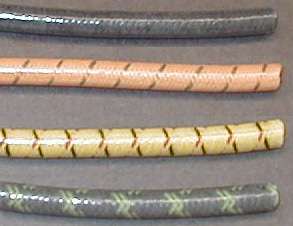
Posted on: 2011/1/3 9:02
|
|||
|
||||
|
Re: 54 Battery and Solar
|
||||
|---|---|---|---|---|
|
Home away from home
|
Some great links.
At Harber Hieghts i saw this strange looking coin shaped feeler g, and this 6 v battery and engine starter a good one? These conectors look right for 6 volt battery? Attach file: (12.41 KB)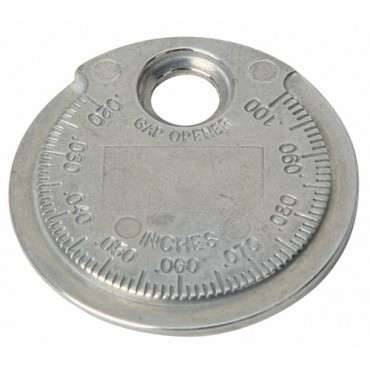 (11.92 KB) (11.92 KB)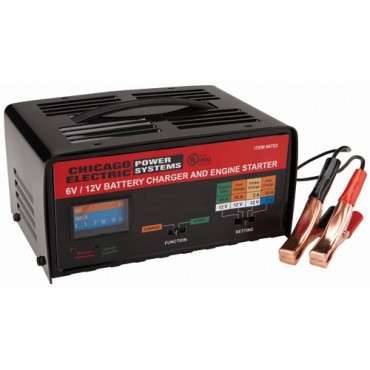 (9.95 KB) (9.95 KB)
Posted on: 2011/1/3 4:12
|
|||
|
||||


.jpg")


