|
Re: Clock Light Mystery
|
||||
|---|---|---|---|---|
|
Home away from home
|
Pat, can I ask you how you got the end cap off the socket body on your clock??? Is it soldered? My thought was to get it apart and 'fuse' the 'ball contacts' and then put a nice little inline rotary switch in the wire so it could be used.
Thanks for responding. Chris
Posted on: 2017/10/13 10:43
|
|||
|
'If you think you can, or you think you can't - you're right!' Henry Ford.
1939 Packard Six, Model 1700 |
||||
|
||||
|
Re: Clock Light Mystery
|
||||
|---|---|---|---|---|
|
Home away from home
|
Thank you Howard. I have always given Packard a lot of credit for innovative ideas and design, but I have to say, I am surprised this was available in '39. I notice in the picture of the disassembled switch, that the end cap has been separated from the socket body. Do you know if this is soldered or just pressed together? I tried heating one of my pair up with a micro-torch, and pulling it with a pair of pliers but couldn't get the cap to come off. Any idea how to remove it?? Chris.
Posted on: 2017/10/12 19:34
|
|||
|
'If you think you can, or you think you can't - you're right!' Henry Ford.
1939 Packard Six, Model 1700 |
||||
|
||||
|
Clock Light Mystery
|
||||
|---|---|---|---|---|
|
Home away from home
|
When I got my '39 Six, the glass clock face was broken. I was able to find one online and I sent them both to Smith's Classic Clocks and was able to get 'one good one' out of the two.
The 'mystery' question stems from the light on the back of the clock. Not to be confused with the internal illumination light that plugs into the hole in the top of the clock's back, which is wired to the light switch. I'm referencing the small one that is mounted on the back housing. It looks like it is meant as a 'map light'. Problem is, the light is wired together with the power feed for the clock. Both clocks were wired the same way and while both bulbs were good, neither of them came on when hooked up to power. AND, if they did, because the clock power is constant and not ignition-switched, the light would drain the battery. While neither light has current getting through to the bulb, both socket bodies have a distinctive rattle to them. Has anybody ever come up against this before?? Could these little light sockets have vertical/horizontal gravity switches in them in 1939?? Can they be taken apart and fixed? Or, are they available ANYWHERE?? I would dearly like to get this resolved and back to factory if possible. I cannot see how the sockets come apart - does anyone know the answer??
Posted on: 2017/10/12 18:17
|
|||
|
'If you think you can, or you think you can't - you're right!' Henry Ford.
1939 Packard Six, Model 1700 |
||||
|
||||
|
Re: Autolite Regulator Question
|
||||
|---|---|---|---|---|
|
Home away from home
|
Thanks Howard,
I'll print and save these instructions for future use!! Chris
Posted on: 2017/10/4 10:52
|
|||
|
'If you think you can, or you think you can't - you're right!' Henry Ford.
1939 Packard Six, Model 1700 |
||||
|
||||
|
Re: Autolite Regulator Question
|
||||
|---|---|---|---|---|
|
Home away from home
|
Thanks J from Kanters. Is there a polarization 'how-to' guide anywhere on our site??
Much appreciate your help! Best Chris
Posted on: 2017/10/3 22:13
|
|||
|
'If you think you can, or you think you can't - you're right!' Henry Ford.
1939 Packard Six, Model 1700 |
||||
|
||||
|
Autolite Regulator Question
|
||||
|---|---|---|---|---|
|
Home away from home
|
I want to replace the regulator in my '39 Six 1700. I came up with one online that is NOS, looks to be in excellent condition and says it is correct for '37-'39 Junior cars. It is a VRR-4002B. The seller says Tuscon Packard told him this was 'spec-correct' for 37-39 Junior cars. When I check on the Packard parts site, it looks to me like they say a VRD-4001A or a VRD-4005A is the correct number for a '39 1700. Knowing how much these numbers can get switched up over the years, can anybody help me with this?? For what it's worth, the NOS unit on Ebay doesn't look like the one in my car, but I have no way of knowing if mine is original or has been 'crossed' with another model. Pictures below; first one is what mine 'looks' like, 2nd is Ebay offering. Thanks to any help or input anyone can offer up.
Attach file:  (7.14 KB) (7.14 KB)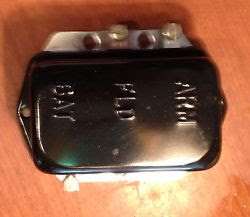 (3.61 KB) (3.61 KB)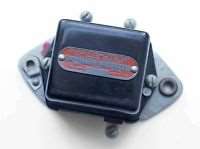
Posted on: 2017/10/2 19:36
|
|||
|
'If you think you can, or you think you can't - you're right!' Henry Ford.
1939 Packard Six, Model 1700 |
||||
|
||||
|
Re: Steering box Re-installation '39 Six
|
||||
|---|---|---|---|---|
|
Home away from home
|
Thanks Howard (Joe) & Ross - appreciate you taking the time to read and post. It would seem the steering link has to be removed. In Joe's thread, it sounds like he 'unthreads' the link by loosening the end clamps and turning the tube out. This will obviously change the wheel alignment and I would sure like to avoid that. I see there are castellated nuts and cotter pins on both ends of the link and my thought was undoing those and separating it that way. Has anybody done that?? Is it feasible? Does one need a ball joint fork?? I am definitely in 'unfamiliar territory' here and don't want to wreck anything; can someone with front-end expertise jump in here?? As always - thanks in advance.
Posted on: 2017/8/27 10:32
|
|||
|
'If you think you can, or you think you can't - you're right!' Henry Ford.
1939 Packard Six, Model 1700 |
||||
|
||||
|
Steering box Re-installation '39 Six
|
||||
|---|---|---|---|---|
|
Home away from home
|
I had my steering box out on this car once already and had a machinist re-do the sector shaft wheel, as the open face ball bearings that counter the side-thrust had disintegrated and there was at least a half revolution of Wheel-play in the steering. The bearings were unavailable and the machinist made up some bushings that initially did the trick but the stock was too soft and I was soon back to a 1/4 wheel of play. I took it back out and sent it to a steering rebuild specialist, who was able to adapt some GM bearings to work and got it back to zero-play, factory specs.
My question is this: both times when I removed it before (and once putting it back in) the only way I could get the box out was to remove the bottom end cap of the box, and, after removing the sector shaft out the top, pull the steering shaft straight out the bottom. Then the steering box could be lifted out easily. Otherwise, I could not get the whole assembly to clear the steering linkage as it slid out of the steering column tube. The rebuild guy 'strongly recommended' that I find a way to reinstall it without taking it apart as it now has open face ball bearings in it AND is all adjusted to perfection, so I don't want to mess with it. Has anybody come across this issue before and/or does anyone know the 'trick' to reinstalling the assembly in one piece? I spent almost 3 hours fighting with it today and although I can get it very close to going up between the control arm and the steering linkage, I cannot 'quite' get it. I am now thinking of removing at least one end of the steering linkage as it would drop down about a 1/4" and pivot back almost 2", which might be enough, but I don't want to go to all that trouble if there is an easier way. REALLY HOPING SOMEONE CAN GIVE ME SOME GUIDANCE OR A 'TRICK' TIP!! THANKS IN ADVANCE.
Posted on: 2017/8/26 18:46
|
|||
|
'If you think you can, or you think you can't - you're right!' Henry Ford.
1939 Packard Six, Model 1700 |
||||
|
||||
|
Re: '41 & '42 160 Temp Gauge Removal
|
||||
|---|---|---|---|---|
|
Home away from home
|
I've been watching this post to see what I could learn, as I had to remove the gas/ammeter gauge cluster in my '39 Six and was fearful I might have to remove the dash, which I was NOT looking forward to.
Although I realize the oil/temp set present a much more complicated removal dynamic due to the contiguous plumbing, the actual disconnection of the cluster pod from the back of the dash is the same for both sets. I did attempt the task today and was very pleased to find I was able to get the cluster pod out without incident. I taped each wire-end off so I didn't have to worry about shorts. A 5/16" nut driver made getting 'at' the nuts quite easy. and I found the 2 right hand nuts had their own studs, while the 2 left hand ones 'share' studs with the speedometer. I bring this up on this post as the cluster I found on the net to replace my 'sprung' ammeter gauge was listed as being from a '41, and the gauges, pod-'can', and hole pattern are identical to the '39 pod I removed. The only discernible difference I could see was the glass/limit(s)-painting. I imagine this is moot for the owner working on the 160, as he has likely figured out the removal procedure for his gauges by now, but wanted to post just in case anybody else is involved with gauge R&R in this year-range.
Posted on: 2017/8/20 18:03
|
|||
|
'If you think you can, or you think you can't - you're right!' Henry Ford.
1939 Packard Six, Model 1700 |
||||
|
||||
|
Re: what to check out when buying a 110?
|
||||
|---|---|---|---|---|
|
Home away from home
|
Hi Megamotorhead,
I am by no means an 'authority' on 'buying stock Packards' and there are tons of guys on this site that have forgotten more than I'll ever know about these cars, but I bought a '39 Six about a year and a half ago and have learned a 'few' things. My car was actually advertised as a '120' and I went to look at it expecting a straight 8. I had done a fair bit of research and knew that the wheel base was a 'tell' on the model. When 'my' car turned out to have a six cylinder and a 122" wheel base, I then thought it was a '110'. I bought the car and started calling it a 110 until someone on the site corrected me. 1939 6 cyl cars were called 'Six's and I don't think they became '110's until 1940. One thing that has plagued me since getting my car is trying to get the steering box to any semblance of factory specs. In mine, the side-thrust bearings that 'support' the sector wheel were disintegrated and I scoured every bearing resource I could come up with and could not find them. I would sure look closer at the steering play if I bought another one. I also did a fair bit of checking on the engine #'s and the VIN ID plate. There is an 'anti-theft' # imprinted into the fire wall and the engine block ID #'s are letter-coded; I.E. 'B' denotes 1939, 'C' 1940, etc.. Packard did not have a 'numbers matching' method of coding their engines, but I would ensure that a) the main VIN ID plate is THERE, and record it, the firewall # and the engine ID and check with the guys on this site and they will be able to give you a pretty good idea if things match up. I found it amazing how many new-old-stock and remanufactured parts were still available for these cars. And there is no way to say enough about the folks on this site for their constant help, advice and clarification on 'all-things-Packard'. I can also say I have never had any 'buyer's remorse' for having bought my car and am still as enamored with is as the first day I set eyes on it. If you do pick up this car - congratulations... and welcome to 'Packard'.
Posted on: 2017/7/19 19:32
|
|||
|
'If you think you can, or you think you can't - you're right!' Henry Ford.
1939 Packard Six, Model 1700 |
||||
|
||||


