|
Re: Coil wiring diagram /1954 pacific/cruising rpm engine bogging/coils
|
||||
|---|---|---|---|---|
|
Home away from home
|
Thank you. I'm on it when I get home. The car does have a tach mounted below the dash. Stay tuned.
Posted on: 2019/11/19 17:30
|
|||
|
||||
|
Re: Coil wiring diagram /1954 pacific/cruising rpm engine bogging/coils
|
||||
|---|---|---|---|---|
|
Home away from home
|
Interesting that you mention that. When I inquired with the previous owner he said the distributor had a Pertronix Ignitor. I thought maybe he was pulling my leg. In fact inside the glove box was a new unopened Pertronix ingnitor. Only thing is, I have a Delco-Remy distributor. I had thought ignitors only work with Autolite distributors. When I pulled the cap off it looked like a normal points distributor with a condenser. The car has a GM 700R4 overdrive trans.
Posted on: 2019/11/19 15:27
|
|||
|
||||
|
Re: Coil wiring diagram /1954 pacific/cruising rpm engine bogging/coils
|
||||
|---|---|---|---|---|
|
Home away from home
|
Fantastic, all makes sense. So riddle me this.....aside from me adding a new coil, incorrectly reversing the polarity, having the car stumble at cruising rpm. Then fixing the polarity by configuring the coil wires as to when I received the car which is ignition and distributor wires on negative coil terminal and the stumble kind of dissipating.....should I now follow the diagram and your advice and put the ignition wire on neg. terminal and distributor wire on pos. terminal and see what happens? Your help is greatly appreciated.
Posted on: 2019/11/19 14:21
|
|||
|
||||
|
Re: Coil wiring diagram /1954 pacific/cruising rpm engine bogging/coils
|
||||
|---|---|---|---|---|
|
Home away from home
|
I came across this on the net:
"A coil with reversed polarity will have about a twenty percent lower output which may not show up at idle and low rpms, but can cause an engine to miss or stumble under load and at higher engine rpms."
Posted on: 2019/11/19 13:43
|
|||
|
||||
|
Re: Coil wiring diagram /1954 pacific/cruising rpm engine bogging/coils
|
||||
|---|---|---|---|---|
|
Home away from home
|
All good. BigKev had the 1954 wiring diagram.
Attach file:  (127.35 KB) (127.35 KB)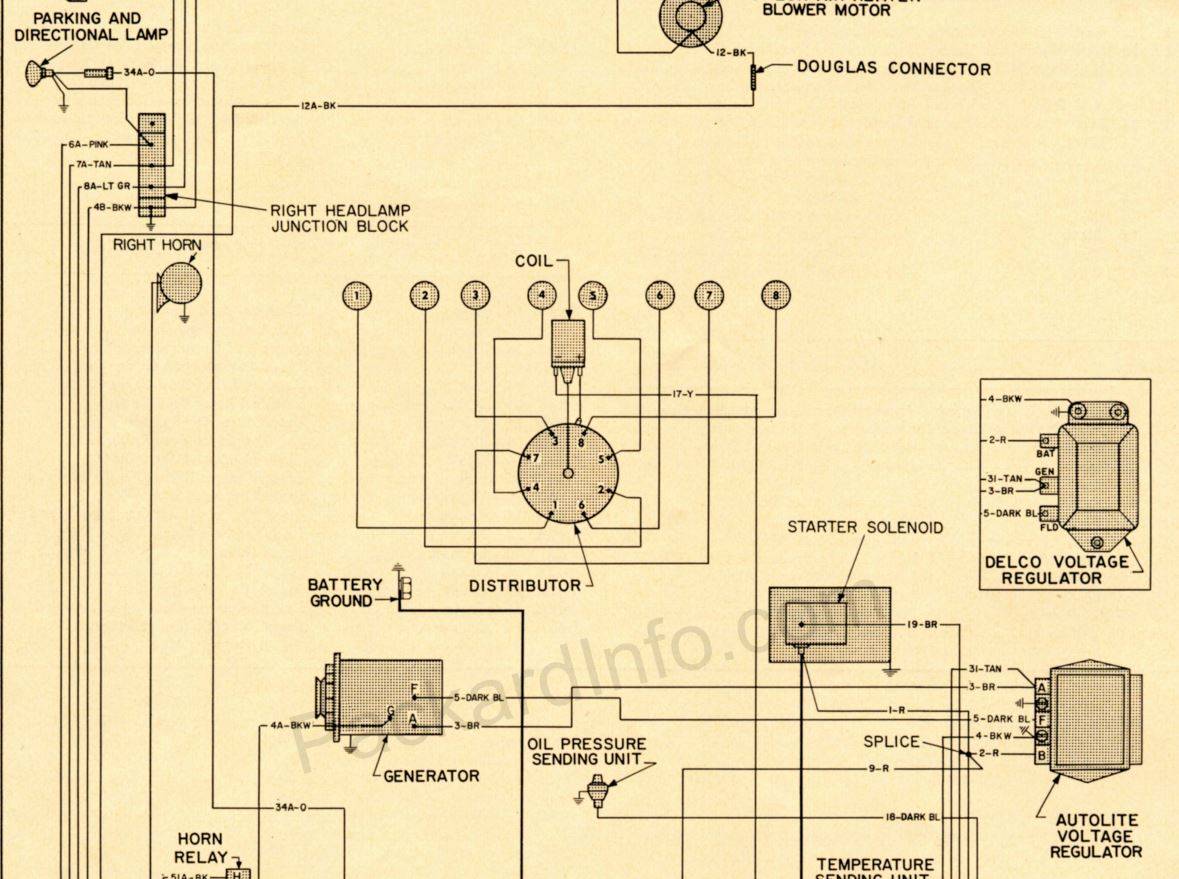
Posted on: 2019/11/19 11:07
|
|||
|
||||
|
Re: Coil wiring terminal /1954 pacific/cruising rpm engine bogging/coils
|
||||
|---|---|---|---|---|
|
Home away from home
|
Great, thank you again Howard. Where it stands now, I have both the ignition wire and the distributor wire connected to the negative terminal and what a appears to be a grounding wire attached to the positive terminal and a bolt on the coil bracket. This is how the car was set up when I received it. Do you know of any spot on the website that has a 1954 wiring diagram? I cleaned the carb with gumout as well. Almost lost the straw down the throat. The 35 mph cruising rpm bogging seems to have dissipated...I think...the car does have the petronix flamethrower #40011 1.5 ohm coil on it with no issues..yet...
Posted on: 2019/11/19 10:50
|
|||
|
||||
|
Re:1954 359 L8 Coil wiring / delco-remy 1115376 coil / 1110848 distributor/ignition wire terminal
|
||||
|---|---|---|---|---|
|
Home away from home
|
Hi Howard. I hope no one minds me jumping in on this old post.In my quest to start my 54 that was turning over but not starting I changed the plugs (autolite 308 gap 0.025), rotor from MAX MERRITT and a new coil. As discussed on another post I have a Standard UC14,UNITED C-14,Duralast C809, Napa Echlin IC-7, Petronix 40011 and the original coil with brown top and #264 stamped on top. All have different primary and secondary resistance. Turns out engine was just flooded. Easy fix. Car now bogs at cruising rpm (35mph)though. Car is positive ground with 6 volt Optima. I noticed when I replaced the coil I put the 2 wires (1 red) from the ignition on the positive terminal and the single black wire on the negative terminal. Please verify that this is absolutely incorrect! I have a wiring diagram from FD Harper that I can barely make out but it looks like red ignition wire does in fact go to the neg. terminal. Could this be the source of the bogging? Your help is greatly appreciated.
Posted on: 2019/11/15 20:02
|
|||
|
||||
|
Re: 1954 Packard Pacific Oil pressure sending unit 4 way brass tee adapter/ Auburn style dash panel
|
||||
|---|---|---|---|---|
|
Home away from home
|
Thank you. I'm on it. Stay tuned. Quick question........compatible 6 volt ignition coils......advan-tech, united, standard, duralast, napa, spectra, master pro all jive...car has delco-remy distributor/points. will a petronix flamethrower II coil be compatible even though I do not have a petronix ignitor? what brand with the tan top and made in usa sticker is the one I pulled out of the car? I noticed the secondary resistance on the old one was 1.5 ohms, the new standard coil i put in has both a lower primary and secondary resistance. could the lower resistance be tied to the car bogging at cruising rpm?
Posted on: 2019/11/14 11:09
|
|||
|
||||
|
Re: 1954 Packard Pacific Oil pressure sending unit 4 way brass tee adapter/ Auburn style dash panel
|
||||
|---|---|---|---|---|
|
Home away from home
|
Hi Howard. I hope you don't mind as you have been very helpful. I have pulled off a school boy error. Navigating to the correct forum has been a challenge for me. Any-who, I recently went through the warm weather/cold weather Carter WCFB 2112S flooding circus. All is well, pedal to the floor and ether....however, in the process I changed the plugs, coil and added a new rotor. Unfortunately I did not mark the location of the rotor. The engine bogs now at cruising rpm around 30mph-40mph. Bogging and pulling sensation. Aside from carb adjustments, carter wcfb trouble-shooting point to "defective distributor advance mechanism" hence the rotor. I assume the issue is caused by me not precisely aligning the new rotor. Since I did not mark the location of the rotor how do I now align it correctly? Is it as simple as pointing it to the number (1) plug/cylinder on the distributor?
Posted on: 2019/11/12 12:35
|
|||
|
||||
|
Re: 1954 Packard Pacific Oil pressure sending unit 4 way brass tee adapter/ Auburn style dash panel
|
||||
|---|---|---|---|---|
|
Home away from home
|
The top two are new. One is stainless steel and the other is aluminum. The bottom one is original. The diameter of the original gauges is 3.125 inches. The panel was held on simply by little clips behind on the chrome gauges rings. No adhesive or screws. I learned that the hard way. The new panels were made with gauge circles with a diameter of 3.40625 inches so as to fit directly over the original panel and gauge rings. Attaching it securely will be a challenge. Thoughts are welcome?
Posted on: 2019/11/1 11:27
|
|||
|
||||


