|
Re: 1939 Super 8 wiper issue
|
||||
|---|---|---|---|---|
|
Just can't stay away

|
If you are mechanically inclined, remove it and work on it. On my '39, I disassembled the vacuum motor and cleaned it with Marvel Mystery oil, then used the same to lube it along with some white Lubriplate. There was a reed valve on top that I flipped over, it acts as the on / off switch I believe. I connected it to my A/C vacuum pump and let it run a couple of minutes and added a little more lube in it. Now my wipers work great. But you should put a vacuum guage on the port at the fuel pump and get a reading and then at the hose attachment on the wiper motor, it is easy to have a problem in between those two points.
Posted on: 2016/12/8 5:38
|
|||
|
||||
|
Re: 1937-1940 repro gas tanks
|
||||
|---|---|---|---|---|
|
Just can't stay away
|
Yes, '39 110 4dr.
Posted on: 2016/9/1 7:41
|
|||
|
||||
|
Re: 1937 Packard 120 sedan door weatherstripping channels
|
||||
|---|---|---|---|---|
|
Just can't stay away
|
Using a good contact {3m Black} cement is much easier. The new rubber is pretty stiff and getting the doors to close correctly is tough when using the clips or channels.
Posted on: 2016/6/27 21:58
|
|||
|
||||
|
Re: 39 1700 map/reading lights, where were they mounted???
|
||||
|---|---|---|---|---|
|
Just can't stay away
|
On my 4dr, they mounted on two vertical brackets that held them in place over the square holes just above the Ign. switch area. I glued in a couple of plastic pieces I cut from a milk carton to act as light deflectors, it looks good at night. This picture is looking from the rear with the radio delete plate installed.
Attach file:  (47.77 KB) (47.77 KB)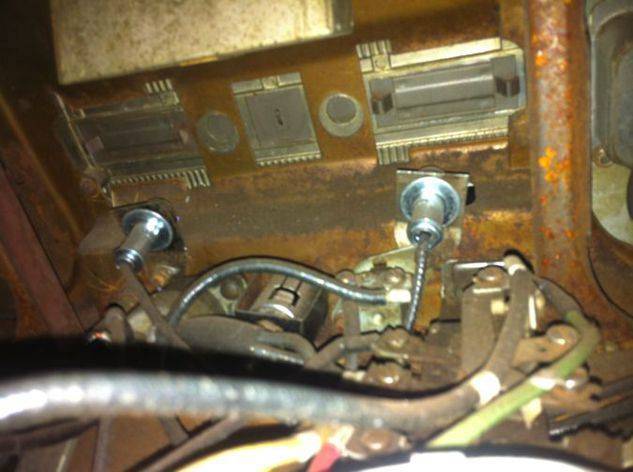
Posted on: 2016/6/26 19:21
|
|||
|
||||
|
Re: 1937 Packard 120 new running board rubber mounting
|
||||
|---|---|---|---|---|
|
Just can't stay away
|
There is a "Bondo" type of filler called Gold Rage that I believe would work very well for your project. You should tape over the small vulcanizing holes from the back side and then mix and spread the Rage on. It should take minimum sanding with 80 grit to get the surface level, then the adhesive should stick well and all should stay on for many, many years. I would suggest to not do bed liner spray, it is a bunch of work.
Posted on: 2016/6/15 19:50
|
|||
|
||||
|
Re: How to break lose front seat adjusters on front seat of 38 four door club sedan
|
||||
|---|---|---|---|---|
|
Just can't stay away
|
I just rebuilt my seat rails on my '39 four dr. as they were also stuck in place. It required a complete disassembly and cleaning. There are four rollers (two per side) that have needle bearings in them that will need to be taken apart and cleaned/lubed. Once the four rollers are lubed and the track is cleaned and lubed, the seat will slide very easily. There are 15 needle in each roller so be careful while you take it apart. The rollers will only come out by turning the track over and letting them roll out along the top of the upper track. Putting the rollers back in is tedious but with lot's of grease the needles will stay in place.
Posted on: 2016/5/16 22:15
|
|||
|
||||
|
Re: Dash?
|
||||
|---|---|---|---|---|
|
Just can't stay away
|
If you only plan to sell it then I suggest leaving it alone. A poorly done regrain would detract worse than an original but worn /faded dash it seems to me. Regraining the dash in the car will be very difficult.
Posted on: 2016/5/9 17:50
|
|||
|
||||
|
Re: '39 Packard Six Steering Box Removal
|
||||
|---|---|---|---|---|
|
Just can't stay away
|
I'm just finishing up on my 1939 110 4dr. and as I recall, if you remove the clutch and brake pedals, you can remove the interior metal plate that goes around the steering column [4 screws]. Then you can pull the steering box up out of the chassis and then go forward and out of the car with it.
Posted on: 2016/4/4 20:15
|
|||
|
||||
|
Re: 1939 Packard 110 Dashboard Trim Removal
|
||||
|---|---|---|---|---|
|
Just can't stay away
|
I just finished this project about two months ago, good luck on the results. There are several small tabs that are bent over to hold the chrome to the dash, you will need to slowly straighten these up to release them. You probably will have several of them break off but it should work OK at the finish. I sent my chrome pieces out to the chrome shop and they look very nice now. To re attach all of this I was able to rebend a few of the tabs but I put a thick coating of RTV silicone around the speedo and clock circles and along the edges of the straight sections. Then I used a bunch of clamps to hold it all tight for a bit. It came out very nice. I used the Grain-It Technologies kit with their large size roller, this process took several weeks as I would strip it again and repaint it to get the correct pattern and color.
Attach file: (61.63 KB)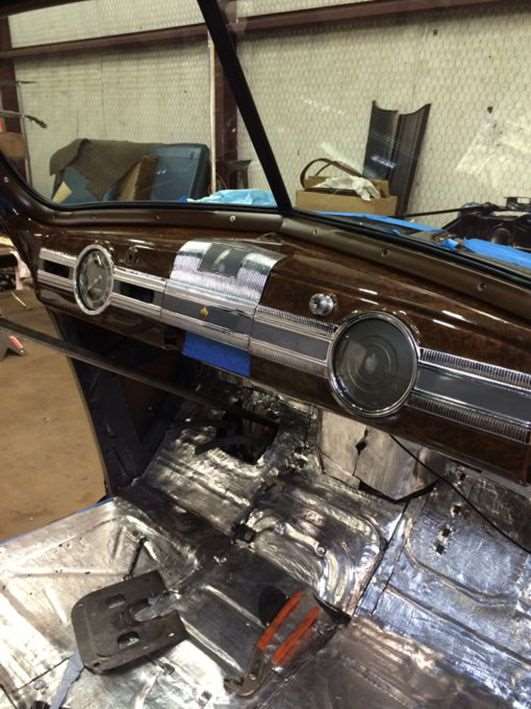 (37.53 KB) (37.53 KB)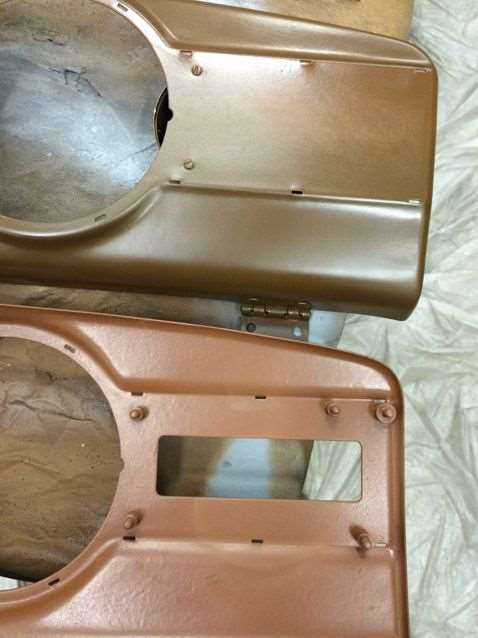 (25.49 KB) (25.49 KB)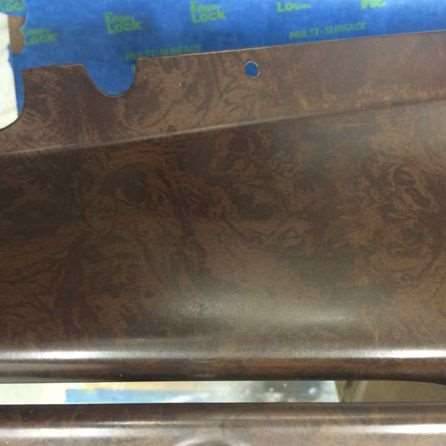
Posted on: 2016/2/29 9:15
|
|||
|
||||
|
Re: Six exhaust and intake manifold
|
||||
|---|---|---|---|---|
|
Just can't stay away
|
Yes, I did a lot to it. I pulled the steering column and seperated the collar just below the steering wheel, I machined the end of the shifter rod that went into that collar and made a bronze bushing for the collar. At the bottom of the steering column, I took that apart because the aluminum piece that is threaded to hold the lower end of the shift rod was bad, I brazed up and rethreaded the lower end of the shift rod and taped the threads in the aluminum end. I built new ends for the actual shift linkages to the trans. and now it seems to shift perfectly.
Attach file: (39.02 KB) (38.07 KB) (38.07 KB)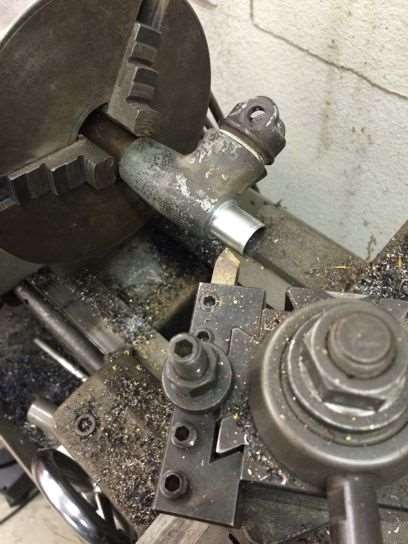 (22.94 KB) (22.94 KB)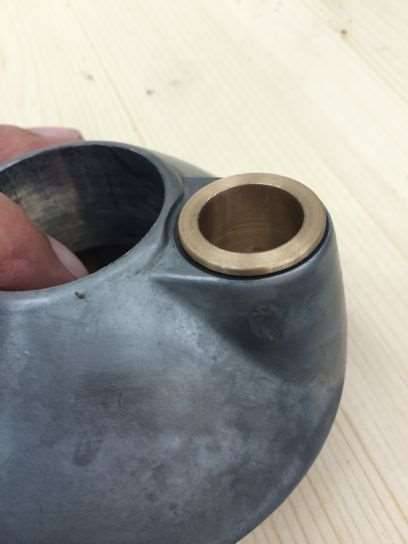
Posted on: 2016/2/4 6:00
|
|||
|
||||


