|
One Person Brake Bleeding with a Mityvac
|
||||
|---|---|---|---|---|
|
Home away from home

|
I changed out my rubber brake lines for new braided stainless ones on the Triumph GT6 yesterday, so today it was time to bleed them.
I spent about 30 minutes by the passenger rear wheel, pumping the mightyvac like crazy to keep suction in it, and getting nothing but a long stream of bubbles that never improved. I finally gave up and moved over to the other rear wheel, with the same results. This is pretty much what happened last time, where it finally ended up good enough to get it to a shop and pay someone about $100 to bleed the brakes with a pressure bleeder. Wasn't looking forward to that again, but I knew I at least had to finish the 4 wheels to get some sort of brake fluid back in there before I could even consider getting it down and over to the garage. Forearms hurting from pumping, I took a break, and pulled up Google on my phone and searched "How to bleed brakes with a mightyvac" and got this video:http://www.youtube.com/watch?v=KTY2iBkFeV0 So I'm watching, and he gets to the part about taking the bleeder valve out and putting 4 loops of teflon tape on it and putting it back in, and I'm thinking "Okay, that's probably overengineering, it can't make that much difference, you're just going to be wasting brake fluid while you put the teflon tape on". So I went back to the passenger front wheel, pumped up the mightyvac and cracked the bleed nipple, and same story, bubbles like crazy and no signs of improvement. So I thought "Well, heck, I'll try it, and if the guys at the brake shop laugh that I have teflon tape on my brake nipples, so be it." Stuck a cup under the caliper and pulled the nipple out, wrapped it around 4 times with teflon tape, and threaded it back in. Topped up the master cylinder again, hooked the mightyvac back up and pumped it up to 20 again. Cracked the nipple and a solid wall of clean fluid came through, with just a few microscopic bubbles (which he explained are usually just from sucking air up the threads.) More telling, now, from the initial pump up to -20, it only got to -15 before I had to top up the master cylinder. Before I would pump to -20, crack the nipple open and run it down to -5 about 7 times before I had to top up. (I counted, because I'm doing this in the garage and it's a pain to get out from between the wall and the car to check the fluid level, but I didn't want to run it dry either.) After another 2 top ups, I was satisfied I had a totally negligible amount of air in the lines. This is probably the 10th time I've bled brakes on a car and the first time I can really, honestly say that I feel good that I'm sure I got it all, and it took about 5 minutes to do the corner, vs 30 minutes of flailing to no effect. Re-did the other wheels, with the same result, every time. I went ahead and ran through the rest of the brake fluid on the rear wheels since it goes bad storing it, just to be sure that I got it all, but it was pretty obviously perfectly fine long before I wrapped up. A quarter's worth of teflon tape, and a minute to pull the nipple and wrap it, to save $100, (or a life, potentially, from dodgy brakes). I'm definitely a believer now.
Posted on: 2015/5/12 22:59
|
|||
|
||||
|
Re: Differential ID
|
||||
|---|---|---|---|---|
|
Home away from home
|
No problems (that I know of yet) - just doing a full frame off restoration on that Caribbean and was hoping to figure out what the gear ratio was. Trying to get the running gear sorted so it'll be a little easier to push the frame in and out of the garage. It's taken my main car's spot to be out of sight of the HOA (while the body and frame are seperate anyway) so whenever we have reports of hail I have to scramble to pull the frame out and stick the nice car in the garage before the attack comes.
Also on the plus side the rain has done an awesome job of knocking the dust off the frame from sitting while we finished up the Triumph. :D
Posted on: 2015/5/12 11:36
|
|||
|
||||
|
Differential ID
|
||||
|---|---|---|---|---|
|
Home away from home
|
Finally found a number on the differential but it doesn't correlate to any of the numbers I had written down as possibilities.
The numbers I had all start with 90251, but the number on this differential is 443645, which isn't even close. A Google Search didn't turn up anything. Anyone have any ideas? Attach file:  (62.67 KB) (62.67 KB)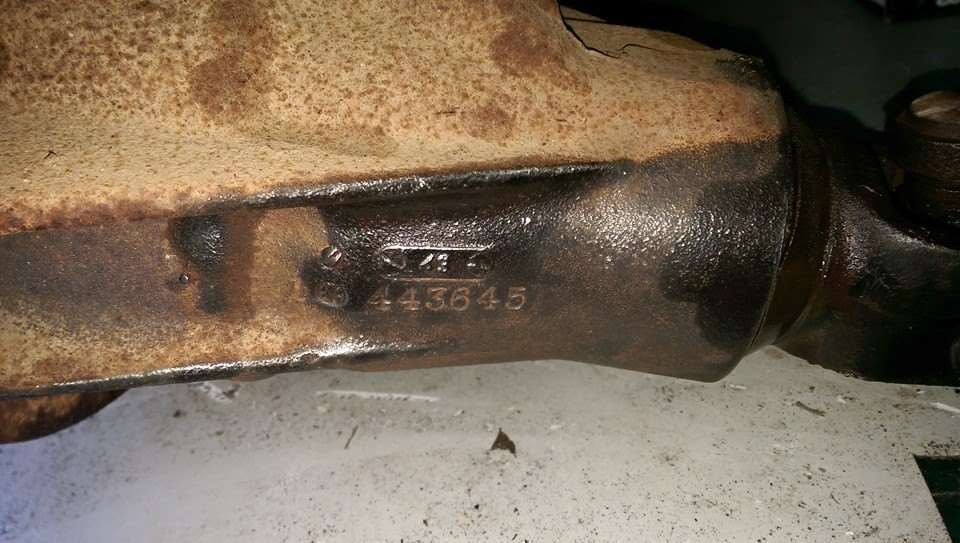
Posted on: 2015/5/8 18:16
|
|||
|
||||
|
Re: Richter's '53 Caribbean
|
||||
|---|---|---|---|---|
|
Home away from home
|
Remembered to get pictures this time - hopefully they're clear enough. The red and white wires are tied to the far left on the back row. The yellow wire ties to the filter capacitor, which ties to ground, which is the far right on both rows.
The nearest row is the tone pot, and the second row is the volume pot, and the very back is the on off switch, so brings power from the fused cable (leave this alone for wiring aux.) And the takeaway from all this is - if you have hum you can't isolate, see if you can test with a 6v battery to make sure it's not your crappy eBay power supply. :) Attach file: (49.66 KB)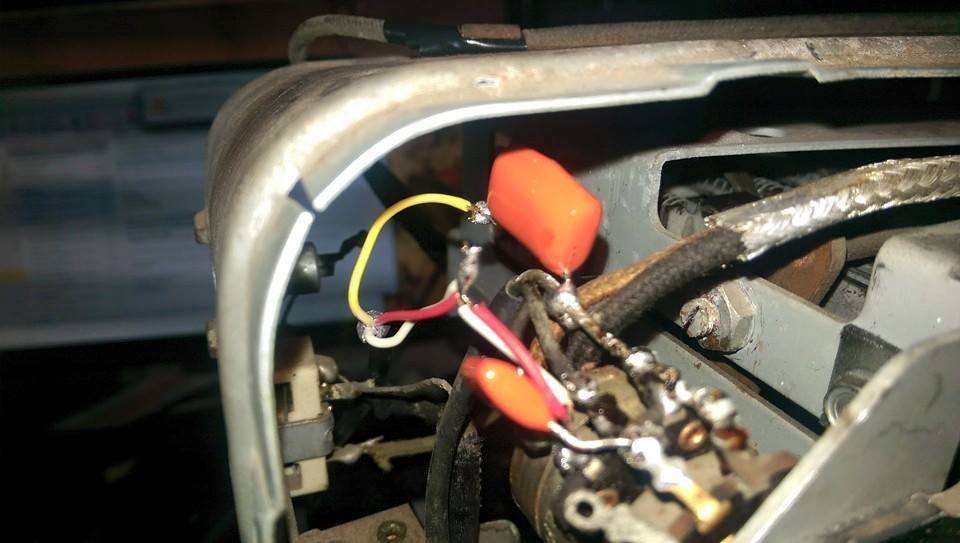 (64.56 KB) (64.56 KB)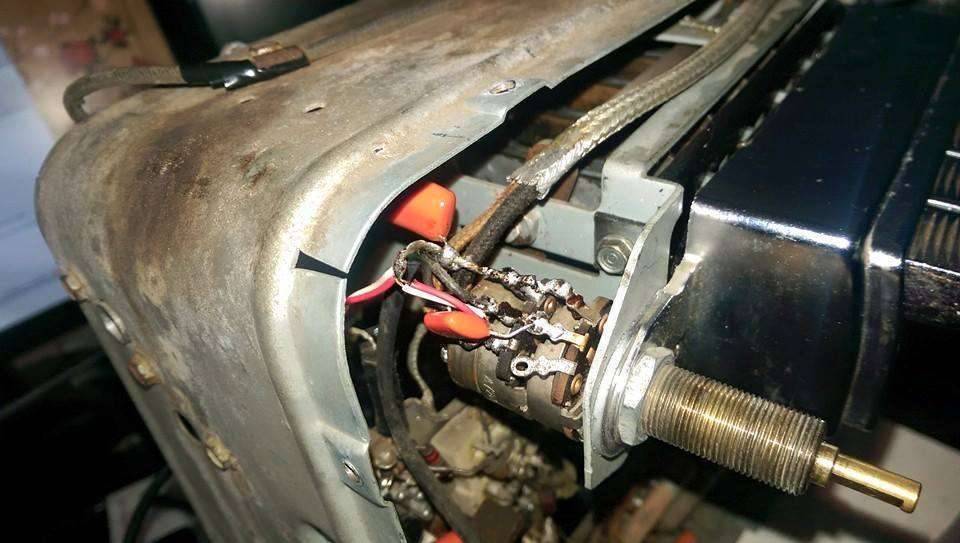
Posted on: 2015/4/27 11:14
|
|||
|
||||
|
Re: Richter's '53 Caribbean
|
||||
|---|---|---|---|---|
|
Home away from home
|
NOTE ON SPEAKER:
This probably wouldn't be a huge issue for most people, but i have a flaky power supply I've been using for testing. Either way, it's cheap insurance. Stick a filter capacitor on the ground lead/pin going out to your phono jack or cable, and that'll prevent DC from leaking back out to your device. It probably wouldn't come up on an mp3 player, because there's no actual ground, so it'd only pull in the amount of power it put out, but my testing input actually has a ground, so when my powersupply negative lead wasn't strong enough, I found it was putting a couple of amps of 6v back to ground, and the phono line plug was getting pretty warm. After the filter capacitor (I just used a 823k (.082 Microfarad, I think) inline, because that was the first thing I grabbed, pretty much any value should block DC) - I had good volume with a hum, that it turns out I was also getting from the power supply. Now nothing but good clean music.
Posted on: 2015/4/27 8:03
|
|||
|
||||
|
Re: Richter's '53 Caribbean
|
||||
|---|---|---|---|---|
|
Home away from home
|
Alright, got it working - unfortunately I have the knack for forgetting to take pictures - I need to patch a few tiny holes in the speaker, so I'll try to remember to get a picture whenever I go back in for that.
Essentially though, the safest, easiest place to install a phono plug is at the terminals for the volume potentiometer. If you're looking at the potentiometer (Volume knob piece from the left side of the radio that increases volume when you turn it.) The first thing is stay away from the pins on the very back - there are two and one is incoming positive and the other is negative. What I did is take a stereo extension cable that I had lying around, cut the female end off of it, leaving just the male (part that plugs into the headphone jack.) Stripped it back to get the three wires inside, (Left, Right, and Ground) and used the Ohms setting on my multimeter to figure out which was which. (I would have thought Red for Right and White for Left, then the yellow left over was ground, because that's pretty standard, but in this case, left and right were opposite.) A quick Google search indicated that the tip should be left, middle band should be right, and the base should be ground for standard stereo. For my case, I tied the left and right together (to pick up signal from both sides, in case I ended up playing a song where vocals or guitar or something only came through one side or the other). Looking at the potentiometer from the front, there are 2 rows of three. On the right hand side, the front and back pins are soldered together, and then onto a ground strap. I soldered my ground wire here. On the second row, the farthest left pin is where the signal goes - this actually brings it back to the output of the second IF transformer, in case you were interested, which according to the schematic feels a 0.1V signal wave. The plug end feeds through a convenient hole on the back of the radio. It probably would be best to incorporate some sort of strain relief so you can't accidentally jerk the wire loose by pulling on the plug too hard. It won't hurt anything, but it'll ruin your day having to take the whole thing out to resolder it. After recapping and resoldering some suspect connections, I get a good loud volume with just a little noise in it, and no hum to speak of. The noise may be down to the holes in the speaker, or it may just be 'old car radio'. It's not audiophile grade, but it sounds perfectly period to me, which is still a satisfactory result in my book. :) The other benefit to doing it this way is, if you remove the cable from the source (unplug your mp3 player) then the connections go to open, so your radio should function normally. I haven't tested it because I don't have a good enough antenna, but I would expect the opposite problem - hearing radio and mp3 player together - rather than having no radio after connection, but that doesn't seem to happen, or I'd have a lot more noise, even if I was off station. So I just need to patch up the speaker and I'll be able to check another thing off the list. Soon the carshow for the Triumph will be done and I can get back to actually working on the Packard car itself again.
Posted on: 2015/4/22 16:22
|
|||
|
||||
|
1953-ish Front Suspension Rebuild
|
||||
|---|---|---|---|---|
|
Home away from home
|
I have the service manual, but I was wondering if anyone had run across a writeup on refurbishing the front suspension?
Mostly interested in separating the bushings and arms and whatnot. I'm sure I can muddle through, but while I'm stuck at work I was hoping to run across some tips and tricks that might help me get the upper and lower arms separated from the pieces that bolt to the chassis. Just don't want to mess anything up. Things like the fact that you should use a hex key to remove the adjustable pin for the top link. (Which I obviously found.) Like how does one remove the end caps? Thanks in advance!
Posted on: 2015/4/20 10:37
|
|||
|
||||
|
Re: Richter's '53 Caribbean
|
||||
|---|---|---|---|---|
|
Home away from home
|
Quote:
I have heard on other sites that there is a fear a power surge could go through the MP3 connection and ruin the MP3 player. Have you heard of this? Did some more reading, because I wasn't sure to what extent it would be a problem. The issue is that the chassis of the radio is what's called your B-, so one lead of your input signal (rca phono type, or 1/8" mono jack) is going to be grounding to the hot chassis. In our case, we're talking about a car stereo though, and hot chassis is only 6v. Most of the electronics in your mp3 player are probably designed to run on 5v anyway, so I don't think it'd be too much of an issue. The bigger issue is doing it on a home system, where the grounded chassis difference is wall power, or 120VAC. THAT could be a problem, although on the two radios I'm using currently, it's never been, even though one's been connected to an iPod constantly for almost 2 years now. So from my understanding, it's one of those "it's theoretically possible" things that's unlikely to cause any issues anyway, and even less of a concern when working with a DC powered unit.
Posted on: 2015/4/7 22:31
|
|||
|
||||
|
Re: Richter's '53 Caribbean
|
||||
|---|---|---|---|---|
|
Home away from home
|
Easter weekend was a bit busy - but I managed to get the clamps for the leaf springs installed, and the sourced bushings worked perfectly. Cleaned up and repainted the shackles and the through-bolts for the front of the leaf spring, and got them both back on the frame.
Next step is to get the front suspension rebuilt (already have the rebuild kit waiting) and to go through and clean up the differential. It'll help a lot being able to just roll the thing in and out of the garage without having to balance it all on jacks. Heck, just getting one end or the other back on tires would help.
Posted on: 2015/4/6 10:28
|
|||
|
||||
|
Re: Richter's '53 Caribbean
|
||||
|---|---|---|---|---|
|
Home away from home
|
Quote:
When you get to the part about adding the MP3 connection, please be as detailed as possible! I would love to know how it would work and I do not have much working knowledge with old radios. Awesome! I'll take a look at that in a bit when I get a chance to fiddle again. The bit about power surge into the radio - technically it could probably happen because the chassis acts as the negative side, so if you were supply 10,000 volts to the chassis or something, that'd probably ruin your mp3 player. :) My MO is to use a cheap MP3 player, so that I can just leave it where it is - old iPods and offbrand mp3 players can be had for $20 with enough storage that you can listen all day and not hear the same song twice. Some of them even get FM. On the off chance something happened to it, it wouldn't hurt my feelings much. If it's a concern though, there's a project I was reading through where someone made essentially a short range AM transmitter, so it wouldn't even have to connect to the radio at all. That seems like a lot of work though. http://www.giangrandi.ch/electronics/am-mod/am-mod.shtml
Posted on: 2015/4/1 16:42
|
|||
|
||||


