|
Re: Joe's '49 Club Sedan
|
||||
|---|---|---|---|---|
|
Home away from home
|
Packard Project Summary 2017 Part 1
I've worked on cars most of my life and planned to make that a full time hobby in retirement. When I retired and moved back to Florida, our home garage was very cramped. My generous wife allowed me to purchase a rundown body shop to work on my car projects. One of the benefits of the shop was a paint booth. It was primarily used to store car parts and tools but with some effort could actually be used to paint. After it was cleaned and cleaned up, I rolled the Packard in to paint. The body was final prepped, masked and painted. It was unmasked and rolled outside to let the paint cure. Then the hood and doors were rolled in on support frames and prepped and painted. Next came the front fenders and trunk. Once the paint had sufficient time to cure, it was sanded and buffed with compound. Still needed to be final buffed with a fine compound. To put the body back on the chassis, the chassis was rolled out and turned around to back under the body. The body was rolled in the shop and suspended both back and front while the body dolly was removed. The chassis was carefully rolled under the body using 4 sets of rollers to position it. The body was lowered on to the chassis and temporarily secured with several body bolts. With the body back on, the trunk was mounted. Holes drilled through the hinges helped get it mounted precisely. The gastank was mounted next. The original tank was badly rusted and not a fan of coating it. With no new Series 23 replacement tanks available, I used a new '53/'54 Chevy tank in its place. Made an adapter to align the filler tube with the gas door. Attach file:  (71.86 KB) (71.86 KB)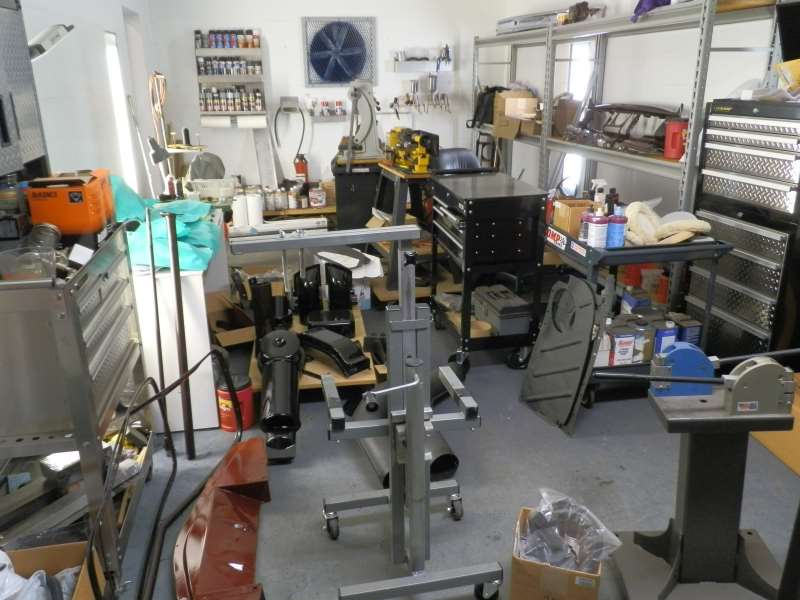 (40.14 KB) (40.14 KB)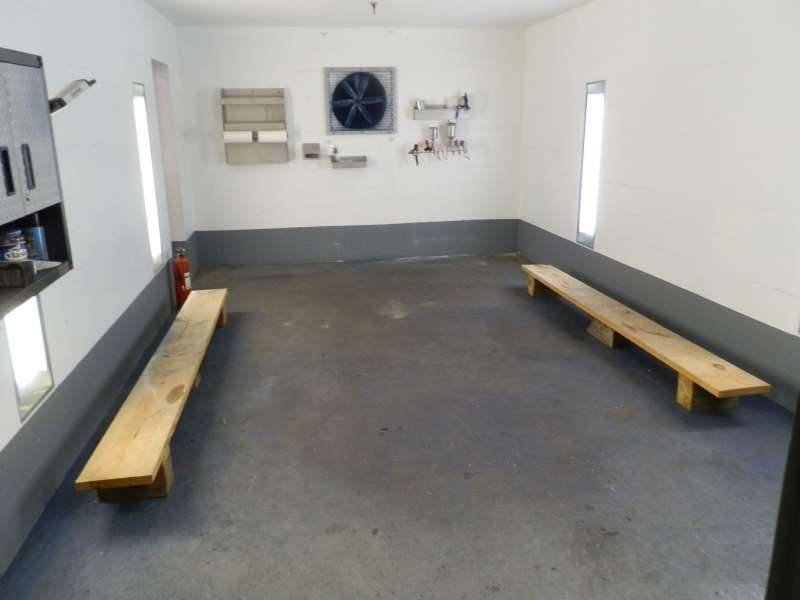 (43.00 KB) (43.00 KB) (46.48 KB) (46.48 KB)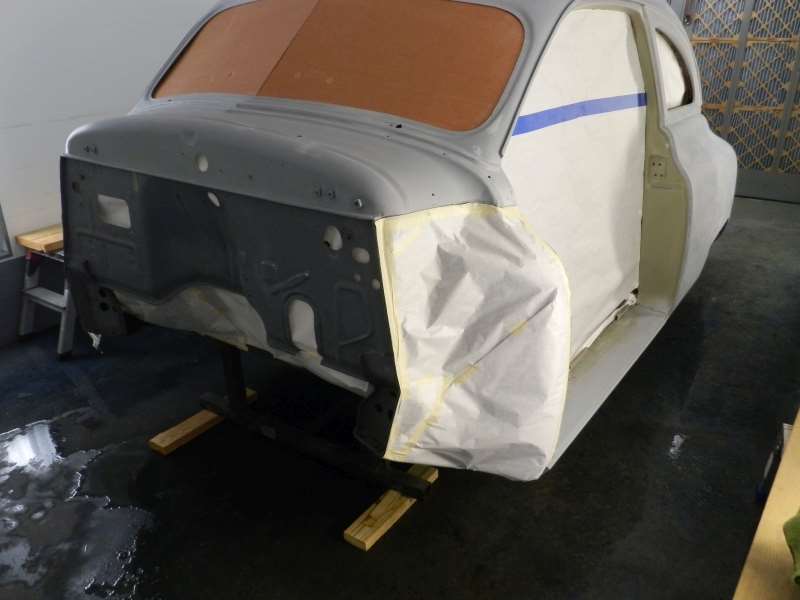 (47.94 KB) (47.94 KB)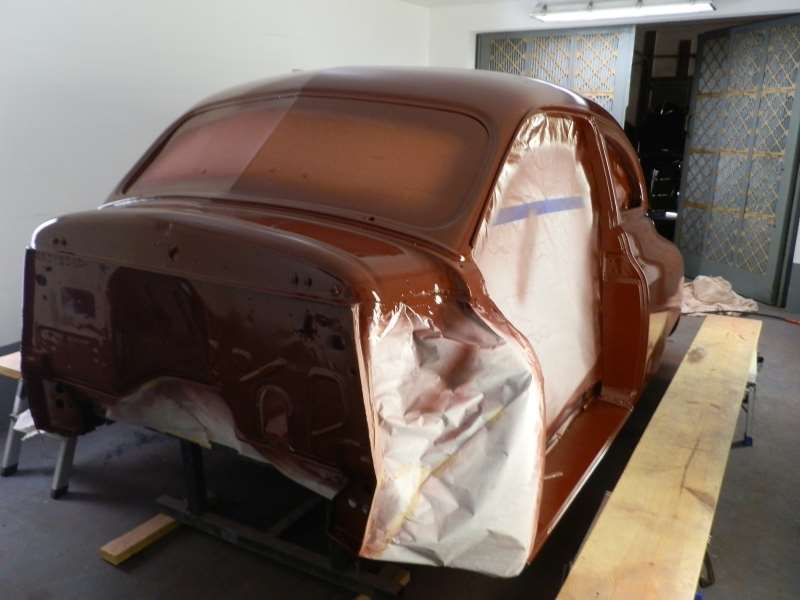 (51.09 KB) (51.09 KB)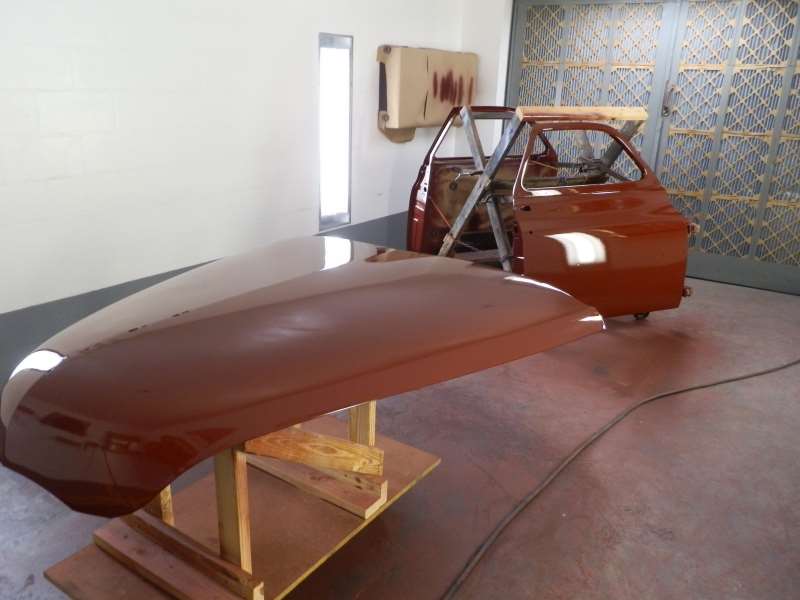 (53.83 KB) (53.83 KB)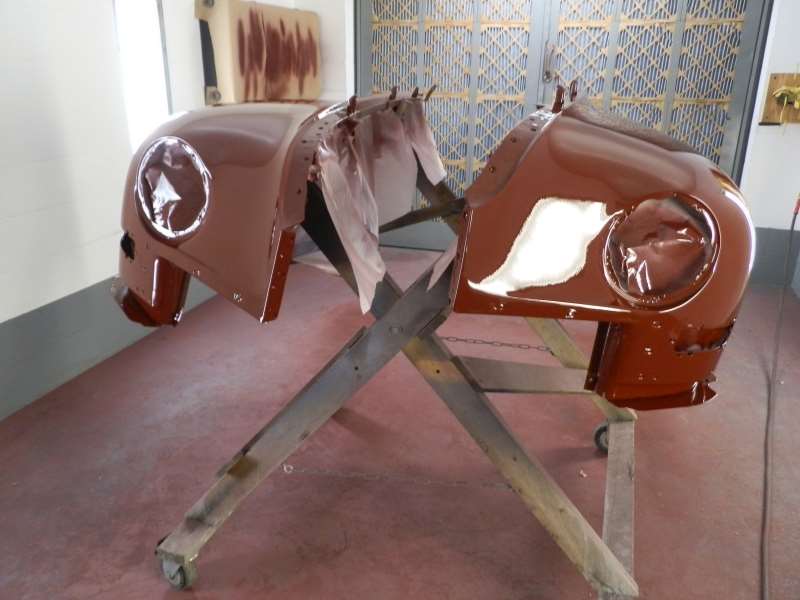 (53.97 KB) (53.97 KB)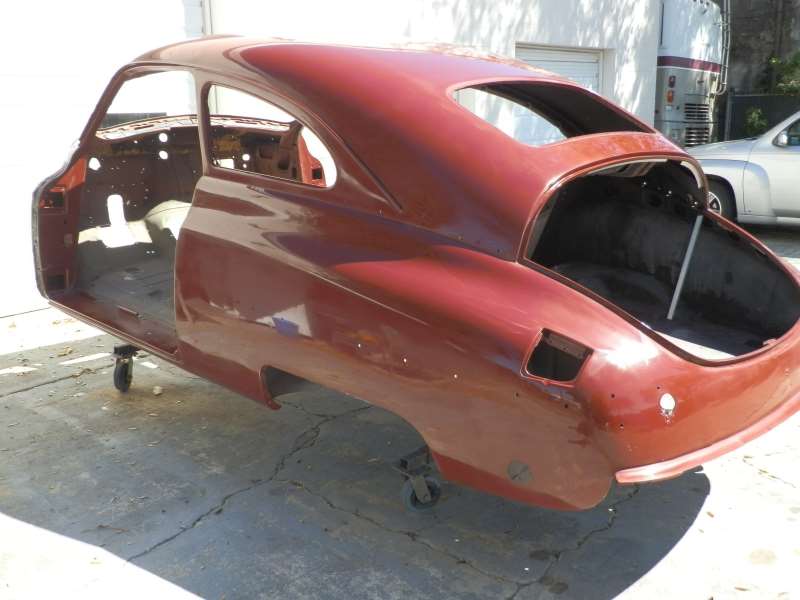 (46.00 KB) (46.00 KB) (76.38 KB) (76.38 KB)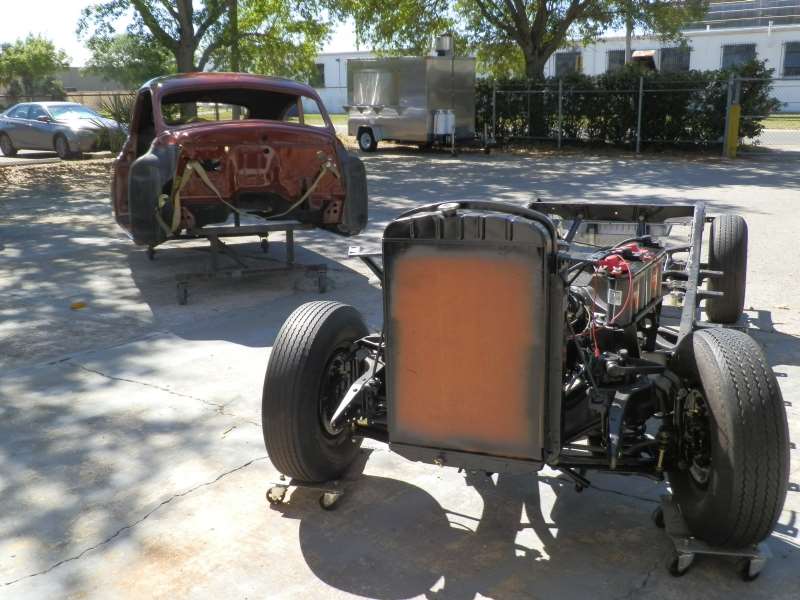 (60.32 KB) (60.32 KB)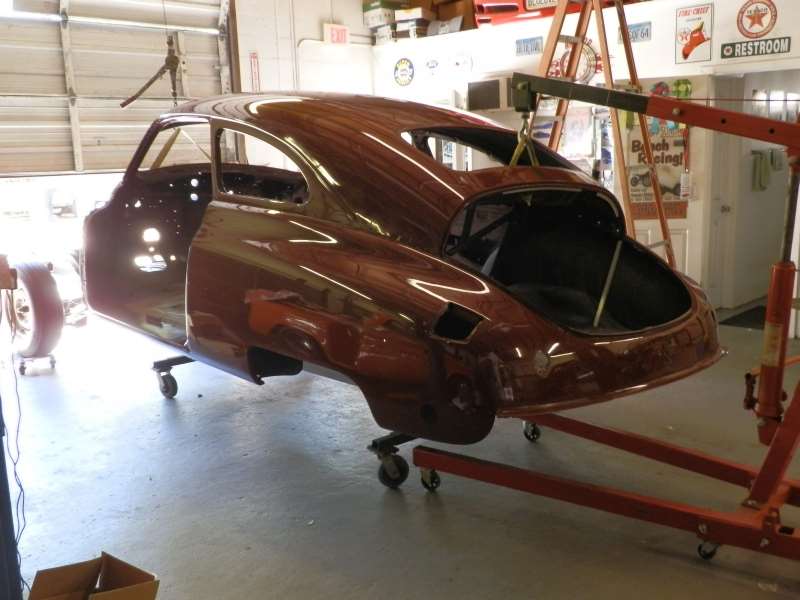 (56.50 KB) (56.50 KB)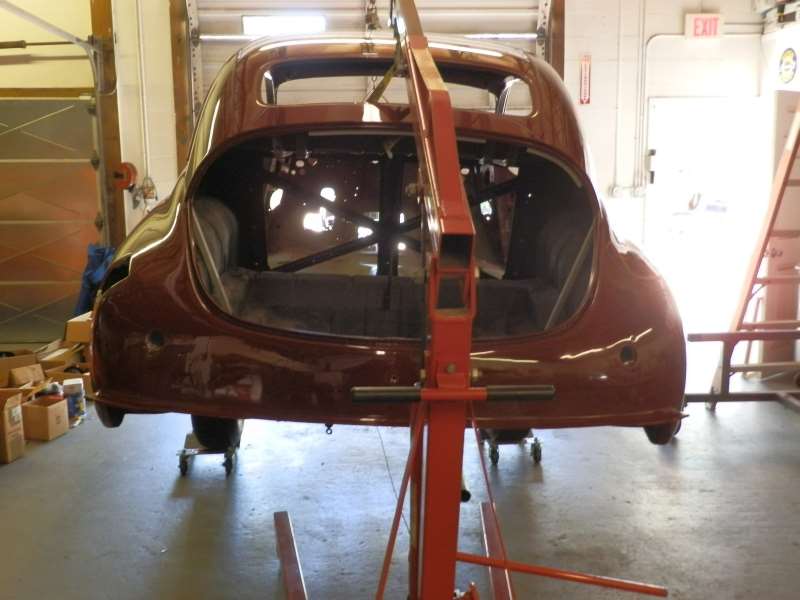 (74.61 KB) (74.61 KB) (51.46 KB) (51.46 KB)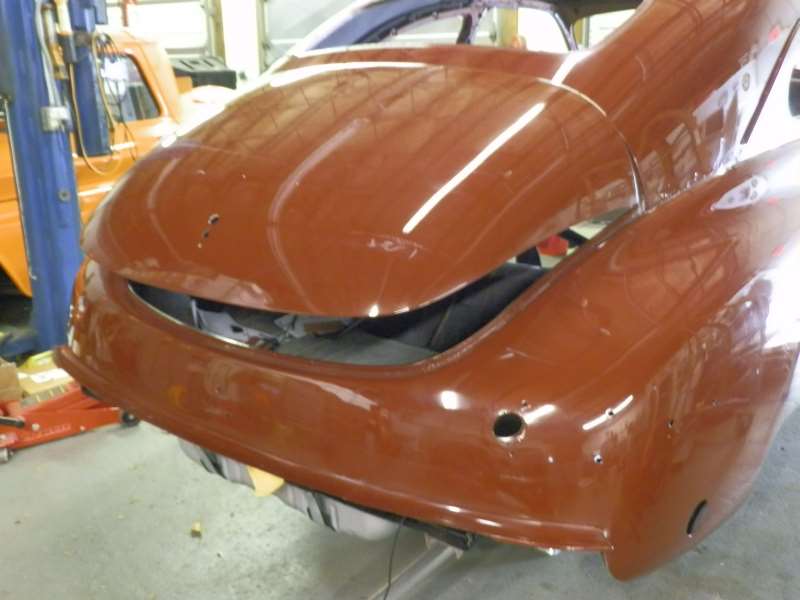 (57.38 KB) (57.38 KB)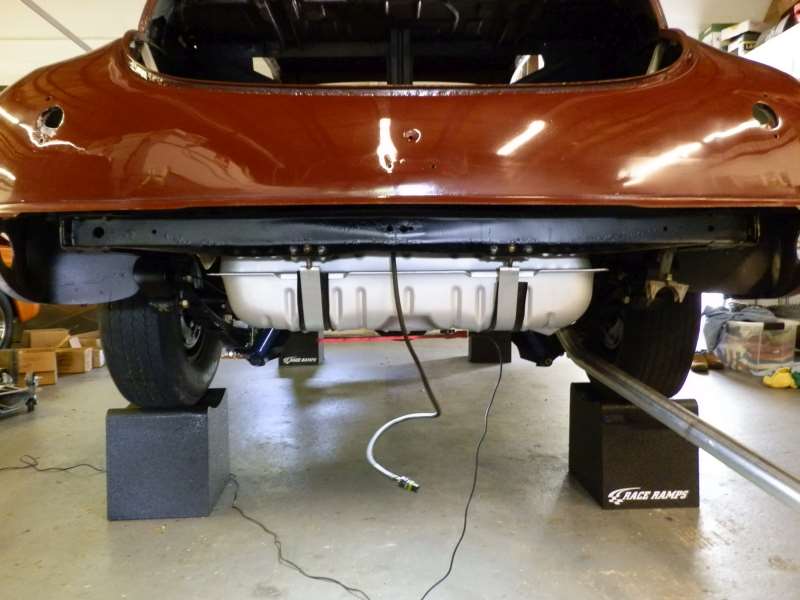 (60.26 KB) (60.26 KB) (49.30 KB) (49.30 KB)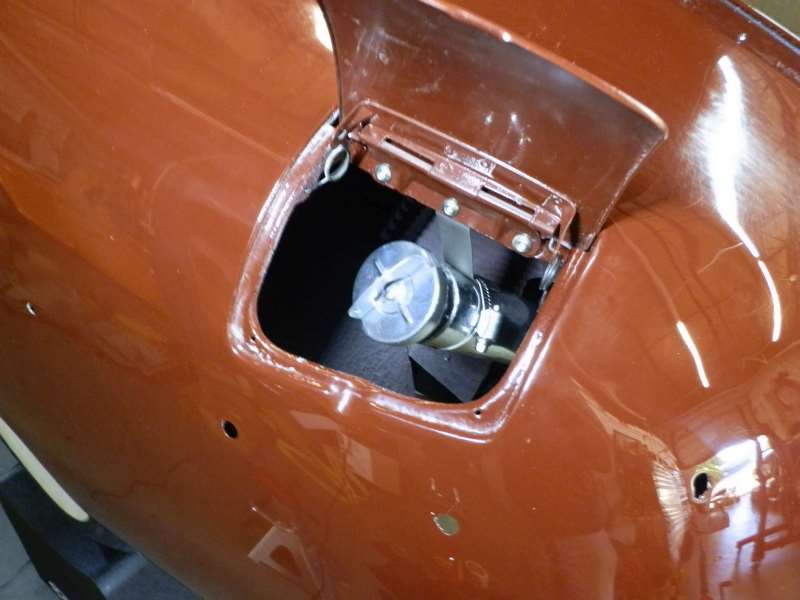
Posted on: 2017/8/3 11:33
|
|||
|
||||
|
Re: Joe's '49 Club Sedan
|
||||
|---|---|---|---|---|
|
Home away from home
|
Personally, I haven't seen a car with and oilbath air cleaner since the '60s. There is absolutely no harm done with replacing a messy oilbath filter as long as you can but it back to original without doing harm if that is your personal choice. In the area of auto air filtration, technology has marched on.
Posted on: 2017/8/3 11:16
|
|||
|
||||
|
Re: Joe's '49 Club Sedan
|
||||
|---|---|---|---|---|
|
Home away from home
|
JW,
Thanks for the pictures. It appears that our 2 air filters are different. I don't remember whether I was specifically looking for an oiled, washable filter element (like K&N) but I knew I wanted to replace the oilbath element. I measured the housing and figured I needed a 8" OD by 3" tall element to replace the oilbath part of the filter. The only element I could find with those specs was 8" by 3" but was not rigid. I had to build an adapter to go at the bottom of the element to keep the round shape. When I looked at your pictures, the top of air cleaner covered up the filter while mine shows about a 1" gap with the filter shown. I took my filter apart and reinstalled the oilbath section. It still has the 1" gap and shows the filter element. There are differences between your '47 and my '49 and that's why there is the gap with the filter showing. FYI - I probably should have looked for a standard paper element, it would have worked as well and been easier to install without requiring fabrication. Attach file: (145.59 KB) (164.44 KB) (164.44 KB)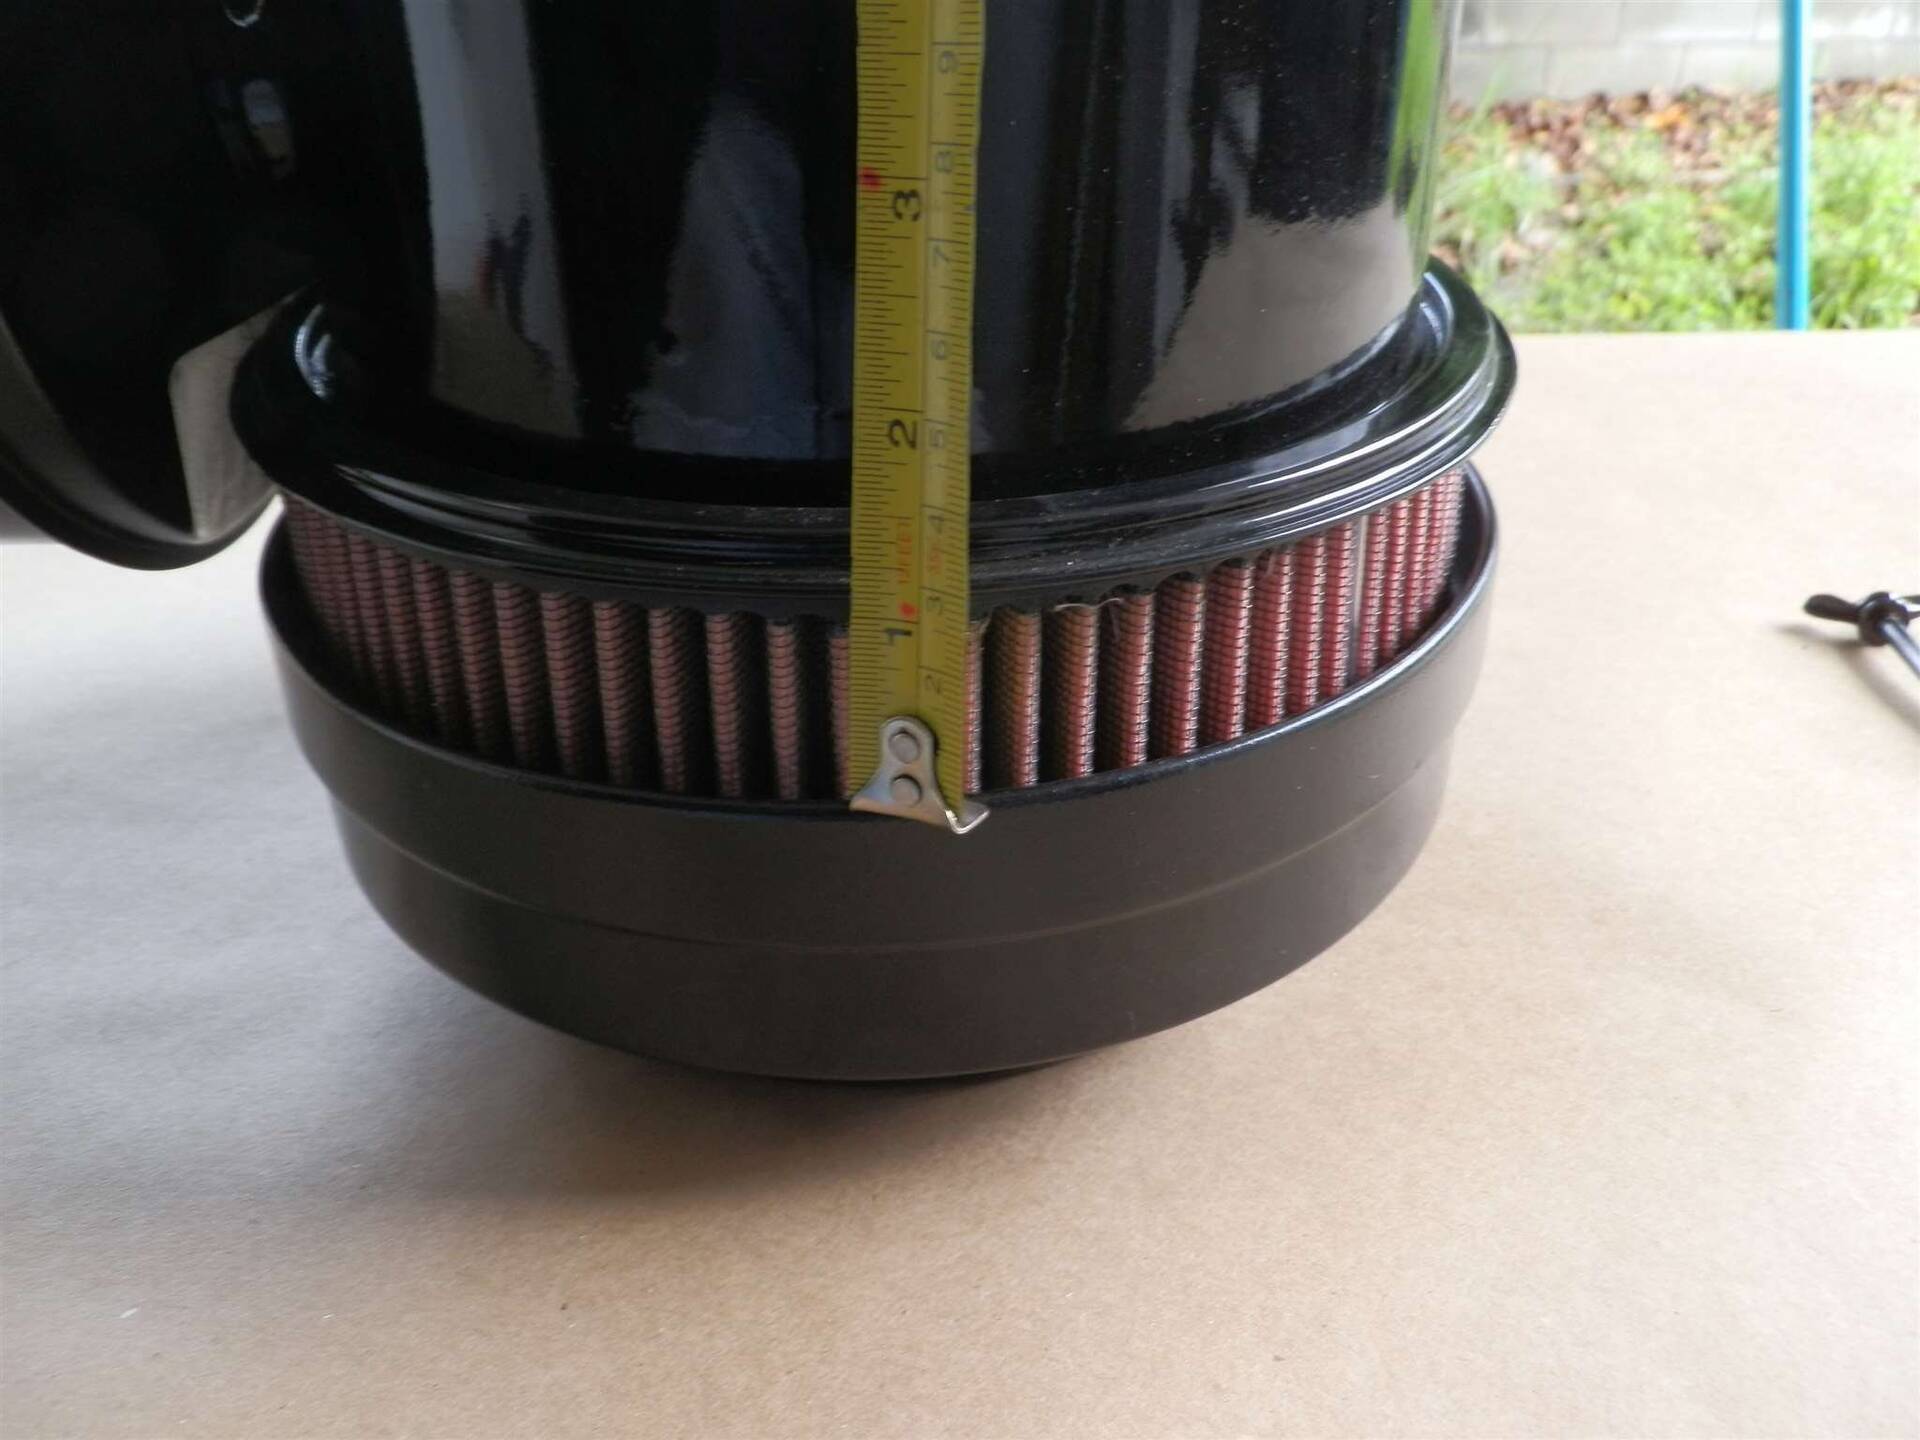 (235.11 KB) (235.11 KB)
Posted on: 2017/8/3 10:25
|
|||
|
||||
|
Re: Series 23 Bracket ID
|
||||
|---|---|---|---|---|
|
Home away from home
|
BDeB,
Great picture, that what I was trying to say to Howard. Thanks. Joe
Posted on: 2017/8/2 13:18
|
|||
|
||||
|
Re: Series 23 Bracket ID
|
||||
|---|---|---|---|---|
|
Home away from home
|
Howard,
Too short for that area, but you got me looking closer at that plate. They were stored with my grille parts so I thought they went in the front. But looking closely at the picture you attached, I believe it is the piece to the upper left of the air duct hole in the splash panel. I was trying to fit it in the wrong area. It bolts to the splash panel and to the horizontal edge on the back of the fender. There are 2 holes in that area of the fender so I believe that's where it fits.. Thanks for your help! Joe
Posted on: 2017/8/2 13:16
|
|||
|
||||
|
Series 23 Bracket ID
|
||||
|---|---|---|---|---|
|
Home away from home
|
I'm gathering parts to re-assemble the front fenders and grille on my '49. There are a couple of brackets I can't figure out. I'm sure that when I disassembled the car several years ago, I thought for sure I would remember where they were attached. I've searched the shop manuals, over 180 plates and even the service councilors looking for a picture of this piece. I know it's the area of the grille and fenders. Anyone of you Series 22 or 23 guys happen to know where it goes?
Thanks for the help! Joe Attach file: (476.26 KB)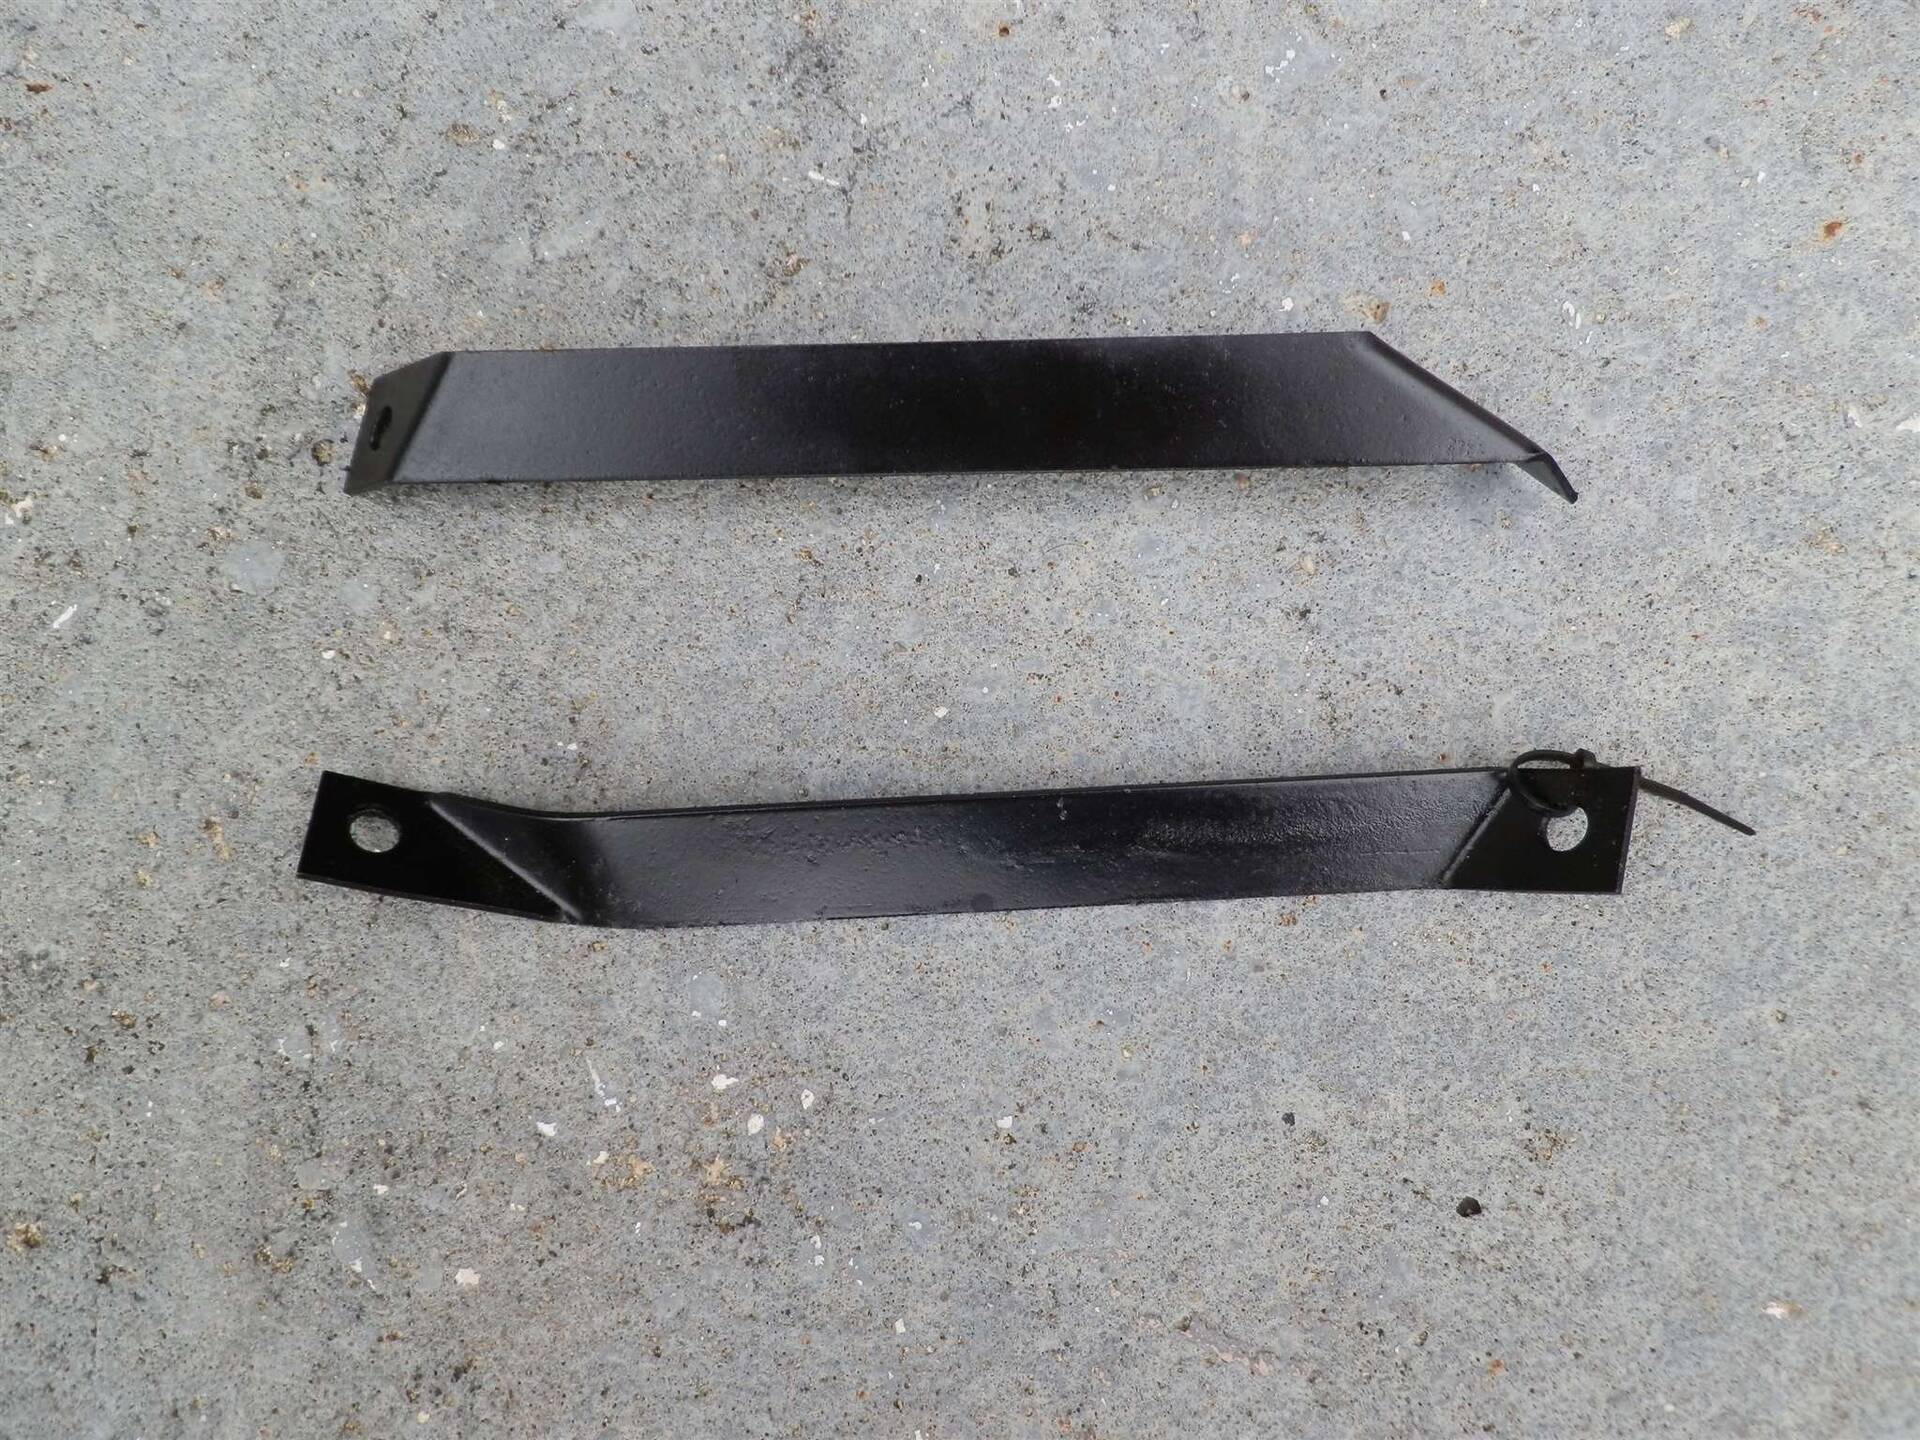
Posted on: 2017/8/2 12:36
|
|||
|
||||
|
Re: Joe's '49 Club Sedan
|
||||
|---|---|---|---|---|
|
Home away from home
|
Packard Project Summary 2016 Part 2
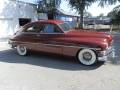
While the primer on the body was given time to cure, the heater parts were painted black. The air filter was repaired and also painted black. It was also modified to replace the original oilbath insert with a K&N-type washable filter element. The interior trim parts, the dash, steering column and window molding were painted a metallic brown rather than the original wood grain. The body was rolled out, masked off and interior was sprayed with LizardSkin ceramic insulation. All of the remains of the original tack strips that secure the headliner were removed and replaced with a composite tack strip sold by Bob Drake parts. The tray of the original battery box was totally rusted away but the legs were in good condition. Rather than replace the original long 6 volt battery, it was replaced with 2 Optima 6 volt batteries wired together for 6 volts. They are about the same size as the original battery so a new tray and hold-downs were built using the legs from the original box. I want to keep the car 6 volt but if that is not satisfactory, the batteries can be rewired for 12 volts. At this point, the body was ready for the final color painting. The color I picked was a non-metallic burgundy basecoat with clearcoat over it. It is similar to one of the Series 22/23 original colors. I got a few scrap sheetmetal panels from a body shop friend of mine and shot some color test of the paint. It came out fine and the car was ready to paint. Attach file: (48.40 KB) (49.99 KB) (49.99 KB)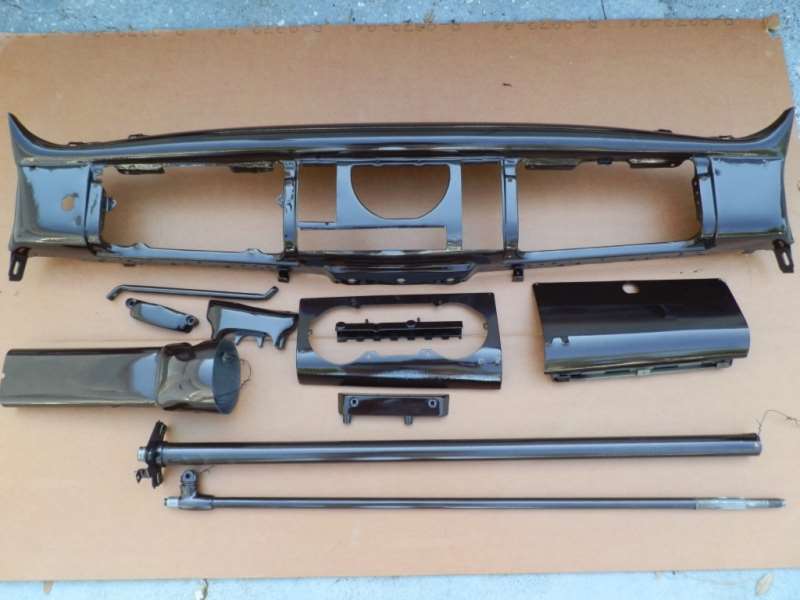 (52.44 KB) (52.44 KB)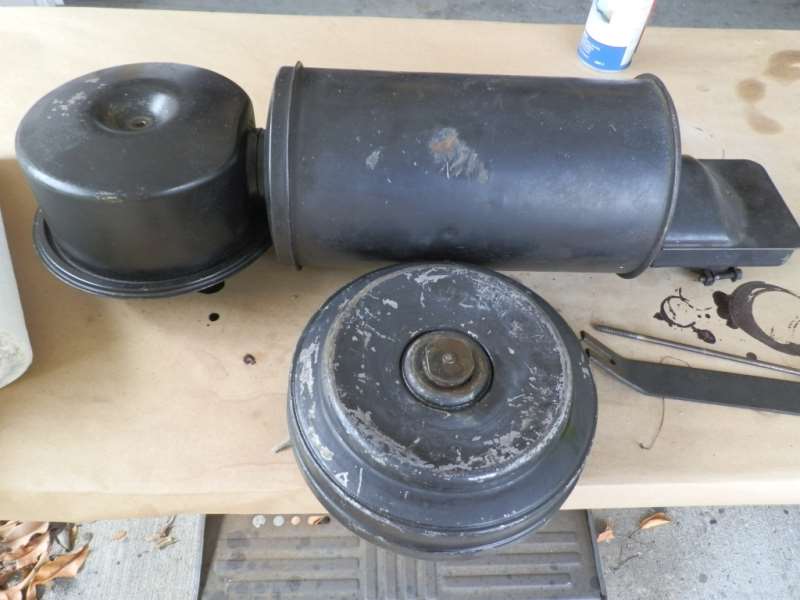 (40.26 KB) (40.26 KB) (46.76 KB) (46.76 KB)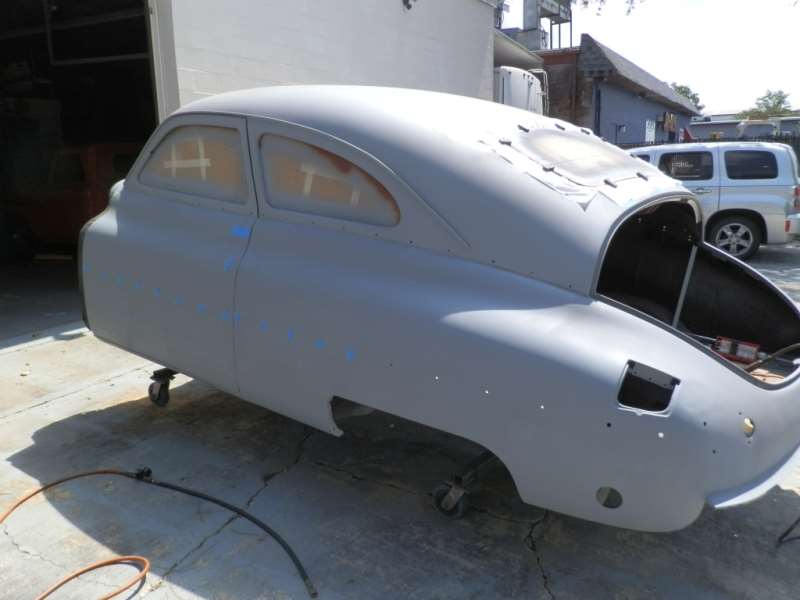 (51.42 KB) (51.42 KB)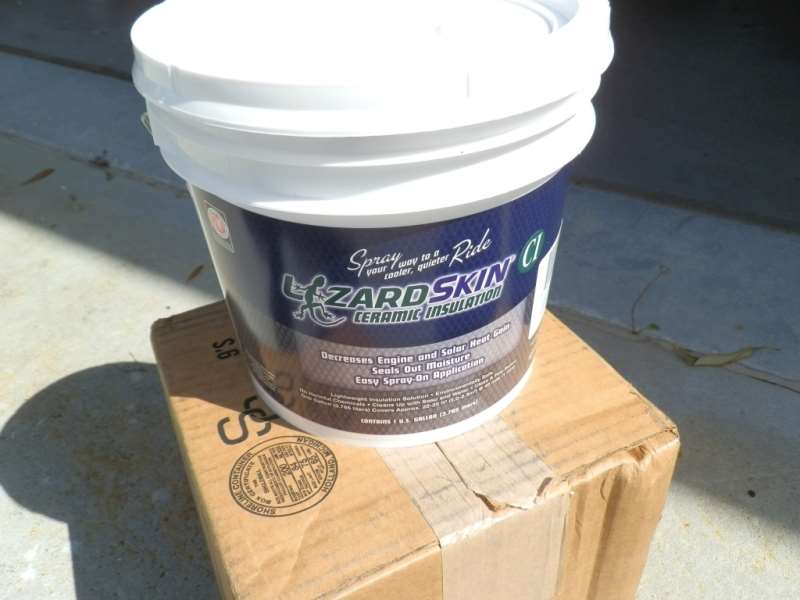 (73.36 KB) (73.36 KB)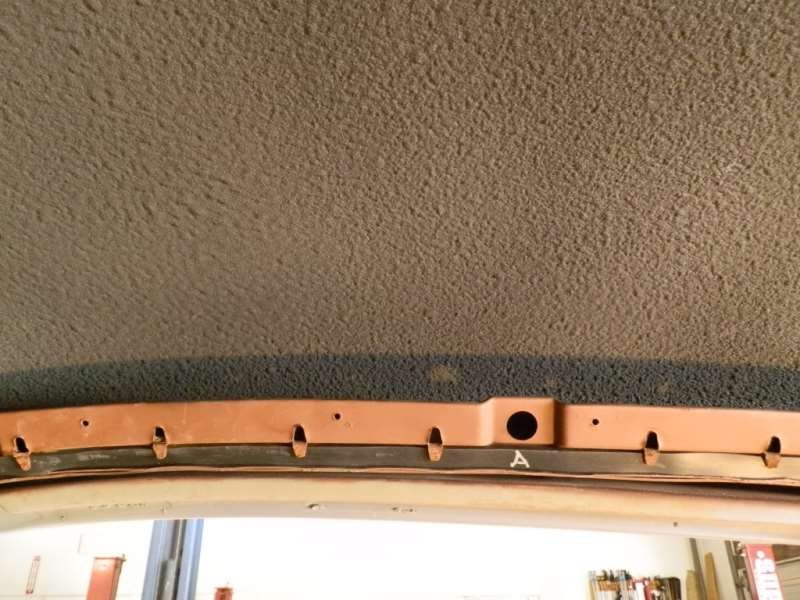 (46.31 KB) (46.31 KB)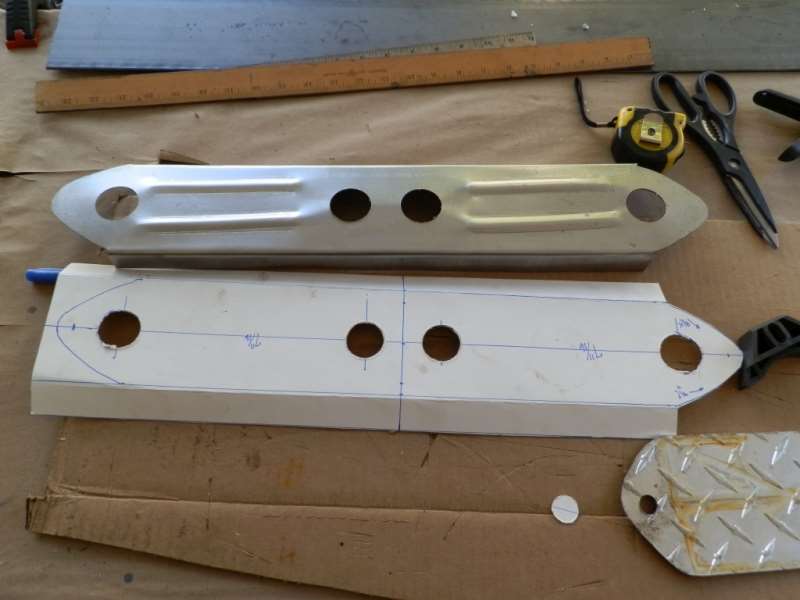 (48.90 KB) (48.90 KB)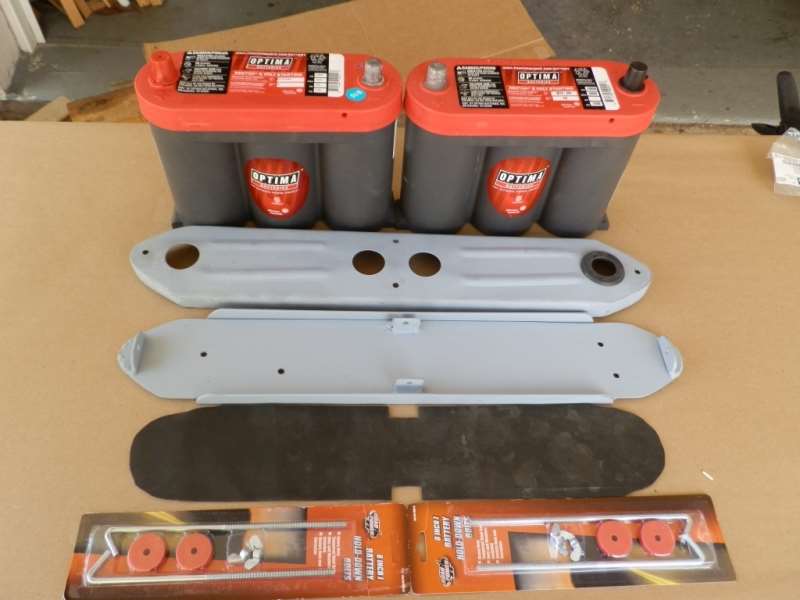 (71.48 KB) (71.48 KB)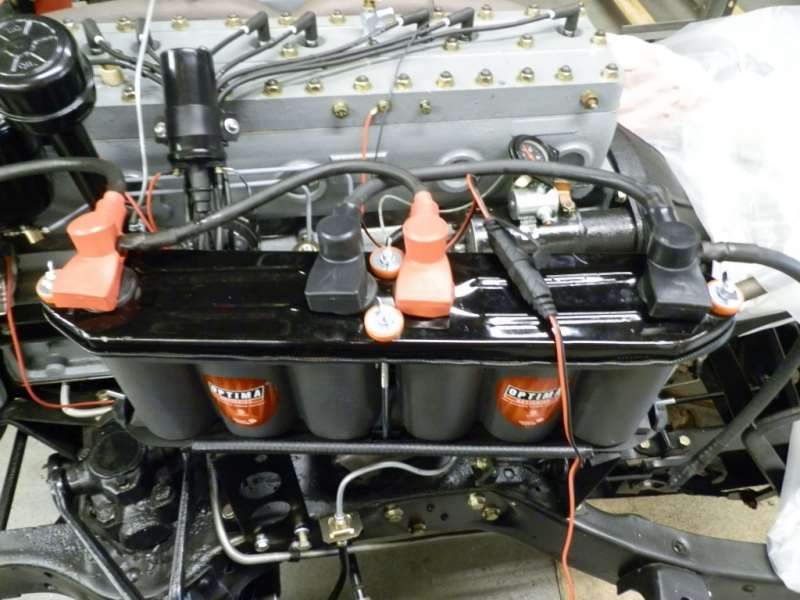 (49.99 KB) (49.99 KB)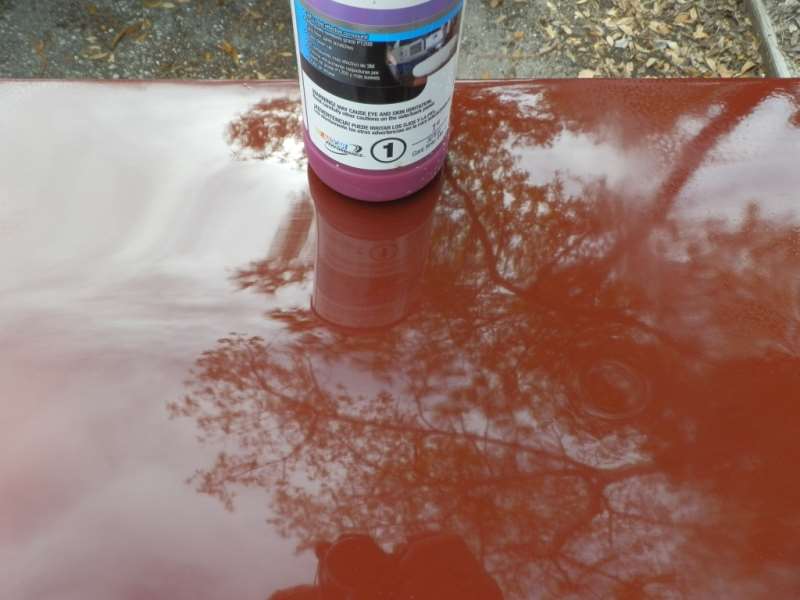
Posted on: 2017/8/1 10:37
|
|||
|
||||
|
Re: Joe's '49 Club Sedan
|
||||
|---|---|---|---|---|
|
Home away from home
|
Packard Project Summary 2016 Part 1
One of most difficult rust repairs on the car were the drip rails. Almost considered cutting them off but figured it would not look right for this car. Replacing them was out of the question due to time and cost. Used a metal-based filler over the outer rust, stripped and cleaned the gap between the bottom of the rail and the body with 2-part 3M seal sealer then filled with body filler. The inside of the rail was cleaned and filled with 2-part 3M self-leveling sealer. Continued sanding and filling until they came out relatively smooth. The car was badly rusted but had few dents. The one exception was a "sideswipe" dent in the driver's door. It was heated, hammered and filled. The body was filled, sanded and primed section by section until the entire body was in primer. The rear bumper pan was in bad condition so it was bolted on permanently, sealed, filled, sanded and primed.The body was then spayed with polyester primer-surfacer to fill any minor imperfections that were left. The underside of the front fenders had been undercoated. The top, under the hood portion of the fenders and the underside of the hood were painted black. Then the outside of the hood and fenders were primed. Attach file: (40.66 KB)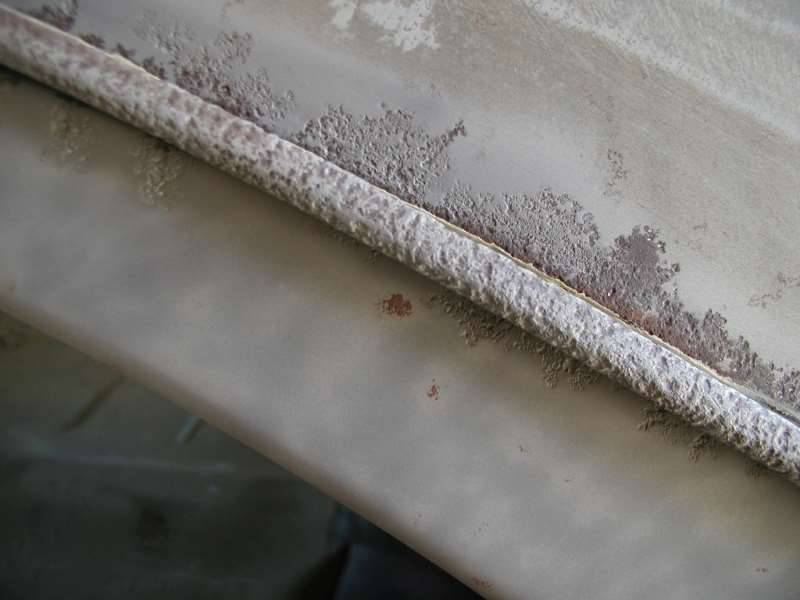 (36.59 KB) (36.59 KB)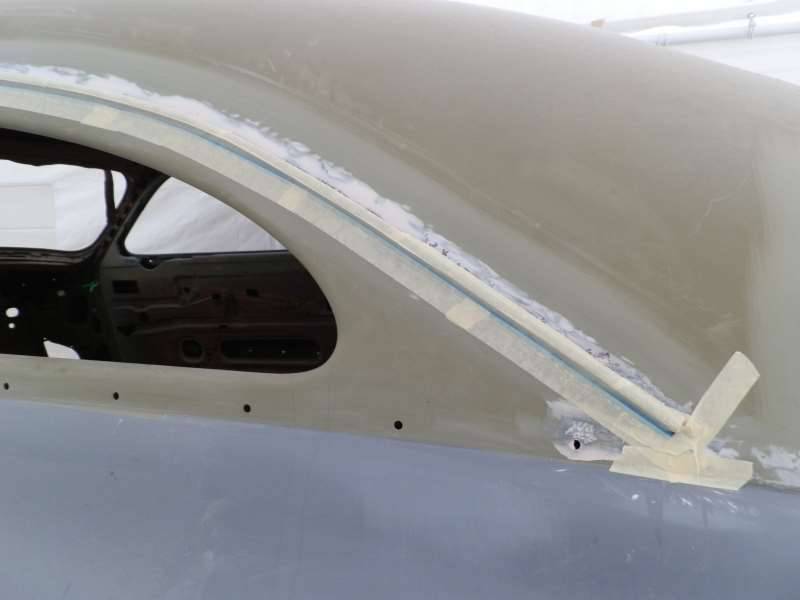 (33.82 KB) (33.82 KB) (30.12 KB) (30.12 KB)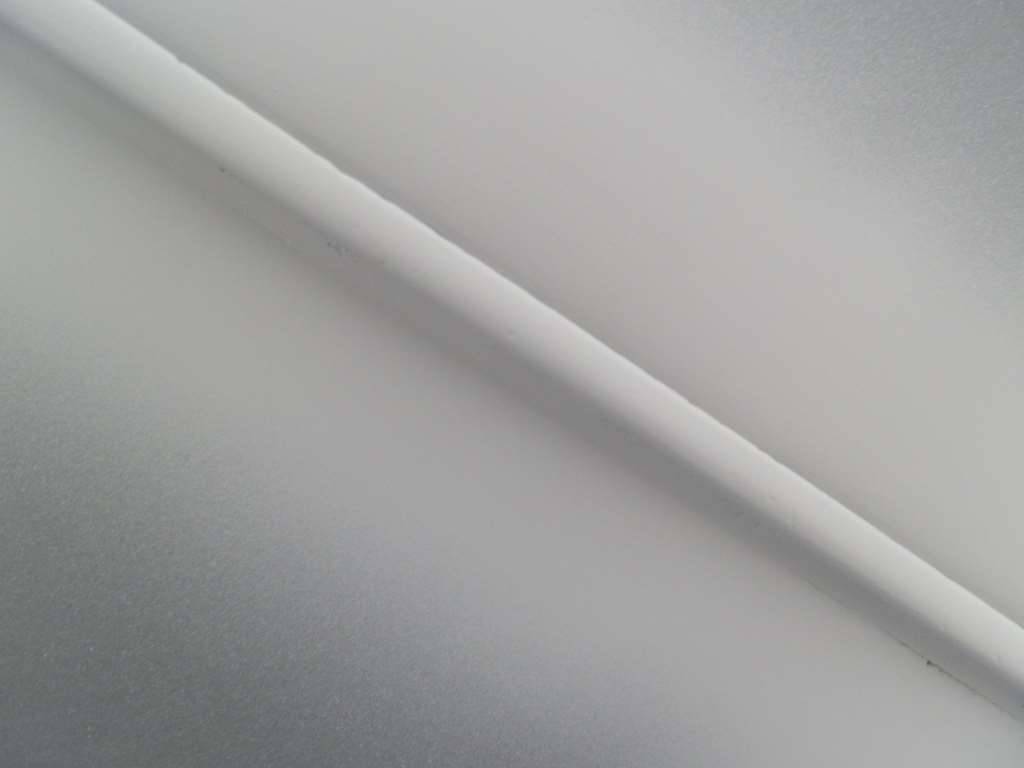 (46.65 KB) (46.65 KB)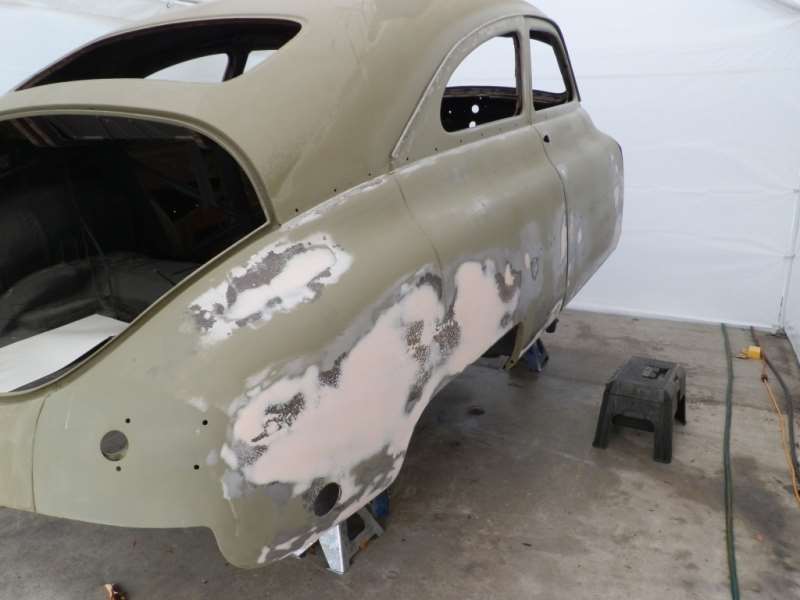 (41.94 KB) (41.94 KB)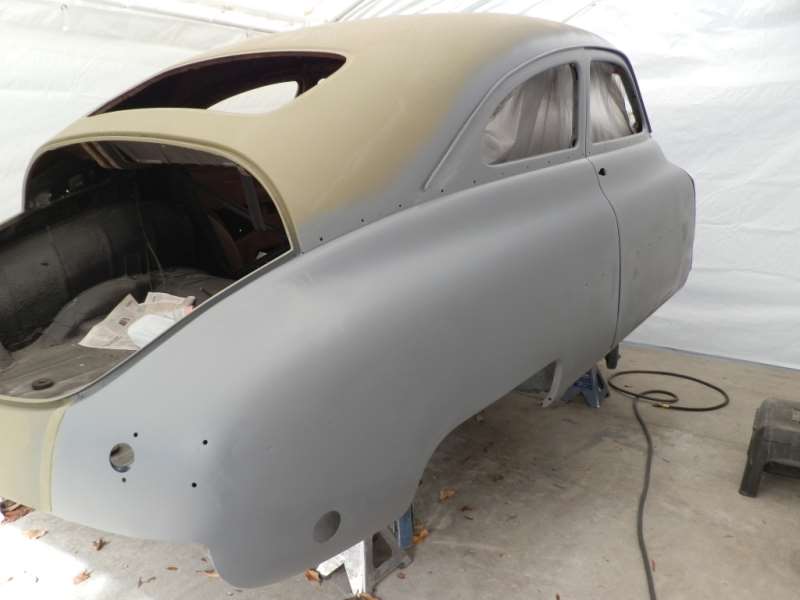 (51.20 KB) (51.20 KB)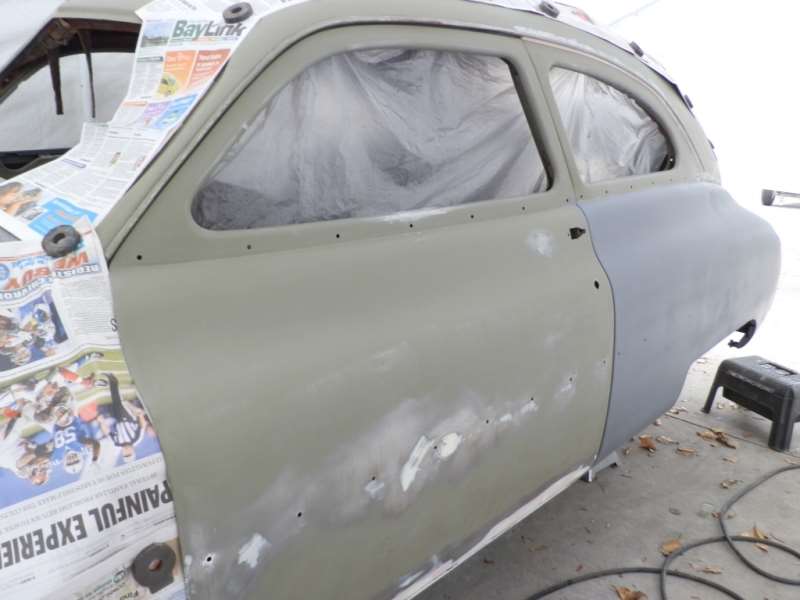 (37.33 KB) (37.33 KB)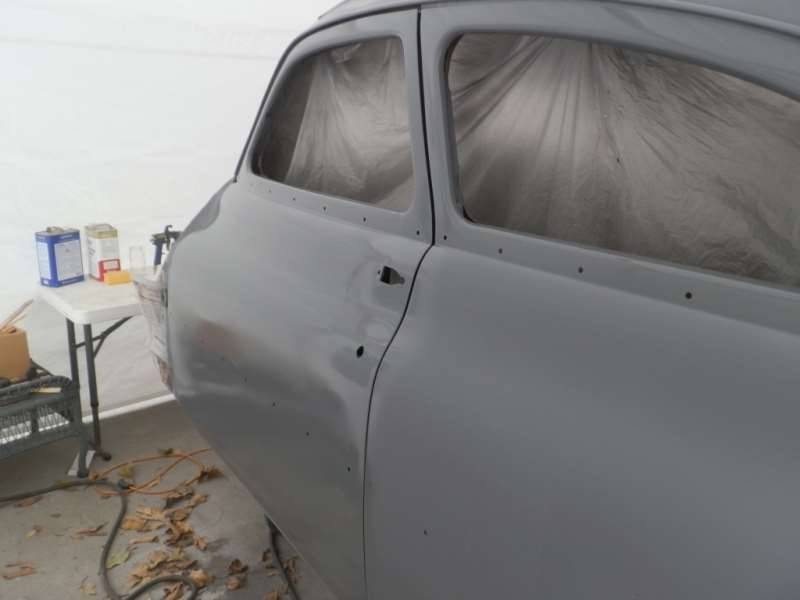 (48.48 KB) (48.48 KB)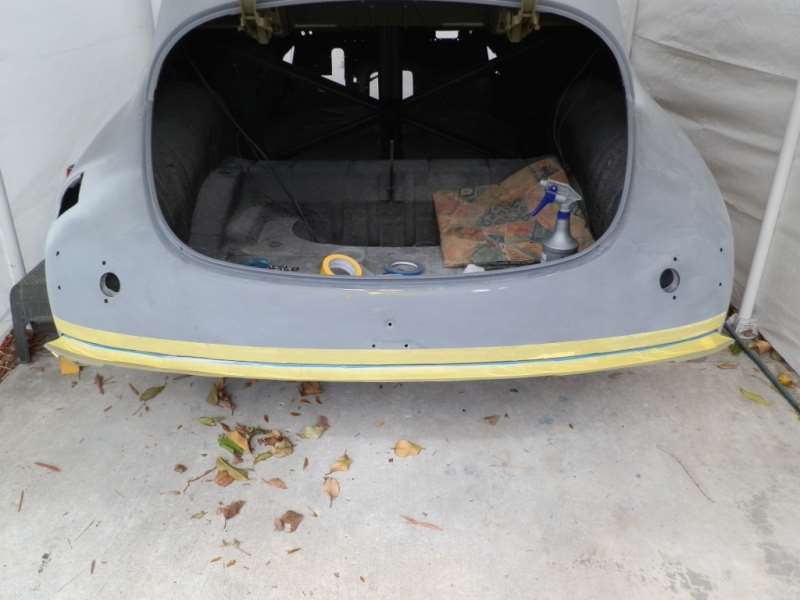 (47.49 KB) (47.49 KB)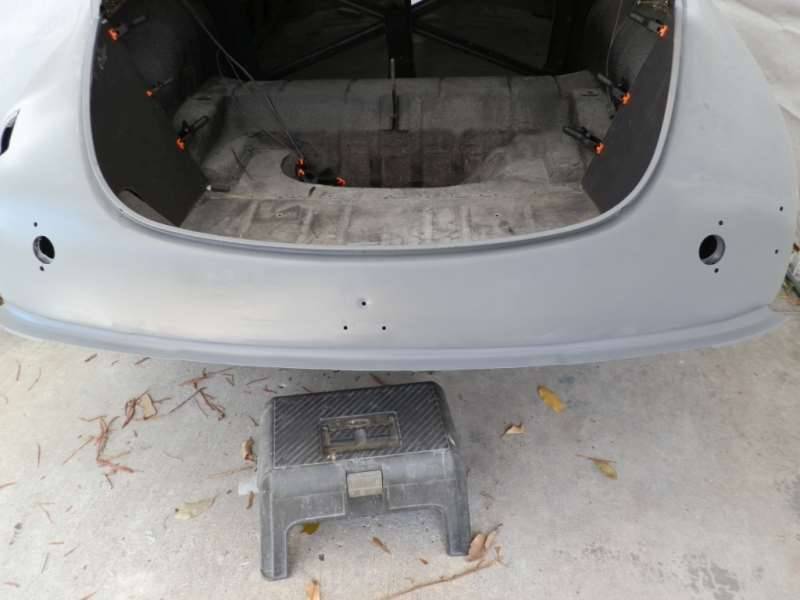 (43.67 KB) (43.67 KB)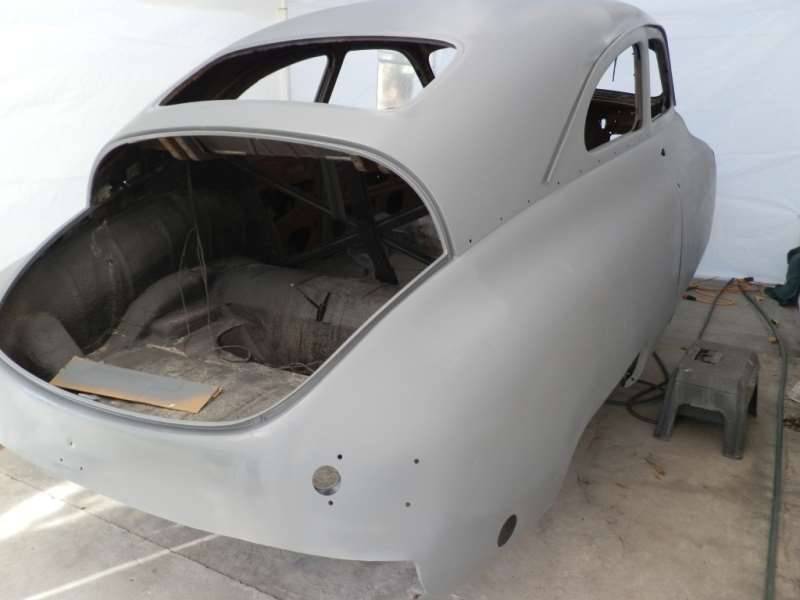 (40.35 KB) (40.35 KB)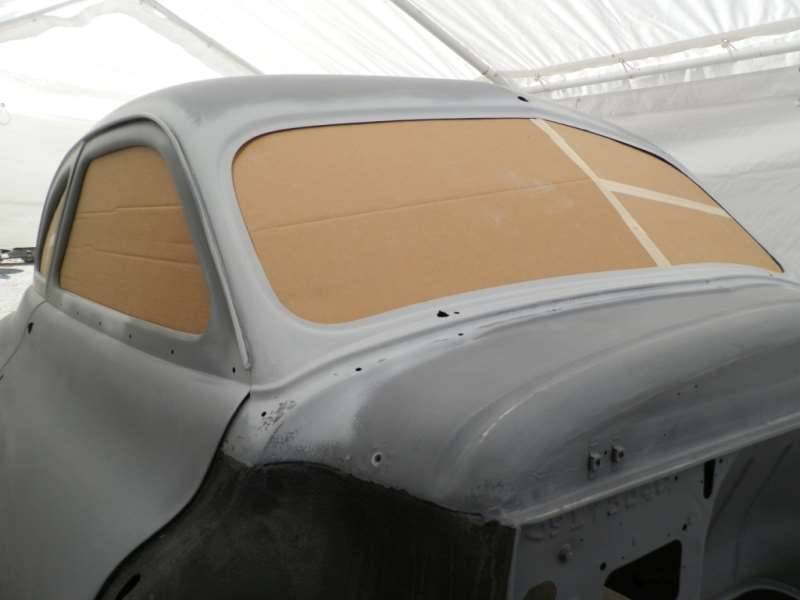 (33.70 KB) (33.70 KB)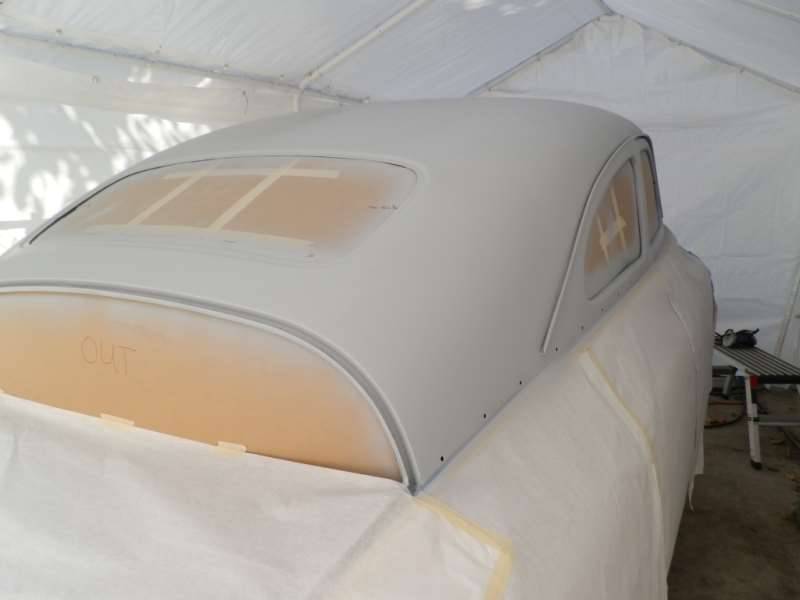 (45.92 KB) (45.92 KB)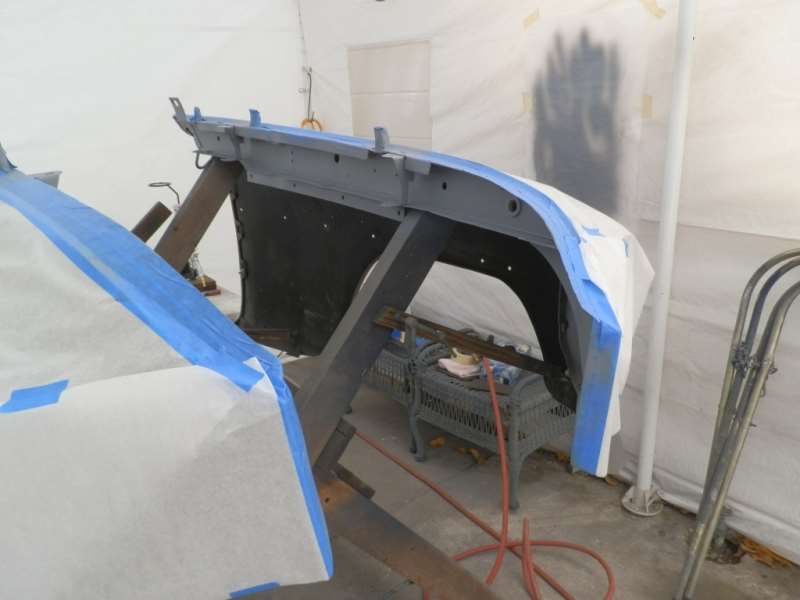 (34.05 KB) (34.05 KB) (40.95 KB) (40.95 KB)
Posted on: 2017/7/31 13:22
|
|||
|
||||
|
Re: Joe's '49 Club Sedan
|
||||
|---|---|---|---|---|
|
Home away from home
|
Howard,
The production number on the car is 5128 in the Series 23. Probably fairly early in the Series 23 run. Plus it's a 288 in a Packard 8 with solid lifters.
Posted on: 2017/7/31 13:09
|
|||
|
||||
|
Re: Joe's '49 Club Sedan
|
||||
|---|---|---|---|---|
|
Home away from home
|
Packard Project Summary 2015 - Part 2
The engine and transmission were placed back in the chassis. The header pipe from the exhaust manifold to muffler was in good shape and was re-used and a generic Walker muffler of the right size was added. A new tailpipe was made from patterns and bent by a local muffler shop for $35. The engine was temporarily wired to start and was run for several 20 minute periods at various speeds to break-in the new components. Distributor uses a 6V electronic module rather than points and condenser along with a new 6V coil. The engine ran very smoothly, good oil pressure, no overheating problems, temperature was monitored with a non-contract thermometer during break-in. The engine and chassis were covered up and put aside so that the final bodywork could begin. As the year ended, the firewall and cowl were stripped and primed. Then the underside of the body was undercoated. Attach file: (55.51 KB)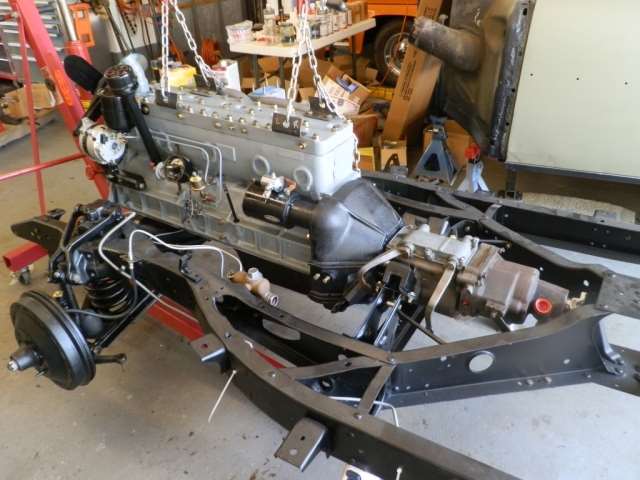 (45.63 KB) (45.63 KB)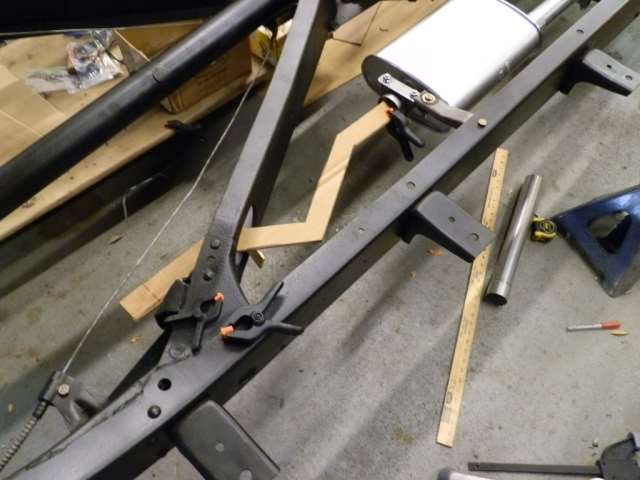 (39.39 KB) (39.39 KB)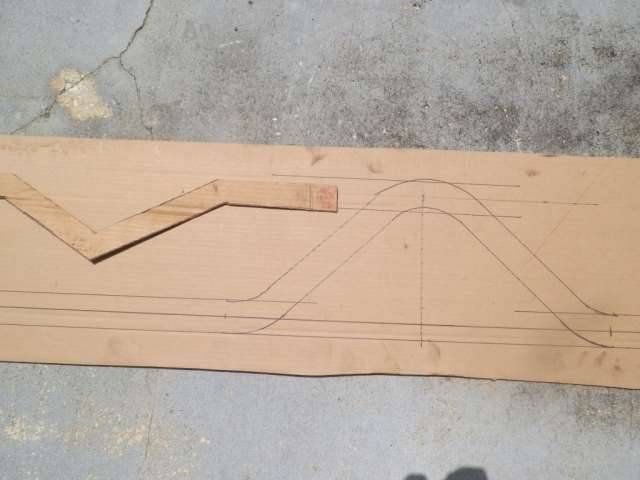 (47.25 KB) (47.25 KB)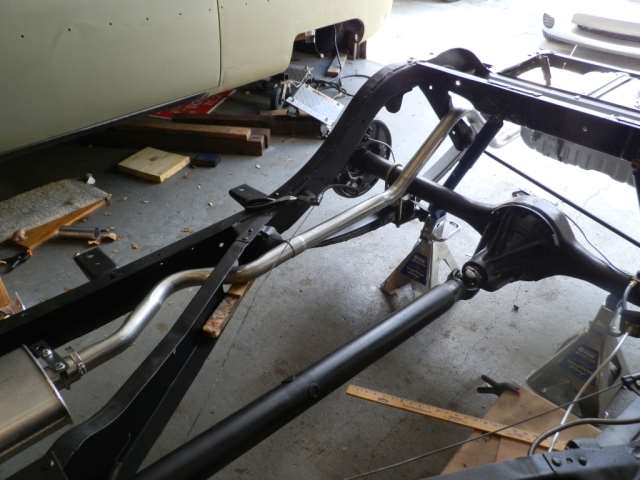 (61.07 KB) (61.07 KB)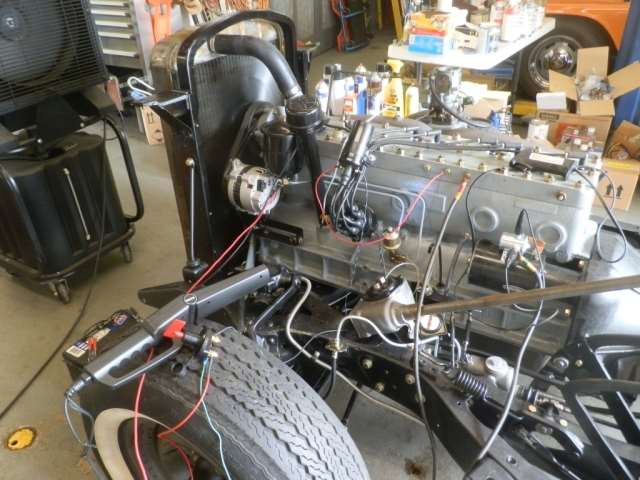 (54.71 KB) (54.71 KB)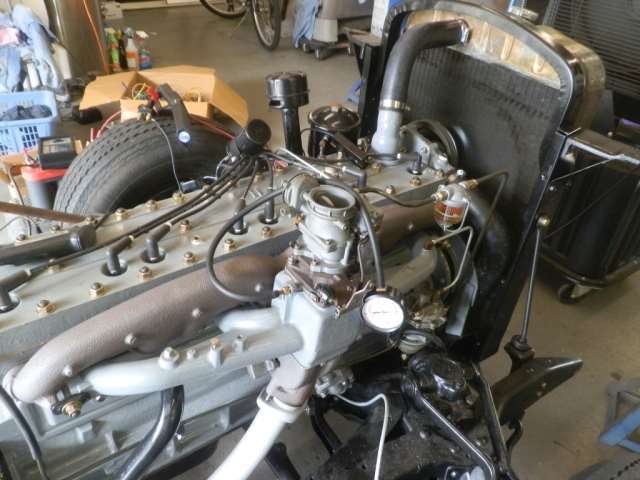 (40.55 KB) (40.55 KB)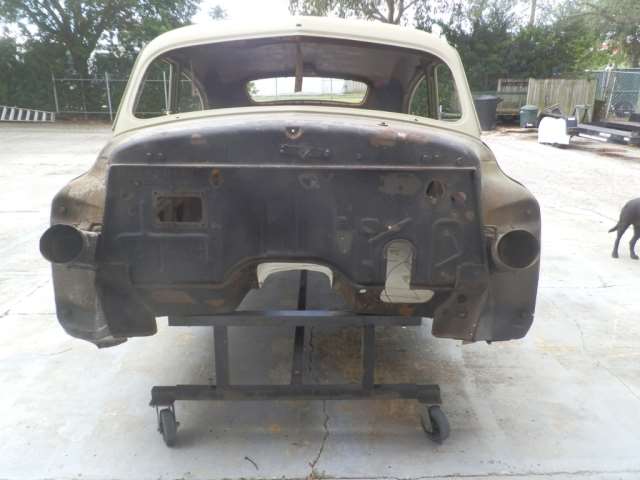 (49.07 KB) (49.07 KB) (41.23 KB) (41.23 KB)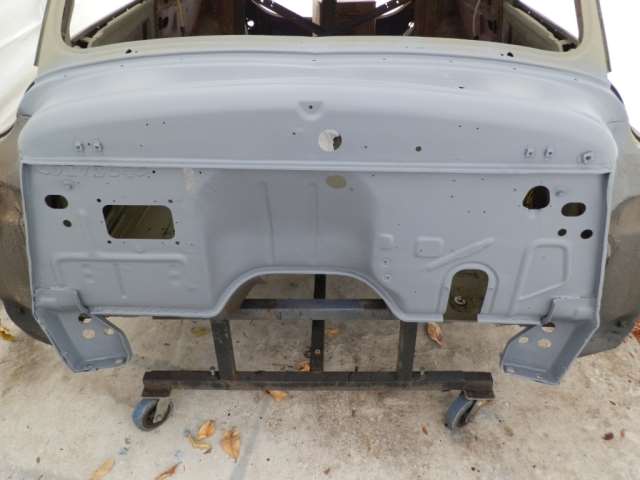 (56.92 KB) (56.92 KB)
Posted on: 2017/7/29 12:13
|
|||
|
||||


