|
Re: Power Steering Actuator Bracket
|
||||
|---|---|---|---|---|
|
Home away from home

|
Also...I'm glad you included a picture of the grommet end with the grommet "system" installed. I did not expect that to be installed like that...interesting design on the outboard grommet!!!
Posted on: 2015/5/18 17:44
|
|||
|
Bill,
Dedicated to keeping the man who owns one on the road!!! |
||||
|
||||
|
Re: Power Steering Actuator Bracket
|
||||
|---|---|---|---|---|
|
Home away from home
|
Howard,
THANK YOU VERY MUCH for your time doing this!!! I am honored at the time you put into this question to help me out. BIG HELP (All CAPS cyber yelling intentional)!!! Yes, I bought a Monroe unit because it apparently has a more elegant plumbing and valving (internal and integral to the unit) arrangement as opposed to the Bendix unit that has more external plumbing and hoses. It appears as if the PS bracket would be bolted onto the inside right hand chassis frame rail in lieu of the idler arm. Here is a picture of the idler arm and bracket on my dads car. It is bolted onto the chassis with two bolts that are screwed directly onto threaded inserts on the chassis rail and the two bolt holes are 2 inches apart. Looking at the top picture you sent, it almost looks like the top hole of the bracket would (could) bolt up to the top idler arm bracket holes (and if the holes were 2 inches on center) then the right hand hole would match up with the bottom idler arm bracket hole and then bracket would hang down and forward below the chassis. My chassis has a third hole that I initially thought would mate up with the third hole of the bracket however it is too far forward and too close to the bend in the chassis so it certainly would not work. I have no idea what that hole is for. The third hole of the bracket would need to be bolted onto the chassis with a self taping bolt. Does anyone know if the 1955 chassis bolt holes are in the same location/configuration as the 1949 unit (in other words is the PS bracket designed to be a direct bolt on unit to make non-power steering cars power steering)? If so the best course of action for me would be to simply buy an OEM bracket. What year/model car did that bracket come off of??? If the holes are different, then it looks like I would need to fabricate my own bracket and try to make it look as OEM as possible. THANKS AGAIN!!! Attach file:  (19.19 KB) (19.19 KB)
Posted on: 2015/5/18 17:38
|
|||
|
Bill,
Dedicated to keeping the man who owns one on the road!!! |
||||
|
||||
|
Differential Lube Recommendation and Quantity
|
||||
|---|---|---|---|---|
|
Home away from home
|
I looked through the Packard Shop Manual however I could not find the quantity and SAE grade of differential lube.
Can anyone PLEASE provide this information? THANKS in advance!!! Bill
Posted on: 2015/5/18 16:55
|
|||
|
Bill,
Dedicated to keeping the man who owns one on the road!!! |
||||
|
||||
|
Torrington Bearing B-1012X
|
||||
|---|---|---|---|---|
|
Home away from home
|
Greetings Know-er of All Things Packard who lurks on the other side of my computer screen!!!!
I have a bunch of parts disassembled and during disassemble I discovered this Torrington Bearing B-1012X needs replacement. I took a picture of it and I was sure when I got home that I would remember what it was for...however... well...I already forgot. I believe it was a part of the Electromatic Clutch Linkage however I do not have access to the parts right but I would like to place the order for its replacement. Fred and Max Merritt needs a Packard reference. Does anyone know what this bearing was used for? THANKS!!! Bill Attach file: (7.93 KB)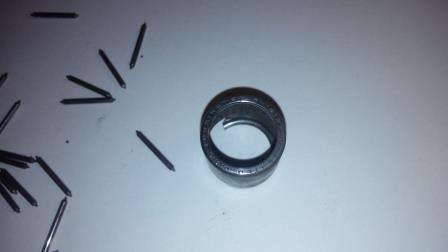
Posted on: 2015/5/18 16:53
|
|||
|
Bill,
Dedicated to keeping the man who owns one on the road!!! |
||||
|
||||
|
Power Steering Actuator Bracket
|
||||
|---|---|---|---|---|
|
Home away from home
|
Hi Guys,
I am the guy who is installing PS in his dad's 1949 Packard. Does anyone who has PS happen to have a picture of the bracket that "anchors" the passenger (right) side of the PS actuator? I need to fabricate this part and I would greatly appreciate a picture of what the OEM bracket looks like. THANKS VERY MUCH!!! Bill
Posted on: 2015/5/17 18:23
|
|||
|
Bill,
Dedicated to keeping the man who owns one on the road!!! |
||||
|
||||
|
Re: Heater Core Box Removal
|
||||
|---|---|---|---|---|
|
Home away from home
|
Thank you very much for the detailed instructions/advice.
This forum is really a great asset!!! Bill
Posted on: 2015/5/17 11:24
|
|||
|
Bill,
Dedicated to keeping the man who owns one on the road!!! |
||||
|
||||
|
Steering Gear Question
|
||||
|---|---|---|---|---|
|
Home away from home
|
Since the engine and transmission are out of the car I am trying to look at other things to ensure the car is safe and reliable for my dad.
The steering gear at the front is leaking oil through the hole that the horn wire exits the steering gear. I bought a replacement gasket / seal kit from Maxx Meritt. Is there anything I should do when replacing the front cover gasket other than the expected remove four bolts and replace gasket and re-install four bolts. Should I remove the steering gear and disassemble, grease it up, and do any kind of adjustments? I was told that the gear shifter mechanism might need to be inspected I am in the process of adding power steering to the car as my dad would like PS so perhaps this might be a good time to even think about replacing the non-PS gear with a PS car unit to get the advantage of the closer ratio. Does any one have a good serviceable PS steering gear for sale? Any suggestions and advice is greatly appreciated!!! Bill
Posted on: 2015/5/17 11:21
|
|||
|
Bill,
Dedicated to keeping the man who owns one on the road!!! |
||||
|
||||
|
Re: Engine Break In Procedure and Post Start Items???
|
||||
|---|---|---|---|---|
|
Home away from home
|
Thanks Tim,
Do the lifters need to be adjusted after the engine has ran hot? Bill
Posted on: 2015/5/17 11:07
|
|||
|
Bill,
Dedicated to keeping the man who owns one on the road!!! |
||||
|
||||
|
Re: What Color is the Bell Housing and Trans Supposed To Be???
|
||||
|---|---|---|---|---|
|
Home away from home
|
Thanks
Posted on: 2015/5/13 23:14
|
|||
|
Bill,
Dedicated to keeping the man who owns one on the road!!! |
||||
|
||||
|
Re: Engine Break In Procedure and Post Start Items???
|
||||
|---|---|---|---|---|
|
Home away from home
|
I had just a couple of minutes before I left for work to look under my dad's Packard to investigate if the body off approach would be do-able as a better means to re-install the engine and transmission.
This seems to be the "easy" way to install the engine and adjust the clutch and rear transmission mount. If I can run the engine on the bare chassis it would be helpful to look for leaks and such as well as if the valves need to be readjusted after it gets hot that would be an easier (whistling) experience. I do have a two post lift so the wood 4X4 under the rocker panels might be the approach. I did determine the following with respect to lifting the body off of the chassis: 1. The rear bumper will need to be removed because there is a sheet metal filler piece that is attached to the body that slips under the bumper. Minor PITA. 2. The front bumper has a similar filler piece under the bumper however it looks like I can leave the front bumper bolted to the front clip but simply unbolt the bumper bracket from the frame....no big deal. 3. There are front inner fender well bolts that will need to be removed. It looks like there are three one each side. Also some kind of vertical rod (left side and right side) with a nut and washer that attaches to the frame that will need to unscrew the nut..this is also no big deal. 4. The gas pedal and clutch pedal levers appear to have a filler piece that goes around them that covers up a large square hole and I did not have time to investigate the inside of the dash to see how difficult it would be to remove this piece. If it is easy to unbolt then the pedals will drop out of the bottom. 5. There are about ten body to chassis bolts that need to be removed. Since the interior is in the car the questions is how tough is it to remove the interior trim and carpet and access these bolts from inside the car and the trunk...this looks to be the most onerous part of the de-mating project. As always...any suggestions and advice would be most appreciated... Bill
Posted on: 2015/5/13 14:13
|
|||
|
Bill,
Dedicated to keeping the man who owns one on the road!!! |
||||
|
||||


