|
Re: 1939 Packard Six, rear seat arm rests
|
||||
|---|---|---|---|---|
|
Home away from home
|
Awesome information, thank you!
One final question, is the front edge of the arm rest “base” vertical and does not go all the way to the floor?
Posted on: 2022/2/20 20:56
|
|||
|
||||
|
Re: 1939 Packard Six, rear seat arm rests
|
||||
|---|---|---|---|---|
|
Home away from home
|
Interesting, I think I like the curve in the arm rest. Did you do this?
Appreciate the information, really trying to figure out what is under Thai / how it is built and attached to car
Posted on: 2022/2/20 20:03
|
|||
|
||||
|
1939 Packard Six, rear seat arm rests
|
||||
|---|---|---|---|---|
|
Home away from home
|
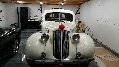
Renovating the interior of my 39 Six, working on rear panels below the push out windows and the arm rests. Who ever worked don this last, "fabricated" the arm rests out of plywood for the top, poorly formed cardboard for the sides and used right angle shelf brackets to hold it to the inner fender wells. Photo show what I am referring to. Anyone have pics, sketches or photos of what this is supposed to look like?
Attach file:  packard interior dwg.JPG (16.76 KB) packard interior dwg.JPG (16.76 KB)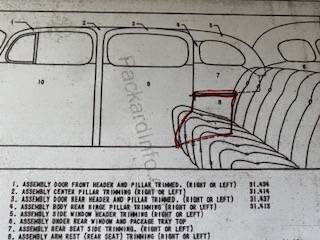
Posted on: 2022/2/20 13:45
|
|||
|
||||
|
Re: Window channel and whiskers
|
||||
|---|---|---|---|---|
|
Home away from home
|
Thanks Chris and Happy New Year!
I took out the channel and the chrome trimmed cat whiskers. Was surprised to see those tiny Philips head screws you are referring to, thought it was a "band aid" fix from whomever installed the u-channel. The channel had broken on the left side, just below the frame opening, or at least so I thought. Upon pulling out the channel where the regulator resides, inside the door frame, I realized the top and bottom were different sizes, someone had switched out the top. Already had the parts from Steele, so installed the trim and whiskers, installed the channel, put my freshly made and covered door panels on and slipped the window trim bezel into place. That's when I noticed the channel was not tucking in at the same plane as the whiskers and hence the trim bezel won't mount up. I'll take another look in the AM, need to make this work and got a laundry list of stuff to get done before honoring my youngest daughters desire to be driven in this car to her wedding. I'll email you some pics in progress, finished the carpet several weeks ago. Challenge there was the laminated tar paper on the inside was falling apart, I removed the chunks and any loose material, fiber glassed the front and back of it and covered the visible part in heavy black denim. Turned out great
Posted on: 2022/2/2 19:01
|
|||
|
||||
|
Window channel and whiskers
|
||||
|---|---|---|---|---|
|
Home away from home
|
I am renovating the worn out window channel and cat whisker trim on my 39 Six as I am reupholstering the door panels.
Putting the first one back together and noticed the channel is not tucking up "behind' the whiskers and as a result, is proud of where it should be by over 1/8" which prohibits installation of the window garnish trim Anyone experience this before or can point me in the right direction? Unfortunately, this car has had some of the channel replaced in the past. The channel within the door is the same size of the stuff I bought from Steele rubber. The channel that goes around the top of the window was replaced at one time with some that is about 1/8" shorter, hence "fits". it should all be one size
Posted on: 2022/2/2 14:49
|
|||
|
||||
|
Rear bench hold downs
|
||||
|---|---|---|---|---|
|
Home away from home
|
Looking for information, ideally the parts, or photos of what holds the rear bench seat down in my 1939 Packard Six. Previous owner used parts of a conduit clamp. There are two places just below the seat where something was, but no idea what. Looks like it goes into the ~1" diameter holes in the bottom of the seat frame. Any assistance is greatly appreciated
Posted on: 2021/8/26 16:03
|
|||
|
||||
|
Re: 1939 Packard SIX Leaf Springs
|
||||
|---|---|---|---|---|
|
Home away from home
|
Excellent input everyone, thank you ! Some of my research indicated some restorers using a dry graphite paint that is quite durable. Others just used POR 15 (of which I think is fine for the exterior of the springs but not the rubbing side
Posted on: 2021/7/22 20:08
|
|||
|
||||
|
1939 Packard SIX Leaf Springs
|
||||
|---|---|---|---|---|
|
Home away from home
|
I am in the process of replacing the 6 leaf spring bushings on my 39 Six. Since it will be a quick task to remove the springs, I plan on taking them off, cleaning them and painting them. I noticed what appears to be remnants of some material between the leaf's. What is that material and anyone have a source for it?
Posted on: 2021/7/21 14:12
|
|||
|
||||
|
Re: 1939 Engine Number
|
||||
|---|---|---|---|---|
|
Home away from home
|
thanks Mr Ambassador! I'll dig up my shop manual. Didn't expect that level of detail in it
Posted on: 2021/4/20 18:10
|
|||
|
||||
|
1939 Engine Number
|
||||
|---|---|---|---|---|
|
Home away from home
|
I have a 1939 Six with an engine number of B26543A. I understand the B indicates 39, what is the A suffix indicate?
Posted on: 2021/4/20 13:13
|
|||
|
||||


.jpg")


