|
Re: Brake Booster Conversion
|
||||
|---|---|---|---|---|
|
Just can't stay away
|
A BIT OF A BREAK DOWN ON PARTS AND PIECES...
BRAKE BOOSTER; LOCAL AUTO PARTS STORE GOING FOR $102.00 BUT I BOUGHT THRU THEIR WEB SITE WITH A SHIP TO HOME AND GOT 20% OFF THAT WAY WITH TAX $82.00 LIFTIME WARRENTY PLUS I HAVE A $10.00 CORE COMMING WITH ONE I USED AS A TRIAL SO $72.00 A new master cylinder $32.99 localy bought life time warrenty A new combination valve with mounting bracket, master to valve lines and combination bleeding tool $65.00 ebay bought. Some extra steel other than what I had laying around here and harden lock bolts and nuts about $45.00 This here alone was $214.99 And a whole lotta blood, sweat and raw configuring on my part... Other added things.... All new brake lines double flared dual lined rust resistant $65.00 ebay bought. Wilwood front brake conversion bought thru summit $840.00
Posted on: 2015/7/24 19:18
|
|||
|
The best are yet to roll

|
||||
|
||||
|
Re: Brake Booster Conversion
|
||||
|---|---|---|---|---|
|
Just can't stay away
|
Yes I shopped hard there was a company that had made the complete setup but they stopped producing them due to low sales of them units.
I did some time speaking with a rep from one of them large brake supplier companies and all they could sell me was a 9" dual brake booster and a purotioning valve. He had agreed with me that anything smaller than a 9' dual booster would be pushing it in the case of a panic stop! Figure adding weights; of the cars wet weight then adding in the person or persons and cargo carring weights it is a lot of weight. My purportioning valve sits nicely enough away from any of the body so no banging of the original structure. Although I am changing it to a bottom mount under the master so I can run my brake lines out from the passage way of the vent tube. The vent tube I will configure in but first I need to explain how and why I went with the booster I went with.. Before doing anything I thought of the things I wanted and studied my compartment. I made a desicion that I wanted a booster that was away from the firewall leaving me about 6 inches in distance apart plus the circumference space between the firewall and booster is now mainly open. By doing it this way I benefit with all of the things I want to do and possibly more. (Rather than having a flush mounted booster) 1.) Keep the vent tube. 2.) Have room for my wires behind the booster. 3.) Keep the regulator mounted back there. 4.) Having a place for a trans dipstick to mount to behind or along side the back portion of the booster (GOD BLESS) The booster mounting bracket firewall side has three mounting holes on each side, two of which are lower away from the four needed. So the one side of that bracket over lapped the vent opening by an inch so i cut a relief cut on that booster bracket and bent that up leaving it at a 45deg. angle then cut off the other side of the relief porion so that would not block the vent hole.. (Now I have a bolt mounting hole if needed) I had done the same to the other side of that booster mount by leaving that mount hole upward at 45 deg I then will use this hole to mount my Trans stick configuration.. (Yet to come) The vent tube hole on the firewall to the booster is about 6 inches gap space, although with this what I am planning on doing is to take that first portion of the vent tube that mounts to the firewall and move it towards the front, it also holds in the vent door so that can not go back there again. (Space is too short having the vent door back there) I will swap out that vent portion with the longer front portion vent tube and have a cut out to allow the booster to fit into like a puzzle fitting. ( Not cutting the tube completly through, leaving it as one piece) That cut out hole will have a molded flashing the shape of the booster inserted into the vent and then have an overlaped flange on the tube to be rivited on and a layer of neopreame to be glued on for rattling purposes. Now the vent tube at that booster location will have an inside halfmoon opening leaving about 3-1/2 inches at it's widest point. The remaining portion of the that vent tube will now be infront of the master cylinder allowing me to mount the other vent tube with the door flapper in it. So doing this I am moving my vent door from the rear now to the front and then extending my vent cable to the door hinge... ( There will be a bit of configuration on the vent tube mounting flange) Having something is better than having nothing.
Posted on: 2015/7/24 16:58
|
|||
|
The best are yet to roll
|
||||
|
||||
|
Re: DO NOT TRUST BTV
|
||||
|---|---|---|---|---|
|
Just can't stay away
|
Hey all see my post on a brake conversion with the original pedal.
Just yesterday I updated my thread with pictures...
Posted on: 2015/7/22 18:59
|
|||
|
The best are yet to roll
|
||||
|
||||
|
Re: Brake Booster Conversion
|
||||
|---|---|---|---|---|
|
Just can't stay away
|
In this image im laying on my back shooting upward into the dash giving you a better look of where the steering bracket came into play..
See the bolt? The first bracket closest to the bolt head this is the Packard steering bracket. Under that if you look hard is a 3/16"x 1" steel flat stock comming out almost at 90deg from under the steering bracket. That flat stock goes from steering bolt to steering bolt using slightly longer bolts. Then that other mounting bracket with the holes drilled in it that goes from that 3/16' x1" flat stock mount straight to my firewall then takes a 45deg straight down the firewall and over the other support plate already on the inner firewall. This also has the cut out for the booster shaft swing and drilled the same holes for the booster mounting bolts. My swing mount is also bolted to the inside of this upper mounting bracket.. Enough for now Better pictures are gold to see this but, the end result is firm and sturdy it made that thin firewall like boulder tough with no flex... Attach file:  (53.80 KB) (53.80 KB)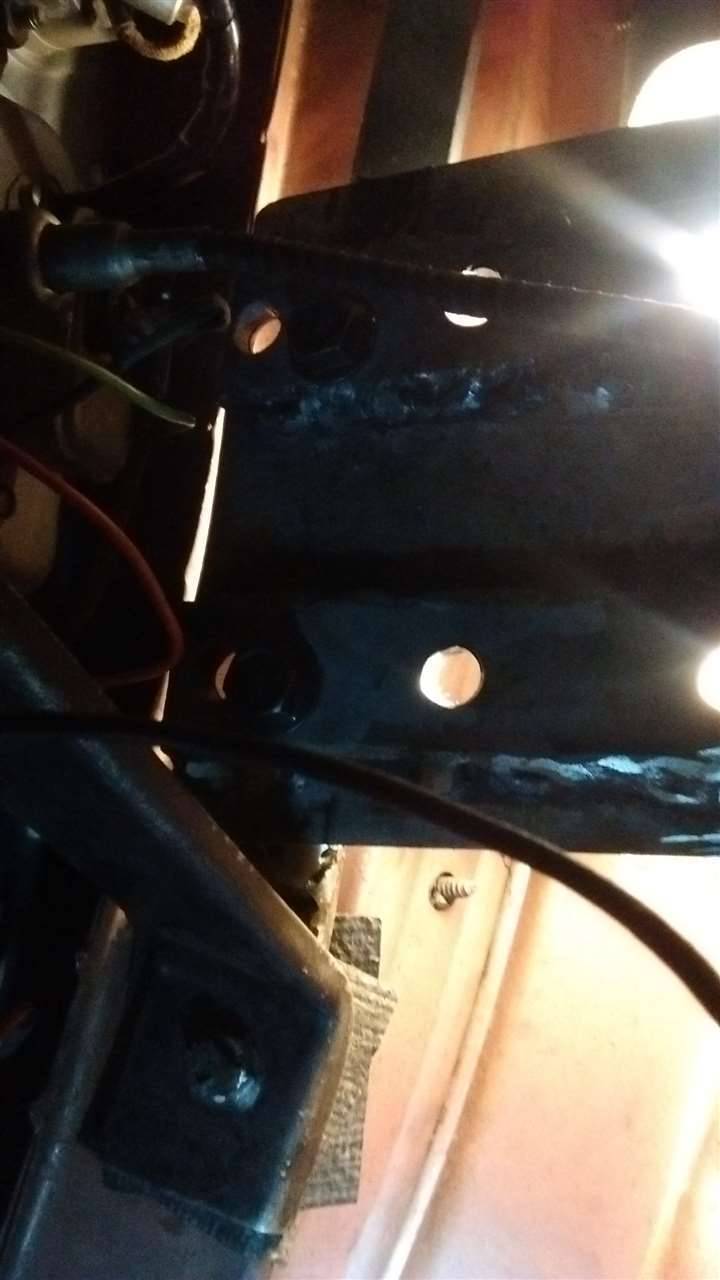
Posted on: 2015/7/21 16:28
|
|||
|
The best are yet to roll
|
||||
|
||||
|
Re: Brake Booster Conversion
|
||||
|---|---|---|---|---|
|
Just can't stay away
|
It is dark but this is where the booster shaft meets with the pedal arm bracket. (It is only temporary for now)
Up above you can kinda see my inner assembly with yet another inner firewall support plate and then it bends and carries over to where the steering bracket mounts to. I had actually removed The steering bracket to reinstall it on top of another fabricated bracket of mine that goes accross to the two steering bracket bolt holes. Then my inner firewall bracket that carries over is bolted to that bracket under the steering braket. You may notice in this picture the heat duct. I thought originaly i would have to cut a portion and shorten it. as you can see I started to do but, as I repositioned myself better I noticed all I really needed to do was to cut a portion of the flat mounting portion of that duct. I will drill new holes in my configuration to mount that duct firm... This must sound confusing but pictures say all, I'll try for better pic's up in there. Oh by the way pay no attention to that weld, this is where I ran out of wire and my wiper motor cable will be moved out of the way... Attach file: (54.87 KB)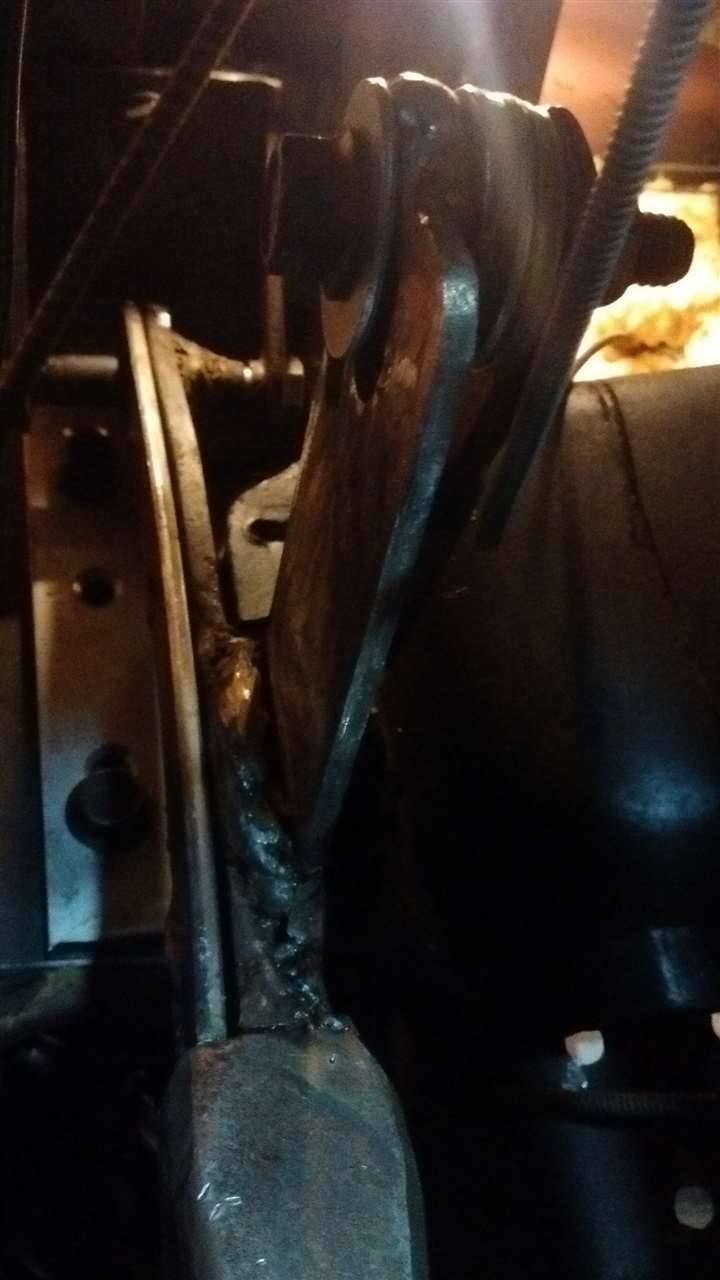
Posted on: 2015/7/21 16:18
|
|||
|
The best are yet to roll
|
||||
|
||||
|
Re: Brake Booster Conversion
|
||||
|---|---|---|---|---|
|
Just can't stay away
|
In the car..
The pedal arm at the bend is about 6-7 inches away from the firewall maybe near 8" I will take a mesurment of that and post it.. From mid pedal up to pivot point is 17 inches which actually leaves it at about a 4.25:1 ratio remembering it right! I was looking between a 4:1 to a 5:1 ratio so it works well. Another thing I had aimed for, I wanted the pedal writing (EASAMATIC) to be looking straight at me not over my head or below my knees to work well in a nice even push keeping your toes planted all the way threw on the braking process. This position has a nice comfortable feel to it to where as you can leave the heal of your shoe on the floor board and pivot from gas to brake easy enough Or with minimal foot lift without having any ankle stress. It has a good pedal feel.. Attach file: (71.18 KB)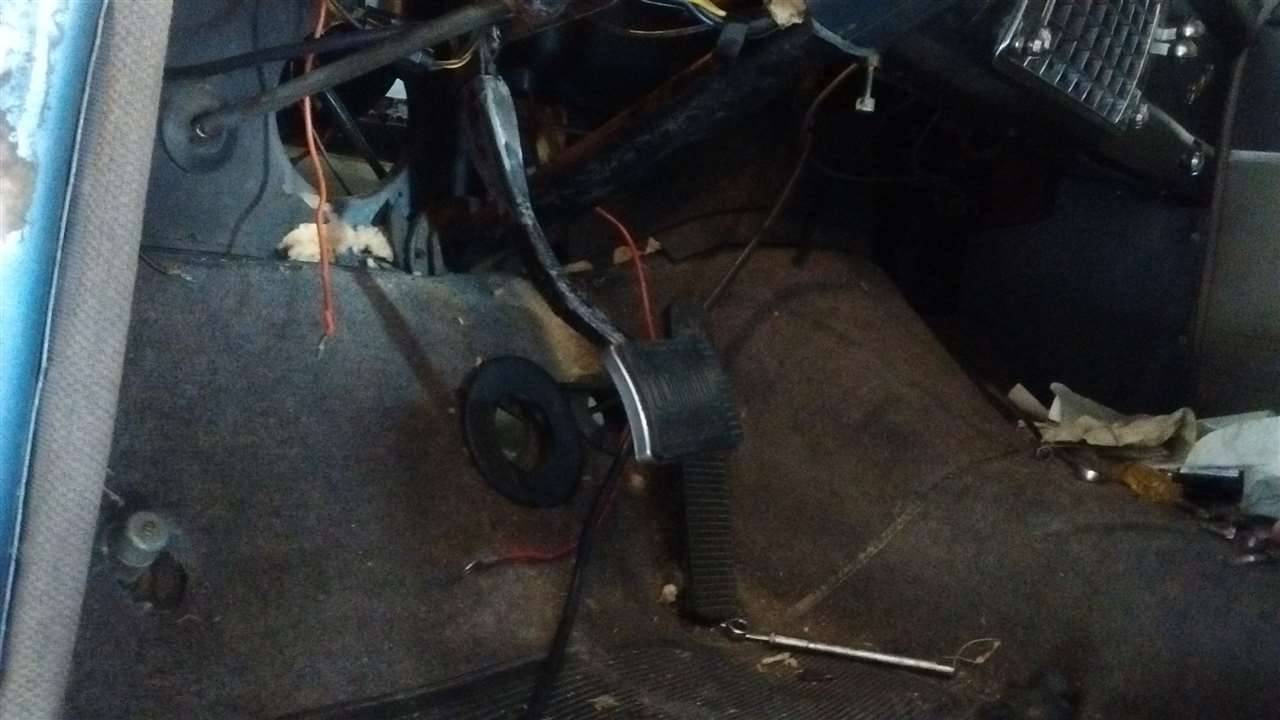 (53.57 KB) (53.57 KB)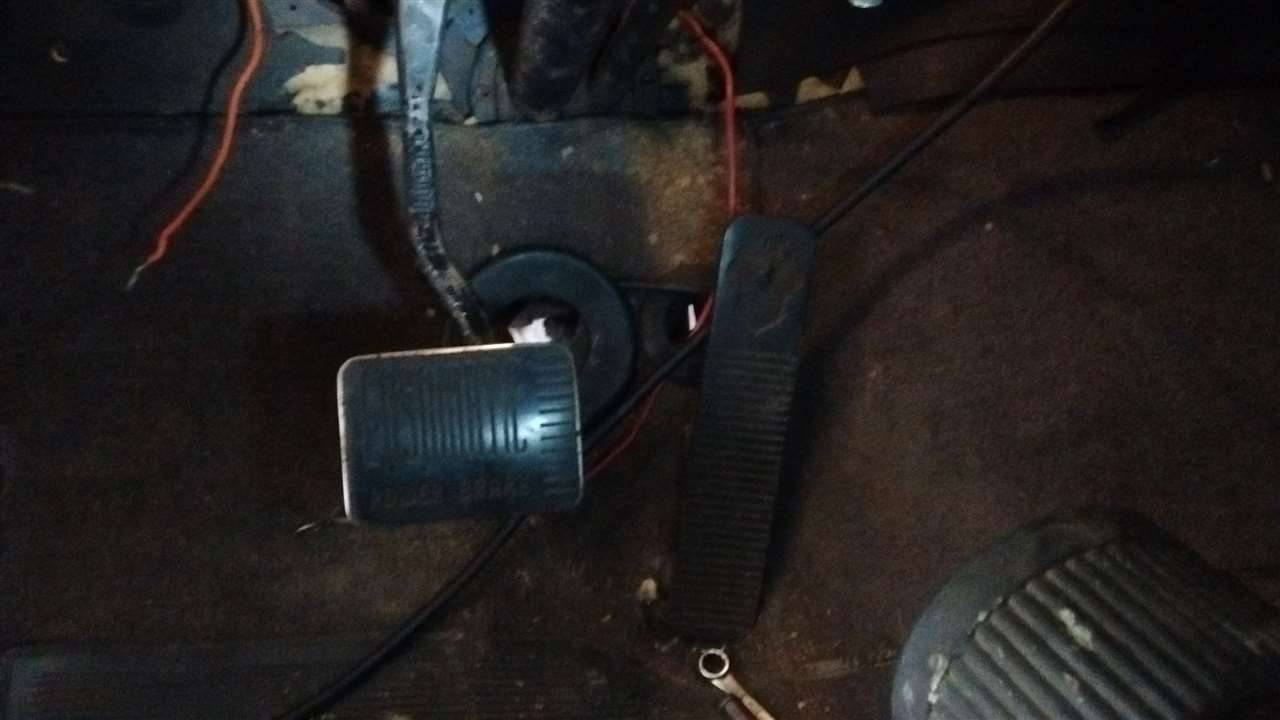 (54.80 KB) (54.80 KB)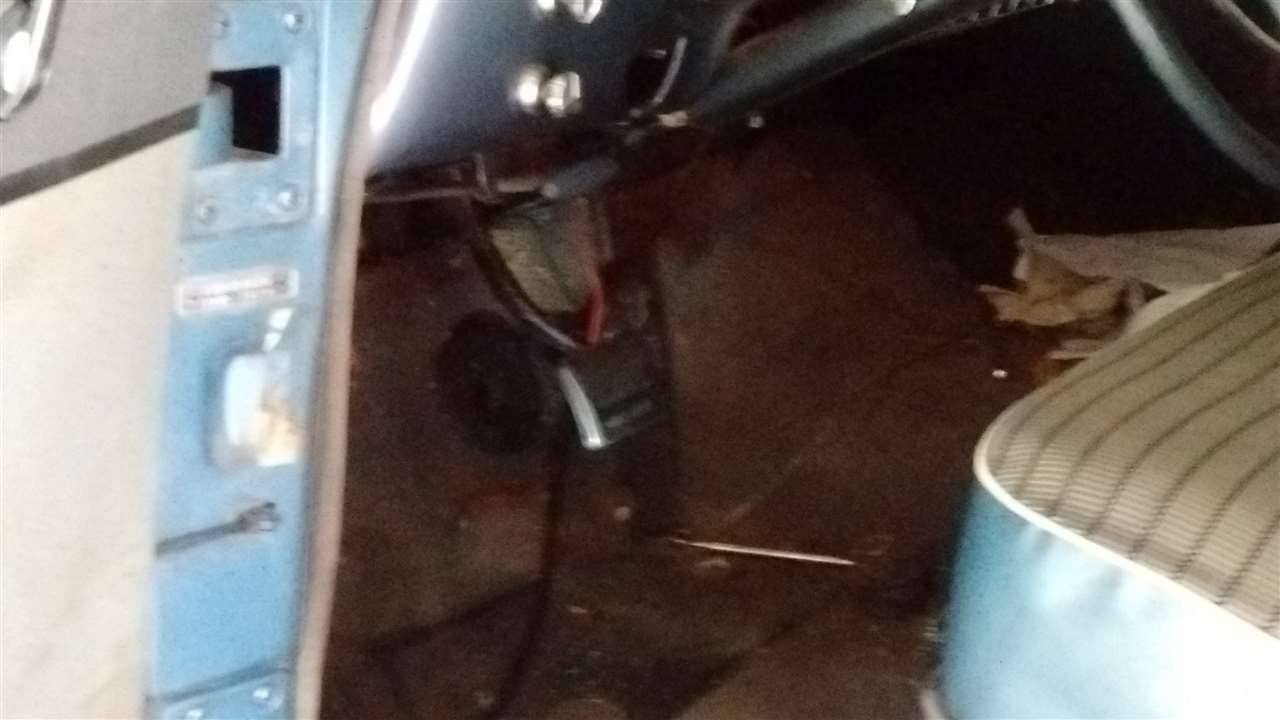
Posted on: 2015/7/21 16:03
|
|||
|
The best are yet to roll
|
||||
|
||||
|
Re: Brake Booster Conversion
|
||||
|---|---|---|---|---|
|
Just can't stay away
|
a few more out of the car..
Attach file: (83.55 KB)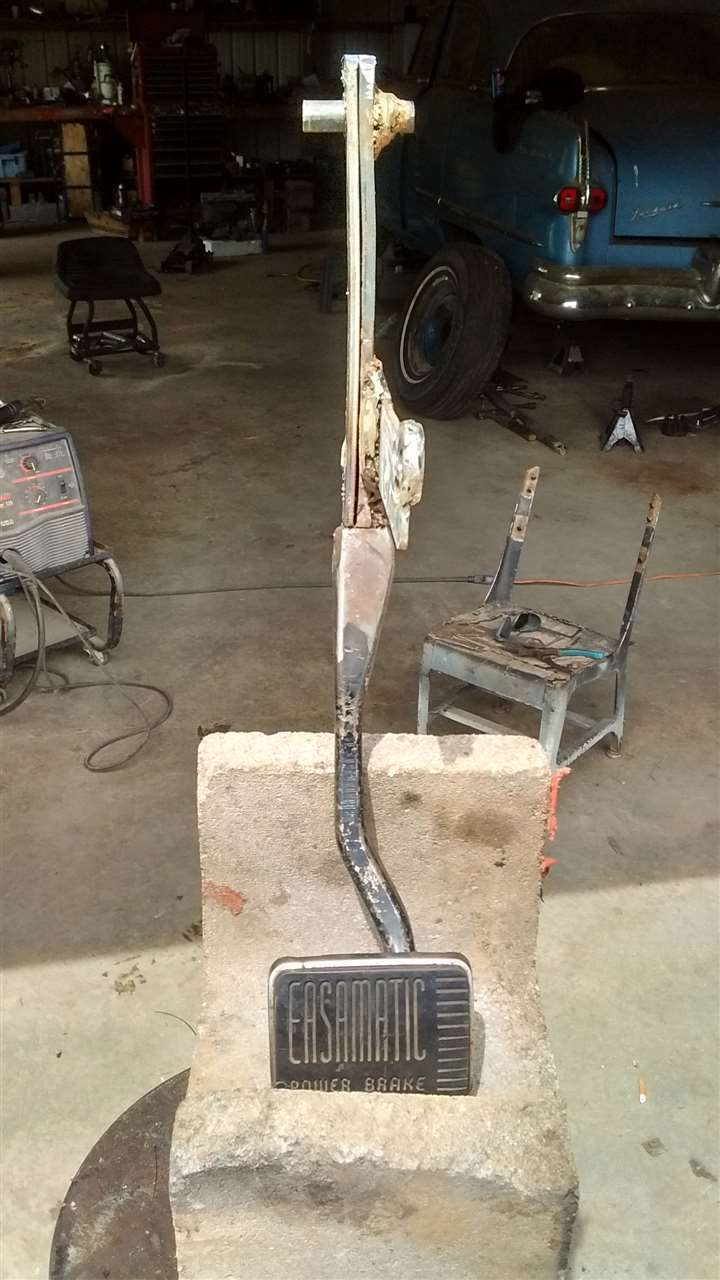 (73.76 KB) (73.76 KB)
Posted on: 2015/7/21 15:56
|
|||
|
The best are yet to roll
|
||||
|
||||
|
Re: My Brake Booster Conversion
|
||||
|---|---|---|---|---|
|
Just can't stay away
|
Ok Howard here you are!
The Brake pedal configuration/Fabrication using the original pedal assembly and swing mount ( I tried to get up in there with my camera "but" lets say I know what im looking at under the dash but will get to that later.. The pedal I took it back out today to try and finish it but I ran out of welding wire so it is still ugly but not done. Now after about 300 times in and out from under the dash for the proper fitting and placement of the pedal and months of doing so ( with some long breaks for back relief and get other things done).. What I used is a 3/16" x 1" steel flatstock as an exstention for the pedal arm. it is just long and hard to find the right angle in combination with the right placement of the swing arm and booster shaft but that part is done I can't tell you what the angle is at this point but I will find that after the final install. So I welded Two 3/16" x 1" steel flat stock side to side into the original pedal arm with the pedal at its pitch. as well as welded in pieces of that frabricated flat stock in where the arm width opened out at to make it firm. I weld an exstention bracket off of the pedal arm to meet up with the booster shaft as it was longer than i thought it would be but, I made it work and that it does well keeping about a 4.25:1 braking ratio... Fingers are crossed I am posting Pictures but, as I said Its not done like I wanted to be today but it will need more welding finishing primed and painted after all that is done it will look like it belonged there Attach file: (93.58 KB)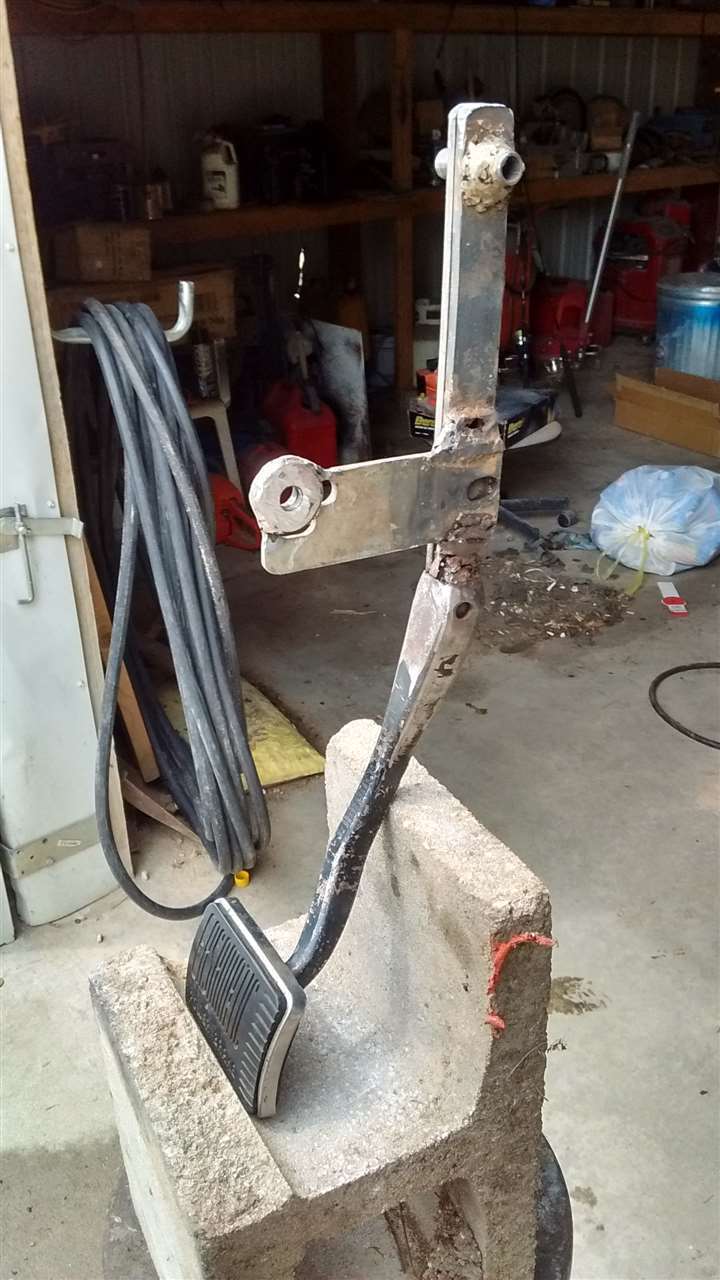 (104.57 KB) (104.57 KB)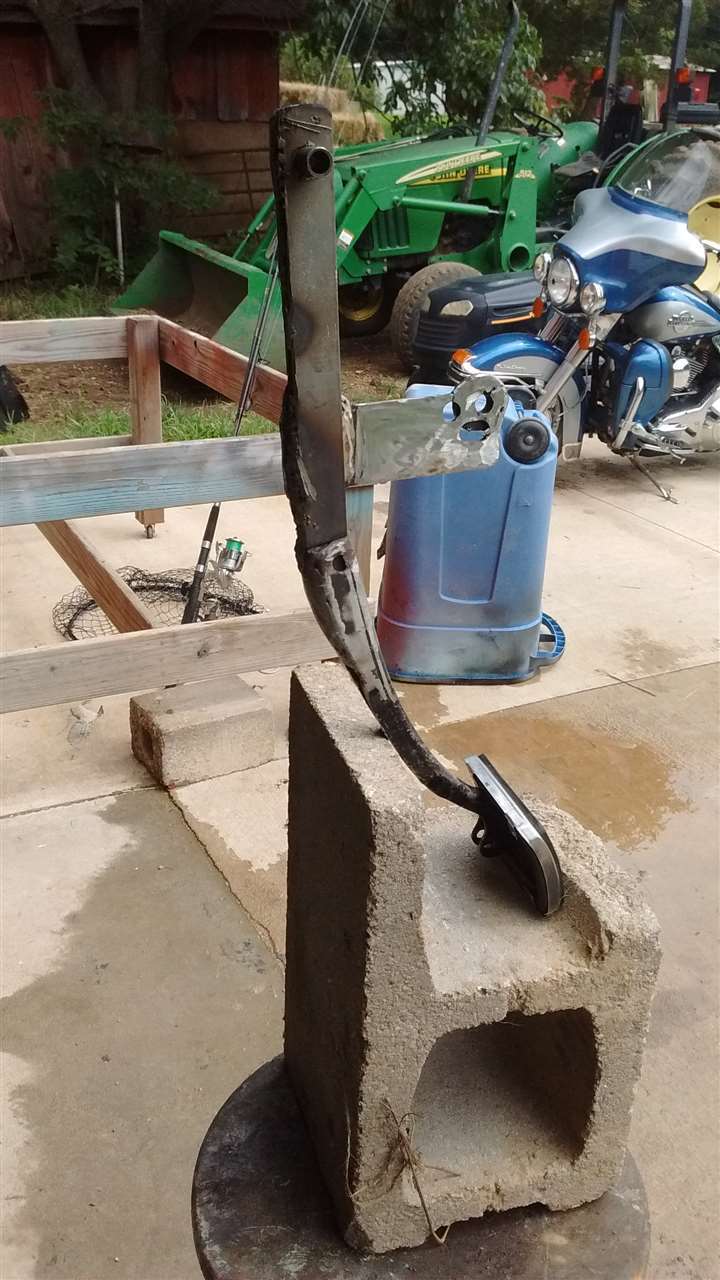 (81.84 KB) (81.84 KB)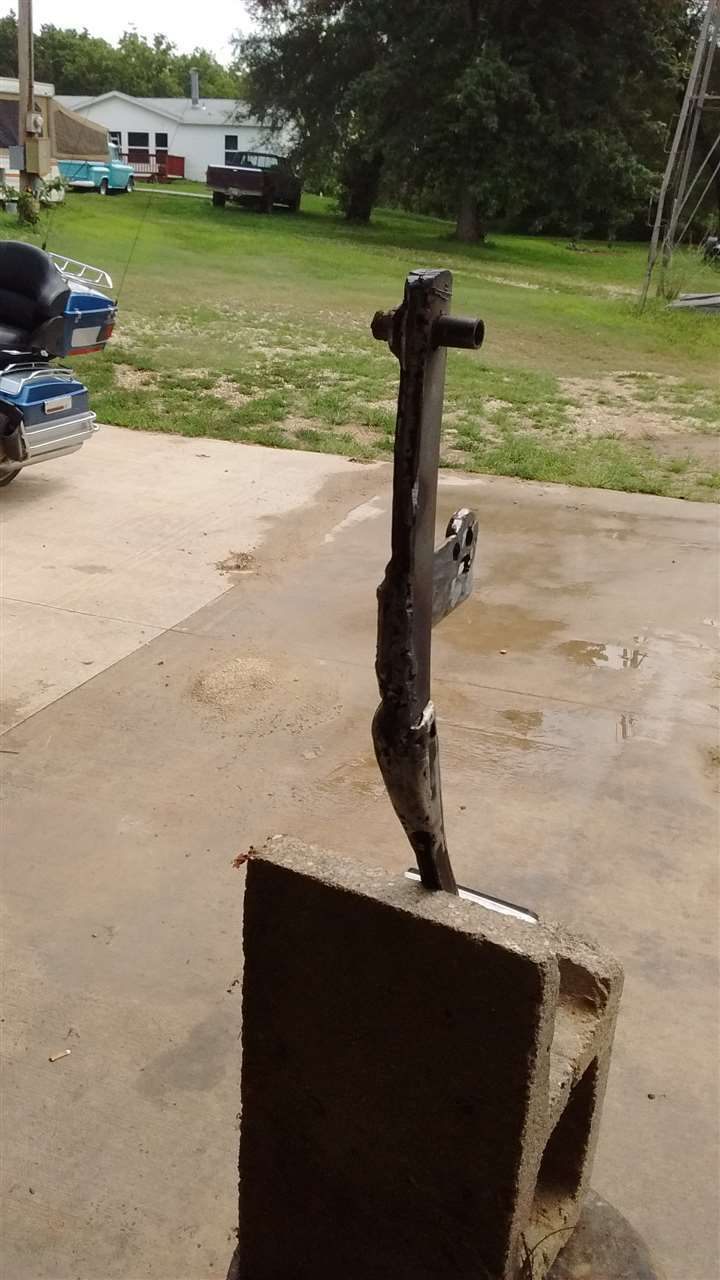 (87.37 KB) (87.37 KB)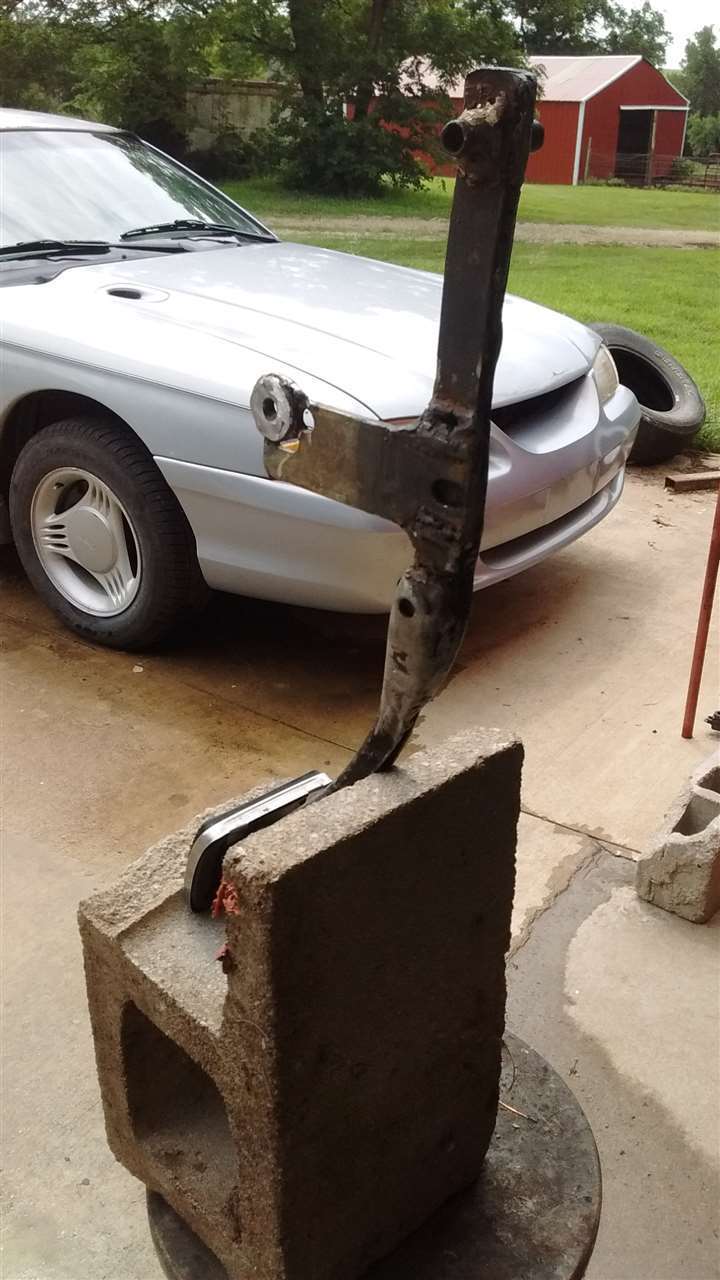 (94.42 KB) (94.42 KB)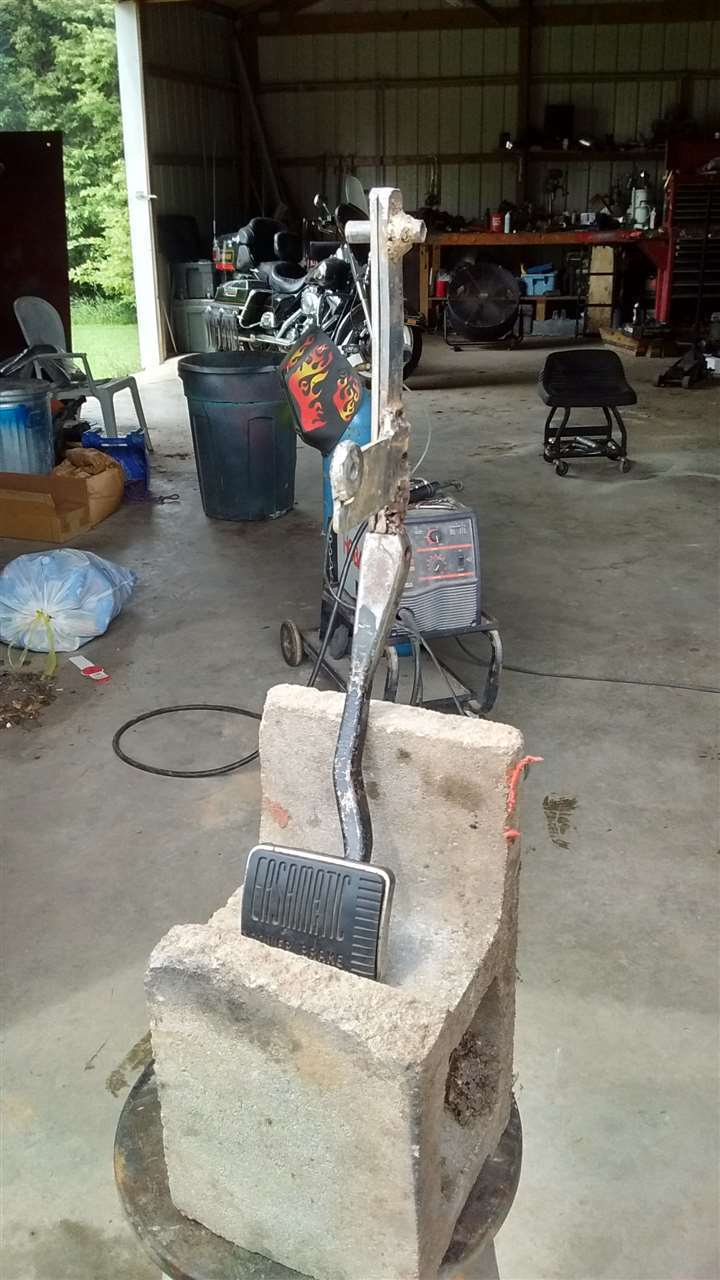
Posted on: 2015/7/21 15:50
|
|||
|
The best are yet to roll
|
||||
|
||||
|
Re: Brake Booster Conversion
|
||||
|---|---|---|---|---|
|
Just can't stay away
|
Firewall
Attach file: (74.64 KB)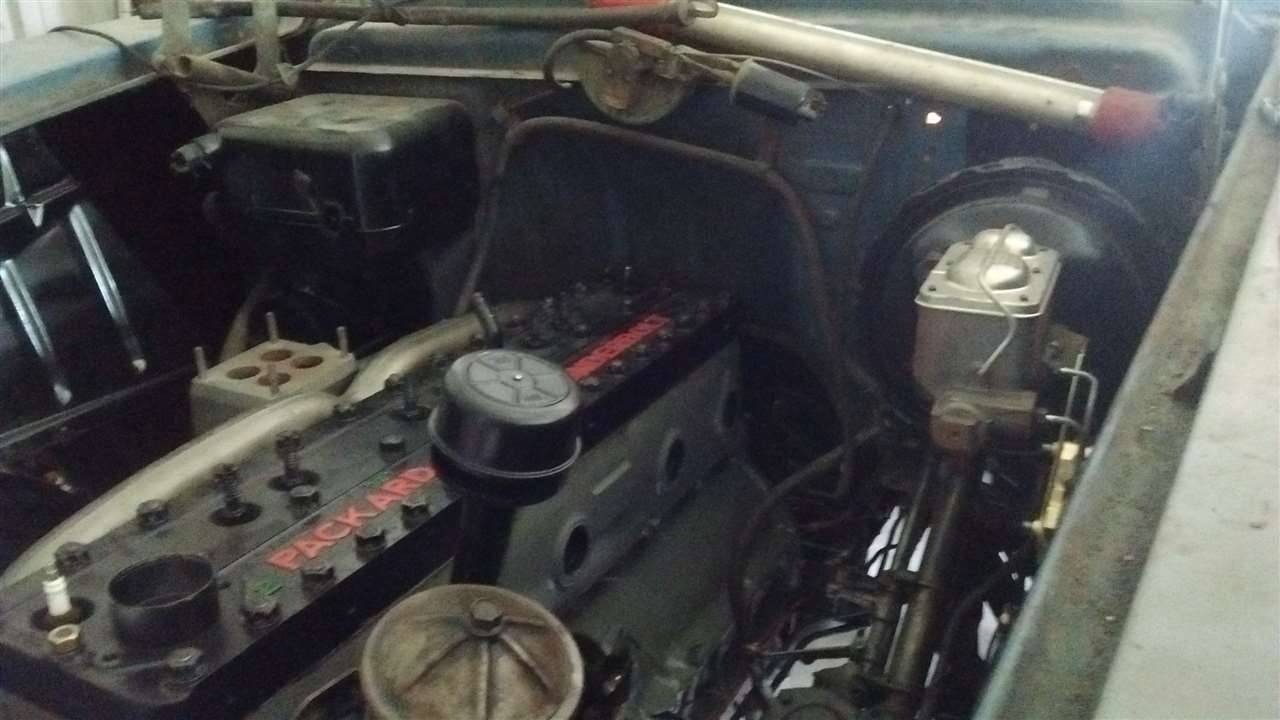 (54.85 KB) (54.85 KB)
Posted on: 2015/7/21 15:17
|
|||
|
The best are yet to roll
|
||||
|
||||
|
Re: Brake Booster Conversion
|
||||
|---|---|---|---|---|
|
Just can't stay away
|
Ok here is my brake conversion so far! my original pictures I took as I went along are lost with that phone I had, so took these today.
I will post these in stages there is still a lot to be done yet... On the firewall engine side I first started where the wires came thru the firewall and took out the rubber insulation that the wires go thru. Found center of that opening then going towards the passenger side edge of that opening staying at midway center. Measuring 3/4" out towards the passenger side on the firewall and then 3/4" down on the firewall then made that center of my booster shaft. I then measured 2" up and down from that point and cut that out an inch wide opening allowing 4 inches for the booster shaft to move. At this location it lines up real nice just about 3 inches away from the insdie steering shaft on the drivers side for the pedal arm.. ( I used the Original pedal and swing mount looks good but not done I ran out of weld wire today but I do have pictures of that I will be posting soon.) I then fabricated two 3/16" steel plates Cut out for the booster shaft swing openings, as well has the drilled holes for booster mounting bolts. This is done for both inner and outer plates for both sides of the firewall, they are made as twins working together in a sandwich effect. Supporting the firewall along with more support that i will get to soon... I went with a 10-3/4" dual brake booster and a 1-1/8" bore master cylinder ( bore may change to a 1" we will see if its too big of a bore ) I decided to use a 1977 GMC/Chevy truck brake booster and master cyinder. (Autozone bought) I went with this because I wanted the booster to be away from the firewall for extra room back there for wires and I will be mounting a Trans dip stick that will mount to that booster mount as you can see the stick laying up by my level and this booster has the exstention bracket that gives me that space behind the booster. I also have a combination valve that I mounted but I am going to remount that valve as an bottom master mount so I can reconfigure in my vent tube.... Here are some pictures of the engine firewall side with my engine I had redone.... Yes the booster clears from the hood hinge about 2-3 inches, I done all this with the hinge in the closed position Post more soon.. Attach file: (80.90 KB)
Posted on: 2015/7/21 15:00
|
|||
|
The best are yet to roll
|
||||
|
||||


