|
Re: Voltage Regulator Issues???
|
||||
|---|---|---|---|---|
|
Home away from home

|
My dad has the paper copy of the Service Manual at his house. I could not find an electronic version of the electrical section that describes the operation of the voltage regulator. Does anyone have a copy or can direct me to the appropriate page?
Here is a picture of the voltage regulator on his car. Looking at the wire diagram it looks to be a Autolite unit. I dont want to just replace parts unless I know for sure what the problem was...Is there a test procedure for the voltage regulator? Bill Attach file:  (20.35 KB) (20.35 KB)
Posted on: 2015/9/27 18:43
|
|||
|
Bill,
Dedicated to keeping the man who owns one on the road!!! |
||||
|
||||
|
Voltage Regulator Issues???
|
||||
|---|---|---|---|---|
|
Home away from home
|
Hi All,
Yesterday my dad reported that the charging system on his Series 22nd was showing a discharge when he drove it home. He said that he just thought that the generator was not charging until he got back home and turned off the ignition key he noticed that the ammeter showed "full pegged discharge". He disconnected the positive ground cable to the battery and he heard the voltage regulator click. He connected the battery cable again and the ammeter needle was centered. He started the engine and the ammeter showed a charging as usual. Does this sound like a common problem? I checked all of the wire connections and they all look fine. The voltage regulator obviously had been replaced at one (or more) time. A few months back I believe (cant remember for sure) I burnished the contacts while I had the engine out and it has been working fine until yesterday. The voltage regulator installed in his car has four wires however it does not say AC Delco or Autolite. Any tips/suggestions while I dive into the service manual? THANKS (as always)!!! Bill
Posted on: 2015/9/27 18:33
|
|||
|
Bill,
Dedicated to keeping the man who owns one on the road!!! |
||||
|
||||
|
Re: Seat belt installation
|
||||
|---|---|---|---|---|
|
Home away from home
|
Nice report...THANKS!!!
How did you fish the lower inboard belts through the seat? I see one picture however I cannot tell how you did it.
Posted on: 2015/9/23 17:13
|
|||
|
Bill,
Dedicated to keeping the man who owns one on the road!!! |
||||
|
||||
|
Re: How To Add A Six Blade Fan To A 1949 Packard
|
||||
|---|---|---|---|---|
|
Home away from home
|
The water pump does have enough "looking strength" to get the job done...the fan and the power steering pump...who knows...time will tell the truth
Posted on: 2015/9/23 11:58
|
|||
|
Bill,
Dedicated to keeping the man who owns one on the road!!! |
||||
|
||||
|
Re: How to add a PCV Valve to a 1949 Packard
|
||||
|---|---|---|---|---|
|
Home away from home
|
Yes...the aft valve cover already has a baffle to keep the oil from venting out of the road draft breather.
The oil fill tube cap has a wire mesh filter that in the original system allowed air to blow in or out. The cap has a groove so that the cap can only be installed in one direction and that was with the opening facing forward so the radiator fan would create a slight positive pressure to prevent blow by from entering the engine compartment. The old engine had so much blow by that the engine compartment was also greasy mess near the oil fill cap. I found a PCV valve that has a spring loaded piston in it (some are designed for gravity so don't get this type because on the Packard it needs to be installed horizontal) and this spring allows the piston to create a very small vacuum leak at idle and other high engine vacuum conditions (coasting). At wide open throttle the vacuum leak is still there however very slight. There was zero problems in installing this system...a slight carb adjustment was all that was needed. Bill
Posted on: 2015/9/23 11:52
|
|||
|
Bill,
Dedicated to keeping the man who owns one on the road!!! |
||||
|
||||
|
How To Add A Six Blade Fan To A 1949 Packard
|
||||
|---|---|---|---|---|
|
Home away from home
|
Since the engine was new and since it is like 100 F around here I thought I would add a 6 blade fan. Seemed like an easy modification however this took about three days to make happen...
I bought a black 16 inch steel "racing fan"unit with a 5/8 inch arbor from Speedway motors online for 40 bucks. I had my brother in law machine up a spacer to place on top of the water pump pulley because the Packard water pump inlet has a 1 inch shaft and then a 5/8 arbor at the end and I needed the arbor to center the fan on the shaft. I then found out that the winglets of the new fan were in conflict with the radiator so I used my dial indicator and ascribed a line in the painted surface of each blade exactly 1 inch inboard from the fans outer edge and cut off that one inch from all six blades. Not 100 percent scientific however it is not like this fan is installed on a 8000 RPM race motor. The fan does not appear to wobble even at high RPM so I guess I got close enough...not like the old fan was perfect anyway. Since the fan is kinda close to the radiator...and since I cannot remove the radiator with the 6 blade fan installed (because the lower water neck will not slip through the spaces in between the fan blades). Also it proved impossible to thread the little bolts into the fan/spacer/water pump pulley I decided to use four steel studs cut to the PERFECT length so that I can slip the fan down in between the radiator and the studs and then onto the studs and then still with two fingers be able to place the nuts onto the studs and then slip a 7/16 inch open end wrench in between the radiator and the fan blades and tighten the nuts onto the stud 1/16 turn at a time. Now, when the nuts are tightened down onto the studs there is still 1 thread of the stud sticking out above the nut (took a while to get that right). Note to self...if the studs are threaded too far into the holes in the water pump flange they will hit the water pump casting and prevent the fan from turning (took some bad words to figure that out). I used blue thread lock both in the water pump flange threads and on the nut threads just to make me feel better. Then I found out that the oval slots of the new fan were a bit too wide for the studs and the 7/16 inch hex head nuts so I re-drilled the four fan hub holes using the perfect sized hole for the stud and now the fan will not slip back and forth as the engine revs. (Found that out after I bolted the fan on the first time...gee...glad I used the blue thread locker and only had 1/16 of a turn on the wrench...Im here to tell you...that stuff sets up fast when heated by the radiator) Picture shows the wide oval holes but I forgot to make a picture of the new holes. Now the fan REALLY blows some air through the radiator and as a result...there is an extra bonus in that there is also now a 15 Kilometer radius bug no fly zone centered around my dad's house where...no surprise...there are no more flying bugs to be found. Bill Attach file: (14.25 KB)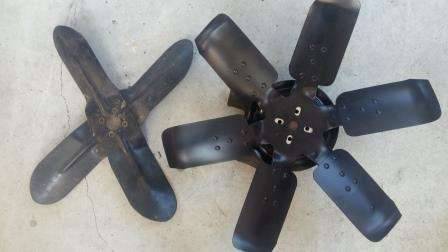 (9.92 KB) (9.92 KB)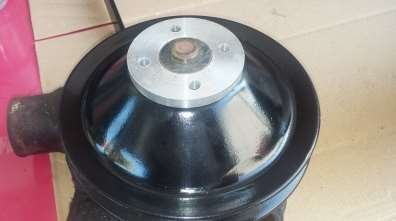 (16.26 KB) (16.26 KB)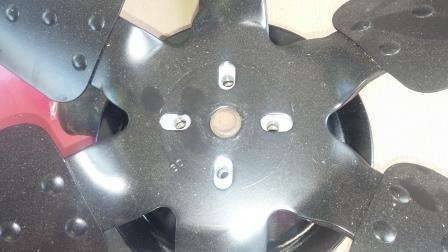
Posted on: 2015/9/22 16:37
|
|||
|
Bill,
Dedicated to keeping the man who owns one on the road!!! |
||||
|
||||
|
Re: How to add a PCV Valve to a 1949 Packard
|
||||
|---|---|---|---|---|
|
Home away from home
|
- other changes you may have needed to make in order to not rob too much vacuum from the engine manifold.
The PCV valve robs almost no vacuum from the intake because it is a calibrated hole with a spring loaded piston. The amount of vacuum leak is negligible. Only needed change is a slight idle enrichment adjustment. - Did you simply block the existing draft tube hole? Removed the draft tube and stuck a rubber grommet in it's place. - Did you add any restriction to the Oil Filler Cap? No. It already has a mesh filter so all I did was clean it in the solvent tank and squirt some oil in it and let the oil flow through the mesh. - Are you able to report on power & economy effects? Nope...the previous engine was essentially a 5.5 cylinder but now with all new exhaust valves it REALLY purs like a kitten. At first I was a little concerned because it seemed to run rough however with the help from this forum I was able to hot adjust the valves and after a bit of wear in it REALLY runs smooth. Power wise she does not break any speed records however the new paint on the engine and the buffed out exterior paint job I am confident I have shaved off a couple of tenths from my 100 foot and quarter mile ETs. Additionally less sludge on the bottom of the car will increase gas mileage a bit. WIN/WIN/WIN if you ask me!!! Bill
Posted on: 2015/9/22 15:52
|
|||
|
Bill,
Dedicated to keeping the man who owns one on the road!!! |
||||
|
||||
|
Re: How To Add Power Steering To a 1949 Packard
|
||||
|---|---|---|---|---|
|
Home away from home
|
Good info!!!
The Chrysler brochure talks about using a pressure hose that is constructed by connecting two different diameter hoses end to end (larger diameter at first and then the smaller diameter right before it connects to the actuator) and this acts as an "oil cushion to absorb the pulsations of the pump". A bunch of Foooey!!! My first hose was a strait hose of the same diameter and then after hearing the annoying noise and after much research reading the Chrysler literature I spent another 60 dollars and made up a hose with two diameters complete with the aforementioned "oil cushion" however the noise was not "cushioned" much. When I use lots of bad words when driving the car I cannot hear the noise so perhaps that will be my strategy. ; )
Posted on: 2015/9/22 15:39
|
|||
|
Bill,
Dedicated to keeping the man who owns one on the road!!! |
||||
|
||||
|
How To Add Power Steering To a 1949 Packard
|
||||
|---|---|---|---|---|
|
Home away from home
|
Here are the pictures of the Power Steering system I added to my dad's 1949 Series 22.
The actuator is a Monroe actuator from a 1955 Packard. I had to use the 1955 Packard Pitman arm because it has a curve in it to allow the two PS hoses to be installed in the actuator without conflict. I also had to use two drivers side steering tubes (the parts that connect the actuator to the tie rod ends) because the passenger side tube needed a little bit of a curve in the tube so that it did not conflict with the actuator bracket I fabricated). I had to fabricate a passenger side actuator to frame anchor bracket. My first attempt was to use a 1955 OEM bracket however the chassis are different and the OEM part had a curve in it so that it when installed it to the Series 22 chassis it did not match the rubber grommets that the actuator uses to attach to the anchor. Naturally hydraulic hoses had to me custom made for this application. A 1952 Chrysler PS pump is a cleaver contraption because it is a generator with a PS pump mounted to the back of the same shaft. I thought this would be an elegant solution because I could install it in lieu of the existing generator (had to fabricate a heavy duty bracket for it). All I needed to do was to use a pulley that matches the Packard V belt thickness pulley and a slightly longer belt. The remote oil filter still worked and all I needed to do was to install it a bit higher in its bracket and bend the steel oil lines slightly to make it work. The Chrysler pump when installed was in conflict with the OEM battery (the long and skinny 6V battery) so I had to redo the OEM battery box to accommodate a 6V "Type 4" which is not as long as the OEM battery but much wider (from a golf cart) battery. This ended up actually being a good thing because the Type 4 battery has about 150 more cold cranking amps than the OEM battery. The Chrysler pump used in the same system with the Monroe actuator in hind sight was a bad choice because the output (pressure and flow) of the Chrysler pump is a perfect match for the Bendix actuator (both are 650 PSI and 1.5 GPM) however the Monroe actuator apparently needs more pressure and flow (1000 PSI and 1.9 GPM). Those who also visit the V8 pages of this forum will know of all of my trials and tribulations trying to figure this out. The Monroe seemed to be a better choice at first because it has much less external rubber hoses and valves but either I should have gone with the Bendix or else used a separate PS pump but then it would have been a huge hassle dealing with different brackets and belts. Since the Chrysler pump is a lower output design as compared to the needs of the Monroe actuator, the PS system makes an annoying humming sound at very low speed turns such as in parking when you really need the power assist. Cant hear it from outside the car but inside it is annoying. I told my dad to turn up the radio to fix it. He is REALLY happy to have PS...noisy or not. I did modify the Chrysler pump to put out more PSI (now puts out 1000 PSI) by adding shims ( 3 washers) to the pressure relief spring however now I need to figure out how to shim up the flow control valve to increase the GPM output. Anyhoo...as my Hot Rodding mentor says "Well...that's hot roddin" Bill Attach file: (19.51 KB) (22.17 KB) (22.17 KB)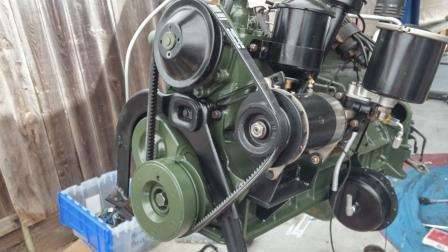 (23.42 KB) (23.42 KB)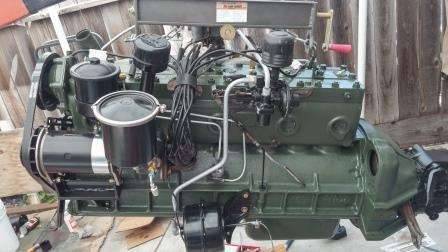 (18.46 KB) (18.46 KB) (16.43 KB) (16.43 KB) (24.38 KB) (24.38 KB)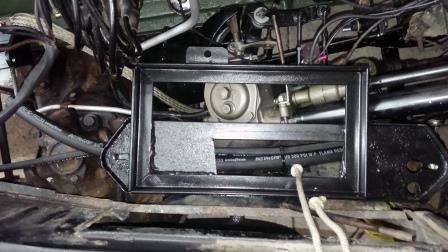 (21.88 KB) (21.88 KB)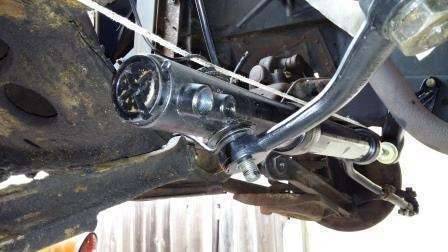 (13.05 KB) (13.05 KB)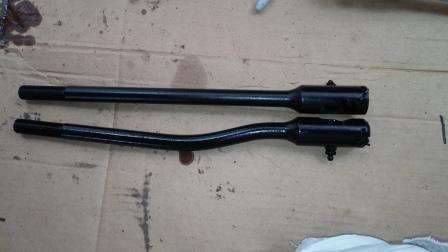
Posted on: 2015/9/22 15:02
|
|||
|
Bill,
Dedicated to keeping the man who owns one on the road!!! |
||||
|
||||
|
Re: Running Packard = Happy Dad!!!
|
||||
|---|---|---|---|---|
|
Home away from home
|
I was able to reduce the power steering humming sound some however it is still there. I added three washers to the Pressure Relief valve spring and bumped the pressure output to 1100 PSI and that helped some.
I am currently researching on how I can add some washers to the Flow Divider valve spring. I think I know how to do it however id any of you happen to have a 1952 Chrysler Imperial manual laying around can you PLEASE scan and zap me the PS pump pages?!?!? Even so...I doubt my dad will let me take his Packard to my house again anytime soon?!?!?
Posted on: 2015/9/22 14:31
|
|||
|
Bill,
Dedicated to keeping the man who owns one on the road!!! |
||||
|
||||


.jpg")


