|
Re: 31 headlight connector
|
||||
|---|---|---|---|---|
|
Home away from home

|
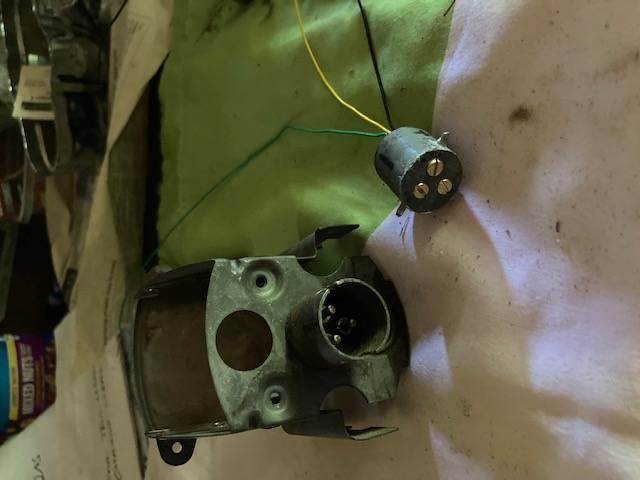
I’m good for the fronts but need a taillight socket. Have any of them? I think I can make one out of a 7/8 inch plastic dowel rod, and some thoughtful drilling.
Posted on: 2021/8/24 14:01
|
|||
|
||||
|
Re: 1930-1932 Fender Lights - 'market survey'
|
||||
|---|---|---|---|---|
|
Home away from home

|
Crin -- If you want to remanufacture some parts, try doing some Oakes tire locks for 29-32; I would think they'd be hot sellers. I have a single reproduction one you could use as a prototype if you'd cut me a deal on a pair that'd fit my 31. Thanks!
Posted on: 2021/8/8 16:58
|
|||
|
||||
|
Re: Current Limit Relay For 1930 733
|
||||
|---|---|---|---|---|
|
Home away from home

|
Are you talking about the cut-out on the generator or the circuit protector on the firewall? Is your generator producing amps?
Posted on: 2021/8/4 17:18
|
|||
|
||||
|
Re: stuck engine
|
||||
|---|---|---|---|---|
|
Home away from home

|
btw, I assumed since the problem cylinders weren't draining the penetrant the issue was rings. Trying turning the crankbolt counterclockwise and if you get some movement then it's probably a valve. Perhaps soak the whole thing with diesel/ATF for a few weeks and then come back to it.
Posted on: 2021/8/1 14:34
|
|||
|
||||
|
Re: stuck engine
|
||||
|---|---|---|---|---|
|
Home away from home

|
Just make sure that the Evaporust won't hurt any other metals that it might come in contact with (i.e. aluminum pistons). Read the label carefully. Evaporust is rather amazing stuff.
Posted on: 2021/8/1 14:28
|
|||
|
||||
|
Re: stuck engine
|
||||
|---|---|---|---|---|
|
Home away from home

|
Wat -- I would try taking a big wood dowel rod, put it down the problem cylinders, and lightly tap around the edges of the piston to try to create some micro-fissures in the corrosion. If that doesn't seem to move the ball, then I would clean it all out real good and dump Evaporust down the cylinders as a last resort prior to tearing it all apart.
Posted on: 2021/8/1 5:33
|
|||
|
||||
|
Re:
|
||||
|---|---|---|---|---|
|
Home away from home

|
Assuming the issue isn't old/ethanol gas, I'd first check the timing/points gap, then the advance mechanism in the distributor (I take it that 29's had an automatic centrifugal weight advance) which might not be advancing as it should be, then carburetor issues such as running too lean or improper fuel float level/excessive pressure in the line.
Posted on: 2021/7/31 5:31
|
|||
|
||||
|
Re: stuck engine
|
||||
|---|---|---|---|---|
|
Home away from home

|
I have a 31 Standard 8 where I was able to rotate the crank bolt about 180 degrees before everything got stuck. Figured it was a valve. Per youtube advice I drained the oil, mixed up a 50/50 solution of diesel and ATF fluid, and filled the cylinders to the top. Most of the fluid will drain to the crankcase, and you will have to clean out the intake/exhaust manifolds as any open valves will collect the fluid. Situation solved, after two weeks I was able to turn it over. Obviously, make sure all the cylinders are devoid of fluid and keep the sparkplugs out when turning over by hand.
https://www.youtube.com/watch?v=_QqXKzS1JVU
Posted on: 2021/7/31 5:24
|
|||
|
||||
|
Re: 31 headlight connector
|
||||
|---|---|---|---|---|
|
Home away from home

|
I finished my headlights yesterday on the 31 and wanted to convey some thoughts for the benefit of any future searches seeking knowledge on the same subject:
1. After searching high and low for replacement headlight plugs/parts specific to the CM Hall lights used on early 30's Packard, I couldn't find anyone that has anything in supply. Definitely retain the old electrical plugs off the harness cause you'll have to reuse them. 2. If you're missing the brass screws and electrical connectors in the plug, or they're wrong or stripped, I found Model A Ford used very similar brass bits for the 28-29 year and can be purchased cheap from any national supplier. If you use them, then prior to wiring anything make sure the brass connectors will fully insert into the plastic cylinder make sure Also, Model A Ford headlight bulbs enjoyed the same base and seem to work just fine, at a fraction of the price of what Packard distributors are selling. 3. When you're putting everything back together do bulb checks and circuit/continuity tests on the three circuits in the headlight buckets to determine if you have problems. I hooked a 6V lantern battery up to each of the circuits and grounded to bucket and made sure the bulb would glow before mounting to the car. 4. The cork gaskets on the buckets can easily be duplicated with 1/8 inch cork, a straight edge, and sharp razor. They only need to be 1/4 wide to fit right. 5. The male plug and female connector are each marked "1", "2", and "3". On mine, 1 was the depressed beam circuit, 2 was the low beam, and 3 was the high beam. This means you have to wire the harness to the plug correctly so that, when inserted, these circuits line up with the 1, 2, and 3 circuits on the female side. Also, you have to recognize where the 1 position is on the female side, so that you insert the plug it lines up correctly. You could be 180 degrees off. Also the entire headlight is grounded by virtue of a small brass semi-circular plate that conforms to the inside circumference of the lower section of the plug. It has to be soldered to the ground wire from the harness. Be sure everything is real clean inside the plug and grounding plate bright to get a good ground. I put a small piece of wadding in the plug to force the grounding plate against the inside of the plug. Seemed to work. 6. If you're missing the plug, or the plastic insulator cylinder that fits into it, consider removing the female connector in the bucket, and just wiring everything directly to the harness using insulated spade connectors. You'll just need to ground the bucket to the ground wire from the harness which can probably be done by running a small machine screw on the bottom (to conceal from view) and bolting down the ground eyelet with a matching bolt on the inside of the bucket. Good Luck!
Posted on: 2021/7/18 6:30
|
|||
|
||||

 Rear light plug.jpg (32.84 KB)


