|
Re: Wade's Workshop
|
||||
|---|---|---|---|---|
|
Home away from home

|
I still think a small paintbrush would have filled those holes with Rhino and would have looked a lot better than the urethane...
Posted on: 2009/11/28 21:48
|
|||
|
||||
|
Re: Wade's Workshop
|
||||
|---|---|---|---|---|
|
Home away from home
|
Looks like you've bitten off a big one Mal.....good luck.
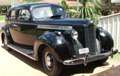
Except for the running boards, my first impression of the 1941 Bohman & Schwartz Limo was of one of the ugliest cars but it is growing on me.
Posted on: 2009/11/28 23:18
|
|||
|
Carpe Diem!!
 Registry Registry
|
||||
|
||||
|
Re: Wade's Workshop
|
||||
|---|---|---|---|---|
|
Forum Ambassador

|
Sunday 29th November 2009
Another 3 hours on the one board with the 80 paper. The closer to the inside of the board the more orange peel there is. At the rate I'm going, instead of just losing my finger prints could go all the way to the elbow! Quote: Turbopackman wrote: I still think a small paintbrush would have filled those holes with Rhino and would have looked a lot better than the urethane... Trouble is I'm learning as I go, not a good way to do it. But hopefully others will learn from all this. Quote: Appin wrote: Looks like you've bitten off a big one Mal.....good luck. Except for the running boards, my first impression of the 1941 Bohman & Schwartz Limo was of one of the ugliest cars but it is growing on me. You're right, it's a much bigger job than I thought it would be, but what else am I going to do? As for the Bohman & Schwartz Limo, an impressive formal car in which my chauffeur would drive me to the opera while I sat in the back with top hat on, I'd suffer it! Attach file:  (31.17 KB) (31.17 KB)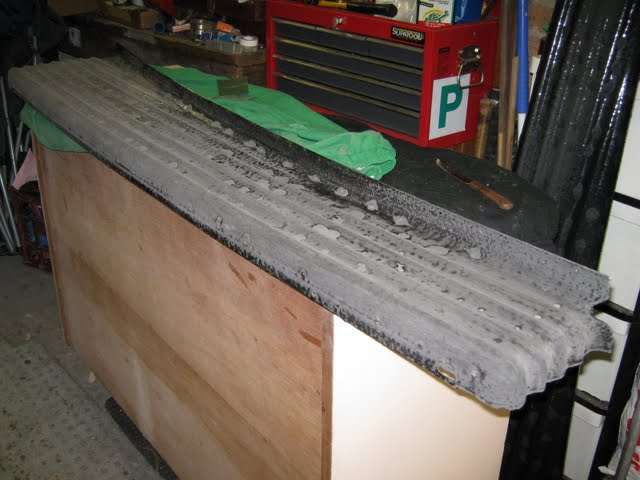 (31.62 KB) (31.62 KB) (33.39 KB) (33.39 KB)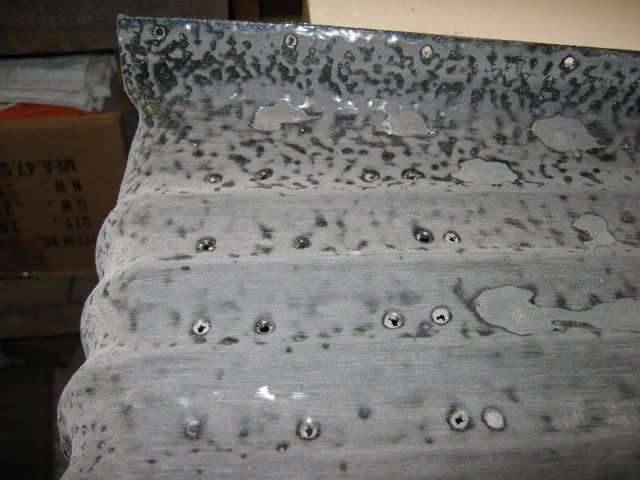
Posted on: 2009/11/29 1:21
|
|||
|
Mal
/o[]o\ ====  Bowral, Southern Highlands of NSW, Australia "Out of chaos comes order" - Nietzsche. 1938 Eight Touring Sedan - SOLD 1941 One-Twenty Club Coupe - SOLD 1948 Super Eight Limo, chassis RHD - SOLD 1950 Eight Touring Sedan - SOLD What's this?  Put your Packard in the Packard Vehicle Registry! Here's how! Any questions - PM or email me at ozstatman@gmail.com |
||||
|
||||

|
Re: Wade's Workshop
|
||||
|---|---|---|---|---|
|
Forum Ambassador
|
Mal,
What happens after the running boards are sanded out? Do the get re-coated, painted, or something else? I recently refurbished the running boards on my 39... I truly feel your pain. Hang in there, Jim
Posted on: 2009/11/29 10:47
|
|||
|
||||
|
Re: Wade's Workshop
|
||||
|---|---|---|---|---|
|
Webmaster

|
Couldnt the boards be stripped to bare metal, the extra holes either MIG\TIG welded or brazed closed, and then coated?
Posted on: 2009/11/29 20:19
|
|||
|
-BigKev
1954 Packard Clipper Deluxe Touring Sedan -> Registry | Project Blog 1937 Packard 115-C Convertible Coupe -> Registry | Project Blog |
||||
|
||||
|
Re: Wade's Workshop
|
||||
|---|---|---|---|---|
|
Home away from home
|
Mal,
I had the same thought as BigKev, if it was mine I would strip it and start again however I would fill the holes with soft solder. I have had good results with this method of filling unwanted holes up to about 3/16" diameter. I always lightly counter sink each side of the holes to key the solder and have never had a failure. The roof of my 1929 sedan had hundreds of holes where a non standard steel top had been screwed in place and I used this method. The benefit is that there is no distortion and I have never had a failure. If you did this and sanded all the filling back to a smooth finish I would think you would get a much better result. David
Posted on: 2009/11/30 4:40
|
|||
|
||||
|
Re: Wade's Workshop
|
||||
|---|---|---|---|---|
|
Forum Ambassador
|
Monday 30th November 2009
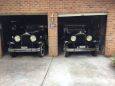
A morning with the granddaughters was followed by afternoon with Packards. Wade was working on removing the shutterstat rear plate and actuating arm from John's 110 radiator top tank. Wade had already taken off the thermostat housing and upper radiator hose before I arrived and in inspecting the in-line hose filter installed discovered it full of crud. And this from a rebuilt engine with rebuilt water pump, good water distribution tube, and a flushed and cleaned radiator. It's also had very little running time, a couple of short 5 minute test drives and some stationary running time in the workshop, probably not more than 1/2 an hour all up. But the real reason for this activity was to 1) fit a thermostat in the thermostat housing(had been assembled and run while waiting for the parts to arrive from Max) and, 2) fix the improperly mounted shutterstat mechanism. At this point Harvey arrived with a couple of things for me and some for Wade. For me he had what he thought was a '41 door handle, well it might be but it's not the same as the ones on my 120. And also an old Packard Service Manual, titled Tool Catalog, which I'll have scanned and uploaded to the Site soon. Only problem is it's missing the first 12 pages. And he had a cheque for the engine parts Wade had imported for Harvey's rebuild of his bosses '39 120 Convertible Coupe. He also had the inner speedo cable out of his bosses other '39, 'Kermit', the 110 Business Coupe. The cable was broken about 4" from the end. Wade couldn't help, but Harvey rang later to say that General Instruments at Lidcombe, the guys that Wade uses, had made him a new cable in about 5 minutes. Back to the shutterstat. After the removal of the cover plate and pivot arm and comparing it with the one on Noel's '39 120 it appears that the pivot arm is "incorrect". It may be a fabricated piece but in doing so it pivots the wrong way. That is, it's pulling the shutters shut instead of pushing them open when it heats up! So all that blame heaped on Dave and his guys at the radiator shop for installing it in the top tank incorrectly was in error. It could only be installed one way, the way it was. Now that it was figured out what was wrong, how to fix it? After some discussion and more figuring it was decided to cut the pivot post off, turn it round by 90 degrees and weld it back on to the shaft. With the whole plate then rotated 180 degrees the lever will now push the shutters open. A quick trip around to see Brendan, at Col's brake shop, whose welding expertise was used and there we had it, a properly functioning shutter operation lever. Bolted it all back together and connected the pivot lever to the shutter actuating lever, re-installed the thermostat housing, now complete with new thermostat and retainer, filled the 110 with water and fired her up and no leaks. Went for a test run around Wades circuit down to the ferry wharf at Shepherds Bay, stopped and saw the shutters were now opening and also took a few pic's, then back to the workshop. On return, with the engine now well warmed up, re-torqued the head nuts. And last thing, Wade installed the rubber bumps stops in the front suspension, these had also been on order from Max. So in the near future Wade will drive the 110 to/from the workshop for a couple of days to ensure all's well before handing it back to John. And speaking of driving to/from the workshop, on Friday Wade had completed the work on Noel's '39 120. You'll remember that on Thursday I'd dropped Wade off at Col's to see him about the fluid leak from the banjo fitting on the front of the master cylinder. Ended up that Wade used a thicker washer because the new copper one supplied wasn't thick enough because the threaded hollow bolt bottomed out before it sealed properly. That was one problem solved but taking the 120 home that night Wade found the re-welded trans rod to be giving all sorts of problems. This prompted Wade to return to the workshop on Saturday to remedy that. Rather than try again to rework the rod, which by this time was almost more weld than rod, another approach was taken. From John or Rick's spare parts Wade found a rod, I know, I know it's not Packard(probably off a Mazda or a Holden  ) but after the necessary re-working it works and keeps a Packard on the road until Noel can source a "correct" replacement. Upshot of it all is that it is now shifting well and so much so, that with Noel's permission, and as part of the road test program Wade will take the 120 on the Morris Minor Picnic Club run tomorrow. Unfortunately I can't make it, a flimsy excuse of "having a dental appointment". Believe me, I'd rather be driving a Packard any day than be in the Dentists chair! ) but after the necessary re-working it works and keeps a Packard on the road until Noel can source a "correct" replacement. Upshot of it all is that it is now shifting well and so much so, that with Noel's permission, and as part of the road test program Wade will take the 120 on the Morris Minor Picnic Club run tomorrow. Unfortunately I can't make it, a flimsy excuse of "having a dental appointment". Believe me, I'd rather be driving a Packard any day than be in the Dentists chair!Quote: hardtop wrote: Mal, at least your garage looks a lot better then mine...... Pic's can lie! Quote: 39super8 wrote: Mal, What happens after the running boards are sanded out? Do they get re-coated, painted, or something else?......Jim Quote: BigKev wrote: Couldnt the boards be stripped to bare metal, the extra holes either MIG\TIG welded or brazed closed, and then coated Quote: DavidM wrote: Mal, I had the same thought as BigKev, if it was mine I would strip it and start again however I would fill the holes with soft solder. I have had good results with this method........If you did this and sanded all the filling back to a smooth finish I would think you would get a much better result. David The holes come back to my naivety, knew they were there but didn't think they'd be a problem and then discovered otherwise after being Rhino coated. Solution was to fill them with urethane, rub the filling back and recoat with Rhino. Peter, the Rhino guy, did the filling and I've started the rubbing back with a view to his alternate suggestion of then re-finishing using black bumper paint for the final coats. But in doing the rubbing back I've found that I've rubbed through the Rhino in some places(too thin) and the orange peel is quite bad in others. Because of these two recent developments I'm now thinking along the lines of re-coating with Rhino AGAIN! First time around I suggested to Peter that thin coats were the way to go but I'm thinking that a couple of thicker coats may now be better. Thanks to all for their suggestions, and if I was doing it all again from the start the boards would certainly be prepared differently. Attach file: (35.18 KB)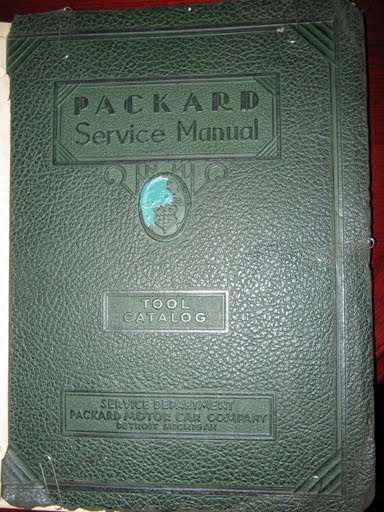 (53.53 KB) (53.53 KB)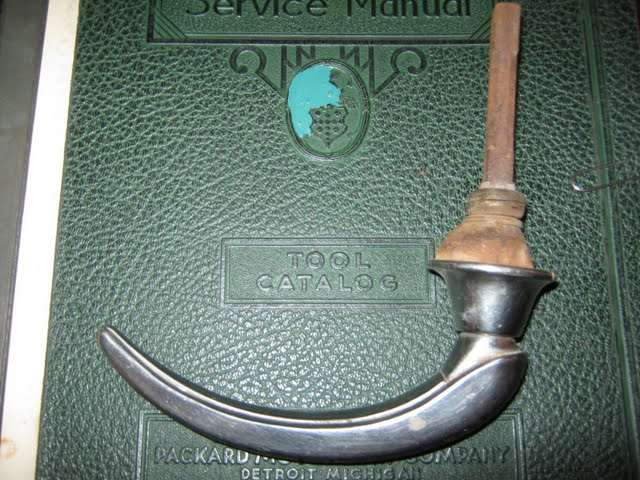 (15.26 KB) (15.26 KB) (32.84 KB) (32.84 KB)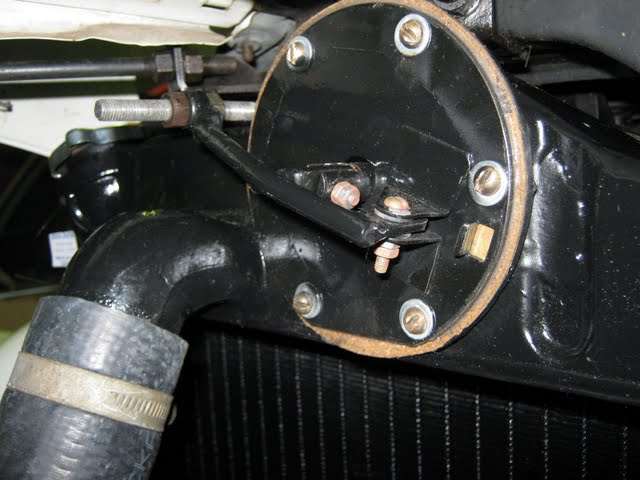 (46.32 KB) (46.32 KB)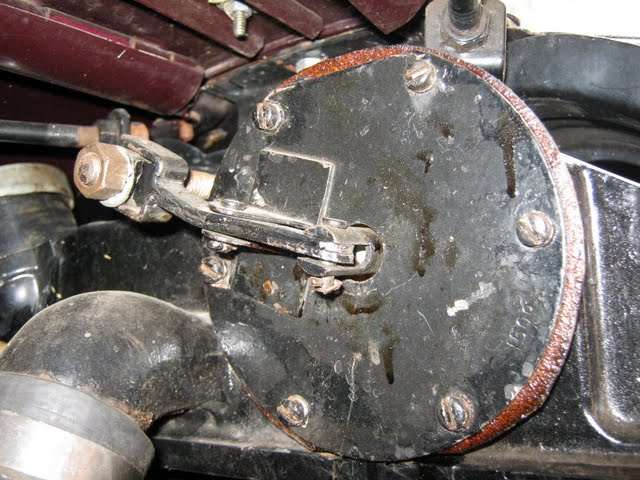 (30.93 KB) (30.93 KB)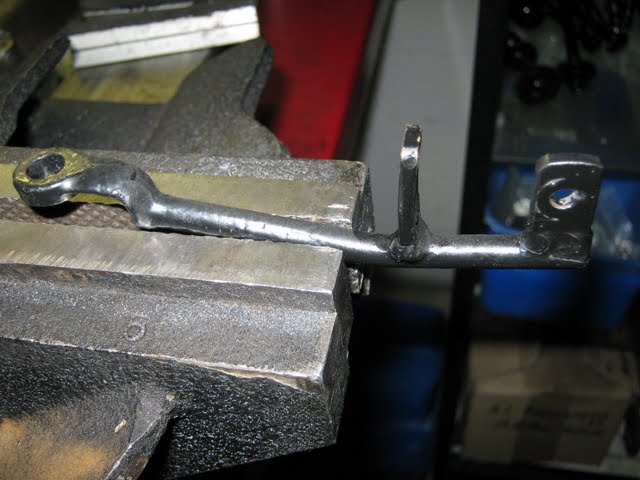 (29.22 KB) (29.22 KB)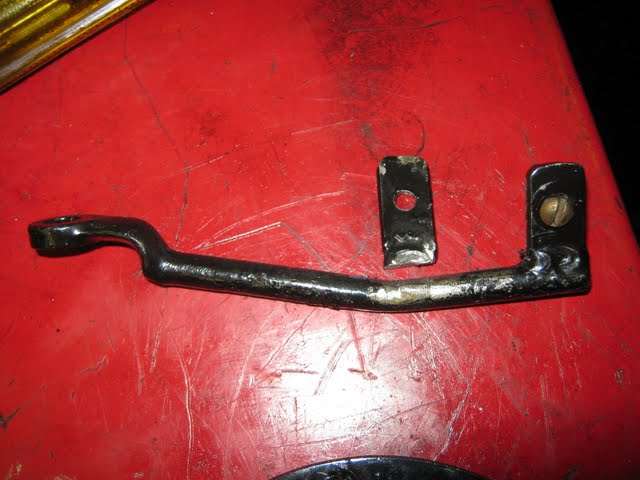 (29.77 KB) (29.77 KB)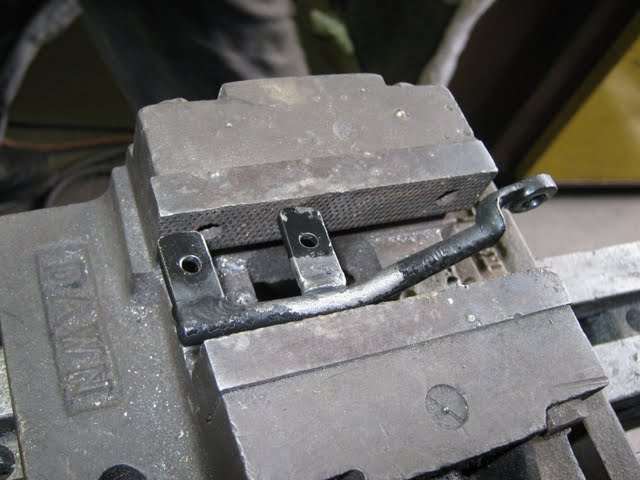 (27.49 KB) (27.49 KB)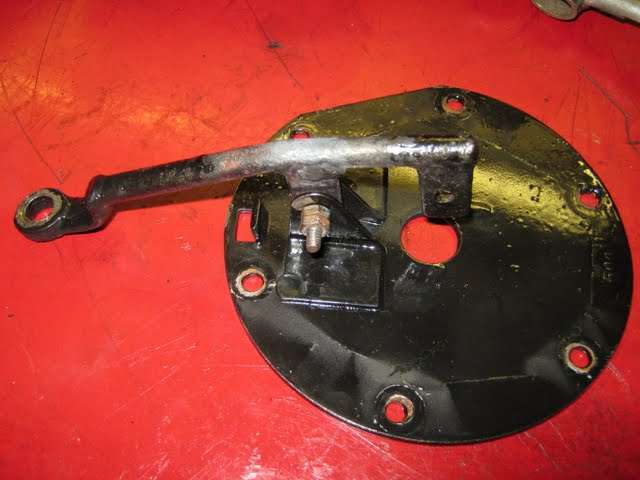 (34.24 KB) (34.24 KB) (24.56 KB) (24.56 KB) (32.76 KB) (32.76 KB) (28.10 KB) (28.10 KB)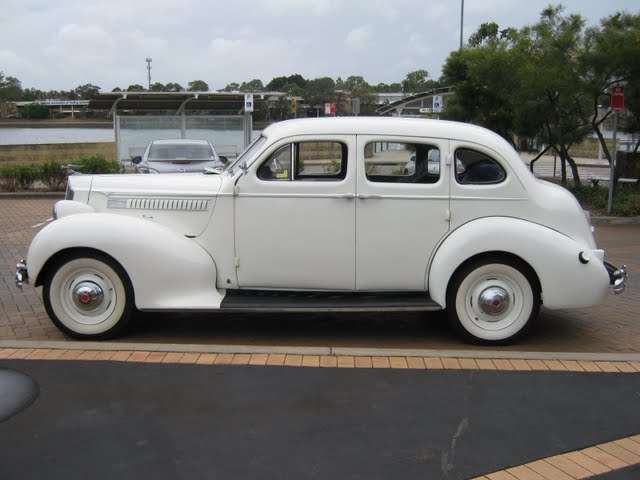 (28.19 KB) (28.19 KB)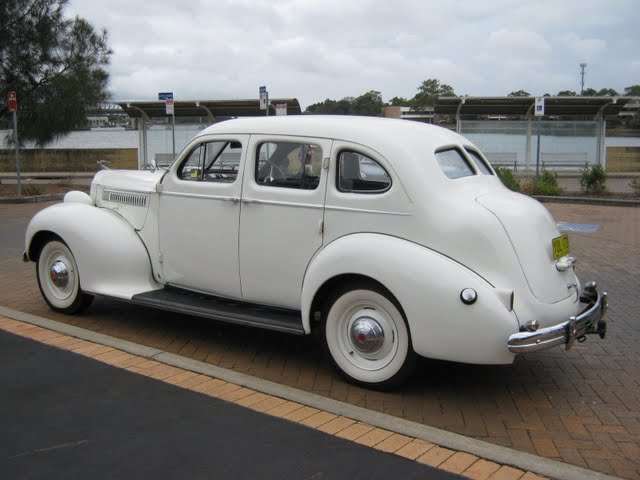 (32.33 KB) (32.33 KB) (24.44 KB) (24.44 KB) (38.72 KB) (38.72 KB) (25.44 KB) (25.44 KB)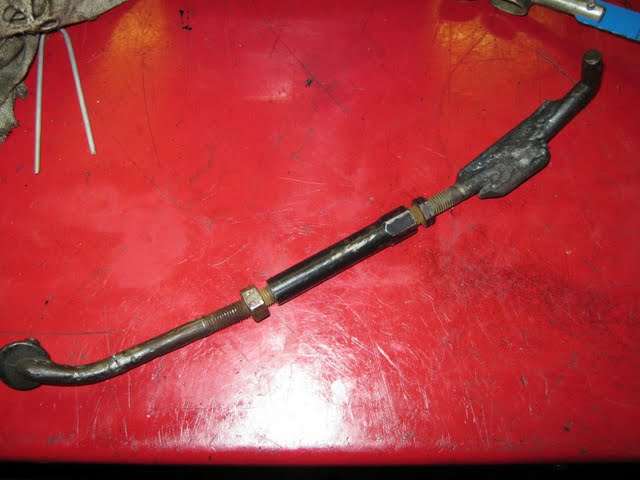 (29.45 KB) (29.45 KB)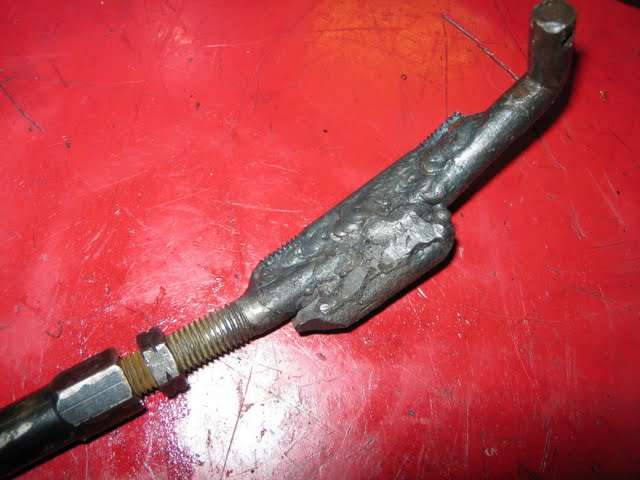 (22.38 KB) (22.38 KB)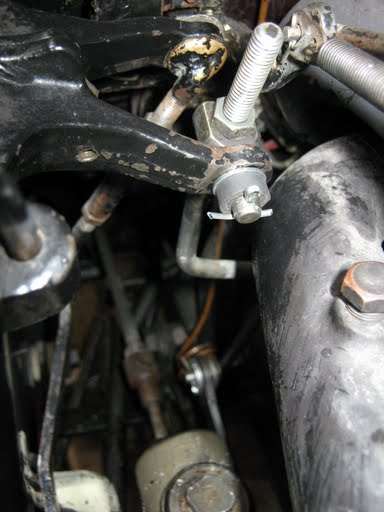 (21.30 KB) (21.30 KB)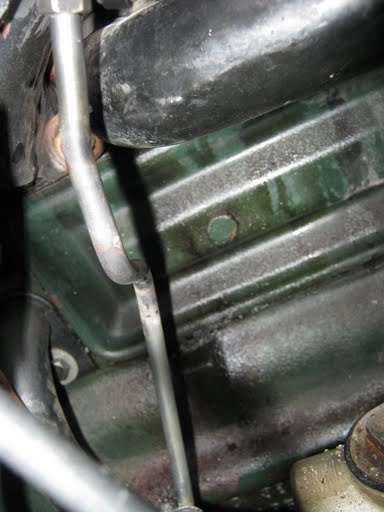
Posted on: 2009/11/30 16:36
|
|||
|
Mal
/o[]o\ ==== Bowral, Southern Highlands of NSW, Australia "Out of chaos comes order" - Nietzsche. 1938 Eight Touring Sedan - SOLD 1941 One-Twenty Club Coupe - SOLD 1948 Super Eight Limo, chassis RHD - SOLD 1950 Eight Touring Sedan - SOLD What's this? Put your Packard in the Packard Vehicle Registry! Here's how! Any questions - PM or email me at ozstatman@gmail.com |
||||
|
||||
|
Re: Wade's Workshop
|
||||
|---|---|---|---|---|
|
Webmaster
|
Mal, looking forward to seeing the tool catalog. It should be a nice companion to the KM Post War tool catalog.
Posted on: 2009/11/30 21:52
|
|||
|
-BigKev
1954 Packard Clipper Deluxe Touring Sedan -> Registry | Project Blog 1937 Packard 115-C Convertible Coupe -> Registry | Project Blog |
||||
|
||||
|
Re: Wade's Workshop
|
||||
|---|---|---|---|---|
|
Home away from home
|
Mal,
Your door handles look suspiciously like my 1940 ones........
Posted on: 2009/12/1 5:19
|
|||
|
Carpe Diem!!
Registry
|
||||
|
||||
Register To PostTopic is Locked


