|
Re: 1947 Horn Ring Removal
|
||||
|---|---|---|---|---|
|
Home away from home
|
Checkout my youtube video .
https://www.youtube.com/watch?v=DnmplfYabuM And there are three Wes
Posted on: 2017/6/17 19:02
|
|||
|
||||
|
Re: 1947 Horn Ring Removal
|
||||
|---|---|---|---|---|
|
Home away from home
|
Plus here's a picture. I think I might be missing the washers that go with the screws to hold the assy. on the steering wheel base.
Wes Attach file:  (133.34 KB) (133.34 KB)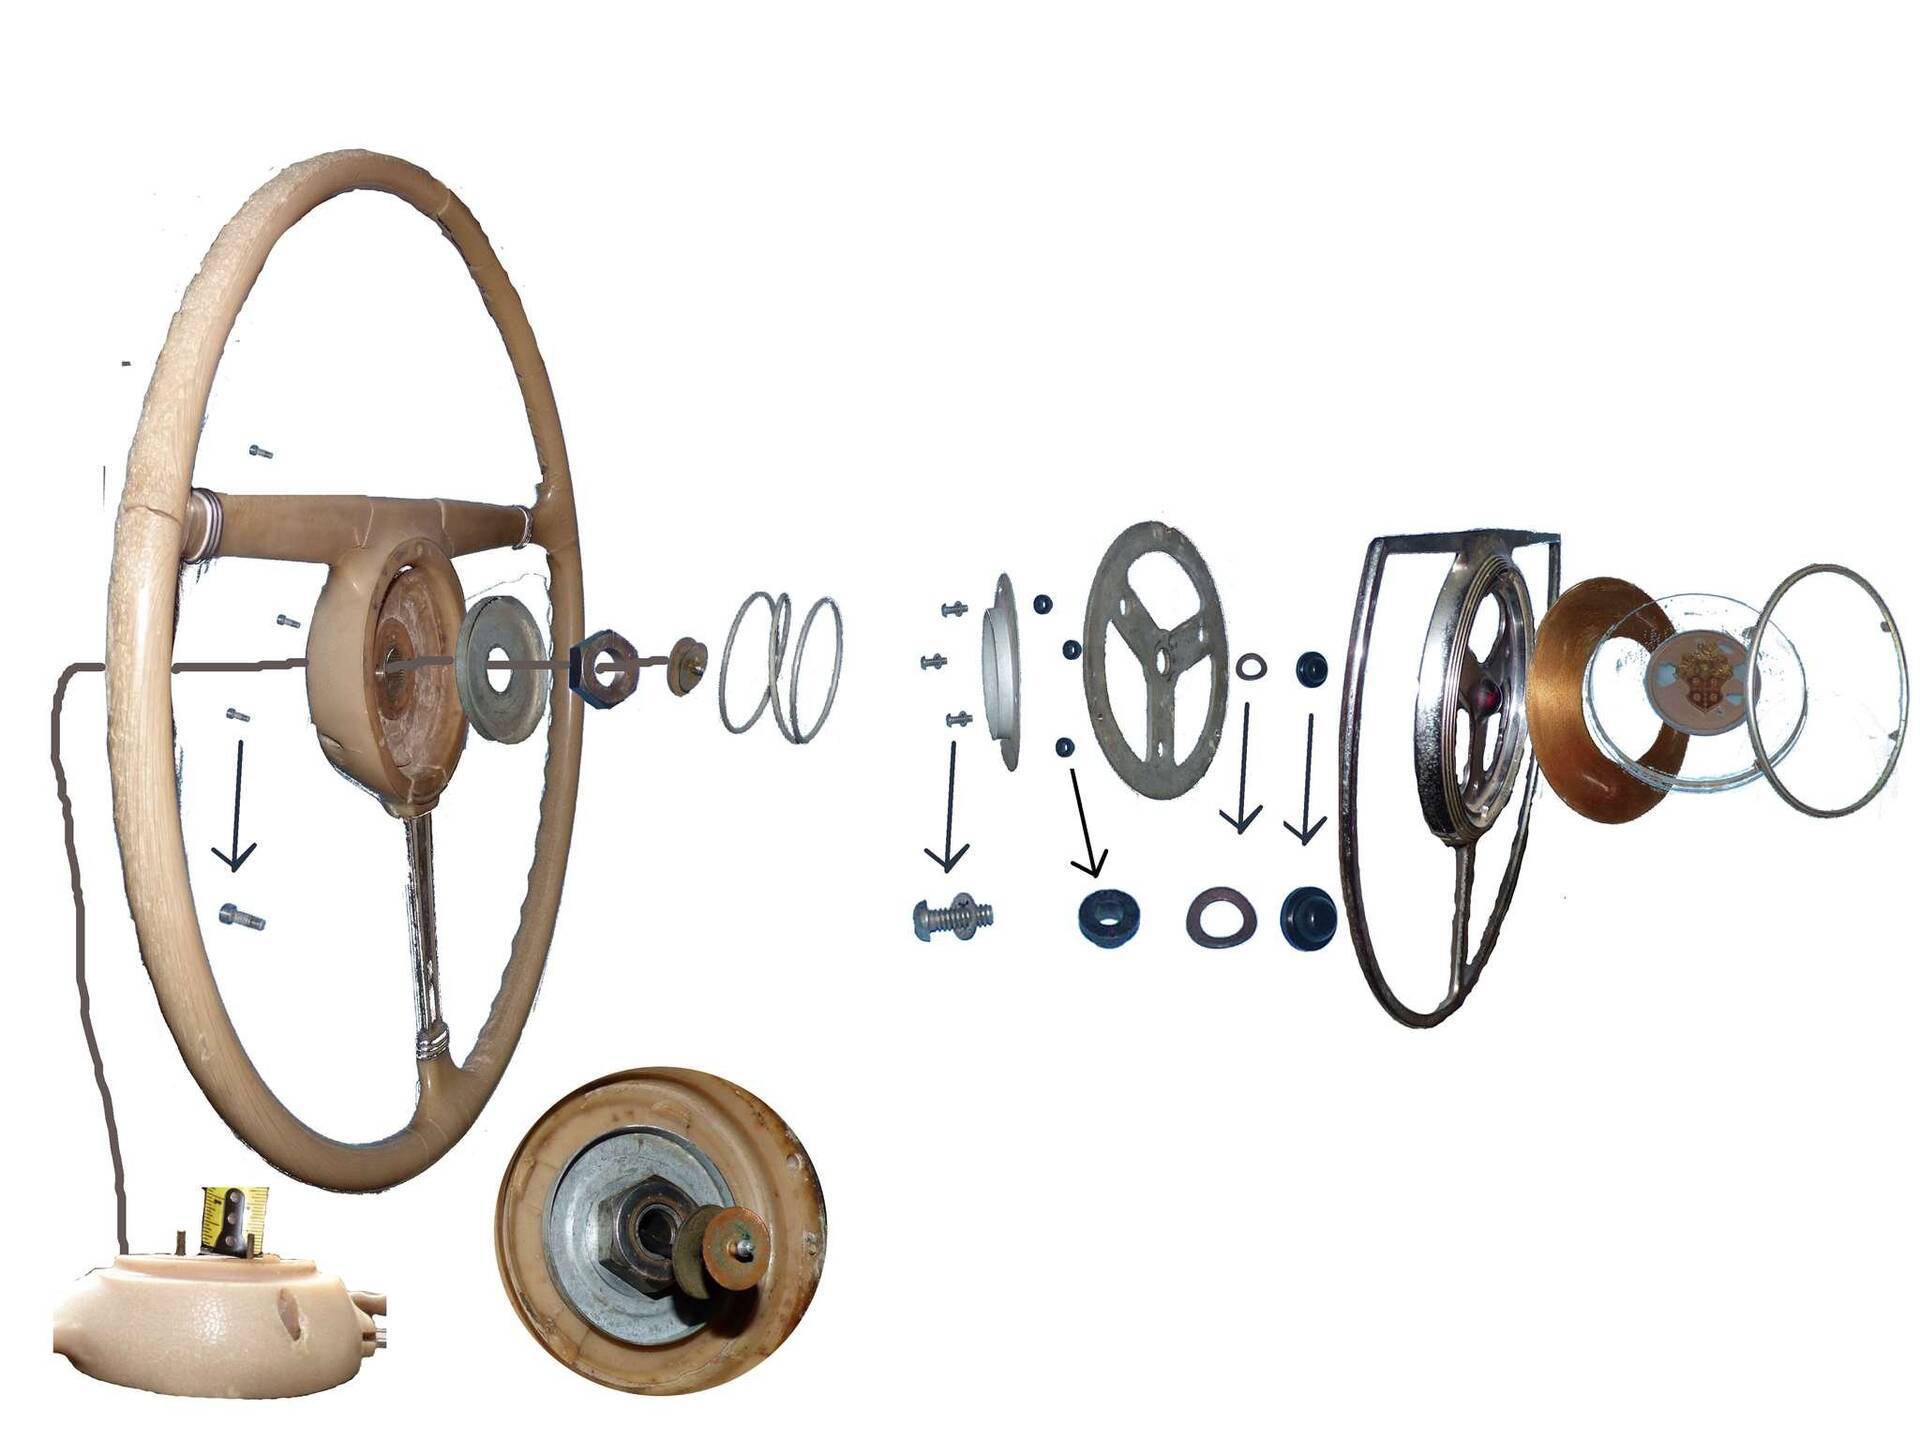
Posted on: 2017/6/17 19:10
|
|||
|
||||
|
Re: 1947 Horn Ring Removal
|
||||
|---|---|---|---|---|
|
Forum Ambassador

|
This wheel is the standard type wheel that came with 47 Clippers and as Wes said, there are 3 screws holding the horn ring. On this wheel they were Phillips head high profile or sometimes called Fillister screws. These took a small #0 or possibly a #1 Phillips screwdriver.
Attach file: (101.77 KB)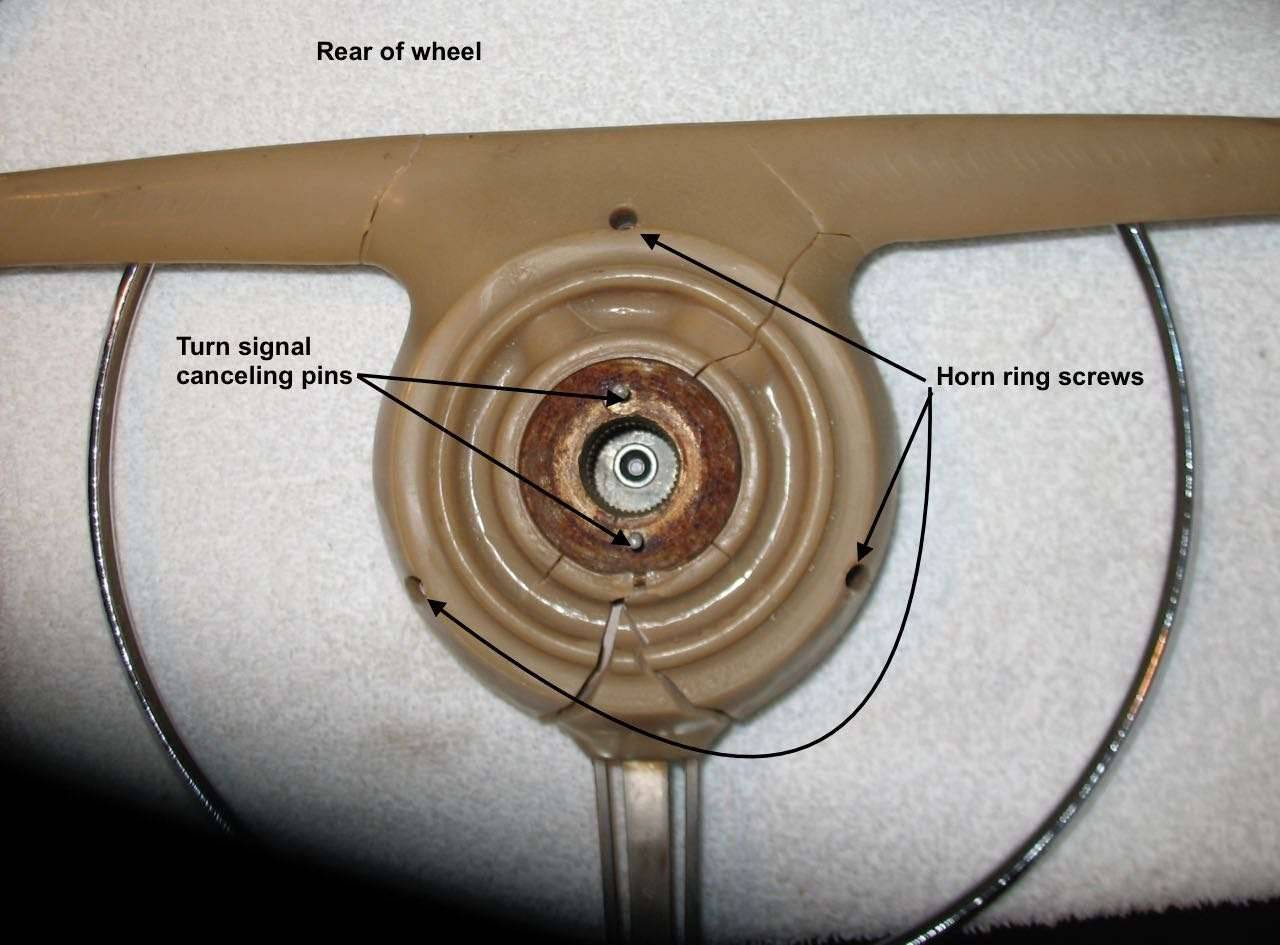 (121.69 KB) (121.69 KB)
Posted on: 2017/6/17 19:11
|
|||
|
Howard
|
||||
|
||||
|
Re: 1947 Horn Ring Removal
|
||||
|---|---|---|---|---|
|
Home away from home
|
Thank you all very much. This makes the procedure really clear. I'll try again tonight.
Posted on: 2017/6/18 6:29
|
|||
|
Steve in Indiana
1949 Deluxe Eight Sedan 1955 400 Hardtop 1956 400 Hardtop |
||||
|
||||
|
Re: 1947 Horn Ring Removal
|
||||
|---|---|---|---|---|
|
Home away from home
|
Question for you Steve, why do you need to remove the Horn Ring? The reason I'm asking is if the plastic is cracked on the steering wheel hub, you stand a good chance that the screw holes won't match up when you go to put it back together. Look at Howards first picture and you will see two deep cracks at the bottom of the hub that spreads those two lower holes apart. I found that I could only get two of the screws back in and I had to drill and tap a new hole for the third screw. Maybe someone has some better ideas but that's what I did.
Wes
Posted on: 2017/6/18 7:00
|
|||
|
||||
|
Re: 1947 Horn Ring Removal
|
||||
|---|---|---|---|---|
|
Home away from home
|
Hi, Wes:
Twofold answer: The previous owner half-installed a new wiring harness, and neither the horn nor the turn signals work. I really like driving this car, and I know it's dangerous to drive it without those items. Also, the turn signals won't cancel after the turn, so that mechanism has to be dealt with. Believe me, if I could solve all this without removing the wheel, I would.
Posted on: 2017/6/18 8:00
|
|||
|
Steve in Indiana
1949 Deluxe Eight Sedan 1955 400 Hardtop 1956 400 Hardtop |
||||
|
||||
|
Re: 1947 Horn Ring Removal
|
||||
|---|---|---|---|---|
|
Forum Ambassador
|
On the turn signals, check the gap between the steering wheel and the column. It could be the column has slipped and is too far down so the cancelling hooks on the switch cannot reach the pins on the back of the steering wheel. You may need to loosen the clamp at the base of the column to steering box and the one under the dash to pry or slide the entire column up an eighth of an inch or so. There is a concave ring that surrounds the shaft and forms the inner race of the upper bearing. It is under spring pressure. If the column has slipped that ring will prevent the column from sliding up. Wheel will need to come off to relieve the spring tension. You can then manually pull the ring up so the column can raise.
Using the drawing Wes made, here is a depiction of the electrical path for the horn contact. The relay coil wire is plugged into the main loom a short distance away from the end of the steering box. The upper end of the wire is insulated from the grounded steering shaft via a phenolic washer like piece and makes contact directly with the inner mounting or contact plate which is screwed to the steering wheel. Blue shading shows those parts. The inner mounting and contact plate is kept insulated from ground via the plastic steering wheel hub and some insulator washers that keep it separated from other grounded parts inside. Ground from the steering shaft is transferred to the outer chrome ring via the bottom cup, large spring and the upper spring support piece which is screwed thru insulating washers to the chrome ring. Insulating washers keep the screws and support from touching the contact plate. Those pieces are identified with the red shading. When the horn ring is pushed, the chrome ring pivots a small amount on another piece of plastic to touch its inner circumference to the outer edge of the contact plate. The horn relay coil gets ground to energize and blow the horn. Oxidation on either piece can make the horn very intermittent. Attach file: (109.92 KB) (122.70 KB) (122.70 KB)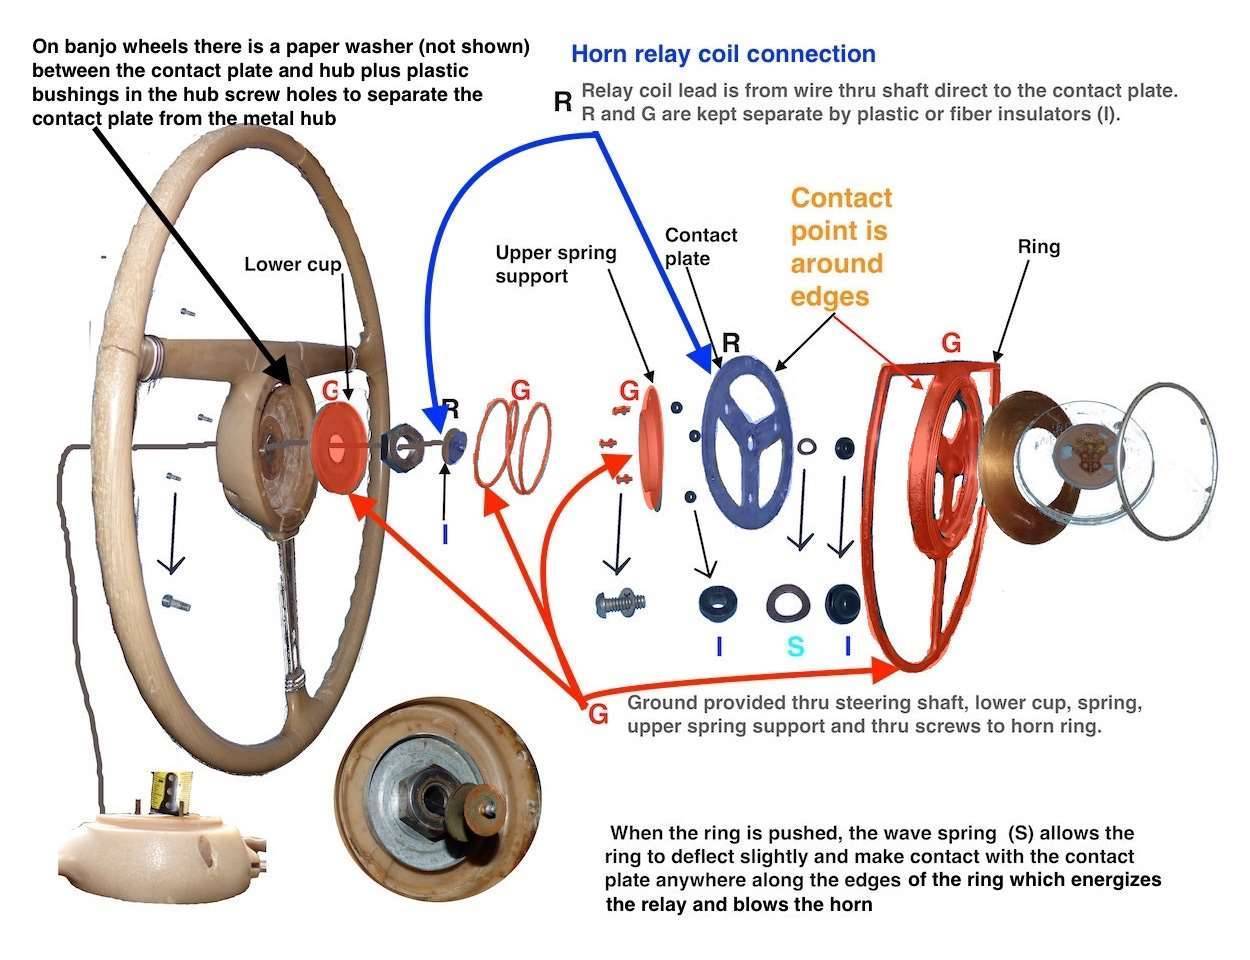 (128.89 KB) (128.89 KB)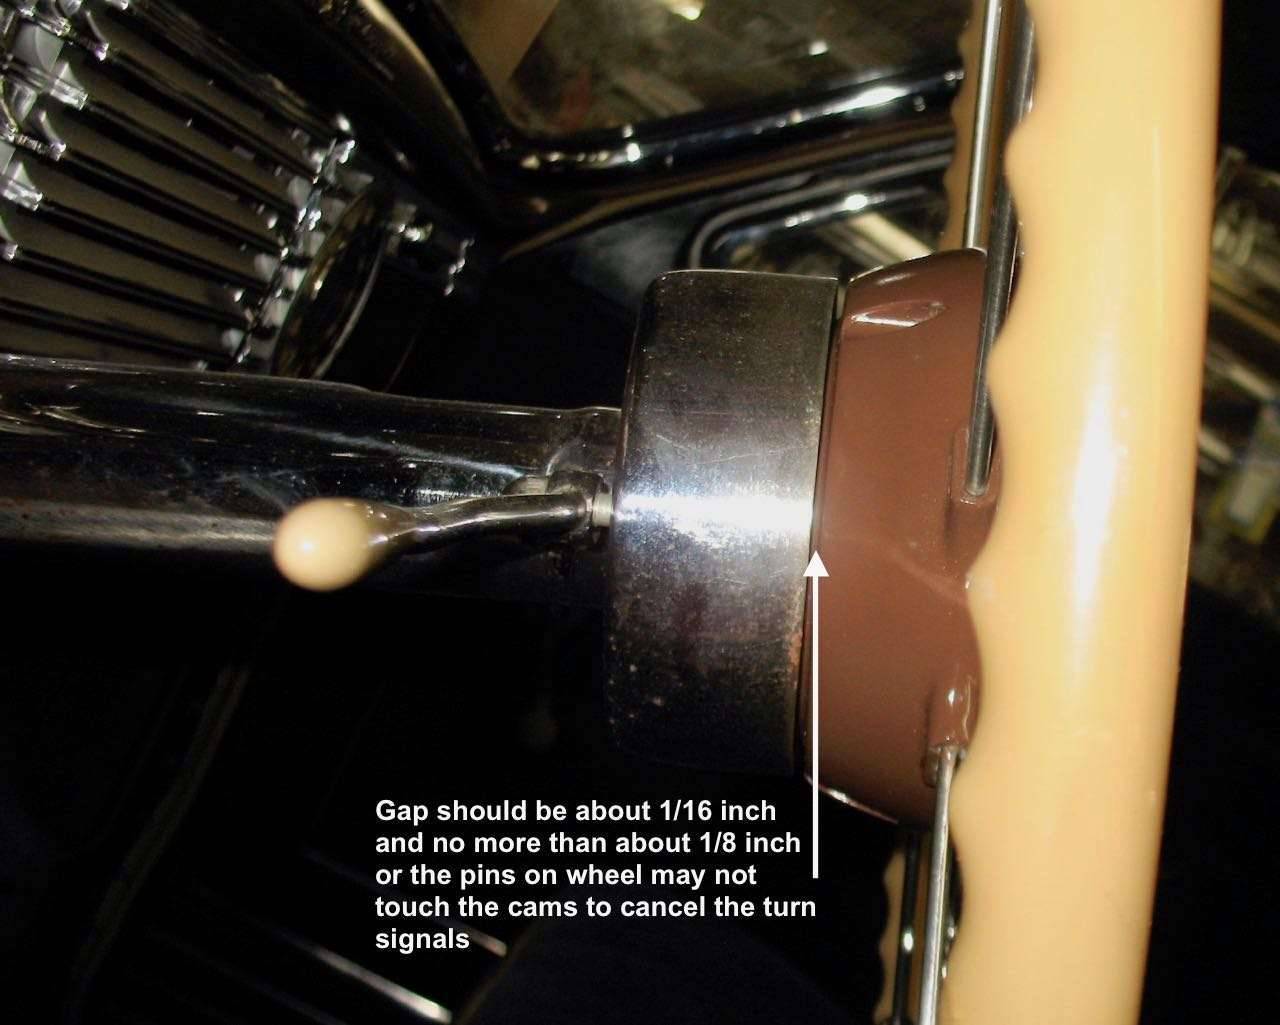
Posted on: 2017/6/18 9:01
|
|||
|
Howard
|
||||
|
||||
|
Re: 1947 Horn Ring Removal
|
||||
|---|---|---|---|---|
|
Home away from home
|
Wow. I am surely grateful for the detailed help.
I got the horn ring off and made the horn work by connecting the steering column wire to the new harness. The horn sounds beautiful, just as a Packard should. The turn signals are next, but will take longer, I'm sure. I'm going to wait for another day for that. Thanks a million for your help. Steve
Posted on: 2017/6/18 16:05
|
|||
|
Steve in Indiana
1949 Deluxe Eight Sedan 1955 400 Hardtop 1956 400 Hardtop |
||||
|
||||
|
Re: 1947 Horn Ring Removal
|
||||
|---|---|---|---|---|
|
Home away from home
|
I know this is an old post but I wanted to update the three missing washers going to the screws that mount the Horn Assy. to the Steering Wheel. The parts breakdown shows three #6 Lockwashers.
Wes Attach file: (155.76 KB)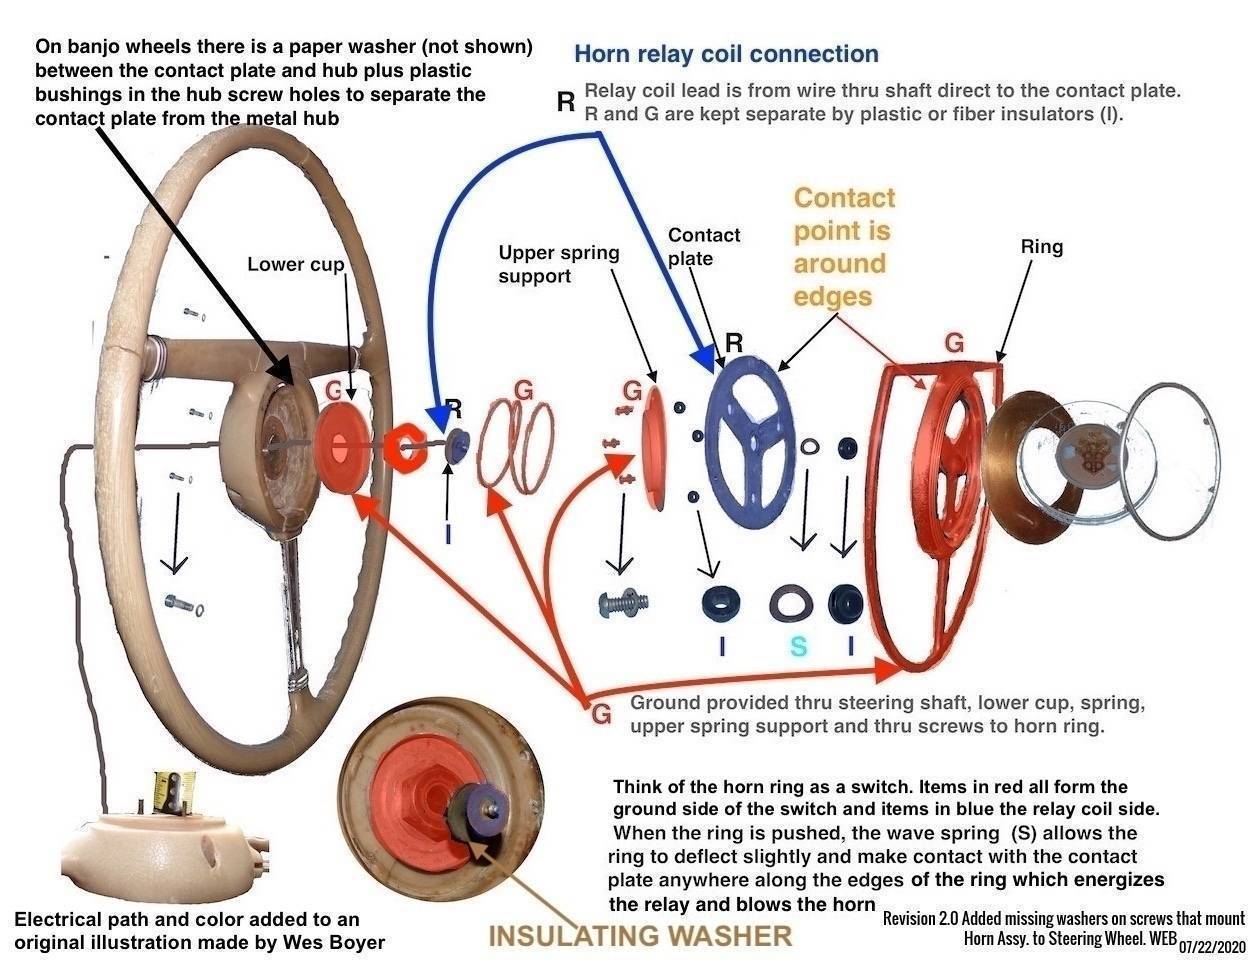
Posted on: 2020/7/22 19:12
|
|||
|
||||


.jpg")


