|
Re: 1924 Sport 136
|
||||
|---|---|---|---|---|
|
Home away from home
|
A little update on the silencer... because the electroplating company didn't meet its deadline again... this time the excuse was... that the most important employee is on vacation for 5 weeks and the other one called in sick right today ... so I have to keep waiting and others prefer to work. I sandblasted the end covers and muffler brackets. .... by the way, .. the holders do not belong to the 136 Sport, these holders belong to the 236. The holders are therefore different, but can be easily adapted to the existing frame parts. I turned out the groove inside of the cover on the lathe. They now fit perfectly on the muffler housing tube. The gray cast iron lids have deep rust spots on the outside. For the sake of “visual correctness” I filled it with “Lab-Metal”. For the same reason I also rolled the 4 beads into the outer tube. This was not structurally necessary as the pipe is 2mm thick and therefore very stable. Back then, the beads were used to support the really thin sheet metal of the original muffle. More information about this when I compile the data for construction and renovation and post it here. Why do I pay so much attention to the purely visual work on a silencer....??? ... well, I want the visitors to the car shows and the judges who are always among the cars... to be satisfied and happy.
 Karl Attach file:  k-P1040530.JPG (92.74 KB) k-P1040530.JPG (92.74 KB)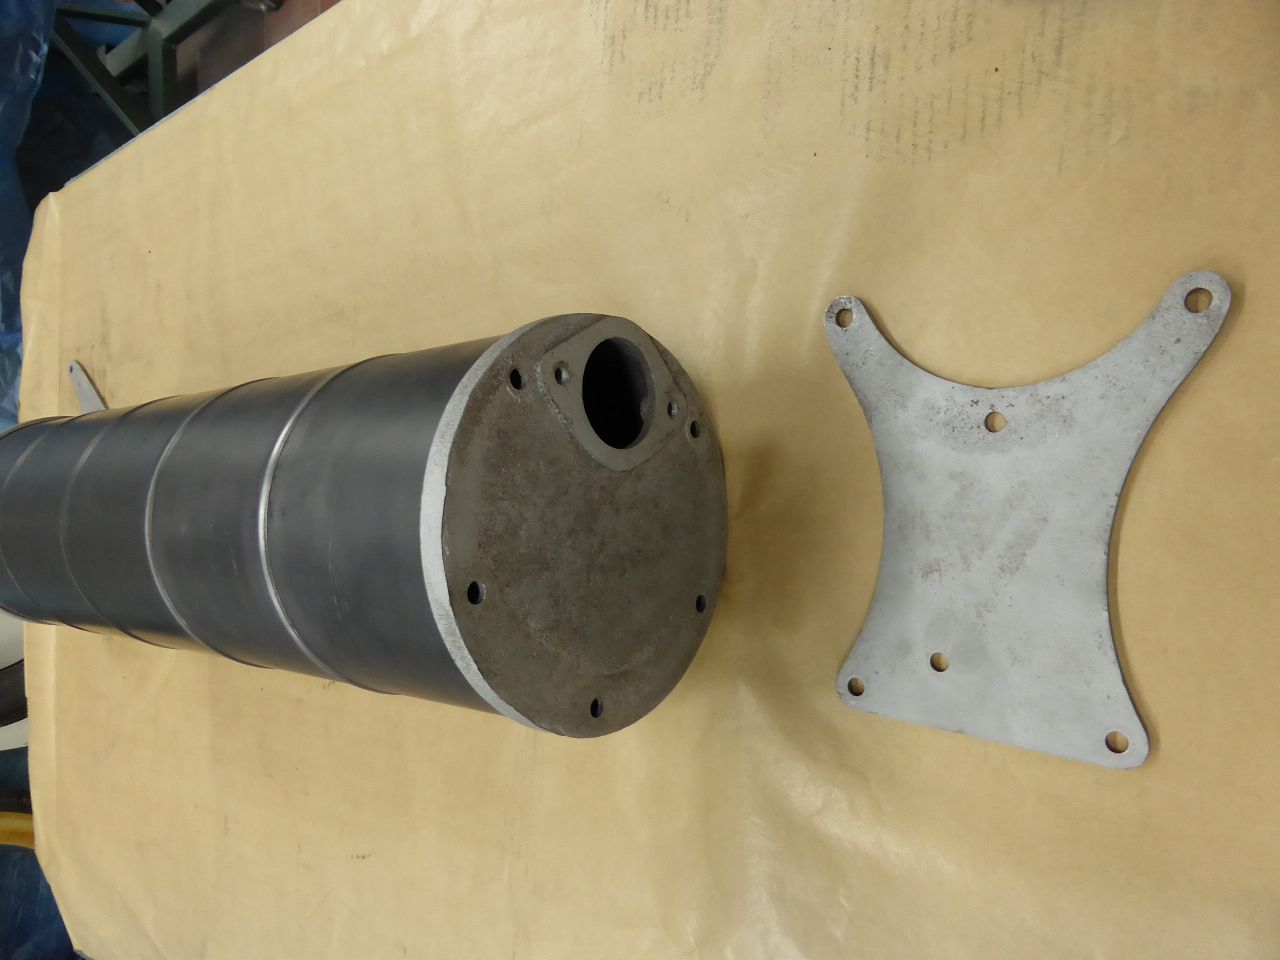 k-P1040532.JPG (104.50 KB) k-P1040532.JPG (104.50 KB)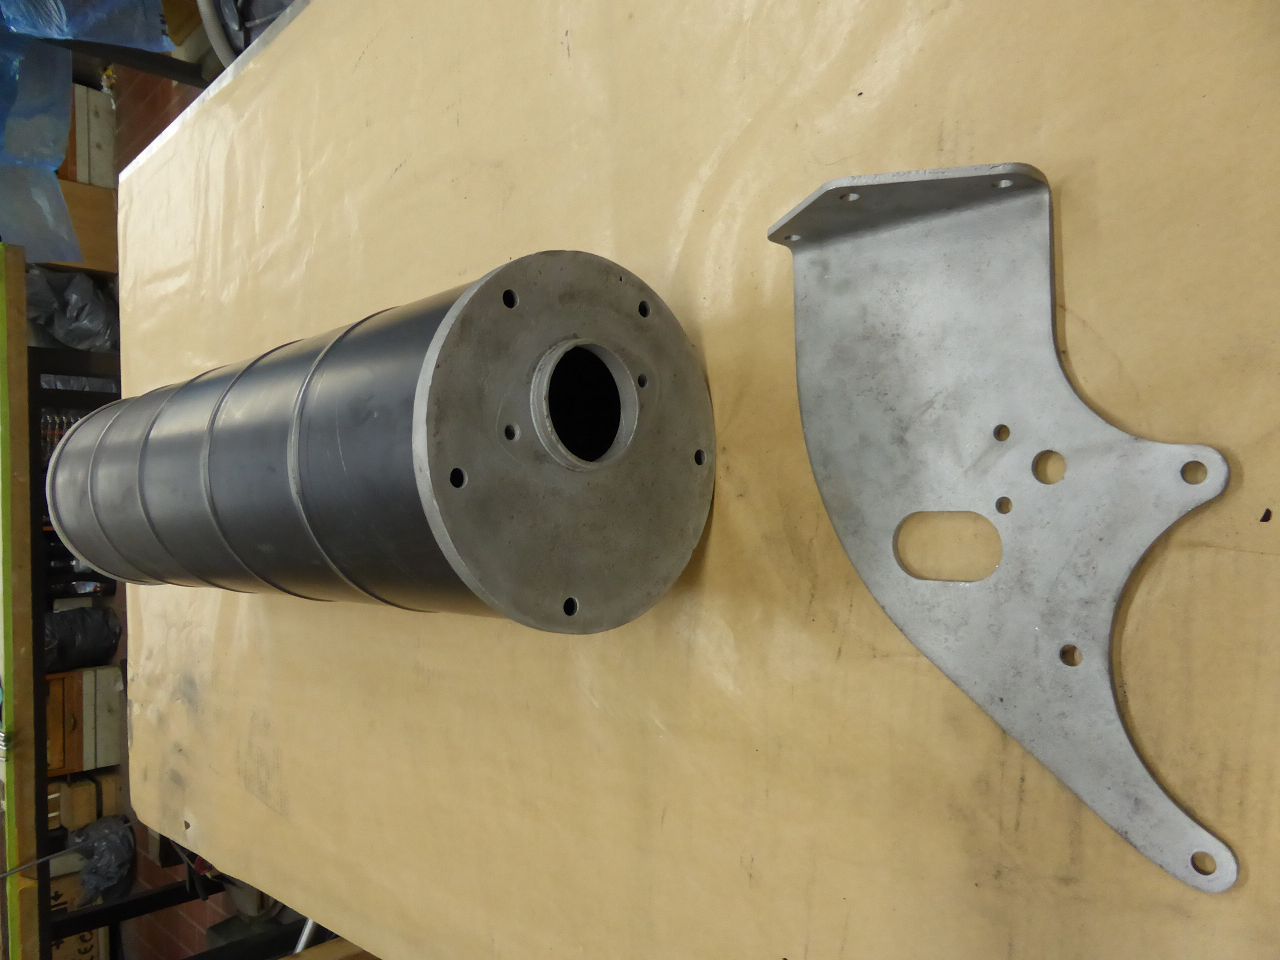 k-P1040533.JPG (122.61 KB) k-P1040533.JPG (122.61 KB)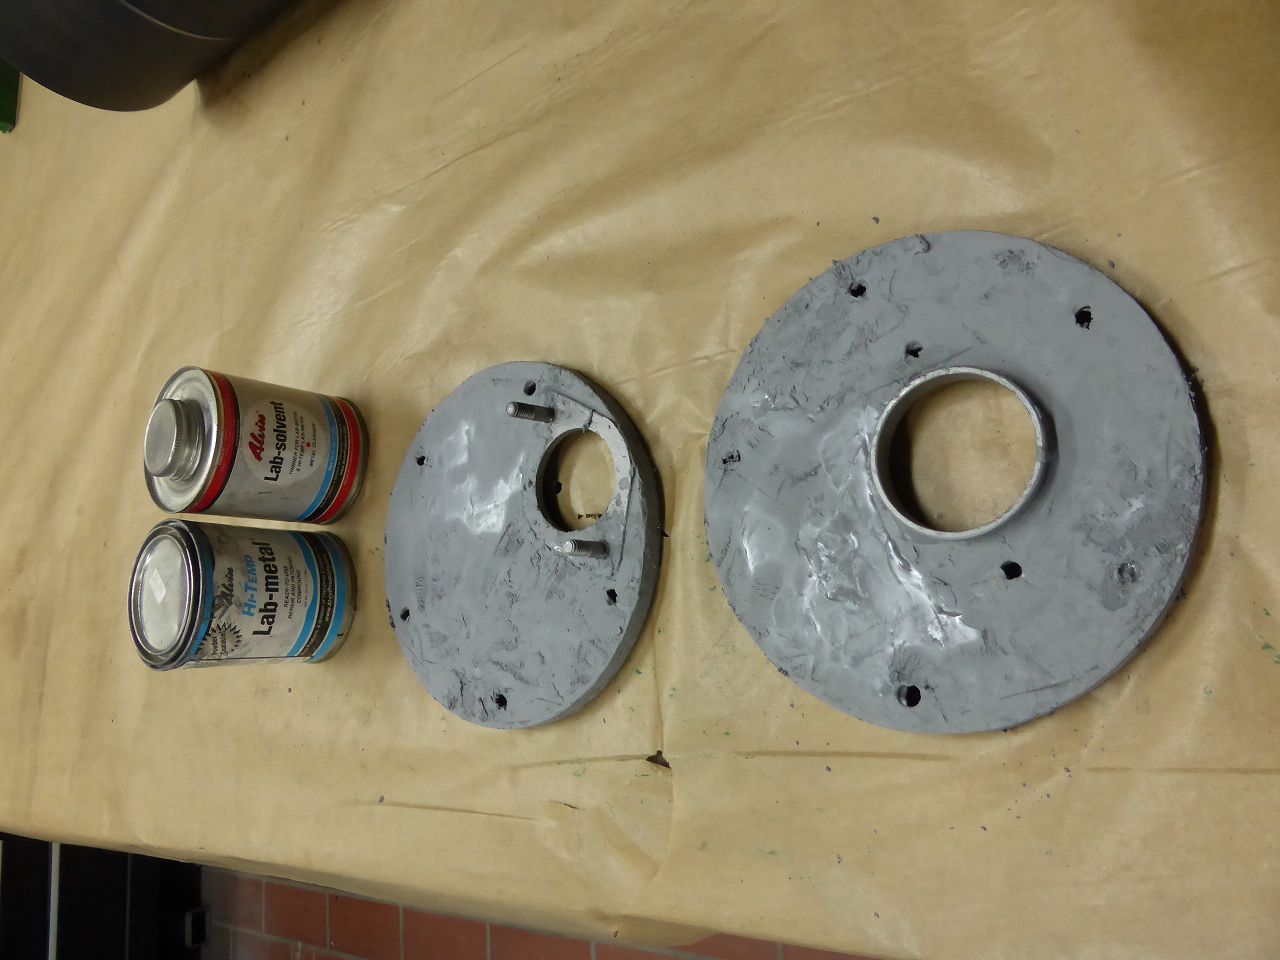
Posted on: 7/24 8:18
|
|||
|
||||
|
Re: 1924 Sport 136
|
||||
|---|---|---|---|---|
|
Home away from home
|
The snap rings and the retaining rings for the wheels are back. The chrome is striped and the nickel looks very good. Exept the bolts. These looks really bad after dechroming because they have had too much pressure on the edges. Does anyone know if the special bolts with this high nuts can be purchased as reproductions for these rims with the retaining rings ???
The dimensions are: 9/16 x 18 / length is 1.5" Karl Attach file: k-P1040534.JPG (120.56 KB)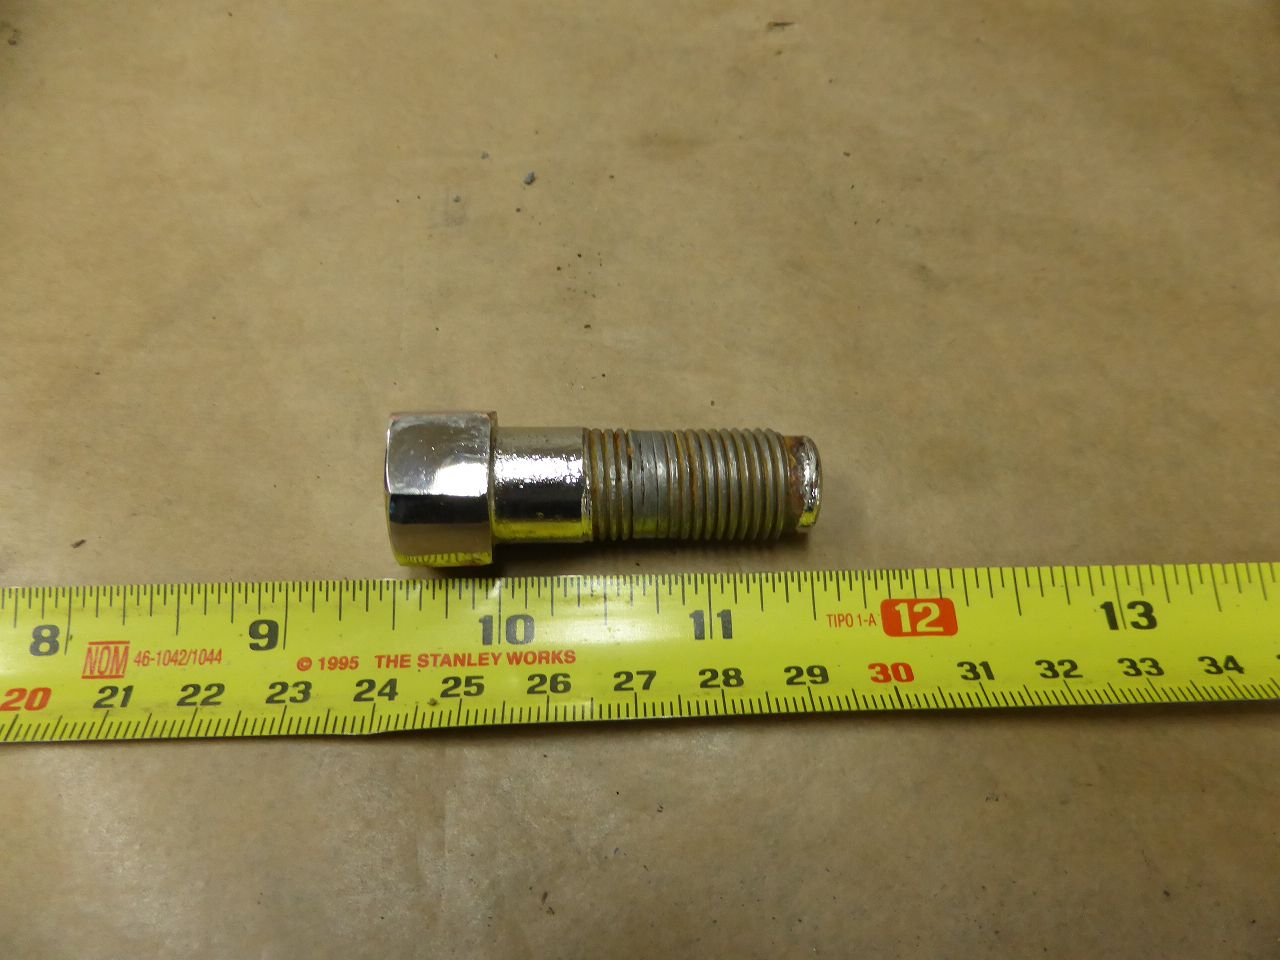
Posted on: 7/25 10:45
|
|||
|
||||
|
Re: 1924 Sport 136
|
||||
|---|---|---|---|---|
|
Forum Ambassador

|
I'd check first with Bruce Blevins in Michigan. If he doesn't already offer them, he certainly has the expertise and equipment to make them.
Posted on: 7/25 11:21
|
|||
|
||||
|
Re: 1924 Sport 136
|
||||
|---|---|---|---|---|
|
Home away from home
|
Thanks for the tip Dave, I found the bolts in Bruce Blevins online catalog.
Karl
Posted on: 7/26 10:42
|
|||
|
||||
|
Re: 1924 Sport 136
|
||||
|---|---|---|---|---|
|
Home away from home
|
Here are the last parts that still need to be painted in the body color. The door
hinges are sandblasted, primed and pre-treated with filler before top painting. The carriage bolts hold the corners of the rear bumper. The heads of the screws, like the corners themselves, must be painted in the vehicle color. The reconstruction and processing of all of these many small parts takes up a significant part of the restoration time, which hardly anyone notices in the later depictions. This effort is also a part of the answer after the long restoration time. The front bumpers and the rear corners themselves are in the paint shop. I'm now working on the tires to mount them on the rims. At the this time also I'm working on the Exhaust/Muffler and the Pipes. Karl Attach file: k-P1040541.JPG (184.35 KB)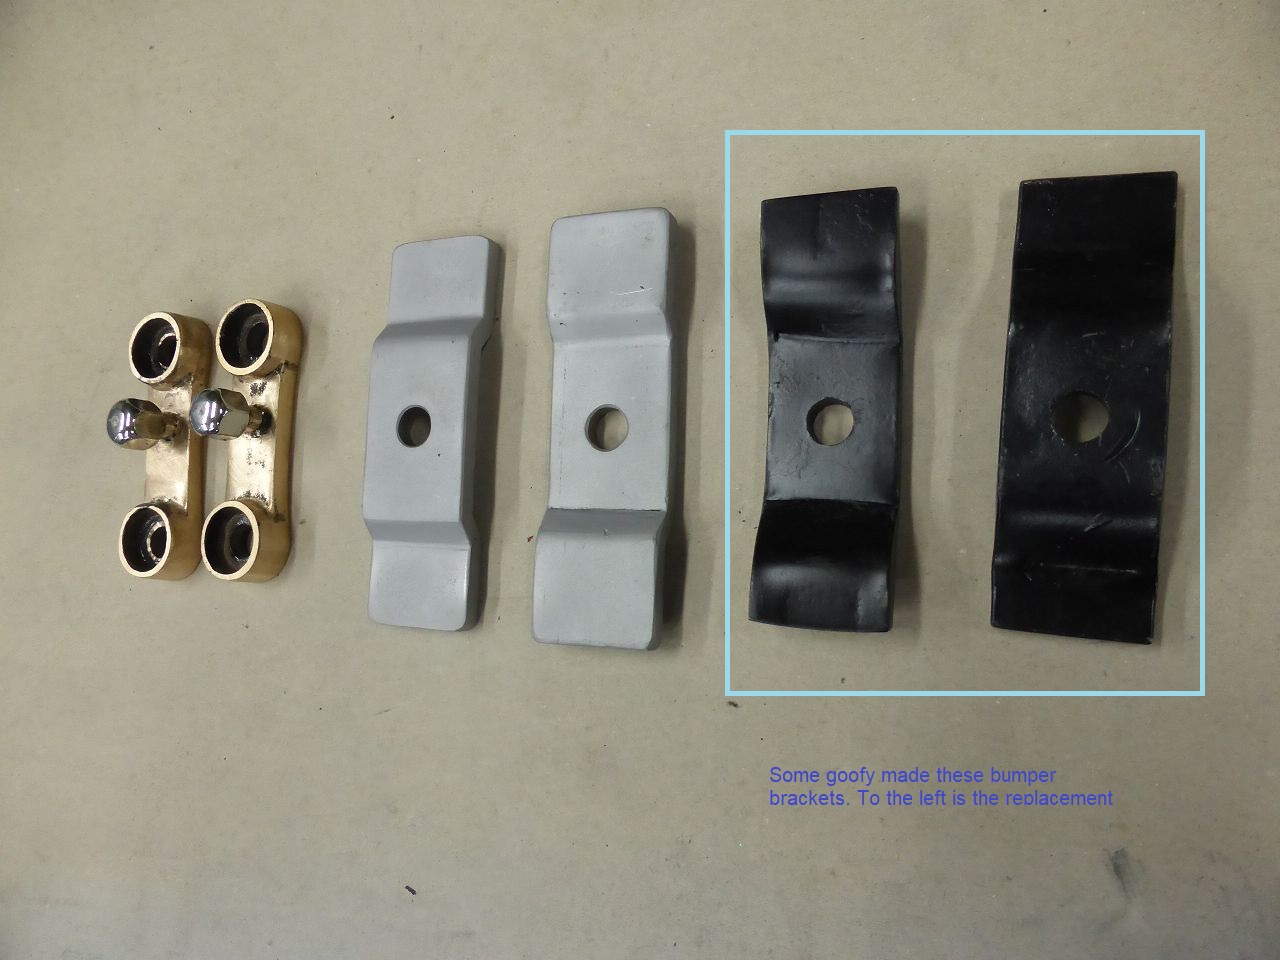 k-P1040535.JPG (101.00 KB) k-P1040535.JPG (101.00 KB)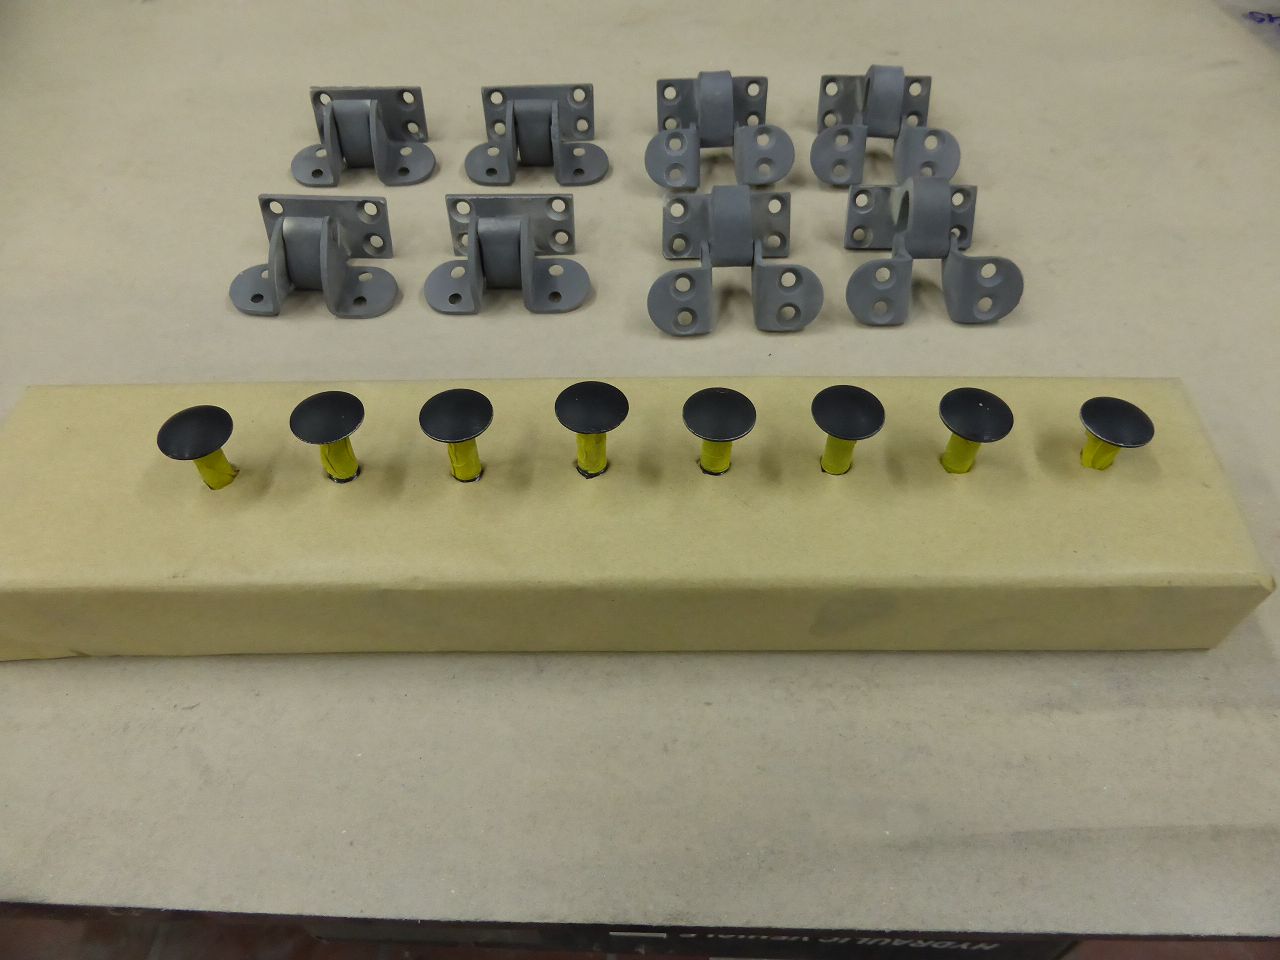
Posted on: 8/10 6:36
|
|||
|
||||
|
Re: 1924 Sport 136
|
||||
|---|---|---|---|---|
|
Home away from home
|
Here are all the dimensions and information required to recreate the muffler for the Packard models 136-443.
Basically, the mufflers of all models from 136-443 are identical. Only the holders differ from model to model. Since I received the original holder for my muffler, I was able to assign it to the model 243, because only this model has this holder combination according to the spare parts list. (Parts No. 130601 and 132086). Since I want to use these original brackets on my sport, I will only determine the position of the mounting holes of these brackets after installing the engine/gearbox and re-determine them in the frame and crossbar. Here are the dimensions of all components of the muffler that I determined from the original. 1. Outer Shell, Parts No. 127409: Length 653 mm, outer diameter 185 mm 2. Intermediate Shell, Parts No. 126628: Length 653 mm, outer diameter 120 mm 3. Inner Shell, Parts No. 124279: Length 653 mm, outer diameter 79 mm The sheet thickness is 1.2 mm for the outer shell and ~1.0 mm for the two inner ones. The diameter of the holes in the reflection/expansion areas of the two inner/intermediate shells is 4.5 mm. I have marked the arrangement of the holes in 2 of the photos. The height of the front and rear lids is 10 mm. The Outer Shell sits in the Lids in a groove that is 3 mm wide and 4.6 mm deep. The exact position of the eccentrically arranged retaining rings for the intermediate and inner shells can be seen in the two drawings. By the way, these are not construction drawings. They are just sketches whose dimensions are taken from the original components. For a replica that is intended to reproduce the desired original dimensions, function and original sound, these dimensions, which only differ by a maximum of one millimeter, should be absolutely sufficient. All dimensions are metric in mm. It should be easy to determine the inch dimensions from the mm dimensions. The bolt spacing for the flange at the rear exhaust outlet is measured at 77.5mm. In inches that should actually be 3 inches. Basic information about the original muffler and my replica. The outer shell of the original muffler was made of thin 1.2 mm sheet metal and stiffened by 4 beads. An insulation mat ~ 7mm thick was inserted inside, which was riveted to the inner wall with five 20mm metal strips. All of the muffler's panels were obviously made from flat sheet metal with holes punched into them. The sheets were then rolled in a rounding machine and joined together with a fold. For my replica I used commercially available steel pipes, like those used here in furnace exhaust construction. The outer tube had... for whatever reason... an outside diameter of exactly 19.3 mm and therefore fit exactly into the existing groove of the original lids after I had turned the groove out of the lids on my lathe with a 3mm chisel. The wall thickness is 2mm, which promises good sound insulation and good sound at the same time. I lined the inner wall with a sound insulation mat from the exhaust accessories and secured it with a stainless steel grille. The back and front covers are pulled onto the outer tube using threaded rods and thus fixed there. In the original, the rods were inserted through the muffler and threaded freehand on the opposite side. I wanted to save myself this “exercise” and therefore inserted a 3mm thick ring on both sides that precisely defines the position of the threaded rods. I unscrewed the ring on the lathe so that it could be driven into the pipe with light taps. I also soldered the rings into the tube in several places with silver solder. The threaded rods (stainless steel) are fixed and the covers only need to be attached on both sides. The intermediate tube had an outer diameter of exactly 120 mm, but did not fit completely into the existing web as it became thicker towards the bottom. So I cut a 20mm high ring from the pipe, fitted it into the web and then welded this ring back to the pipe. Since the pipe also had a wall thickness of 2mm, I was unable to “taper” the pipe on my beading machine. After determining the locations, I drilled the required 357 expansion/reflection holes. In this particular case, I decided against using the sieve pipes used in exhaust construction, as these can only be supplied with a hole diameter of 4 mm and a maximum pipe diameter of 63.5 mm. It was easier to drill the holes than to cut the pipe, adjust the diameter, and work on the lapping machine and welding. I made the inner shell from an 80 mm stainless steel tube with a thickness of 1.5 mm. This tube also did not fit exactly into Lid's existing bridge. But here I was able to pull in the pipe ends on my beading machine. Since this 80 mm diameter pipe cannot be supplied as a sieve pipe, I drilled the required 154 holes myself. By the way, the pipe that leads directly from the exhaust manifold into the muffler has a diameter of 2.25 inches. The pipe leading out of the muffler is only 2.0 inches in diameter. This leads to a “back pressure” in the silencer. This is intentional during the design and should be taken into account when replicating. If someone can explain the reflection processes to me in simple words, that would be too much. This completes the work on the main silencer. The rear silencer is now missing, which is mounted directly behind the main silencer and is directly connected to the axle arch and the tailpipe. Since this is a simple absorption silencer and the dimensions were easy to determine using the parts list, I ordered a very precisely fitting 2" stainless steel silencer online. Visually it is very similar to the original, so I simply have to adapt it to the axle arch I still have to bend the pipe bend that leads from the exhaust manifold to the muffler because I couldn't find a company that wanted to bend the pipe for me. If I had had to build the lids myself, I would have made the lids from a 10mm thick steel disk. In the lathe I would have first turned out the groove and then turned out the rest of the disc to a depth of 5mm. I would have made the bars into which the hoses have to be inserted from 3mm thick and 5mm high strips. They are fixed in position and soldered into the lid with silver solder. I would have determined the positions based on the images in the parts list after enlarging them accordingly. Karl Attach file: k-P1040543.JPG (124.70 KB)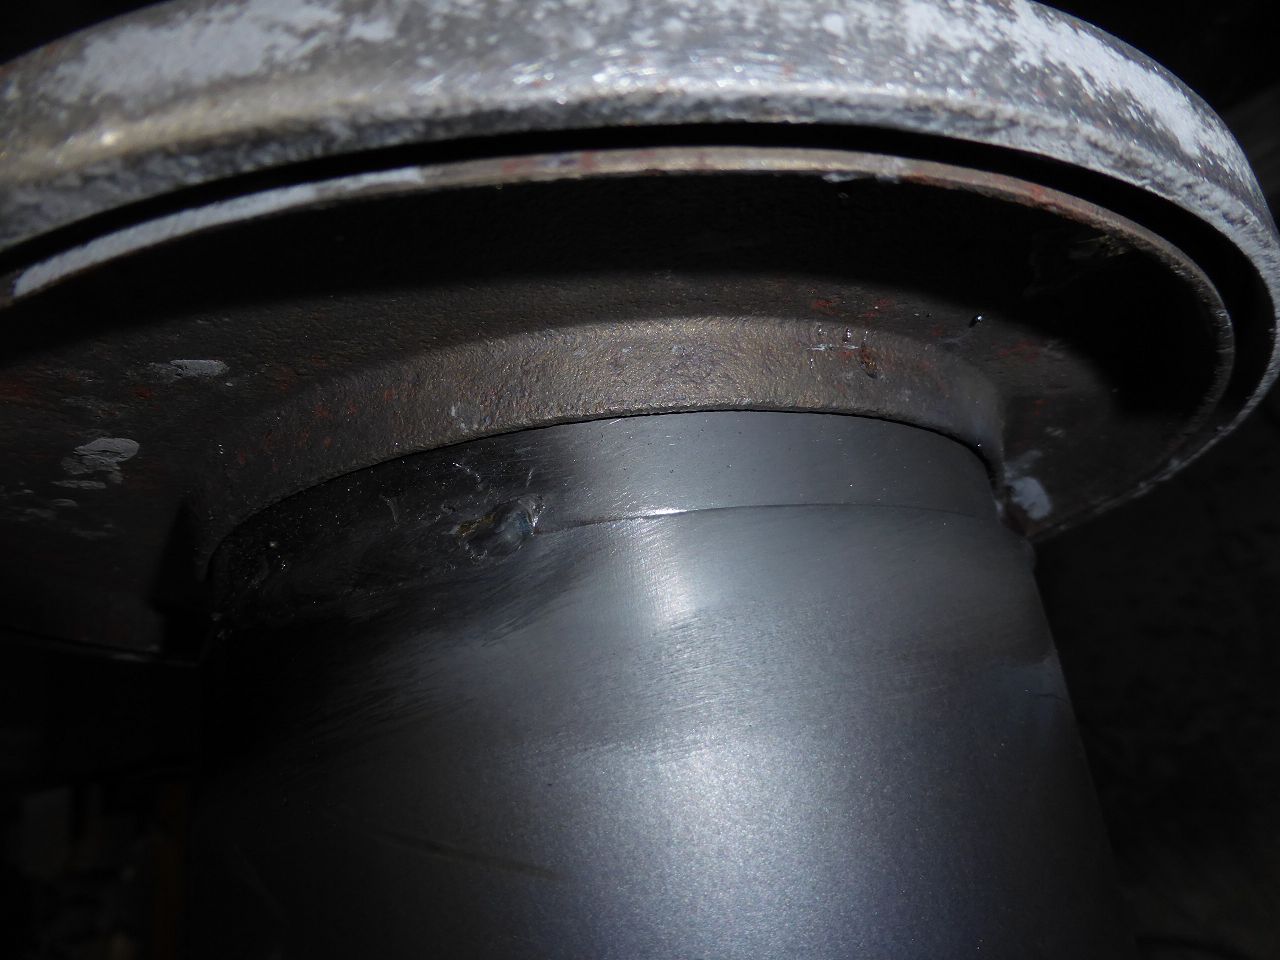 k-P1040597.JPG (89.20 KB) k-P1040597.JPG (89.20 KB)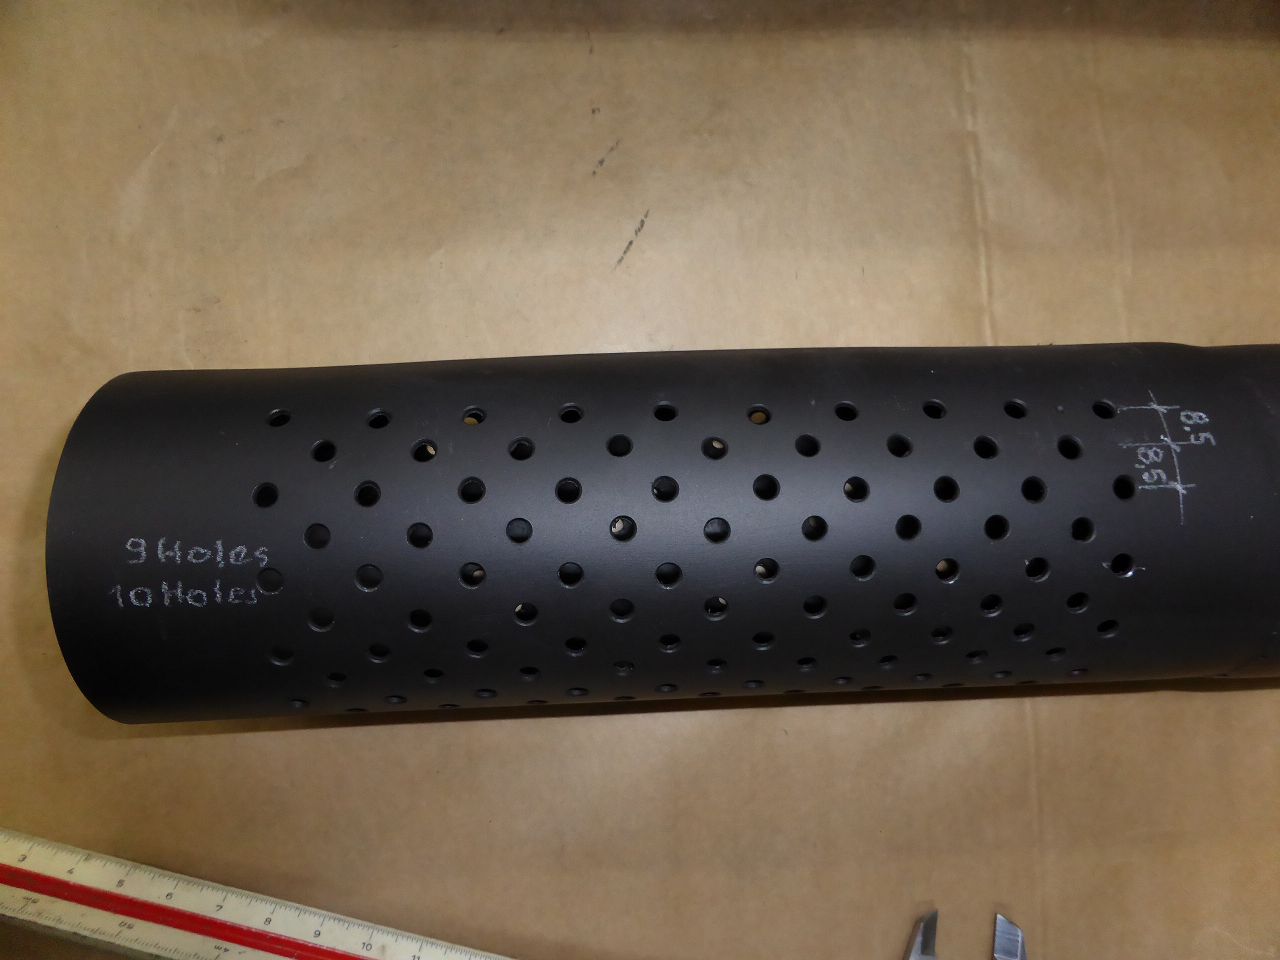 k-P1040598.JPG (81.75 KB) k-P1040598.JPG (81.75 KB)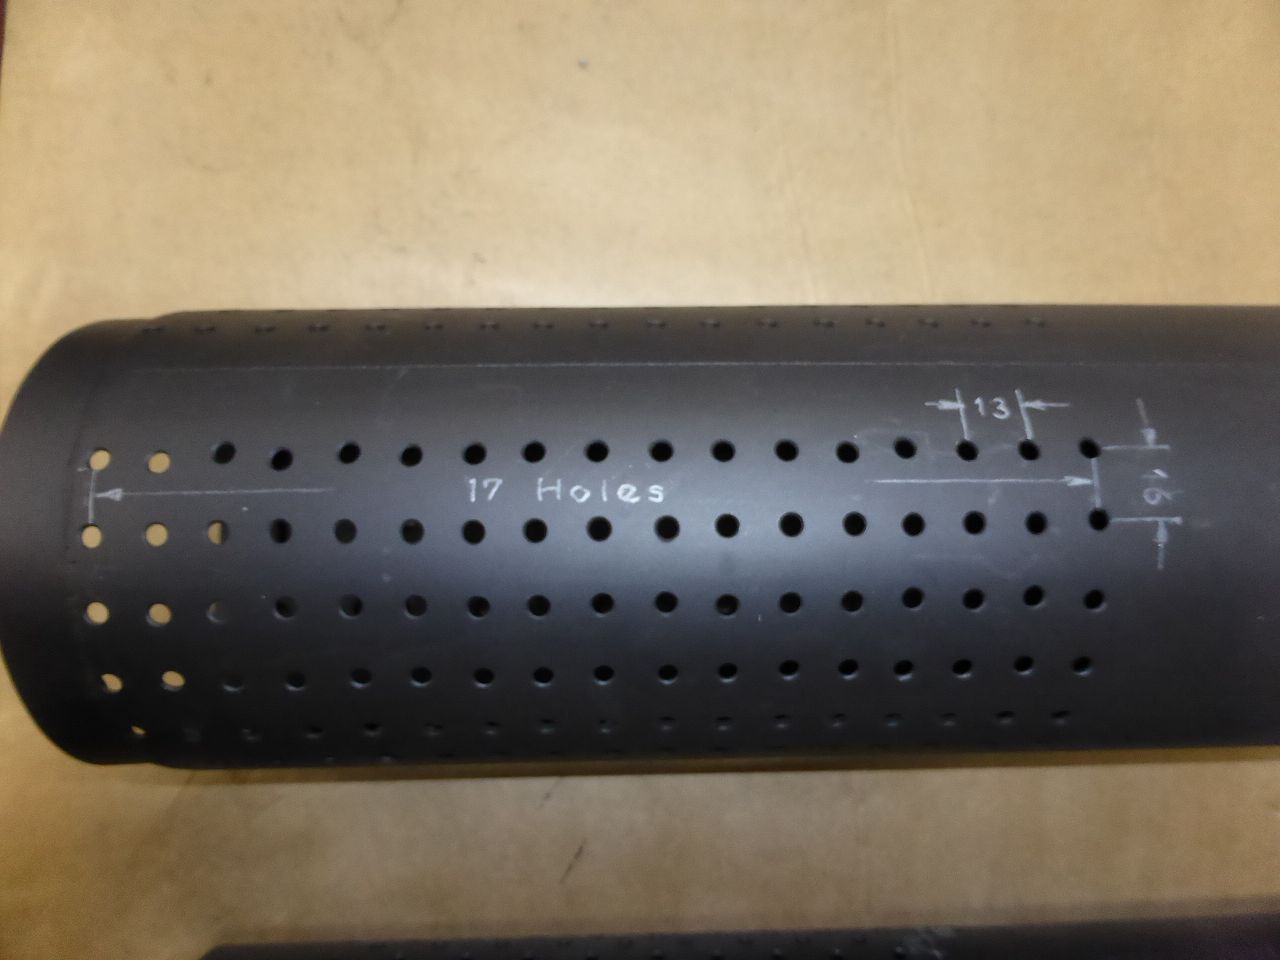 k-P1040606.JPG (88.35 KB) k-P1040606.JPG (88.35 KB)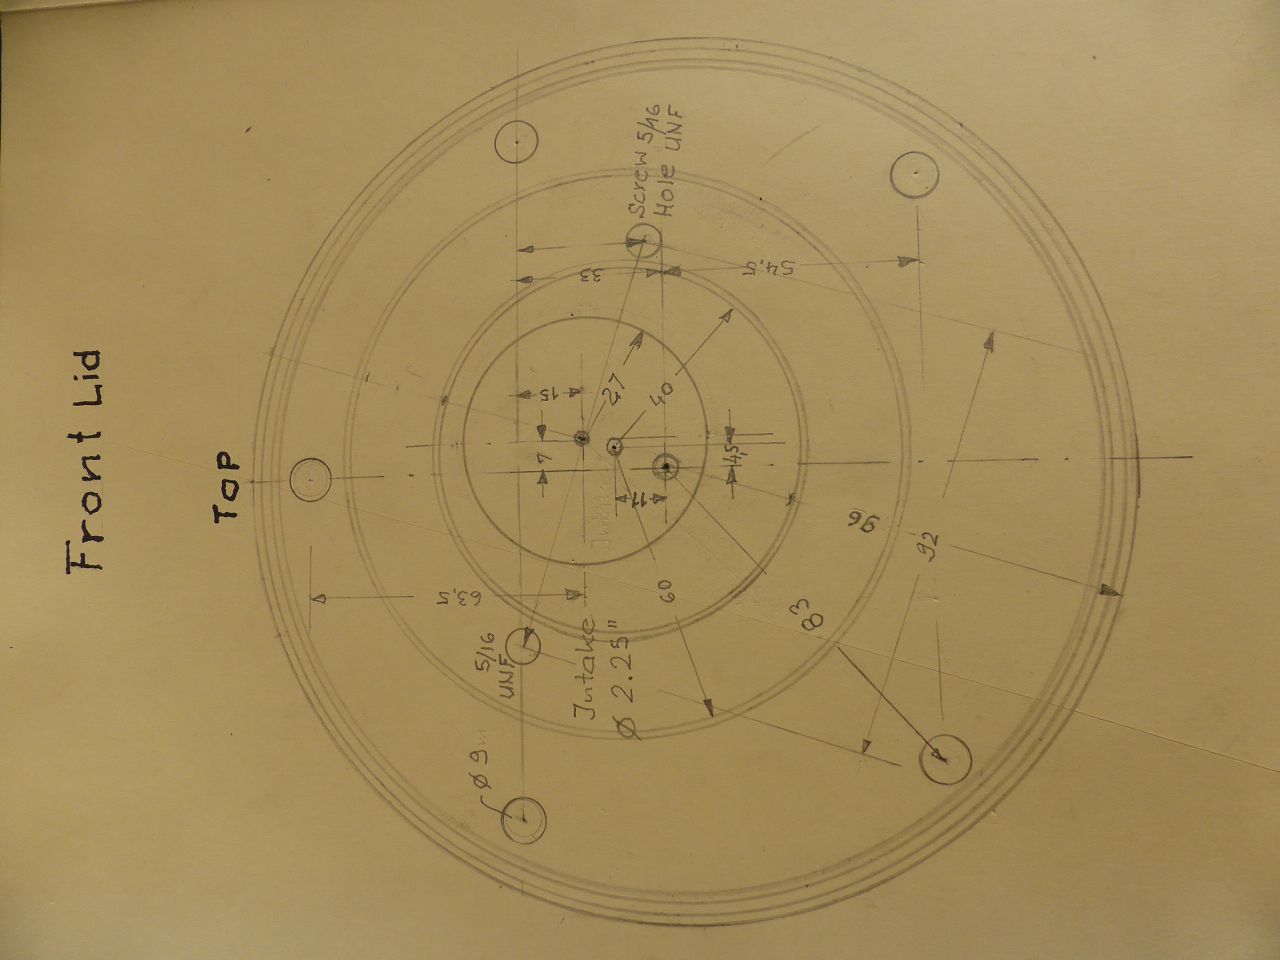 k-P1040607.JPG (80.38 KB) k-P1040607.JPG (80.38 KB)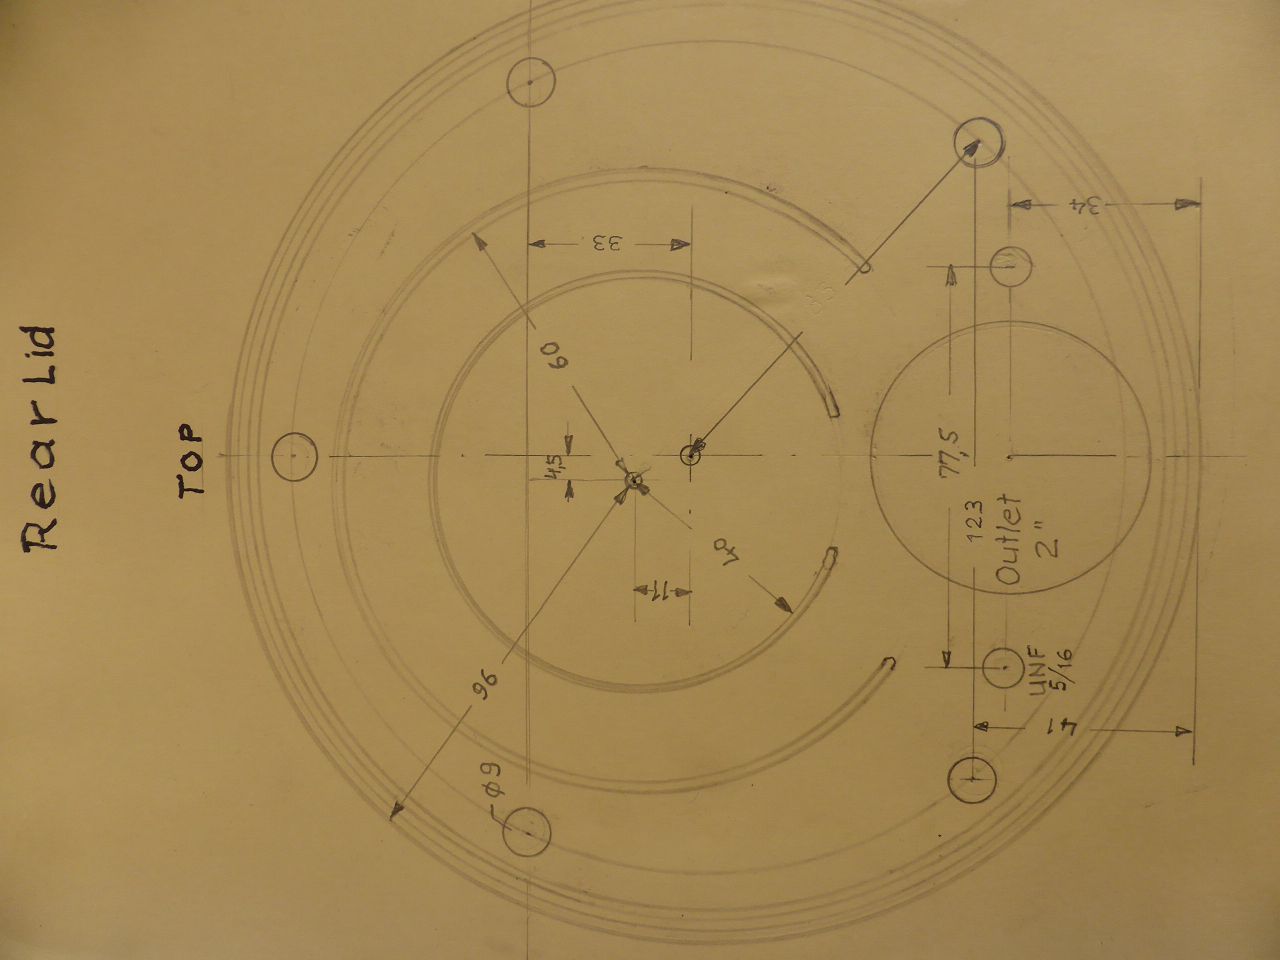 k-P1040601.JPG (114.06 KB) k-P1040601.JPG (114.06 KB)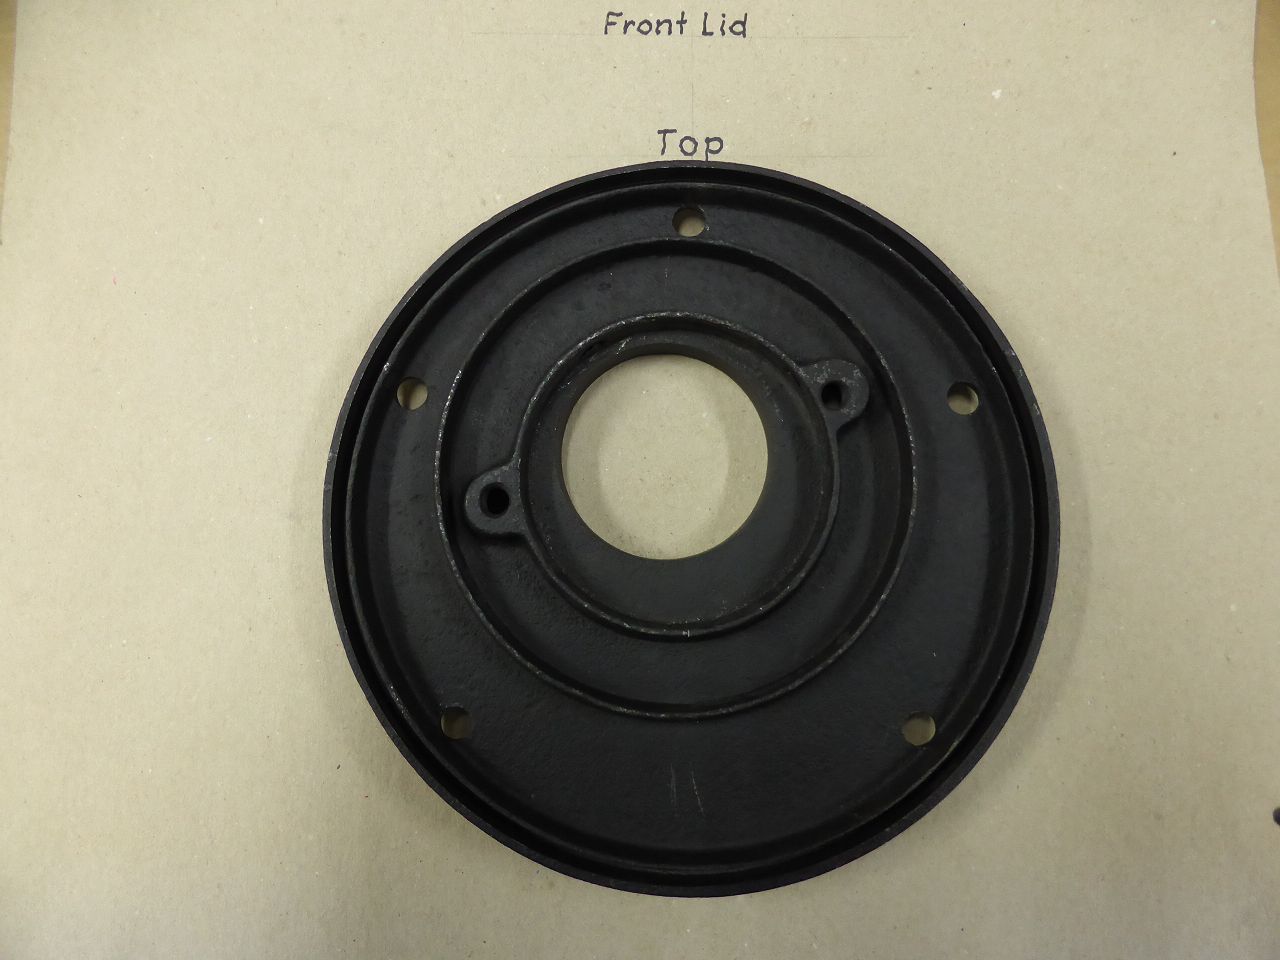 k-P1040602.JPG (123.07 KB) k-P1040602.JPG (123.07 KB)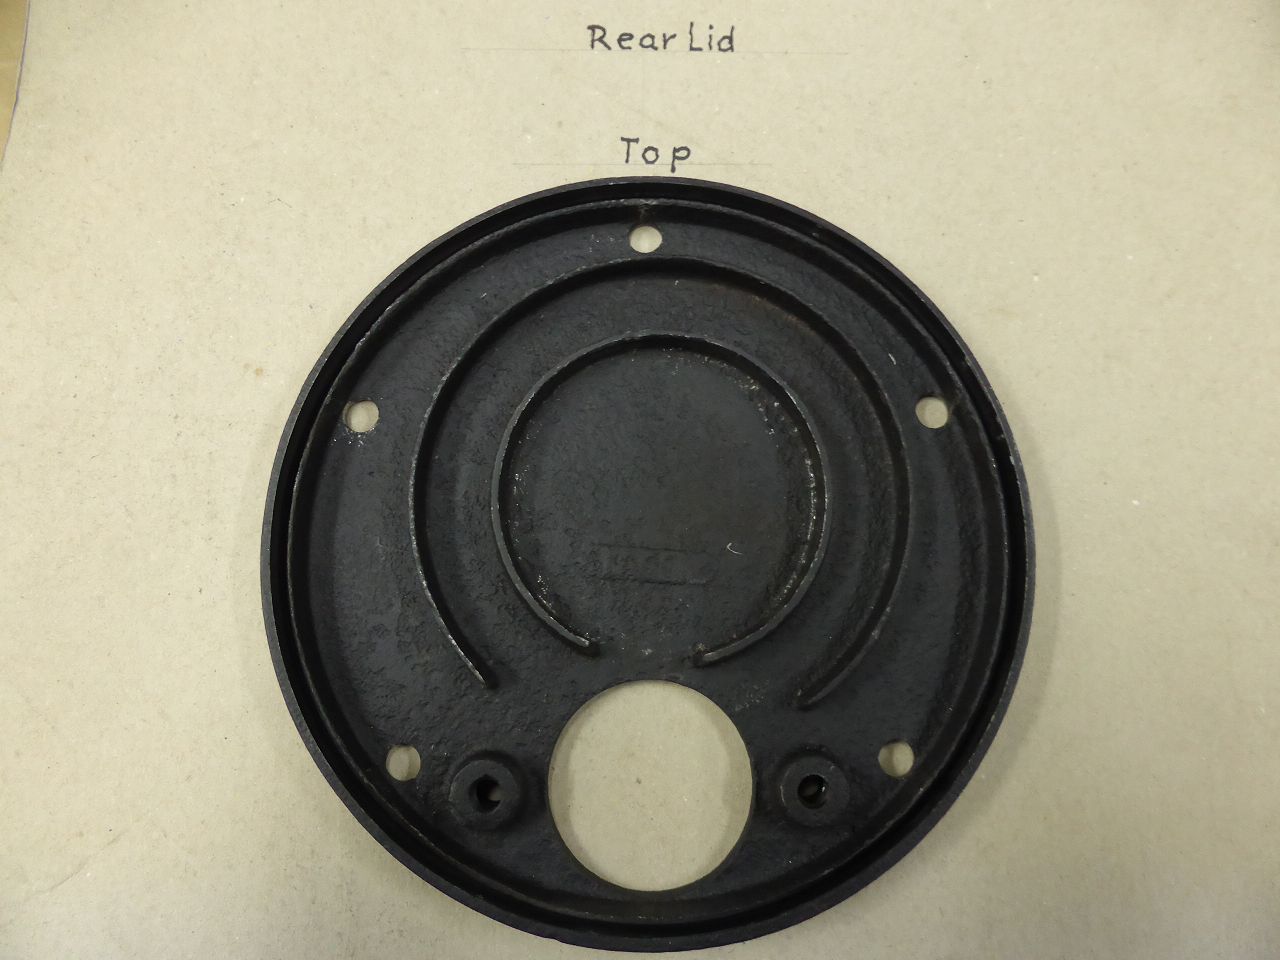 k-P1040562.JPG (124.72 KB) k-P1040562.JPG (124.72 KB)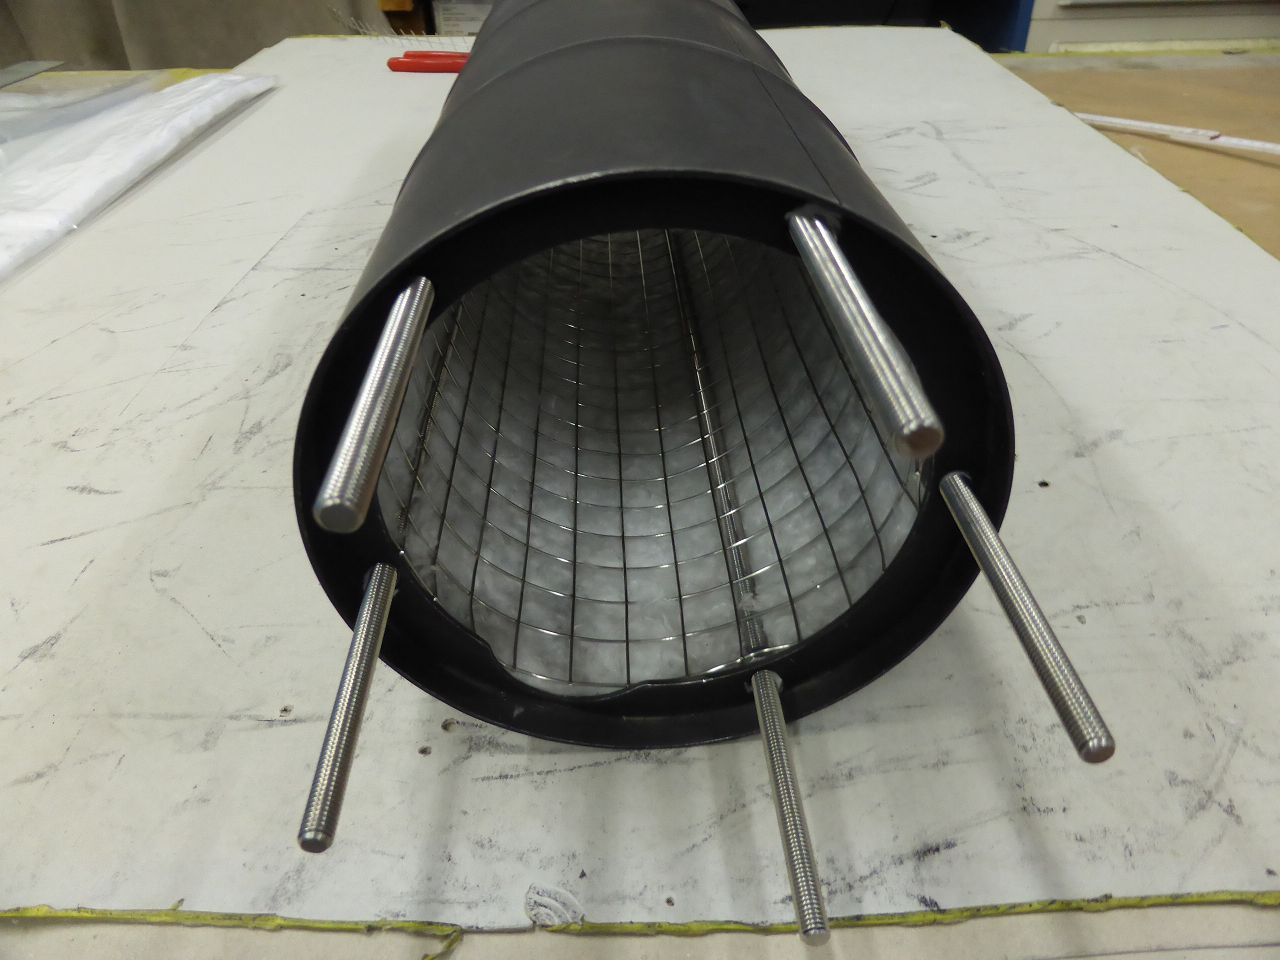 k-P1040548.JPG (96.87 KB) k-P1040548.JPG (96.87 KB)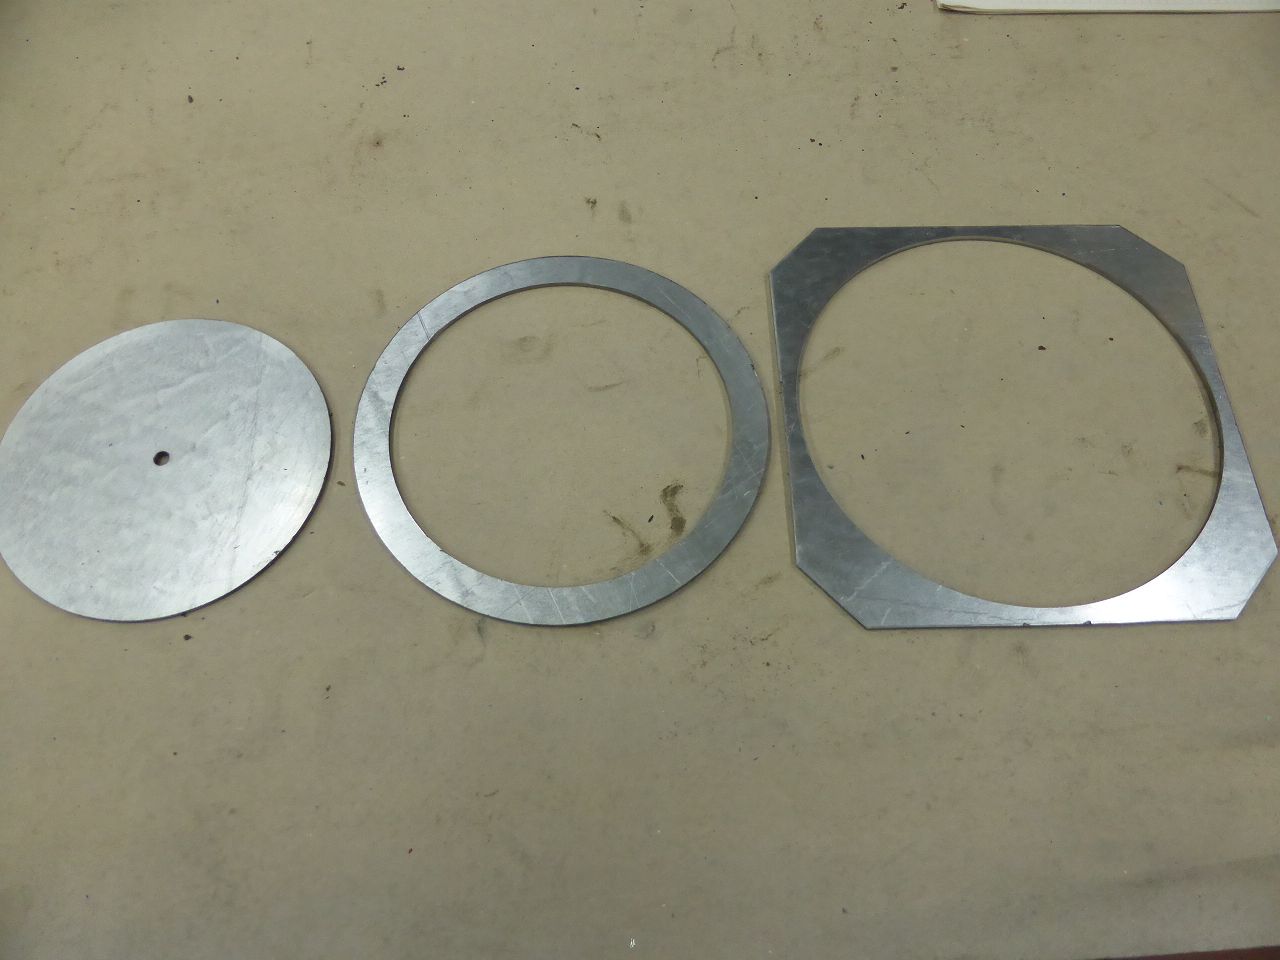 k-P1040552.JPG (122.89 KB) k-P1040552.JPG (122.89 KB)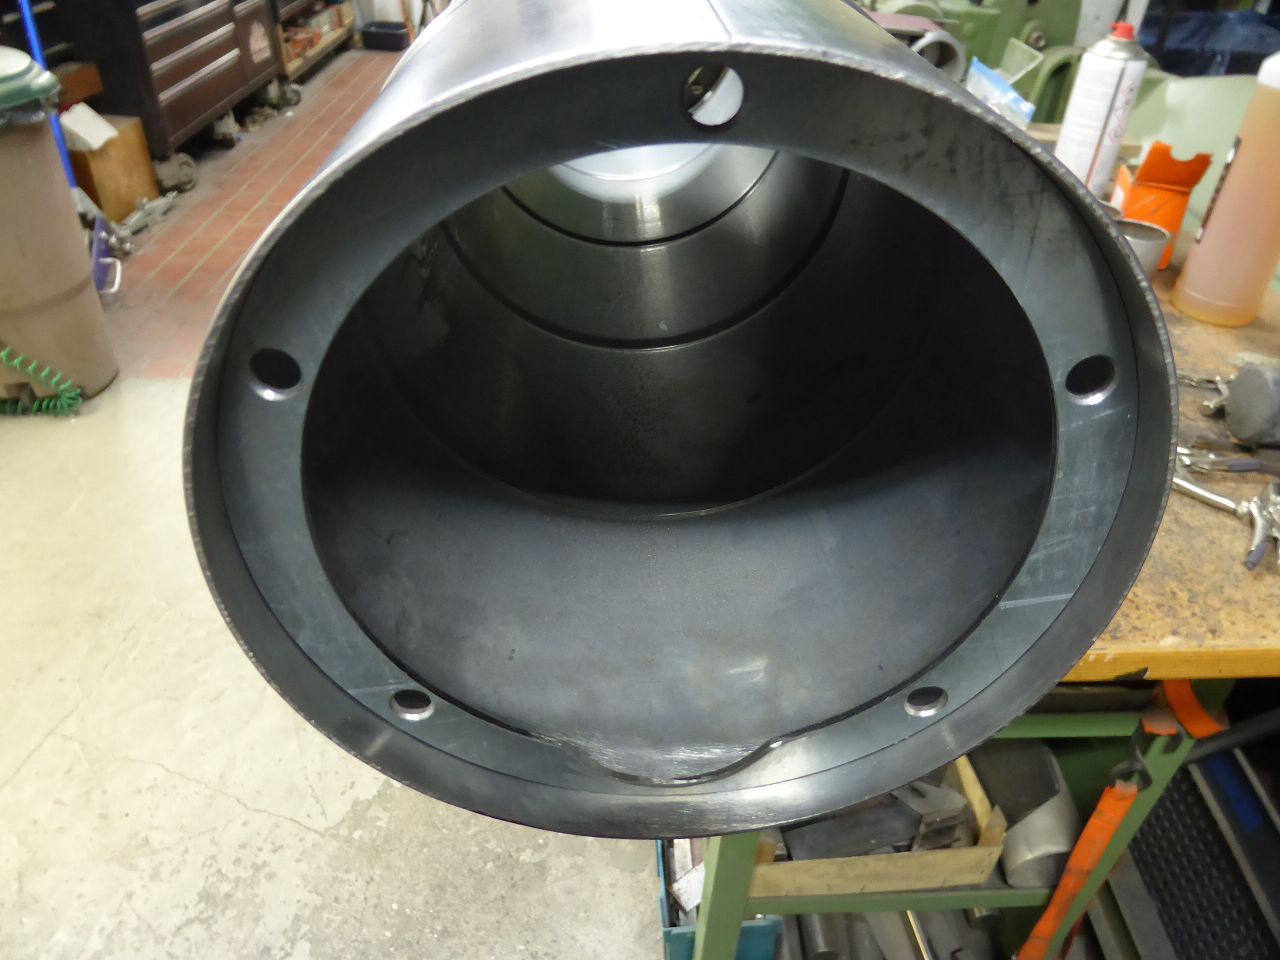 k-P1040555.JPG (93.97 KB) k-P1040555.JPG (93.97 KB)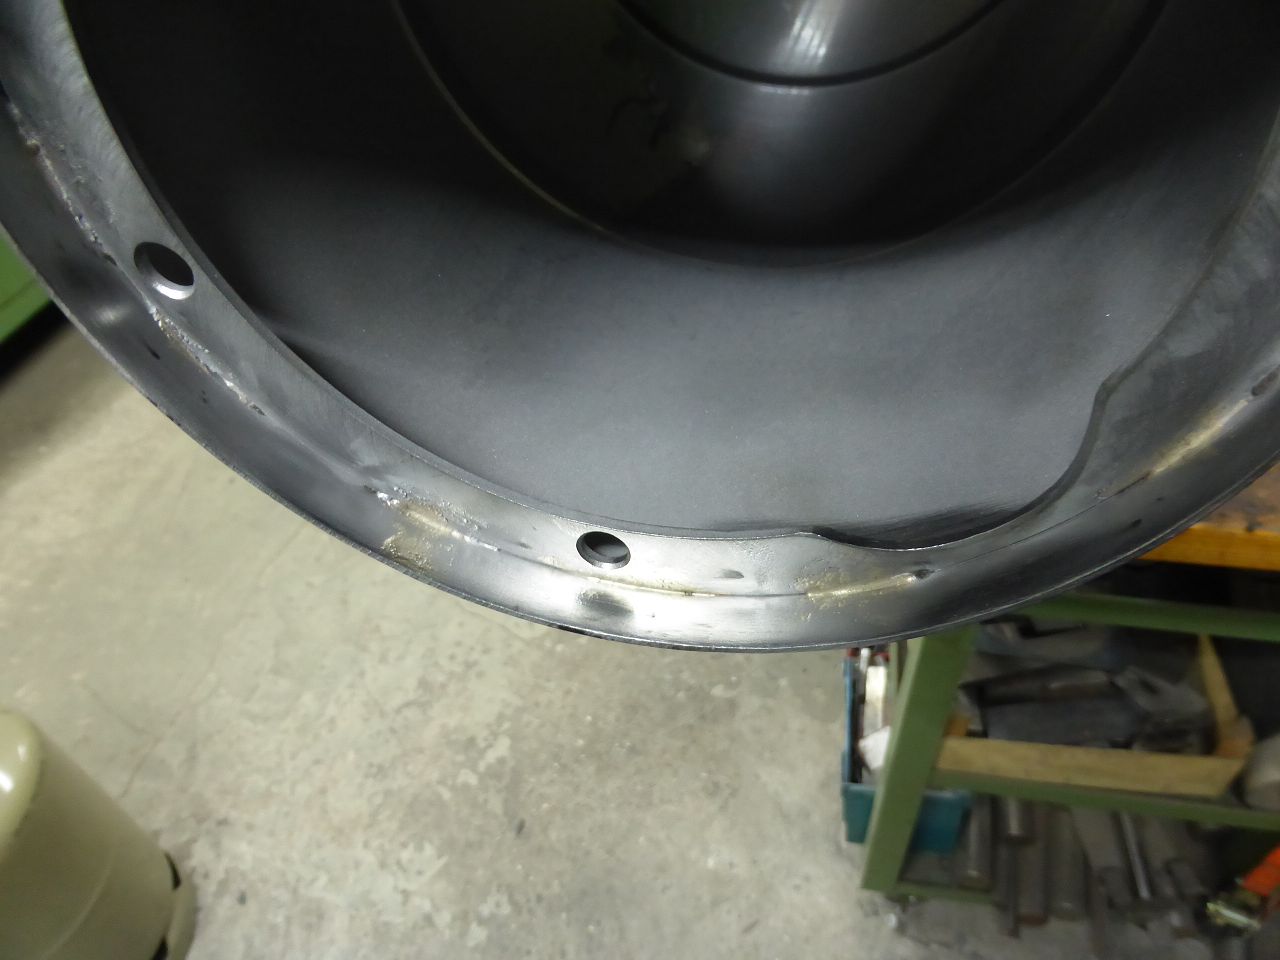 k-P1040549.JPG (120.74 KB) k-P1040549.JPG (120.74 KB)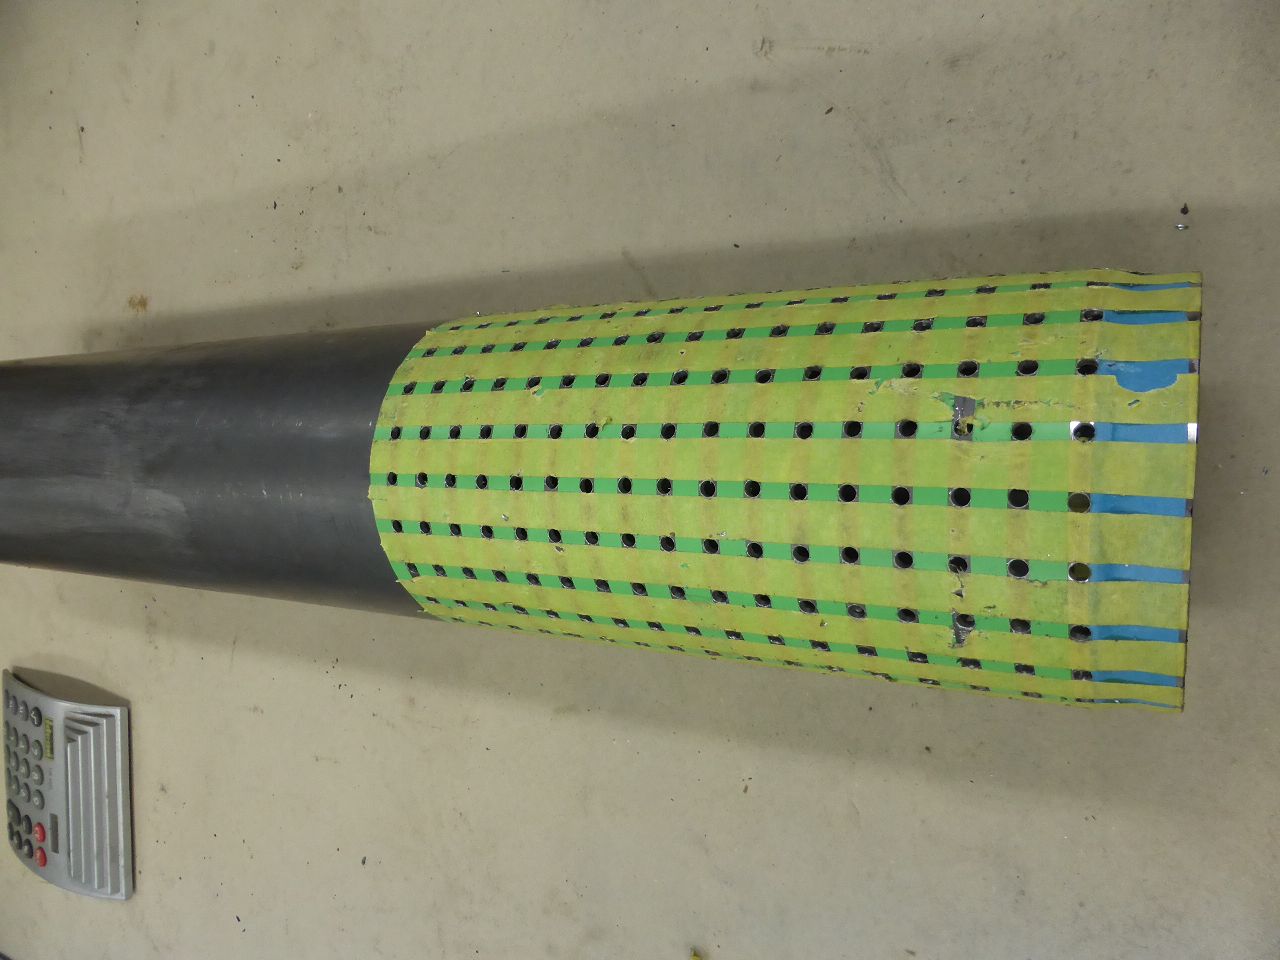 k-P1040594.JPG (106.31 KB) k-P1040594.JPG (106.31 KB)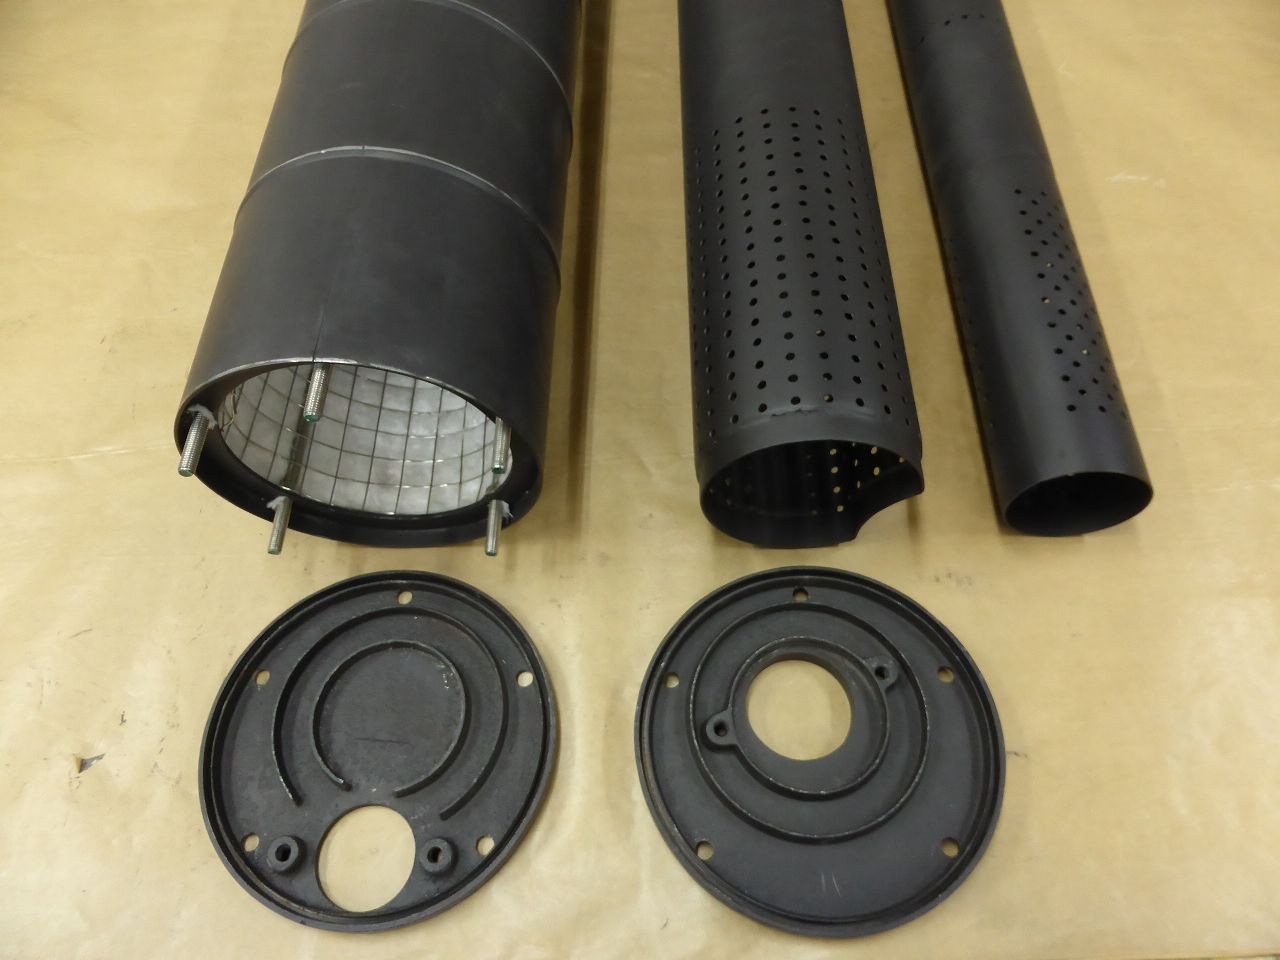 k-P1040603.JPG (140.22 KB) k-P1040603.JPG (140.22 KB)
Posted on: Today 10:06
|
|||
|
||||
|
Re: 1924 Sport 136
|
||||
|---|---|---|---|---|
|
Home away from home

|
Wow! Just amazing! It's always fun and even exciting to see what you have accomplished and your craftsmanship is just amazing.
Posted on: Today 13:40
|
|||
|
||||


