|
Re: Treadle vac disassembly snag
|
||||
|---|---|---|---|---|
|
Forum Ambassador

|
You need to completely remove the power piston by disconnecting the hose and removing the screws holding the vacuum connector to the round shell and then removing that and also screws holding the breather to the shell. After the connector and breather is off you can pull the power piston out of the round shell. Once that is out, there is a large spring pushing against a round plate which is held to the master cylinder ram by a clip. Hold the ram and push slightly against the plate and spring to release pressure and remove the clip so the plate and spring can be removed. You will see some bolts holding the master to the round shell. Remove the bolts and the master will separate from the shell. There is another clip in a groove in the master housing that is holding the parts of the seal assembly to the master. Remove the clip and since the compensator valve is already out the ram and seal assy will pull out.
Inspect the surface where the seal rests in the housing for any pits and corrosion. Make sure there is nothing that would let fluid leak past the outer diameter of the seal.
Posted on: 2019/5/25 20:22
|
|||
|
Howard
|
||||
|
||||
|
Re: Treadle vac disassembly snag
|
||||
|---|---|---|---|---|
|
Home away from home

|
Rarely, the power piston will seize to the hydraulic piston and there is no elegant way to solve that.
Ghandi was wrong. Sometimes violence is the answer.
Posted on: 2019/5/25 20:25
|
|||
|
||||
|
Re: Treadle vac disassembly snag
|
||||
|---|---|---|---|---|
|
Home away from home

|
The unit does not appear to have any corrosion or leakage but it seems the two pistons are locked together. I'm open to ideas how to separate them without breaking anything. Gunpowder and a fuse?

Posted on: 2019/5/25 22:08
|
|||
|
1942 Clipper Club Sedan
1948 Custom Touring Sedan (22nd Series) 1955 Patrician Sedan 1955 400 Sedan |
||||
|
||||
|
Re: Treadle vac disassembly snag
|
||||
|---|---|---|---|---|
|
Forum Ambassador
|
The connection only consists of a socket or rather a closed end hole on the front portion of the power piston casting that the end of the ram slides into. It is only about a 1/4 to 1/2 inch deep and there is no mechanical fastening between the two. Maybe fluid has leaked into the vacuum section and crystallized and hardened or maybe other moisture has corroded the pot metal and the swelling has locked the two together..
There is no way to get behind the piston so I think about all you can do is gently hold the entire BTV unit in something to keep it steady and firm then grab onto the large bump protruding from the front half of the power piston around the actuating shaft where the valve mechanism is housed. Try rocking the power piston slightly up and down, side to side to see if you can break the bond while at the same time giving force to pull the entire piston out. Rotation may not do much good because the ram would try and rotate with the power piston. It might be possible to reach thru the compensator port to hold the ram with something but you would need to be very careful not to scratch or otherwise damage it so it could no longer seal. There is a leather around the piston which is snug to the vacuum shell but there should be some give and take to allow a slight bit of rocking. I would try and not pull much on the actual actuating shaft that attaches to the pedal because it is attached to the valve mechanism and could damage the valve mechanism if a lot of sideways pull pressure is being applied. If that doesn't work and you don't want to risk damaging the unit making it worthless then maybe an exchange for an already rebuilt BTV from Kanter or Max or sending yours to Ross or Kanter for a rebuild by someone familiar with the quirks of the unit is the next best answer. While the rebuild kit has essential parts the BTV hydraulic functions are different from most units. There are places where damage might be found and a couple of parts that can fail are not in the kit. If something is missed or skipped over omissions can lead to poor operation or even sudden failure. Attach file:  (35.05 KB) (35.05 KB)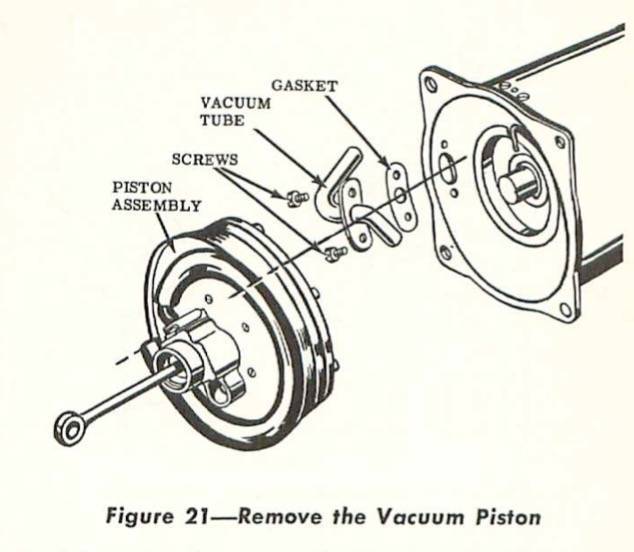 (16.65 KB) (16.65 KB)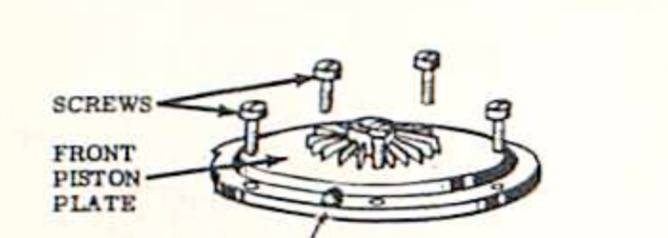
Posted on: 2019/5/26 9:50
|
|||
|
Howard
|
||||
|
||||
|
Re: Treadle vac disassembly snag
|
||||
|---|---|---|---|---|
|
Home away from home
|
I take it there would not be any way to get some sort of solvent etc. in that area to loosen the corrosion. Lac Thinner would probably soften old brake fluid or alcohol might be better.
Posted on: 2019/5/26 11:10
|
|||
|
||||
|
Re: Treadle vac disassembly snag
|
||||
|---|---|---|---|---|
|
Home away from home
|
I hadn't tried a rocking motion so thought I'd give that a go, but in a different way than suggested. Rather than trying to grab the casting, I took a large rubber mallet and tapped around the protruding casting around the pedal shaft. I alternated that with some prying and twisting and banging it outward with the help of the internal spring. Via the vacuum line holes as reference I could see the power piston was ever so slightly coming farther out. The rocking motion had helped break it free but it was still tight separating from the brake piston.
Eventually, success. Here's a picture of it just as it came out. There's some white, chalky casting corrosion in the socket. Some of the goo at the bottom is due to the PB Blaster but there's debris with perhaps a little crystalized brake fluid mixed in. It could be worse. The bore looks fine. I should mention this car lived it's life in the wet Western Oregon where all pot metal castings have rather short life. Onward... thanks for the help. Attach file: (487.39 KB)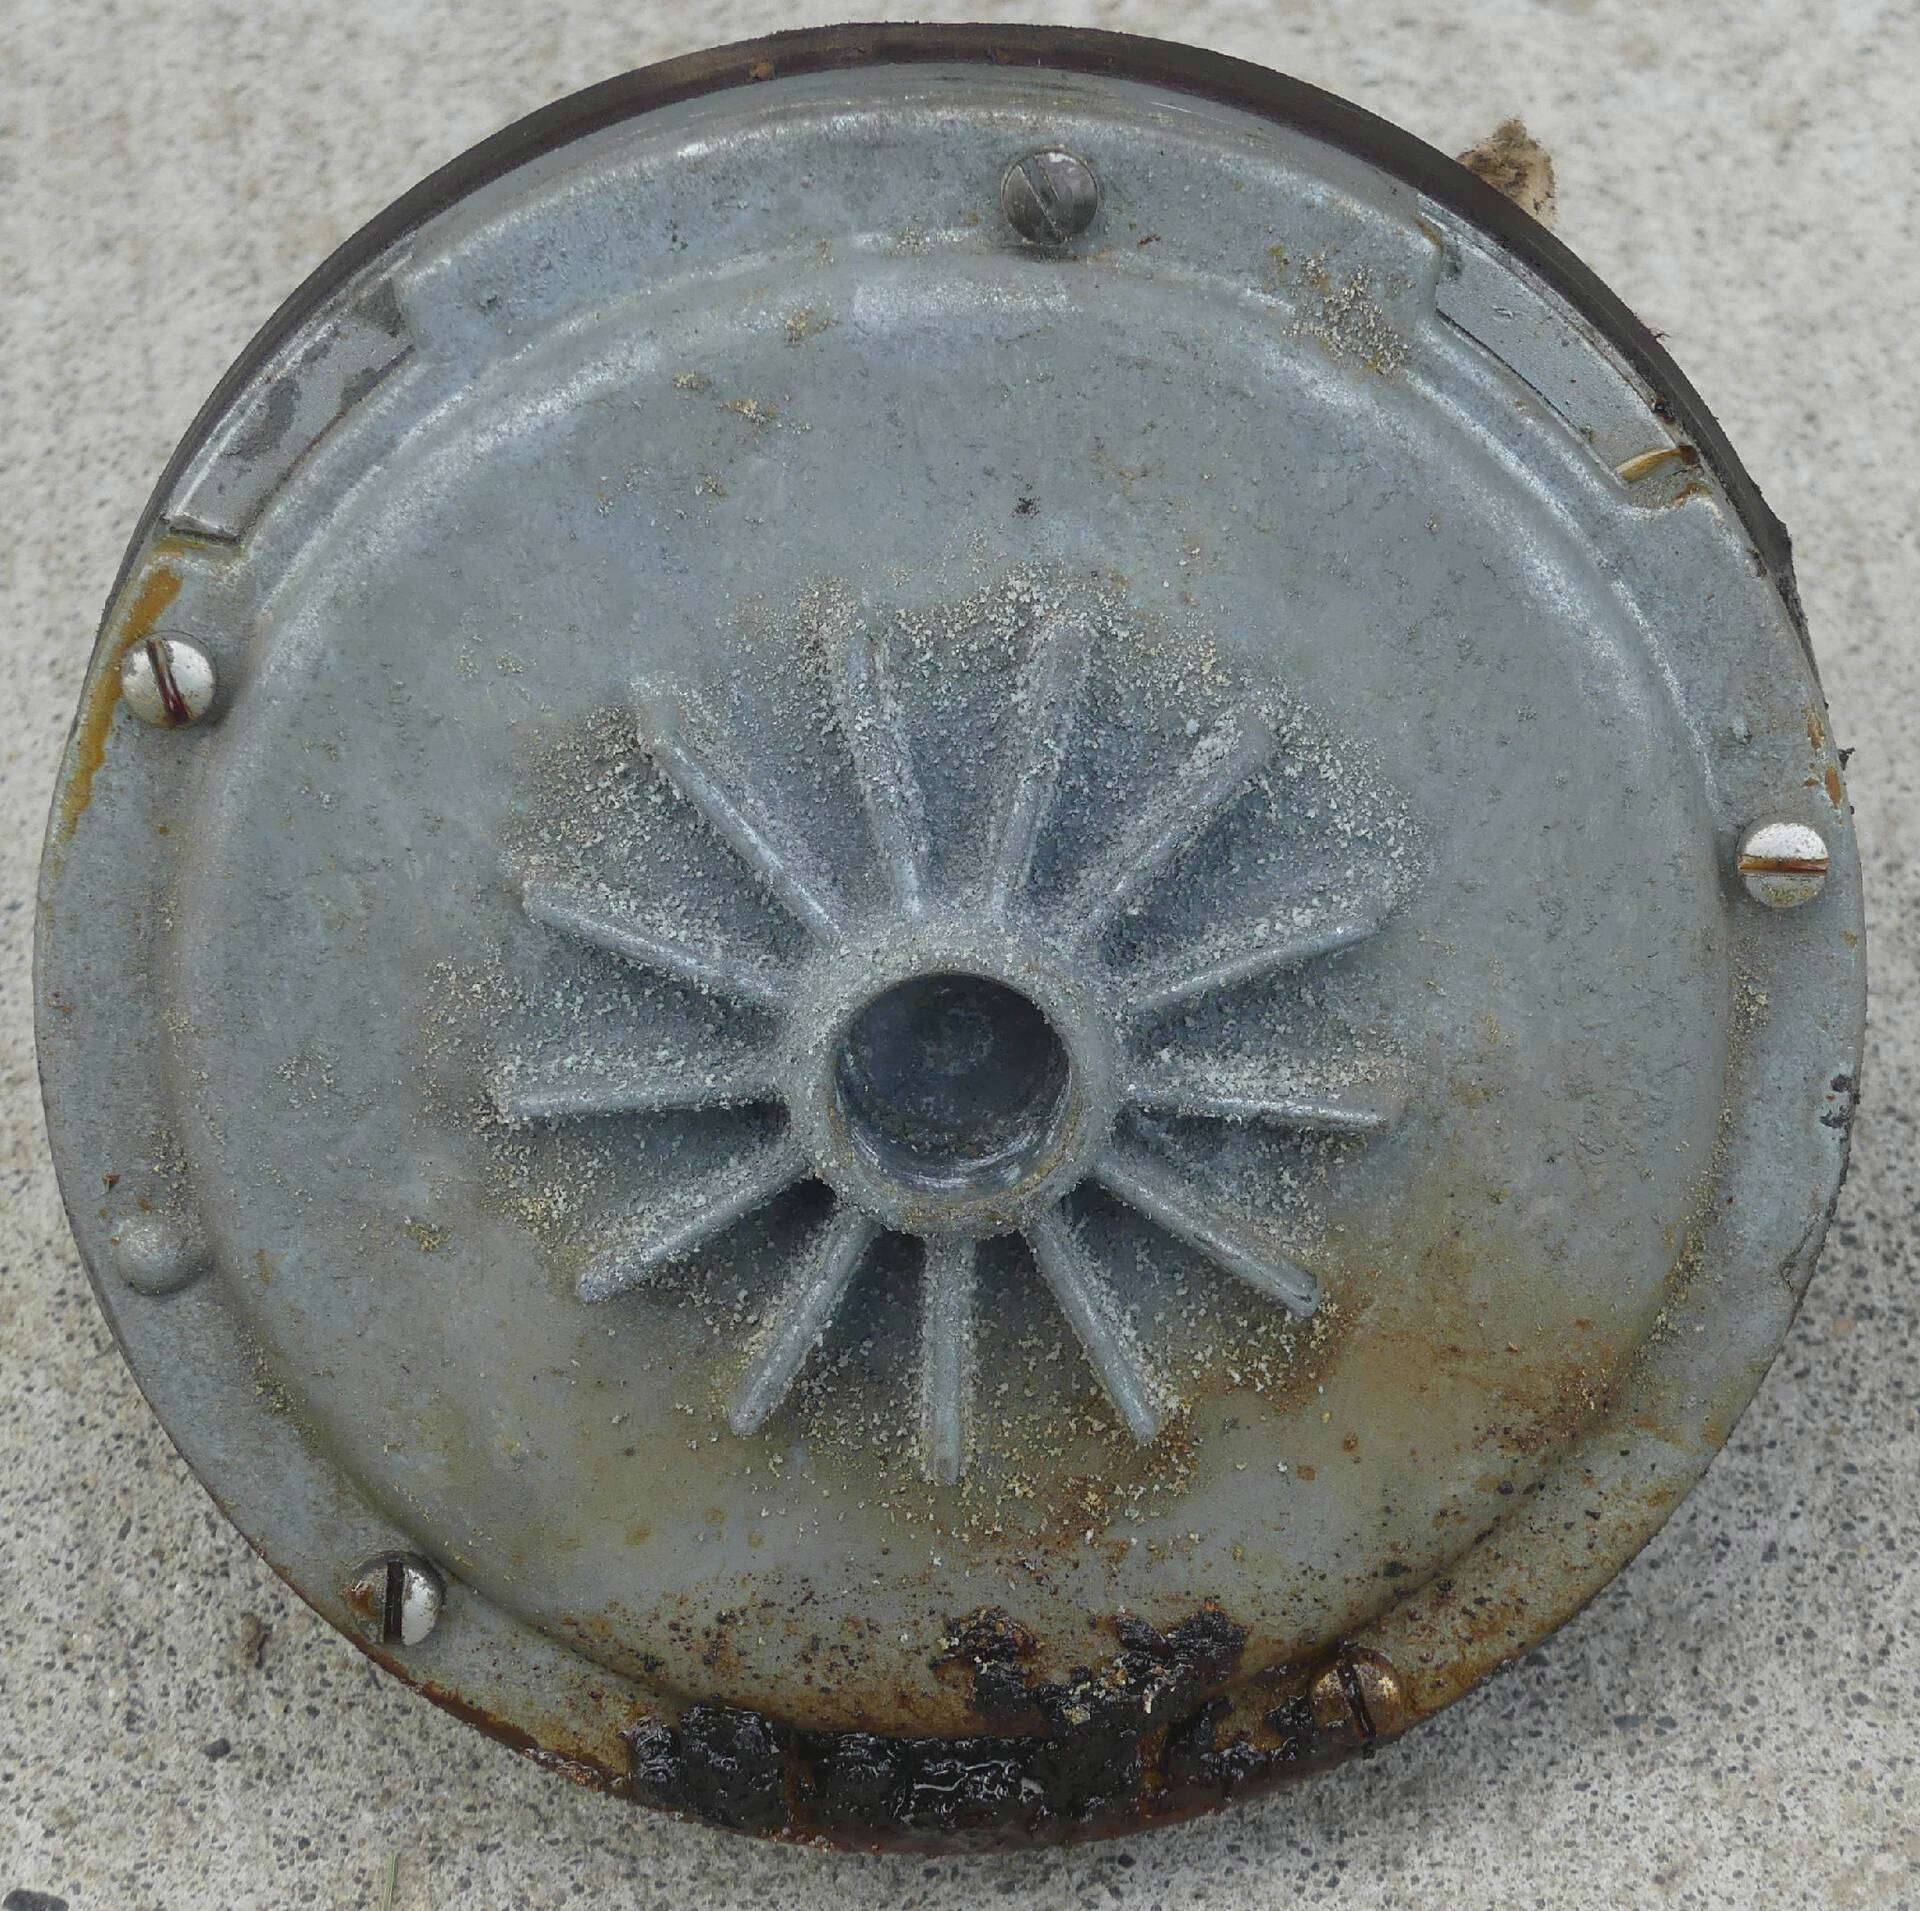
Posted on: 2019/5/26 12:53
|
|||
|
1942 Clipper Club Sedan
1948 Custom Touring Sedan (22nd Series) 1955 Patrician Sedan 1955 400 Sedan |
||||
|
||||
|
Re: Treadle vac disassembly snag
|
||||
|---|---|---|---|---|
|
Forum Ambassador
|
With that much corrosion make sure the bore where the seals are positioned is in excellent shape and that the relief passage between the top of the fluid reservoir and the space between the hydraulic and vacuum seals is open. Also make sure the ram shaft is smooth and undamaged the entire length.
The vacuum side seal is thin and fairly simple but if it should leak a tiny bit the vacuum can pull fluid out of the hydraulic section and into the vacuum side if the relief passage is blocked. Conversely, the hydraulic side seal is heavy and robust but is designed to allow a tiny bit of seepage to keep the seal moist and lubricated. If the small amount of fluid that gets past the seal builds up in the space because it can't get to the reservoir it can be forced into the vacuum side by hydraulic pressure as it keeps building up. The bore needs to be in excellent condition on the outer circumference of the seals because if it is pitted vacuum can leak or fluid can be pulled or forced around the outside of the seals. If the unit was dry and fluid crystallized there is also a possibility the ram shaft has been scored or even pitted around the area the seal was touching. The shafts are not part of the rebuild kits but Kanter has new stainless shafts if yours is the least bit damaged. Also check that the conical spring that pulls the compensator valve closed is intact and functional. It is supposed to be stainless but some have reported finding ordinary springs that had rusted and no longer could pull or hold the valve tightly closed. I don't know if any repro springs are available at retail. A rebuilder that had some made for his personal rebuilds retired and no idea if anyone bought his inventory or if anyone else has made them available. When reassembling the unit, check the reservoir cover gasket. If it is the typical gasket found in many of todays kits there will be a portion of the gasket that sits directly over the relief port. The port will be blocked if you have the later version BTVs which had the relief port flush with the top of the reservoir and combined with the thick flat cover plate that was usually found on Packards. Apparently the gaskets were designed for use with a different cap than was used on most Packards. Those other caps had a slight raised channel pressed into the cap and centered over the port to provide an opening. To use the port blocking gasket with the flat caps just make a small notch between the hole and inside edge of the gasket so the port can be opened to the reservoir. Some Packards did have a later style cap so if you do have a cap with the channel then use the gasket as is. Attach file: (11.86 KB)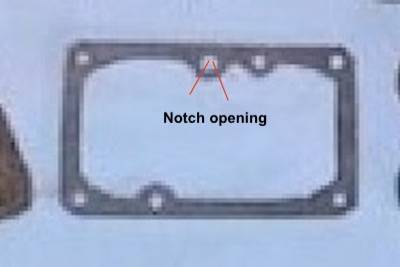
Posted on: 2019/5/26 13:52
|
|||
|
Howard
|
||||
|
||||
|
Re: Treadle vac disassembly snag
|
||||
|---|---|---|---|---|
|
Home away from home
|
Thanks for the information.
This unit looks to have leaked some into the vacuum section, but not a large amount. There was a puddle of gunk almost two inches wide and an inch front to back, rusty underneath. The piston shaft looks quite good actually but I have a new one that I'll use. The relief passage was packed solid with crystalized fluid. Still cleaning things up but will start reassembling soon. What I'm not looking forward to is trying to hook the brake lines back up during installation. They were difficult enough just to disconnect but I expect starting those threads is going to be a pita. Very difficult to reach and is virtually blind. Scott
Posted on: 2019/5/26 16:24
|
|||
|
1942 Clipper Club Sedan
1948 Custom Touring Sedan (22nd Series) 1955 Patrician Sedan 1955 400 Sedan |
||||
|
||||
|
Re: Treadle vac disassembly snag
|
||||
|---|---|---|---|---|
|
Forum Ambassador
|
It is a little confined for space but I have had success leaving the unit unbolted from the toe plate. Lay some blocks of scrap wood on the frame and adjust the wood and maybe use some rags as padding and something to to cradle the BTV in the approximate position. Reach back to start the lines from inside the car. After you make sure the nuts are started properly but not tightened you can remove the blocking and making sure the unit doesn't get away from you enough to stress the lines bolt the toe plate onto the unit. Once the unit is in the proper position and the toe plate screwed into the floor you can do the reach over the fender to tighten the nuts.
Posted on: 2019/5/26 17:32
|
|||
|
Howard
|
||||
|
||||


