
|
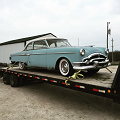
Re: 1954 Clipper Deluxe Sportster
|
||||
|---|---|---|---|---|
|
Just can't stay away
|
Howard, I have not. Do you have his contact information?
Thank you Don. Steve, that sounds like a good idea. I'll try to contact the yard and see what they can do.
Posted on: 2015/9/13 12:11
|
|||
|
||||
|
Re: 1954 Clipper Deluxe Sportster
|
||||
|---|---|---|---|---|
|
Forum Ambassador

|
Mike
Attach file:  (10.30 KB) (10.30 KB)
Posted on: 2015/9/13 12:16
|
|||
|
Howard
|
||||
|
||||
|
Re: 1954 Clipper Deluxe Sportster
|
||||
|---|---|---|---|---|
|
Just can't stay away
|
Thanks.
Ok, so I am taking the front clip off of my 54. I removed the plate the hood latches to, the 2 bolts on top of the fenders by the windshield, the fender to rad support bolts, I am going to remove the bottom fenders bolts. Do I need to remove the panels that the air vents are connected to or can those stay on? And then should I be able (with a couple of friends of course) to lift up the whole front clip?
Posted on: 2015/9/13 19:47
|
|||
|
||||
|
Re: 1954 Clipper Deluxe Sportster
|
||||
|---|---|---|---|---|
|
Home away from home
|
You can leave the air vents in place. I am able to lift a fender assembly on and off by myself as long as there is room to maneuver, so you should be OK. I imagine it would be easier with two guys, perhaps you (unlike me) are wanting to be careful about scratching your paint.
Don't forget the bolts attaching the fender to the grille too. And there is a removable panel on the RH inner that makes things easier to get on and off. The RH will be heavier too if you leave the fan in place.
Posted on: 2015/9/13 21:15
|
|||
|
1952 Model 200 Deluxe Touring Sedan
HA's 52 Grey Ghost "The problem with quotes on the internet is you never know if they're true" - Abraham Lincoln |
||||
|
||||
|
Re: 1954 Clipper Deluxe Sportster
|
||||
|---|---|---|---|---|
|
Just can't stay away
|
Ok thank you. I am wondering where those fender to grille bolts are? I removed the bolts along the bottom of the grill, but can't find the ones connecting it to the fenders.
Posted on: 2015/9/14 21:47
|
|||
|
||||
|
Re: 1954 Clipper Deluxe Sportster
|
||||
|---|---|---|---|---|
|
Forum Ambassador
|
There are instructions and a few photos on grill removal in section X -- sheet metal and fenders --of the 51-4 service manual. If you don't have a printed copy you can download the info from the literature section. Believe there is one or two screws holding the fender that you access from the passenger compt. They are behind the kickpanels & go into the rear edge of fender.
Posted on: 2015/9/14 22:00
|
|||
|
Howard
|
||||
|
||||
|
Re: 1954 Clipper Deluxe Sportster
|
||||
|---|---|---|---|---|
|
Home away from home
|
My fenders have: one bolt at the top rear in front of the windshield corner. 2 at the rear bottom forward of the door (these are often rusted solid, mine all twisted the heads off). 2 at the top of the radiator frame. 2 inside the wheel well to the frame. Several into the front of the radiator frame (accessed after removal of the upper splasher that has the hood latch). Several into the rear of the grille from inside the wheel well. And I think a couple holding it to the lower splasher at each side, from the bottom, along with a few holding the bumper inside shield on there.
On the RH it's easier if that access panel is removed inside the wheel well. And on the LH there are a couple extra bolts into the frame on the battery box supports. And the antenna radio cable, and the clips for the main wire harness. You will also have to disconnect the vent hoses, and wiring for the headlight and park light/turn signal. And depending on the side, the battery or the fan wires, and heater hose clamp. That's all I can remember without looking at the car but from fairly recent experience. It seems like a lot but not that bad really. I have a '52 so you might have an extra doodad or two that I don't.
Posted on: 2015/9/15 0:09
|
|||
|
1952 Model 200 Deluxe Touring Sedan
HA's 52 Grey Ghost "The problem with quotes on the internet is you never know if they're true" - Abraham Lincoln |
||||
|
||||
|
Re: 1954 Clipper Deluxe Sportster
|
||||
|---|---|---|---|---|
|
Just can't stay away
|
Thanks for the help. Ok, here is a warning. I do not know anything about electrical/wiring for cars, so please excuse any stupid questions. How can I disconnect the headlight and fog light wiring without cutting the wire? One wire goes to a bracket and screws on, but another goes into a rectangular rubber thing with another wire, so how can I get these disconnected?
 , and sorry again for the stupid questions , and sorry again for the stupid questions
Posted on: 2015/9/24 17:05
|
|||
|
||||
|
Re: 1954 Clipper Deluxe Sportster
|
||||
|---|---|---|---|---|
|
Forum Ambassador
|
If the wiring is stock the headlight wires will be 3 wires in a short cable going thru a hole in the fender that terminates at a terminal strip on each fender. Two wires are on the strip and the third is ground which is on a terminal strip mounting screw directly into the fender. Just remove the nuts off the studs and also the mounting screw and remove the wires from the cable heading toward the headlight buckets. Keep track of which wire was on which terminal or screw so you can get them back without undue effort. If you are removing the fender then the main wiring loom connected to the terminals and screw will also remove. Mark or note the colors and locations on all wires.
The third terminal on the strip will be for the parking light and that wire is in a 2 wire cable. Remove that wire as well. The other wire from the two wire cable is the turn signal and goes into a plastic connector. There were two types of connectors Packard may have used. If it is round it is a Douglas type connector and should pull out without any big effort. There are several round styles that are called Douglas or bullet type connectors but all work in a similar fashion. If it is rectangular, then most likely it is a Wade connector and those can be a problem. The Wade connectors have an almost square tab which the wire is crimped onto and slides into the connector. The tabs have a hole in them which a tang on the connector strip inside the plastic drops into. If the wire has never been removed before the tang will be sharp edged and grabs the hole quite hard. You will have to push the wire more into the connector and use a very thin bladed tool at the same time to work both sides of the tab and try and get the tang out of the hole. It takes a bit of finesse, luck and maybe strong language and even then sometimes the plastic housing will break. If the wire has been removed before, someone else has done the hard work and just a bit of wiggling should release the wire. Anything else and someone has changed connectors so you will have to determine the release. The foglights can be done many ways and in most cases it may be necessary to cut the wires. Typically if the bracket didn't provide the ground internally then the light had two exit wires. One was grounded and the other was used as the supply wire. A wire from each light was run to a convenient or hidden point and spliced together with a single wire continuing on to the switch. You will probably have to find the splice or else a good point to cut and separate the wires. Attach file: (21.89 KB)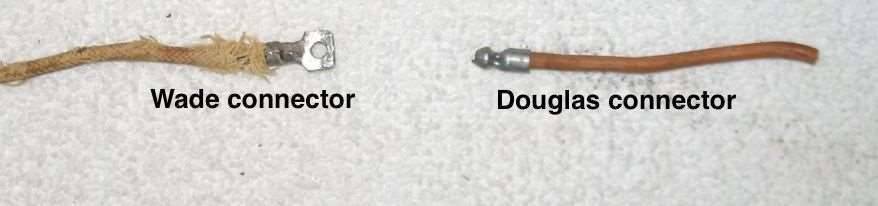
Posted on: 2015/9/24 18:48
|
|||
|
Howard
|
||||
|
||||


