|
Re: KPack's 1954 Panama
|
||||
|---|---|---|---|---|
|
Home away from home

|
Quote:
Bye the way, I've taken a few photos and measurements of the 'ropes' that fit in the trunk between the fender and wheel tub. I think that subject was discussed a while back. If you still need that info I'll post the information. Odd co-incidence but I just found a photo of these from one of my own cars! They are fully intact but the question, can I find the photo again? On the pointed thing, you might be right about what it is.
Posted on: 2020/12/7 23:20
|
|||
|
||||
|
Re: KPack's 1954 Panama
|
||||
|---|---|---|---|---|
|
Home away from home

|
Anthony - Thanks! I'm learning a lot about carbs right now....starting to make sense.
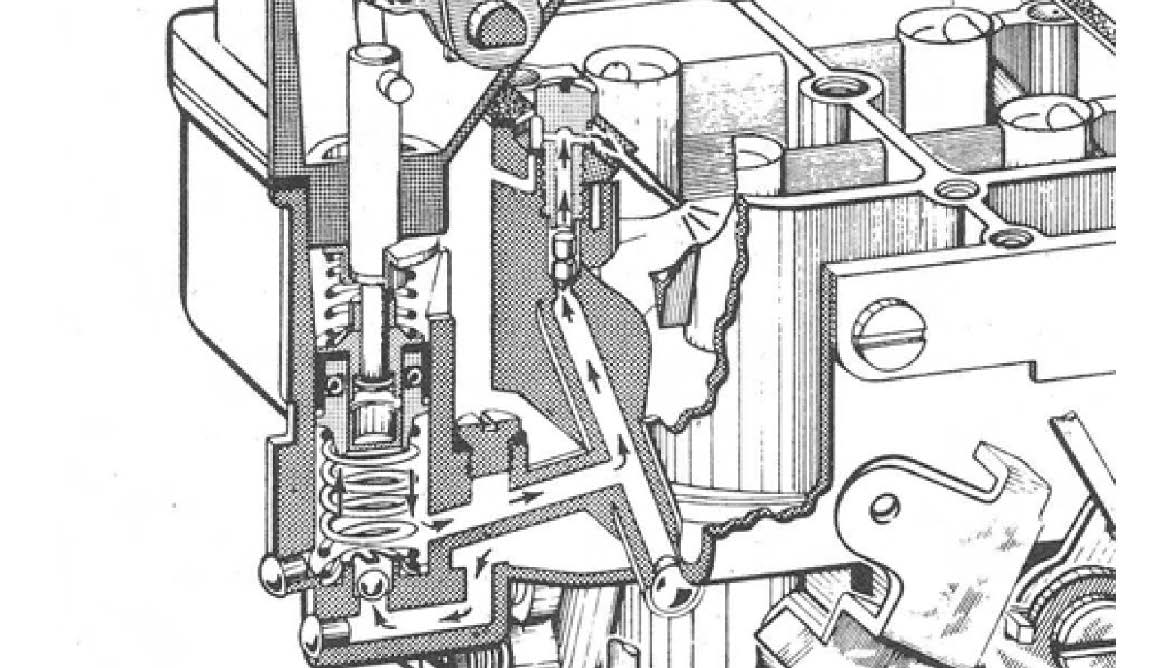
Don - the pin in the picture is the pump check needle, like David was saying. The kit comes with a replacement that doesn't fit my model. The kit covers many different models, so my guess is that it fits something else. The original needle "looked" to be in good shape so I put it back in. I do believe there is a new needle and seat assembly in the kit....haven't quite gotten that far to confirm. I did not take out any of the pressed in plugs. The kit does not have any replacements in it and I wasn't sure if they were supposed to come out or not. I really don't want to have leaks afterwards. David - That diagram is really helpful to illustrate how the accelerator pump works. I knew what it did but not hot it did it. That's very helpful to know. I have the original ropes still in place between the fenders and wheel wells. They are now mostly black though....woops. I may still make side panels and cover them with carpet, and if I do that they won't be seen. Haven't decided on that yet. -Kevin
Posted on: 2020/12/7 23:45
|
|||
|
||||
|
Re: KPack's 1954 Panama
|
||||
|---|---|---|---|---|
|
Home away from home
|
Made a bit more progress on the carb last night. The new needle and seat is completely different than the old. It took me a bit to figure out how the new one went in, but I think I have it correct.
I also set the float level and pump level according to the directions in the kit, as well as the Motors manual. The kit said to use the included measuring gauge, which was not present, so I used a caliper and got it as close as I could. Did the same for the pump level. Carburetor looks a lot better than it did. Should hopefully be able to wrap it up tonight and see if I can get the car to start. -Kevin Attach file:  (159.98 KB) (159.98 KB) (106.00 KB) (106.00 KB)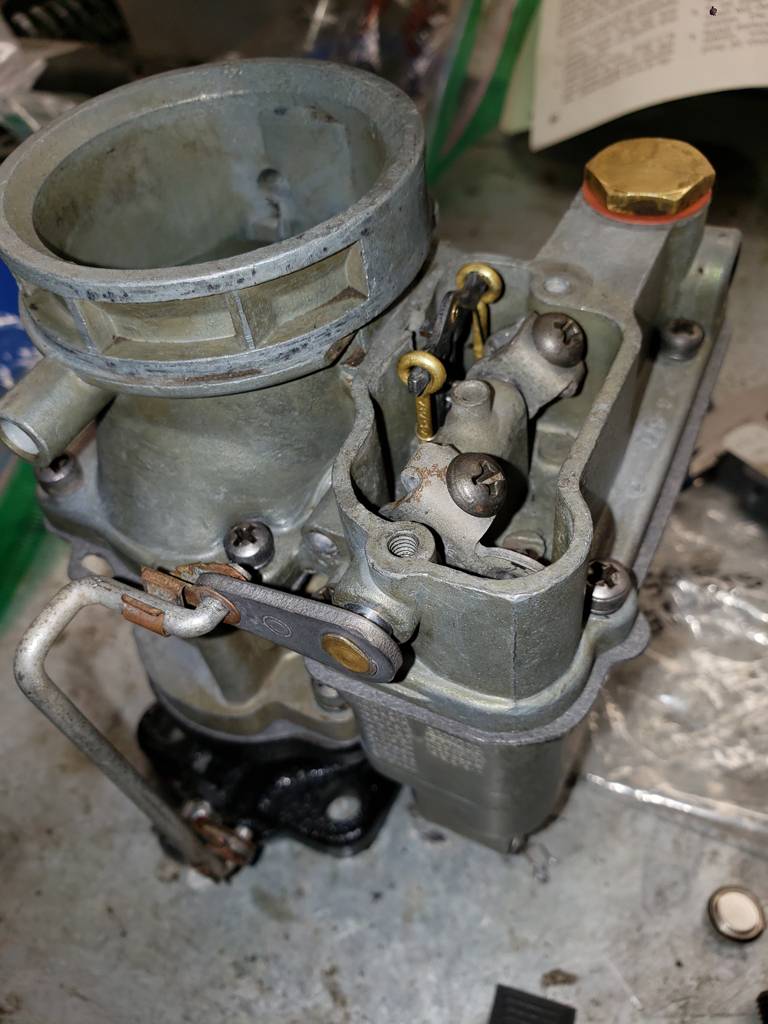 (284.62 KB) (284.62 KB)
Posted on: 2020/12/8 13:13
|
|||
|
||||
|
Re: KPack's 1954 Panama
|
||||
|---|---|---|---|---|
|
Forum Ambassador

|
The needle and seat set shown on the left in your photo is of the original and traditional design, the one on the right is of a design offeref by Daytona Parts, a major producer of premium carburetor kits. Though I was initially apprehensive, I installed quite a few Daytona kits with lthat style needle and seat with complete satisfaction.
Posted on: 2020/12/8 14:15
|
|||
|
||||
|
Re: KPack's 1954 Panama
|
||||
|---|---|---|---|---|
|
Home away from home
|
Thanks for the info! I was thinking the one with the kit was original design, but couldn't be sure. So it looks like the carb has been rebuilt at some point in the past.
Wrapped up rebuilding the carburetor tonight. The choke unit is not original. Currently it's just a manual choke housing that kind of fits, but it's good enough to close and open the choke plate. I'm missing some of the original interior bits, and I don't see anywhere to put the hot air tube on the exhaust manifold. So I'm not sure how to convert back to the original thermal choke. I installed the carb back in the car with a new gasket, put some fuel into the float bowl, tightened my fuel line fittings, and cranked it over. It started on the second try, and once I got the choke opened up it started to run smoothly. Fuel is flowing into the glass bowl and it's nice and clear now. The car smoked like crazy as soon as I started it...the garage looked like a bomb had gone off. Pulled it outside and let it warm up and idle. The smoke eventually improved and wasn't as noticeable. Oil pressure stayed 25 PSI for idle. I for sure will need to fine tune the settings on the carburetor, as well as recheck the timing. I also need to check the vacuum advance to be sure it works. Any tips on how to do this? I took a video of the jets on acceleration. When I accelerate hard there is still a hesitation, but not like before. The car would die on anything but the very lightest of touches. Now I can gas it, but there is a one second delay, then it kicks in. Watch the video and tell me what you think. I accelerate slow and fast in the video. VIDEO: https://youtu.be/wLoQpBuXMk8 -Kevin Attach file: (98.77 KB)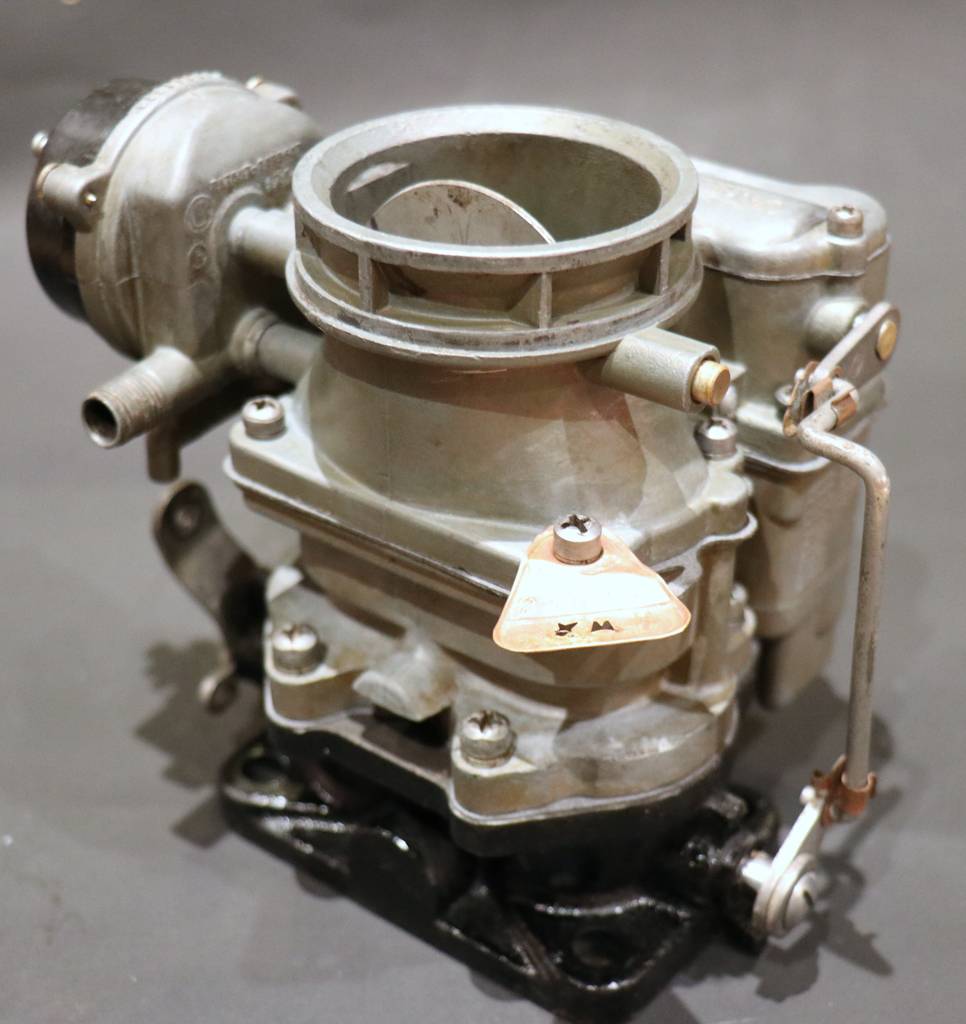 (88.89 KB) (88.89 KB)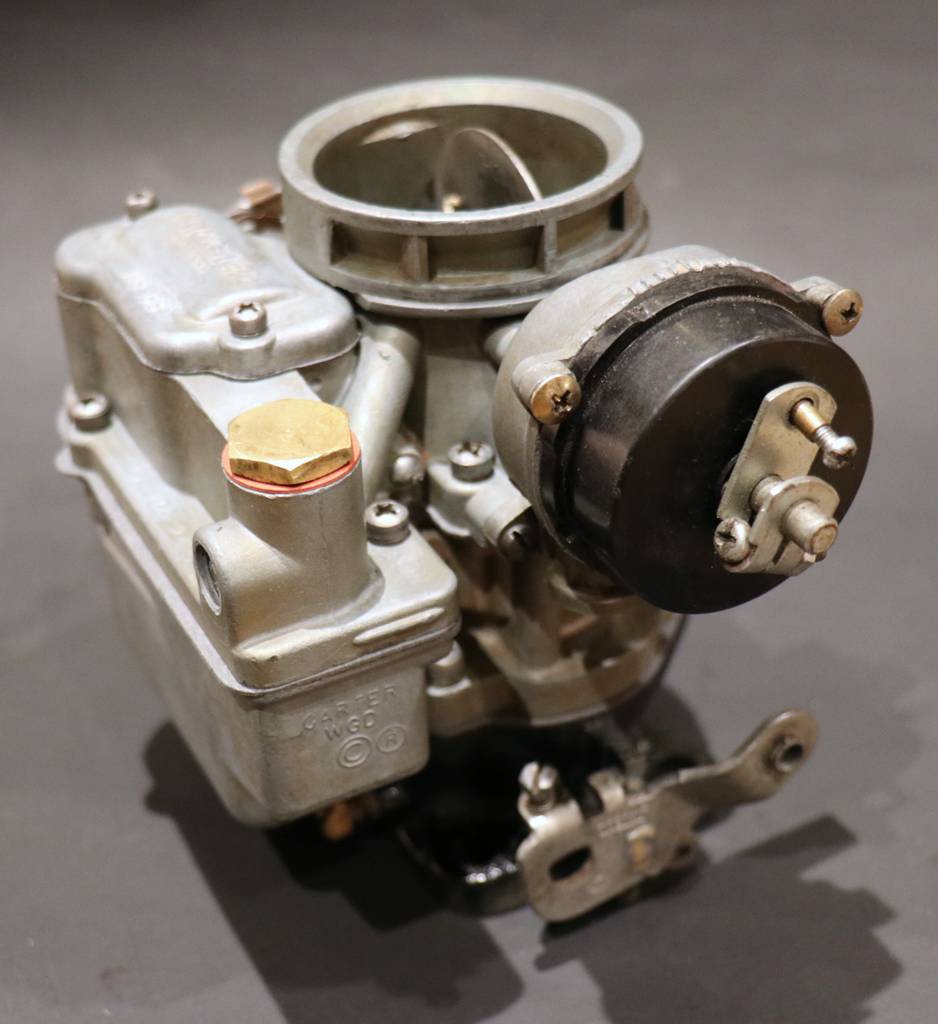
Posted on: 2020/12/9 0:36
|
|||
|
||||
|
Re: KPack's 1954 Panama
|
||||
|---|---|---|---|---|
|
Home away from home
|
The carburetor looks great but you should put the automatic choke back in place and finding one should not be difficult at all. It's been years since I worked on one of these but as I recall there is a slight vacuum in the choke control chamber and it's not clear how well it would work with something other than an actual automatic choke there. However, it should be okay as long as there is a good gasket under the housing and it seals well.
Posted on: 2020/12/9 2:43
|
|||
|
||||
|
Re: KPack's 1954 Panama
|
||||
|---|---|---|---|---|
|
Home away from home

|
Kevin, a few items about the carburetor:
1. The means to adjust the float level is quite different when installing a 'Daytona' type fuel inlet valve. With this valve the float level is adjusted by adjusting the number of gaskets between the housing casting and the female portion of the valve. With the tapered valve a tab on the float is bent to achieve the correct float level. When using a 'Daytona' valve the aforementioned tab should press pretty much in the center of the valve . . . that's important! 2. I use a twist drill as a float level gauge. At times I've also measured the gasket thickness and correct the recommended dimension so I can check the level with the gasket in place. 3. Air flow through the automatic choke. There is a drilled passage in the housing that 'tunes' the vacuum applied the vacuum choke un-loader piston, and ultimately limits the total flow. I think the labyrinth seal geometry on the piston actually sets the total flow. If your choke set-up does not have the piston installed you will probably be on the high side of air flow and be limited by the orifice. If the choke does not have the unloader piston I think I would put a cap on the choke stove fitting. If the unloader piston is still installed it doesn't matter if the stove tubing is installed, or not, but the unloader function will not work if the fitting is capped. Surely the temperature will change whether the stove is hooked-up or not, but not the total amount of air entering the choke housing. I think the thread where the choke stove tubing attaches is a simple ? inch tubing compression fitting. Your local hardware store should have all of the parts you need, including a cap. If it was mine, I would put a cap on the fitting when the manual choke hardware is installed and manage the unloading myself. I have an air horn/choke housing for a WDO that appears to have over-temperature damage, in that the two screws (yours has three ?) that hold the adjustment cover on are no longer parallel . . . they are bent outward. Unless quite warm carburetor castings are not known for their ductility, hence the conclusion that high temperature was part of the scenario. War story: When my dad was teaching me how to start his '48 Chevy with a manual choke and throttle, his advice was; Choke full closed, throttle half, key on, depress started pedal, when engine fires push choke in to 'one finger' unless it was really cold and then it would be 'two fingers', finally adjust throttle to keep engine running, but all of that was done in less than a second, so the engine didn't over rev. I still use that process on my Brand X, which is by far the best starting of my 'old cars'. The Zenith carburetor on Brand X is an up-draft, so there is no accelerator pump. I've convinced myself if the choke and throttle is set correctly where is no need to 'pump the gas' more than what is necessity to set the automatic choke. I'm done. dp
Posted on: 2020/12/9 13:59
|
|||
|
||||
|
Re: KPack's 1954 Panama
|
||||
|---|---|---|---|---|
|
Home away from home
|
In addition to all the great info mentioned, check and repair all vacuum leaks for hesitation . Check vac advance with a vacuum pump. Accl pump check ball seat must be clean/unpitted. Some may tap the ball gently on the seat during rebuild. There is a sensitive relationship between the depth of the plunger, the volume and size of the nozzle/nozzles, the cam stroke and even the float level. If the plunger is too high in the bore there will be a delay in spray causing dead spot. Recommend to check all this on the bench. If not removing all plugs and cleaning all passages at least remove jets and clean ,send wire through and spray through all with carb clean and tiny tube on spray can nozzle. Acc pump spray should come on right away. I used to adj cam and nozzle size till I saw black smoke out tailpipe on load with quick throttle movement then adj down from there. There is more but since carb is on and she runs it is all moot.
Posted on: 2020/12/9 19:26
|
|||
|
||||
|
Re: KPack's 1954 Panama
|
||||
|---|---|---|---|---|
|
Home away from home
|
Don - If I can find an automatic choke I will definitely put it in. The problem will be finding one. If there is any vacuum to the choke housing, it certainly won't be doing anything for me at this point since there it is definitely not sealed. The manual choke works for now, but I'd love to have it be original and just work by itself.
David - I replaced the Daytona needle and seat with the more original type supplied in the rebuild kit. I followed their guide for float level measurements. Good idea using a drill bit! Should've thought of that. I did make sure to bend the arm of the float without putting any pressure on the joint between float and arm. The little piston you are talking about was still in my choke housing. I cleaned it up and put it back in. I believe there is supposed to be an arm from the choke shaft reaching down to it, but I'm pretty sure I don't have that. The rebuild kit (and Motors manual) didn't go into detail on the choke, so I'm not totally sure what the original setup looks like inside. Also not sure exactly how it all works. I understand the functions of the carb a little better now, but the automatic choke is still a mystery. -Kevin
Posted on: 2020/12/9 19:28
|
|||
|
||||


.jpg")


