|
Re: The Duchess Project: 1940 Super 8 Convertible Sedan
|
||||
|---|---|---|---|---|
|
Home away from home

|
Once again, this is very helpful, Howard.
The light comes on, so that contact works. My overdrive quit while on the "Chicken Run" Tour (not like in Rebel without a Cause, but a fundraiser for a church that serves a chicken dinner and awards prizes for cars) after we had to stay at 25 MPH through a small town for a long distance with no opportunity to stop, being in caravan. I don't like to pull the car out of overdrive moving that fast, so the red light was on for a long time. Possibly cooked the pull in/out contacts, perhaps? If it doesn't work after I clean them, I can send it for a $179 rebuild at this place. https://www.vintageautogarage.com/Borg-Warner-12-Volt-6-Volt-Overdrive-Solenoid-p/odsrb.htm
Posted on: 2018/10/18 18:51
|
|||
|
||||
|
Re: The Duchess Project: 1940 Super 8 Convertible Sedan
|
||||
|---|---|---|---|---|
|
Home away from home
|
That was my first thought, but with the flackmaster's provisioning, I replaced the relay and it made no difference, hence under the car we go.
The actual diagnostics require grounding the governor, which I did, to hear clicks. Which I did, but only at the relay, not the solenoid. Then, if there was no click at the solenoid, you test #4 post on the relay for power (with key on and OD cable in) and if there is less than 5.5V, the relay is bad. When doing the ship test, I have no power at #4 on the relay. The diagnostics said Replace the relay. I did that, but that obviously didn't solve the problem. But now, Driving, the governor works, the red light comes on and that's it. Free-wheeling.
Posted on: 2018/10/18 19:47
|
|||
|
||||
|
Re: The Duchess Project: 1940 Super 8 Convertible Sedan
|
||||
|---|---|---|---|---|
|
Forum Ambassador

|
Grounding the governor and with the red light coming on, the relay is working and should be providing 6v at terminal 4 and less -- maybe 5v or so -- at terminal 3 because that voltage comes from the first relay contacts -- same as 4 -- then thru the second relay coil before reaching the solenoid 3.
The red light gets its power from the same place that feeds solenoid 4 terminal. If you have those voltages and the light it is the solenoid but if you do not have the voltage at terminal 4 look and see if there are inline connectors that in Clipper body cars is located on the frame somewhere near where the drivers foot would rest. Imagine the conventional bodies are similar. If you have them it could be a connector didn't appreciate the constant current and burned.
Posted on: 2018/10/18 20:01
|
|||
|
Howard
|
||||
|
||||
|
Re: The Duchess Project: 1940 Super 8 Convertible Sedan
|
||||
|---|---|---|---|---|
|
Home away from home
|
Joe. I'm curious as to what gear you were in. When I'm in town going slow, I usually keep it in second, and let the overdrive engage.
Posted on: 2018/10/19 8:27
|
|||
|
West Peterson
1930 Packard Speedster Eight Runabout (boattail) 1940 Packard 1808 w/Factory Air 1947 Chrysler Town and Country sedan 1970 Camaro RS https://packardinfo.com/xoops/html/modules/newbb/viewtopic.php?topic_id=4307&forum=10 http://aaca.org/ |
||||
|
||||
|
Re: The Duchess Project: 1940 Super 8 Convertible Sedan
|
||||
|---|---|---|---|---|
|
Home away from home

|
Joe, if it turns out that you need the solenoid, reproductions for some of them are available here but check the specifics to be sure yours is the same.
Posted on: 2018/10/19 12:07
|
|||
|
||||
|
Re: The Duchess Project: 1940 Super 8 Convertible Sedan
|
||||
|---|---|---|---|---|
|
Home away from home
|
On my original diagnosis that led me to believe the Relay needed replacing, I later discovered the meter I used was faulty.
Fortunately I had another larger, more sophisticated multimeter with a beeper that went off when I had continuity. Sometimes it's awkward to be touching wires and trying to look at the meter needle, too, so this was an advantage over the dinky one I was using. I switched off the battery. 1. I checked for continuity of the Black #50 wire from the starter to Teminal #1 of the Relay. 2. I checked Green Wire #55 between Relay #1 and Relay#2, with the ignition switch turned to ON (battery OFF still) I cut a jumper wire several feet long to reach from the relay to the solenoid. One end has a standard fork connector, the other the female half of a spade connector with rounded sides I could shove a needle of the multimeter test wire into. 3. I checked Yellow wire #51 between Relay #3 to Solenoid #3 (The number 3 is embossed in the solenoid cover). 4. Wire #54 Brown from Relay #4 to Solenoid #4. 5. Wire #53 Brown from Relay #4 to Solenoid #7. 6. Wire #59 Black with Red Thread from Relay #5 to Rear Terminal of Lockout Switch (that sits on top of the overdrive cable under the dash to the right of the steering wheel) 7. I pushed the Overdrive cable in and checked for continuity through the switch. 8. With the cable pushed in, I checked from Relay #5 to the Right terminal of the Kickdown switch. 9. Then from Relay #5 to the Left Terminal of the Kickdown switch. (To figure out which was "right" and "left," my daughter held the pedal all the way down (which she has plenty of practice doing) to open the circuit at the kickdown switch. Terminal With Continutity is "right" and with No Continuity is "left." 10. Then using the jumper wire again, from the Left Terminal of the Kickdown (gas pedal released) to the Governor terminal. 11. Then from the Governor to the ground. 12. Finally wire #56 Green from Relay #6 to Solenoid #6. All the wires checked out, so the next step is to pull the solenoid. The problem with my solenoid is that the spacer between it and the overdrive needs to have a fair amount of sealant, or it leaks, so I hate pulling it because it will have to be sealed up again which is tricky to get right. To avoid that, I decided to disconnect all 4 solenoid wires and the 2 nuts retaining the cap to see if I could clean the contacts. What I found inside was an electrical device soaked in oil. The O-ring or seal on the shaft must be shot because oil coming into the electrical part of the solenoid from the mechanical part of the overdrive. I sprayed a bunch of electrical cleaner on it and ran a contact file over the 3 sets of contacts. On the test run, it actually clicked in and immediately clicked out. So It has to come out and be replaced. PortlandDon: That referral seems to be only for a 2-wire solenoid. Mine is marked Delco and has 4 connections. I've asked the flackmaster to send one if he has one. West: Wish I'd thought of that at the time, instead of figuring the 25 MPH (caravan was moving at 20) would end. As it turns out, soaking the solenoid with oil from a bad seal did it in. Attach file:  (205.79 KB) (205.79 KB)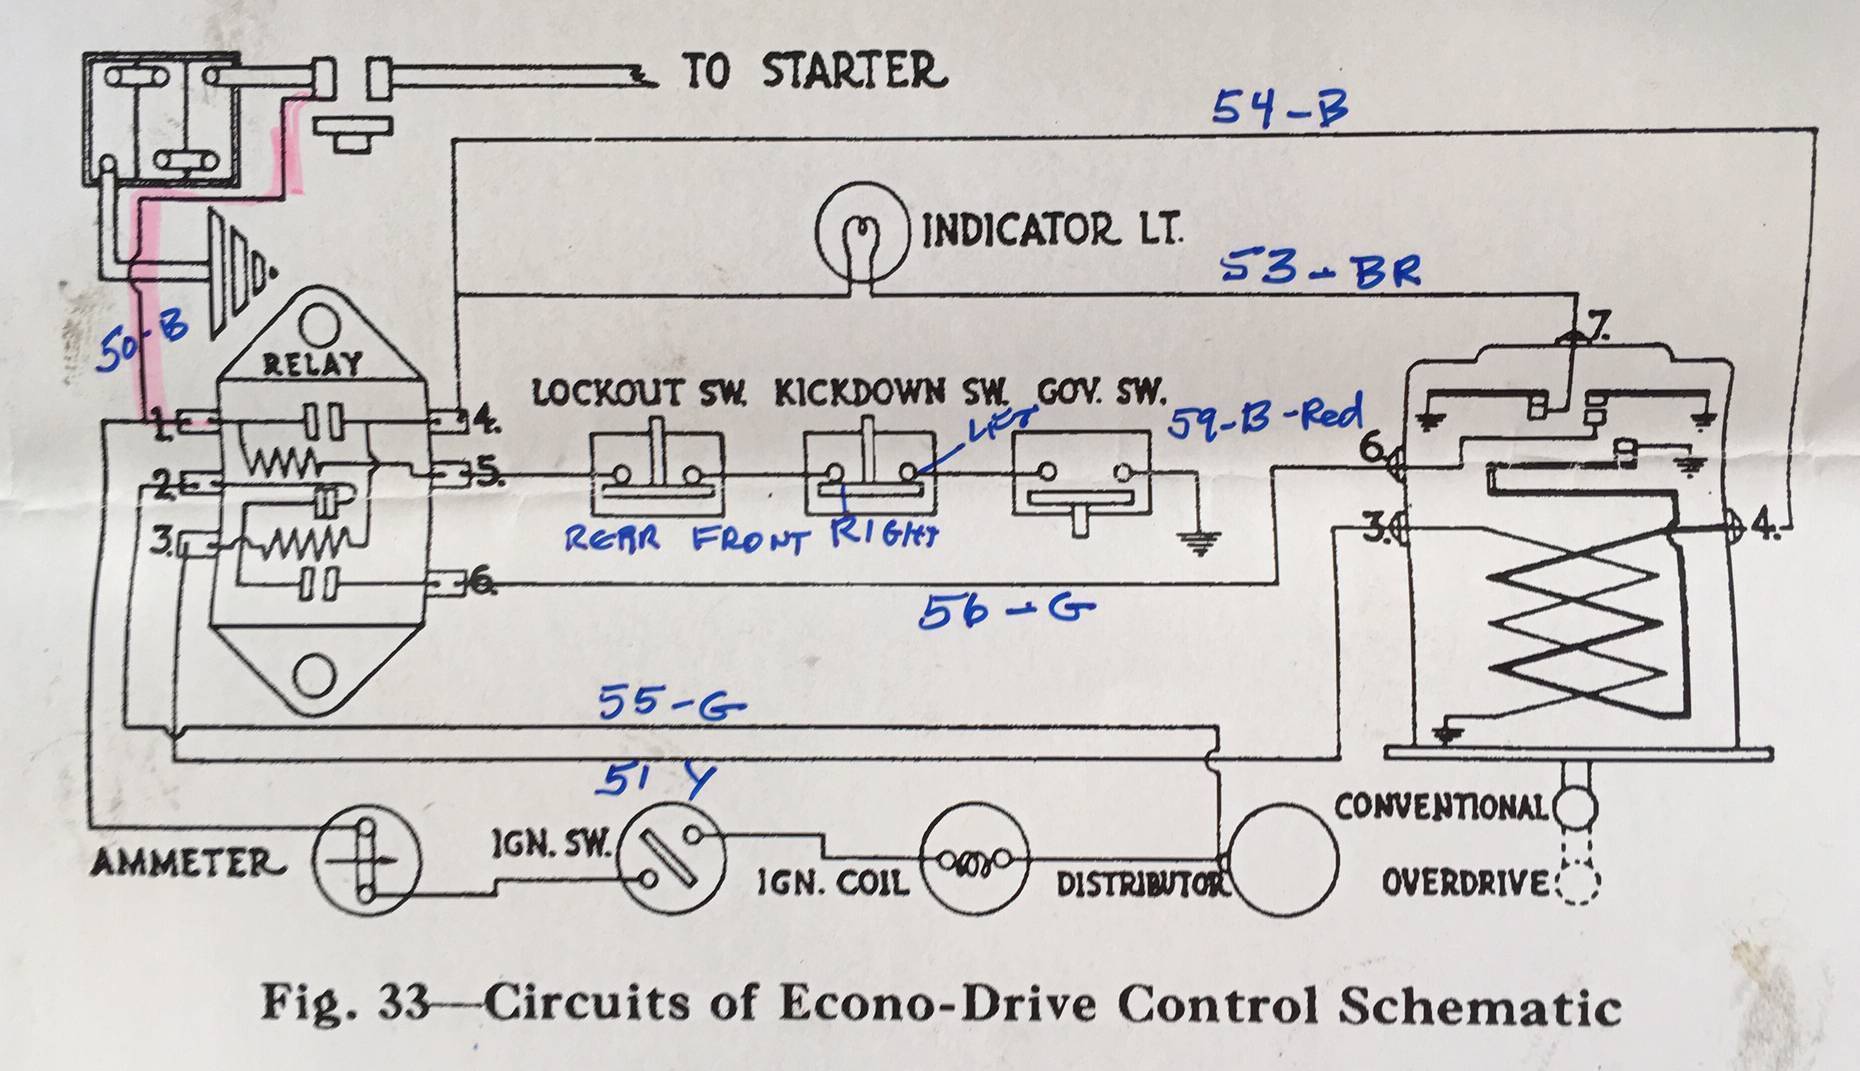
Posted on: 2018/10/22 13:38
|
|||
|
||||
|
Re: The Duchess Project: 1940 Super 8 Convertible Sedan
|
||||
|---|---|---|---|---|
|
Home away from home
|
The link was originated by someone else - I simply fixed it so that it was clickable. However, it was for new R11 solenoids and yours is R9 which is different as you pointed out.
By the way, it was really nice meeting you recently and seeing The Duchess close up!
Posted on: 2018/10/22 13:44
|
|||
|
||||
|
Re: The Duchess Project: 1940 Super 8 Convertible Sedan
|
||||
|---|---|---|---|---|
|
Home away from home
|
Make sure you do not rotate the driveshaft. If you do the pawl inside the overdrive may not fall into place. I am sure someone will be able to attach a photo and use of proper description of what I am talking about. If you have rotated the drive shaft, you will need to push in with your little finger or a rod, the pawl making sure it goes into the indentation on the gear, and then pull back out so you can attach the solenoid again properly. If the pawl is not in proper alignment will cause war page of the adapter plate you mentioned previously as the solenoid tries to push into engagement. Even without touching anything, you might want to check pawl engagement anyway.
On my super have done this a number of times, but not recently, and am too lazy to get the manual for proper name of parts. Make sure you do not overfill your overdrive or transmission.
Posted on: 2018/10/22 17:50
|
|||
|
||||
|
Re: The Duchess Project: 1940 Super 8 Convertible Sedan
|
||||
|---|---|---|---|---|
|
Home away from home
|
UNDER SEAT HEATER GRILLE PHOTO NEEDED.
If anyone has a 1940 under-the-seat heater, I would like a photo of the grille for it. I was told it is cream-colored plastic, but I don't know what it actually looks like. I might be able to find something close in metal and coat it or have one made in plastic. I am in the middle of redoing my regular under-dash heater core, motor and switch. I bought an under the seat heater from John Ulrich, so I'm trying to find instructions for installing it, too. I found the preliminary instructions for positioning the heater in the floor in 5-passenger cars in the Service letters, but not the instructions that come with a new heater. (I wonder why) When I get some of the parts back from Precision Power, Auto Battery Electric and Mac's Radiator, I will post pictures of these parts and the heater harness from Harnesses Unlimited. I have to mention that my car is finally running so reliably, no leaks after replacing oil filter canister, clock keeping perfect time, etc. Can hardly keep my hands off it.
Posted on: 2019/2/19 10:34
|
|||
|
||||


.jpg")


