
|
Re: New Complete Wire Harness
|
||||
|---|---|---|---|---|
|
Just can't stay away

|
Well it looks like there are two options: have deep pockets or dirty hands. The cheapest harness I could find was $800, and that was not an exact match to my 49. The other factor was my car is RHD, a harness from the US won't fit without modification anyway. Also their prices are even higher. Ad to that the unfavourable exchange rate, and freight charges. The wire I bought (9 plain, 10m ea; 11 trace colors 30m ea) cost me less than $200, I got some of that back by trading half with a fellow enthusiast. Box of crimp terminals $15, which I had anyway. A few meters of heat shrink and split tube $20. Tools: crimping pliers and soldering iron, which I had anyway. I also made a few changes such as wiring in an electric fuel pump, if I had a pre-made harness it would not have this feature. Sure it takes time, but not as much as an engine rebuild, or de-rusting. The other advantage is now I know how the car is wired, I can fix any future electrical problem.
Gary
Posted on: 2021/11/15 6:53
|
|||
|
||||
|
Re: New Complete Wire Harness
|
||||
|---|---|---|---|---|
|
Home away from home

|
Is there a particular reason for you stating I should stick with the wire sizes Packard used? After all they were just trying to keep costs down. The three articles I have read regarding the 6 Volt automotive systems all say the same thing. the more strands of the wire, the less resistance and faster flow of current the better for all components, especially the starting function. Basically the current travels faster because of less resistance.
Dave O
Posted on: 2021/11/15 22:14
|
|||
|
||||
|
Re: New Complete Wire Harness
|
||||
|---|---|---|---|---|
|
Forum Ambassador

|
One reason is not all the circuits will need the amount of current 12 ga wire or even 14 can carry. Things like headlights and the main feed to the ammeter might benefit from a size larger although I think adding relays with a single larger feed and eliminating the several feet of smaller wire going thru the old switches would do just as well in providing more headlight brightness. Relays also remove the load from old and possibly worn switches. Other small filament bulbs, gauges, start command etc will typically require a comparatively small amount of current.
You are obviously free to do as you choose but one thing to keep in mind is some of the holes, spaces and clamps the loom goes thru are a bit restricted. If you make the loom out of consistently heavier wire -- even though modern wire might have a thinner insulation -- and it winds up much thicker and harder to bend than a stock loom you may have some issues both in routing and passing it thru the provided openings. Here is a headlight relay circuit that works nicely. This was built for a 47 so those are the existing loom colors referenced. Relay coils connect to the original terminal strip and are operated by the headlight and dimmer switch while the 10ga wire and relay contacts carry the heavy load of the headlights. Attach file:  HeadLight Relay1.jpg (88.38 KB) HeadLight Relay1.jpg (88.38 KB)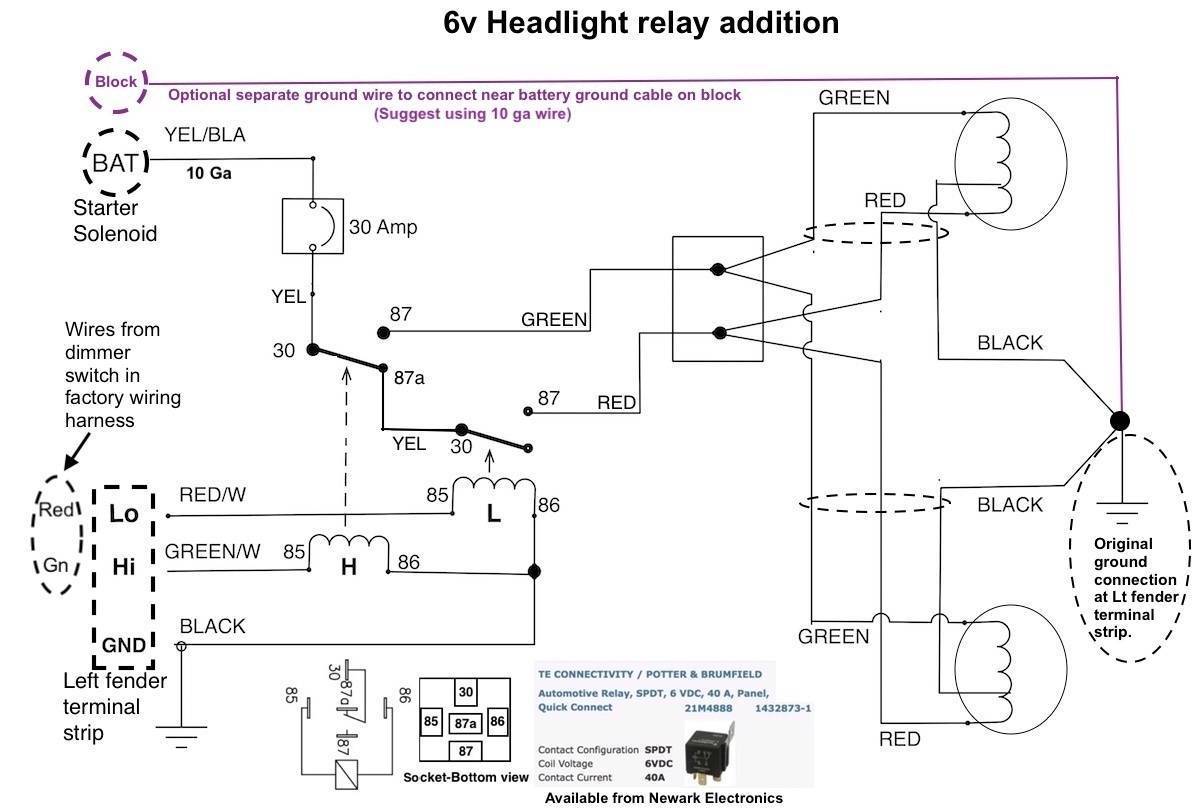 relay.jpg (93.32 KB) relay.jpg (93.32 KB)
Posted on: 2021/11/15 22:48
|
|||
|
Howard
|
||||
|
||||
|
Re: New Complete Wire Harness
|
||||
|---|---|---|---|---|
|
Just can't stay away
|
Hello again everyone. Apologies for the physics lecture. Resistance depends on 3 things, resistivity of the material (hence the popularity of copper), length, and inversely proportional to area. I rebuilt my 288, so it is new and tight, starter motor rebuilt too, it would not crank on a single 6V battery using jumper leads. (It would using 12V). This is due to the length of the leads (9 feet) and the contact resistance of the alligator clips. I got some 1/2 inch cable, and eye terminals which I soldered on, with the battery in its proper place the lead to the starter and earth to the block were about 2 feet long. It cranks and starts fine.
The wire from the starter button (my car is not throttle start) to the starter solenoid does not have to be thick, it only activates the solenoid, it does not carry starting current. Electrical power is volts x amps. Compared to a 12V system for the same power you will have twice the current. Resistance generates heat, more current means more heat for the same wire. diameter. So any high current device (to the amp gauge, the headlights, ciggy lighter) you can go up in wire size. Everything else can be normal diameter. Howard's suggestion of a headlight relay is a good idea, because the headlight switch to the relay only needs low current. Here is another suggestion. The factory ran the wiring inside the A pillar, over the doors and down through the C pillar. It is impossible to pull through a new section of wire. I had to replace what was left of my roof lining anyway, so I replaced the wiring using 5 core trailer wire. The back of the car is the same as a trailer anyway, except for the fuel sender unit wire. Now if you have to do this, but don't want to disturb your roof lining, go to the local trailer place and you should be able to get 5 or 7 core wire, and they should have flat section. (The wires side by side, not in a round bundle.) You can then run this under the carpet, and it will not be noticeable. Gary
Posted on: 2021/11/16 7:09
|
|||
|
||||
|
Re: New Complete Wire Harness
|
||||
|---|---|---|---|---|
|
Home away from home

|
FYI:
Current flow in wires is a complicated issue. First AC with a frequency factor and DC have different current flow characteristics. DC current flow is mainly through the entire cross section of the wire. AC current has skin flow characteristics that shows a frequency affect. The higher the frequency the thinner the layer is for current flow. For household 50/60 hz the depth is between 1/4 and 3/8 inch. The higher the frequency the thinner the layer.
Posted on: 2021/11/16 11:31
|
|||
|
||||
|
Re: New Complete Wire Harness
|
||||
|---|---|---|---|---|
|
Webmaster

|
I've also noticed Packard was not always the best in regards to protecting the wire looms from chaffing when passing through various body/sheet metal areas.
The area up the A-Pillar and transition across the roof channel is a good example. Although the wiring there is not subject to a lot of movement, the bundle still contacts and makes a significant bend over a sharp metal edge. I could see a wear mark on my original harness where it had started to slice through the tape wrap and insulation. So, in the spirit of "an ounce of prevention is worth a pound of cure", for any of these worrisome areas, I either put used a rubber grommet, some rubber U channel edge protector or use a section of modern split-loom wire conduit to protect those metal-to-wire interfaces to ward off any chaffing. I can see where chaffing in a hidden, hard-to-reach area like that A-Pillar to roof transition, could be a frustrating electrical gremlin to trace down and fix. And also its proximity to flammable material is just not something I want to leave to chance. Me being over cautious, perhaps, but at least I know I'll never have to go back in there and deal with it.
Posted on: 2021/11/16 14:19
|
|||
|
-BigKev
1954 Packard Clipper Deluxe Touring Sedan -> Registry | Project Blog 1937 Packard 115-C Convertible Coupe -> Registry | Project Blog |
||||
|
||||
|
Re: New Complete Wire Harness
|
||||
|---|---|---|---|---|
|
Home away from home
|
Howard, this relay is great. What I nice quality work. Did you say you had this made?.
Posted on: 2021/11/18 8:52
|
|||
|
||||
|
Re: New Complete Wire Harness
|
||||
|---|---|---|---|---|
|
Forum Ambassador
|
Thanks, but not commercially made. It is something I threw together a few years ago for my 47. Made it as a module so it could be mounted near the fender terminal strip for easy connections and still be fairly unobtrusive. Also wanted it easily removable if the next owner preferred going back to stock.
Attach file: relay.jpg (123.10 KB)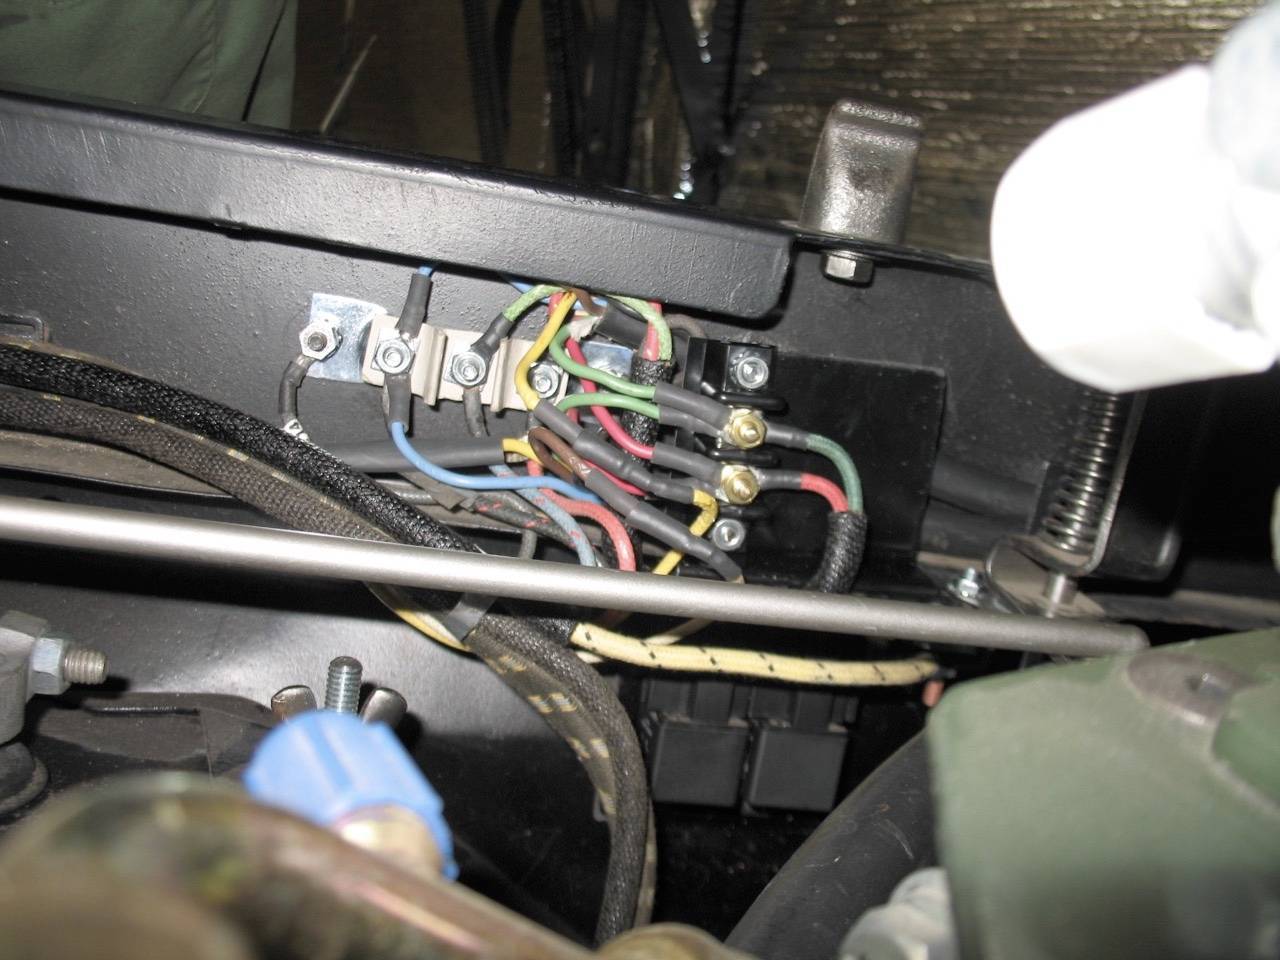
Posted on: 2021/11/18 9:57
|
|||
|
Howard
|
||||
|
||||


.jpg")


