|
Re: Ken's 1937 115C Touring Sedan
|
||||
|---|---|---|---|---|
|
Home away from home
|
As usual, the weekend wasn't as productive as I wanted, but it was productive. I got the transmission rebuilt, reassembled, and repainted.
When I was taking it apart, I initially had a hard time driving the counter shaft out. Solution: I bought a brass punch so I could really get after it, and with one firm tap of the hammer, she came right out. Other tricks- when putting new springs in the synchromesh, I didn't have a ring compressor or a big rubber band, so I found a helper for 30 seconds to hold 4 springs, I held two more, and pushed the two pieces together. During reassembly, the service manual calls for a Packard special tool, a tapered dummy counter shaft. I whipped down to the local Packard dealership, but they were closed for the weekend, so I had to improvise. I found a 1/2 drive deep well socket that was the same OD as my counter shaft, and used that in combination with some extensions and voila! With my tools (Craftsmen) the 9/16" was the best socket. I put it in from the front of the case, tipped the transmission up on end, and slid the tool down just far enough to install the rear needle bearings. The taper on the socket made this much much easier, as did the shaft being vertical instead of horizontal. Also, a tab of Vasoline held the bearings in place as I monkeyed around. I then used the actual counter shaft to follow my tool. I then flipped the case, making sure not to drop the counter shaft on the floor, and put a 1/2 drive normal depth 9/16" socket narrow end up in place of my improvised dummy shaft. Put in the other needle bearings, and I was done. Took a few tries to get the process smoothed out, but pretty easy once it was all done. When I'm out of the navy and have a more permanent shop, I intend to try and find some used machine tools. If I would've had a lathe, I could have made my own dummy counter shaft today. So it goes. Also sprayed some Packard green today! I bought two spray cans from Bill Hirsch. It looked a LOT different than what was on the engine. I'll post a picture in the next few days. Attach file:  (93.56 KB) (93.56 KB)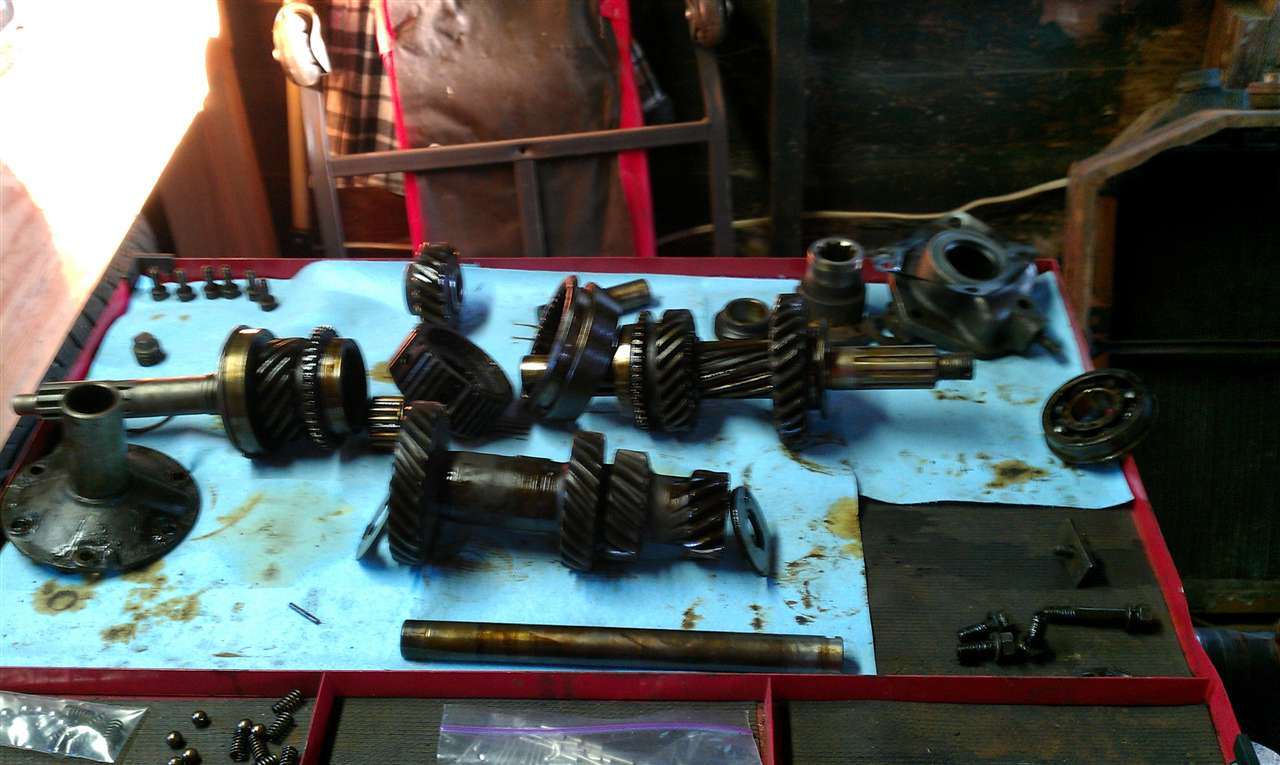 (91.49 KB) (91.49 KB) (128.91 KB) (128.91 KB)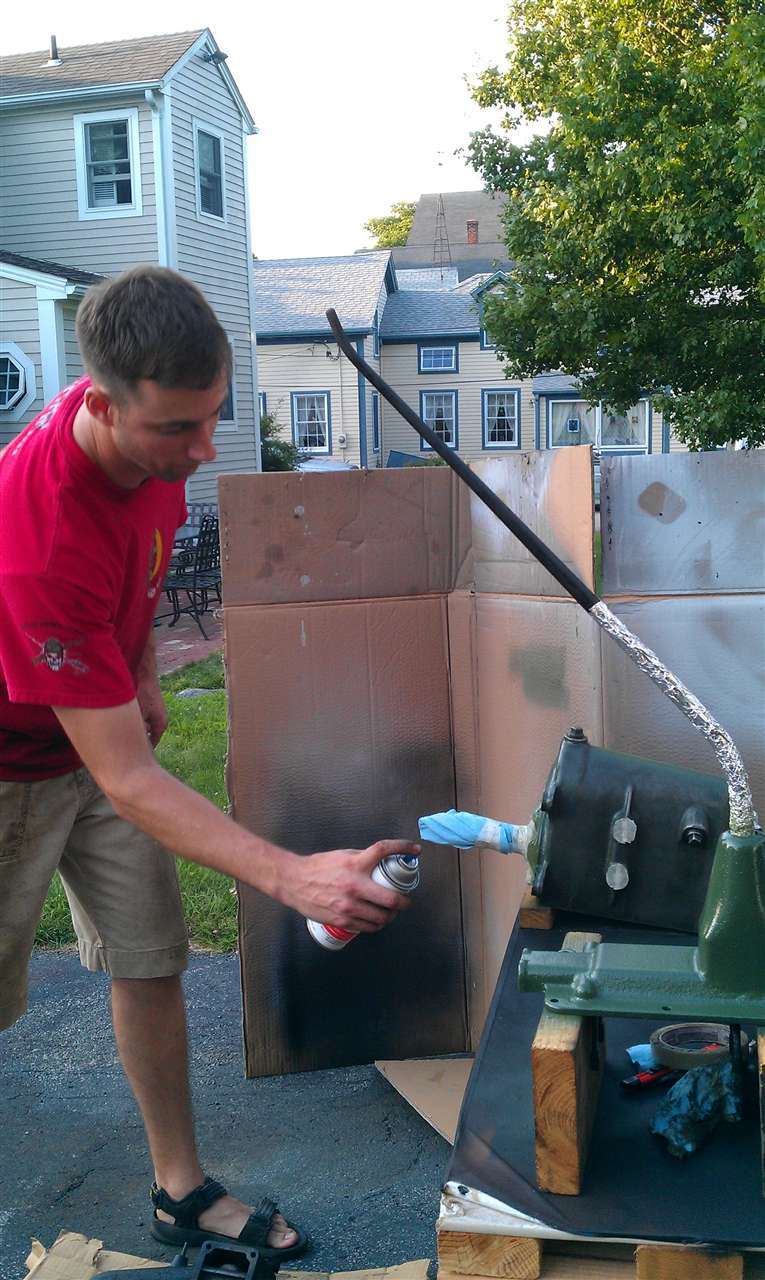 (90.04 KB) (90.04 KB)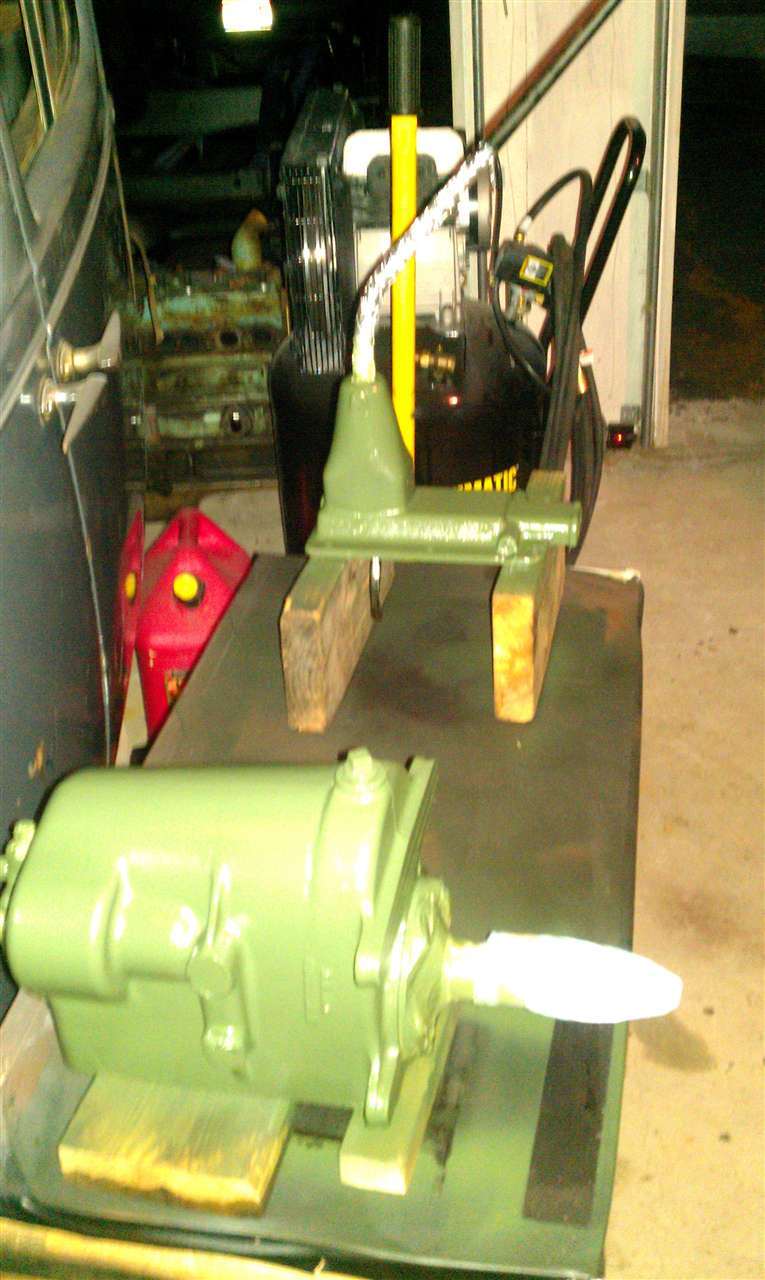
Posted on: 2011/7/17 21:23
|
|||
|
1937 120 1092 - Original survivor for driving and continued preservation.
https://packardinfo.com/xoops/html/modules/newbb/viewtopic.php?topic_id=16514&forum=10 1937 115 1082 - Total basket case, partial restoration, sold Hershey 2015 https://packardinfo.com/xoops/html/modules/newbb/viewtopic.php?start=0&topic_id=6550&order=ASC&status=&mode=0 |
||||
|
||||
|
Re: Hot spot gasket on a '37
|
||||
|---|---|---|---|---|
|
Home away from home
|
Bump... any thoughts on stainless steel bolts and attaching the manifold to the exhaust pipe?
Flackmaster, don't worry too much about the harness- no fork in hand here! Still interested when it comes, but I'm in full crisis mode to get the frame done and car back enough together to drive onto a trailer and towed cross-country in 38 days. My plan for that is to just wire up the starter and coil temporarily to get it on the trailer and off again.
Posted on: 2011/7/12 20:10
|
|||
|
1937 120 1092 - Original survivor for driving and continued preservation.
https://packardinfo.com/xoops/html/modules/newbb/viewtopic.php?topic_id=16514&forum=10 1937 115 1082 - Total basket case, partial restoration, sold Hershey 2015 https://packardinfo.com/xoops/html/modules/newbb/viewtopic.php?start=0&topic_id=6550&order=ASC&status=&mode=0 |
||||
|
||||
|
Re: Double Flare Tools - any experience?
|
||||
|---|---|---|---|---|
|
Home away from home
|
The steel was sourced at a local parts store for $22 for a 25 foot roll. I originally ordered Cu-Ni, it was $47 but turns out it was also copper colored! The same store sells Performance tool brand tools- I used their tubing bender, tubing cutter, and double flare tool kit. Satisfied with all three.
Not sure why, but the 25 foot roll of steel line was dramatically easier to work with than the pre-flared sections. I had one line to do that was about nine feet long, and I didn't want a union, so I went with a roll. If you have an extra long line like the master cylinder to rear junction. My most beautiful wife actually helped me out with that one by providing an extra set of hands during the bending process.
Posted on: 2011/7/12 20:05
|
|||
|
1937 120 1092 - Original survivor for driving and continued preservation.
https://packardinfo.com/xoops/html/modules/newbb/viewtopic.php?topic_id=16514&forum=10 1937 115 1082 - Total basket case, partial restoration, sold Hershey 2015 https://packardinfo.com/xoops/html/modules/newbb/viewtopic.php?start=0&topic_id=6550&order=ASC&status=&mode=0 |
||||
|
||||
|
Re: Ken's 1937 115C Touring Sedan
|
||||
|---|---|---|---|---|
|
Home away from home
|
Hank, thanks for the thoughts. What brand of rust converter primer have you been using? I painted the frame with Rustoleum Stops Rust protective enamel in semi-gloss black. On sandblasted parts, I used the Rustoleum clean metal primer, also in the Stops Rust line, which comes out white. For parts I prepped at home, I typically use the Rustoleum rusty metal primer, which comes out brownish-red (like on my pedals) and bonds to oxidized metal.
I like the rustoleum products, because I can buy the same color in spray cans or in regular cans for application with a sprayer. My long term thought was that this will allow me to touch up frame scratches and the like with just a rattle can, plus it simplifies logistics when I am painting smaller parts.
Posted on: 2011/7/12 18:04
|
|||
|
1937 120 1092 - Original survivor for driving and continued preservation.
https://packardinfo.com/xoops/html/modules/newbb/viewtopic.php?topic_id=16514&forum=10 1937 115 1082 - Total basket case, partial restoration, sold Hershey 2015 https://packardinfo.com/xoops/html/modules/newbb/viewtopic.php?start=0&topic_id=6550&order=ASC&status=&mode=0 |
||||
|
||||
|
Re: Double Flare Tools - any experience?
|
||||
|---|---|---|---|---|
|
Home away from home
|
I bought a $25 Performance tool version that looks very similar to your harbor freight model. I practiced several times on a piece of scrap tubing before I tried a double flair, and was able to make all twelve of my flairs without redoing any- although I did almost forget one of the nuts once!
Tips that I found worked best for me: - Ensure your tubing cutter cuts straight (the expensive tool is perhaps more important here) - Verify the inner and outer edge of the cut end are burr free and have a slight chamfer on the inside and outside. I used a 14 degree tapered die grinder bit in my cordless drill for the inner; that worked very well. - Putting the tubing bender in the vice prior to bending was a huge help! - My bender instructions stated to tighten the clamp further away from my work first. That seemed to help, and after I got everything hand tight, I tightened the clamps a bit more with pliers. - I used a little dab of Sil-Glyde to lube the tubing end. This is how mine turned out: EDIT: Also, my practice flares were conducted on a pre-flared piece from Napa that I cut the end off of, but my actual brake lines were on a coated steel line from a local auto parts store that I bought in a 25' roll. Not only was the roll a lot cheaper, I thought it was much easier to work with. Best of luck! Attach file: (96.90 KB)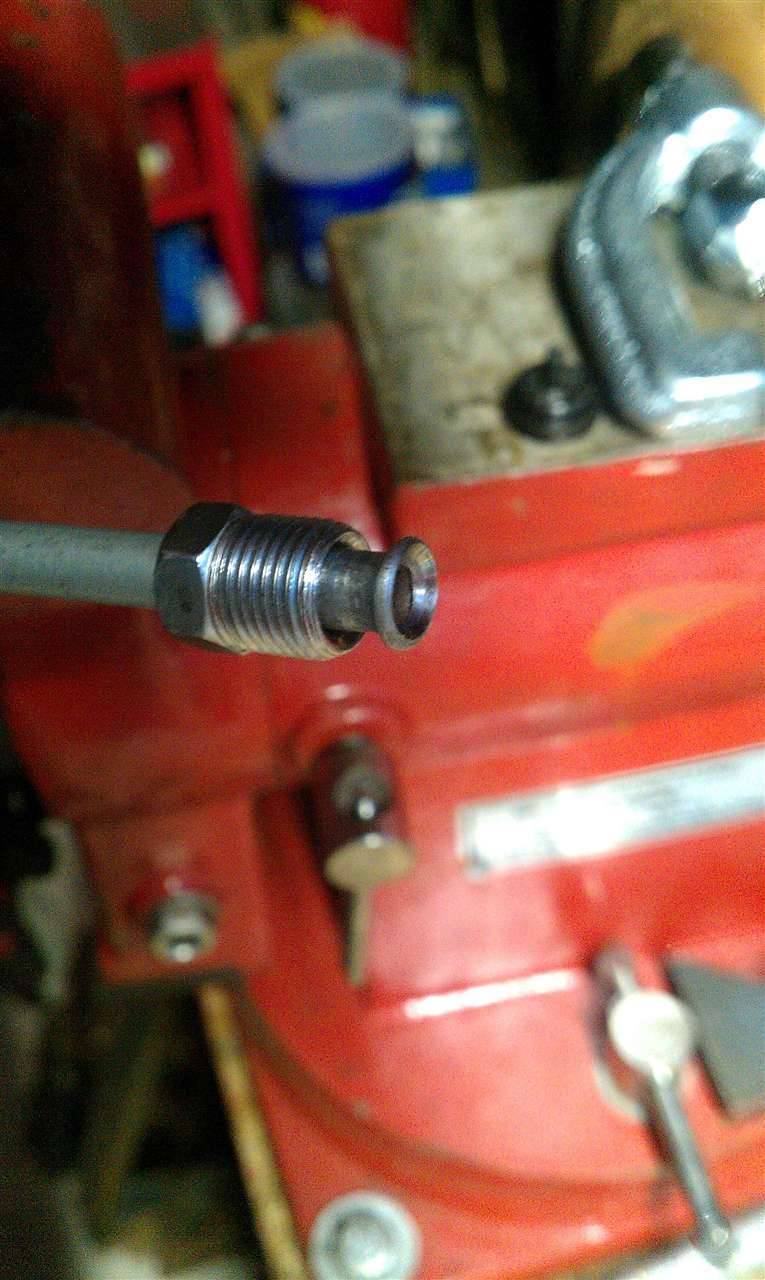
Posted on: 2011/7/12 17:55
|
|||
|
1937 120 1092 - Original survivor for driving and continued preservation.
https://packardinfo.com/xoops/html/modules/newbb/viewtopic.php?topic_id=16514&forum=10 1937 115 1082 - Total basket case, partial restoration, sold Hershey 2015 https://packardinfo.com/xoops/html/modules/newbb/viewtopic.php?start=0&topic_id=6550&order=ASC&status=&mode=0 |
||||
|
||||
|
Re: Ken's 1937 115C Touring Sedan
|
||||
|---|---|---|---|---|
|
Home away from home
|
JW, thanks again! I'm trying... first time I've ever tried to restore something.
I'm wondering if there is a difference between nomenclature and intuitive understanding on this axle. On my car, the only oil seal is in the axle tube, inboard of the outer axleshaft bearing, but clearly in the outboard portion of the axle tube. When I dropped the third member (containing the differential), I found an inner bearing for each axleshaft just outboard of the differential spider gears, and a mechanism for adjusting the ring gear laterally- the proper term for this adjustment escapes me. I saw no evidence of what I would term an inner oil seal, but I wonder if the engineers at Packard termed it an inner oil seal because it was inboard of the outer bearing? Does your reference have an exploded diagram? Incidentally, I found a rear axle oil seal at the local parts store for $14. Will put part numbers in the cross-reference next time I'm out in the shop... it was too bloody hot today to do anything except sit back with a beer and a book!
Posted on: 2011/7/11 20:11
|
|||
|
1937 120 1092 - Original survivor for driving and continued preservation.
https://packardinfo.com/xoops/html/modules/newbb/viewtopic.php?topic_id=16514&forum=10 1937 115 1082 - Total basket case, partial restoration, sold Hershey 2015 https://packardinfo.com/xoops/html/modules/newbb/viewtopic.php?start=0&topic_id=6550&order=ASC&status=&mode=0 |
||||
|
||||
|
Re: Ken's 1937 115C Touring Sedan
|
||||
|---|---|---|---|---|
|
Home away from home
|
One update. I realized that perhaps the shoes I put on the front drums have the thick spot for the parking brake. Will report my findings later.
EDIT: Based on research with Kanter, determined that the front brake shoes will not have a thick spot, as they are the same part number. Long term solution being researched.
Posted on: 2011/7/11 14:43
|
|||
|
1937 120 1092 - Original survivor for driving and continued preservation.
https://packardinfo.com/xoops/html/modules/newbb/viewtopic.php?topic_id=16514&forum=10 1937 115 1082 - Total basket case, partial restoration, sold Hershey 2015 https://packardinfo.com/xoops/html/modules/newbb/viewtopic.php?start=0&topic_id=6550&order=ASC&status=&mode=0 |
||||
|
||||
|
Re: Ken's 1937 115C Touring Sedan
|
||||
|---|---|---|---|---|
|
Home away from home
|
Had a pretty good weekend. I was going to rebuild the transmission, so I got it all cleaned up/out and dis-assembled, but I can't get the counter-shaft out. So, I switched gears. Put in the differential 3rd member gasket, cleaned and inspected the 3rd member, put in the pinion oil seal, and rebuilt the rear brakes. I was a little disappointed in the brake shoes. I got the master kit from Kanter, and the brakes are *almost* the same front and rear, so both sets of brake shoes were the same part number. On the rear shoes, there are two additional pieces of metal on the leading shoe. Those two pieces of metal were not on the Kanter shoes. So, I had to drill out seven spot welds, chisel the two shim pieces off, and bolt them to the new shoe. I also had the grind the coating off of the shoes so the adjustment ears at the bottom of the brakes would fit over the shoes.
I also have an insight from my last post. There is only an outside oil seal on the rear axle. The mark on the inner portion of the axle shaft is from the bearing race. Should've taken some pictures (like the Packard script on the edge of the ring gear), but I was busy working, not taking pictures. Not very good at that. EDIT: In order to remove the passenger side drum, I switched to 9/16-18 bolts that were 1.5" long- sufficient length to pass through the puller and fully engage the threads on the brake drum. Oh yes, and a BFH. I'm convinced that a heavy duty impact gun (like a 3/4" for pulling lug nuts on logging trucks) would be more efficient than a BFH, but until I get into the trucking buisness, a hammer it is. Also, my compressor returned to life. No clue why, but I have another 45 days for it to bite the big one and I can still get a replacement. C'est la vie.
Posted on: 2011/7/10 20:18
|
|||
|
1937 120 1092 - Original survivor for driving and continued preservation.
https://packardinfo.com/xoops/html/modules/newbb/viewtopic.php?topic_id=16514&forum=10 1937 115 1082 - Total basket case, partial restoration, sold Hershey 2015 https://packardinfo.com/xoops/html/modules/newbb/viewtopic.php?start=0&topic_id=6550&order=ASC&status=&mode=0 |
||||
|
||||
|
Re: Help with transmission dis-assembly!
|
||||
|---|---|---|---|---|
|
Home away from home
|
Also, I took a tip from a previous post, and looked at the service manual from 51-54 for hints. The 37-38 shop manual says to drive out the countershaft rearward, but the later manual says to drive it out from the rear. Neither direction works.
Posted on: 2011/7/9 19:59
|
|||
|
1937 120 1092 - Original survivor for driving and continued preservation.
https://packardinfo.com/xoops/html/modules/newbb/viewtopic.php?topic_id=16514&forum=10 1937 115 1082 - Total basket case, partial restoration, sold Hershey 2015 https://packardinfo.com/xoops/html/modules/newbb/viewtopic.php?start=0&topic_id=6550&order=ASC&status=&mode=0 |
||||
|
||||
|
Help with transmission dis-assembly!
|
||||
|---|---|---|---|---|
|
Home away from home
|
So, I'm trying to put the rebuild kit in my transmission, and I'm attempting to disassemble the transmission. I have the transmission in neutral, and have removed the universal joint flange, front and rear bearing caps, and the locking mechanism for the countershaft and reverse idler shaft. The next step in the procedure is to drive the counter shaft rearwards, but it will NOT budge. Any tips?
Oh, of course: the car is a 1937 115c. Thanks!
Posted on: 2011/7/9 15:17
|
|||
|
1937 120 1092 - Original survivor for driving and continued preservation.
https://packardinfo.com/xoops/html/modules/newbb/viewtopic.php?topic_id=16514&forum=10 1937 115 1082 - Total basket case, partial restoration, sold Hershey 2015 https://packardinfo.com/xoops/html/modules/newbb/viewtopic.php?start=0&topic_id=6550&order=ASC&status=&mode=0 |
||||
|
||||


