|
Re: Valve Cover Internal Fins
|
||||
|---|---|---|---|---|
|
Just can't stay away
|
I figured it out....the rear cover has a hole in the fin side to presumably drain condensed oil back into the engine...fin down.
Thanks for the help everyone.
Posted on: 2019/1/26 16:28
|
|||
|
||||
|
Valve Cover Internal Fins
|
||||
|---|---|---|---|---|
|
Just can't stay away
|
I'm resetting the valve clearances on my 288. I forgot to look at how I oriented the fins on the inside of the cover when I rebuilt the engine. Do they go up or down?
Posted on: 2019/1/26 13:28
|
|||
|
||||
|
Re: Mark's 1950 Super Eight
|
||||
|---|---|---|---|---|
|
Just can't stay away
|
September 1st. The Packard made it to the wedding of my oldest, Sam and his beautiful bride Chloe. I worked my tail off to get the car in shape for a cross town trip and everything worked as planned...here's the picture taken at the reception.
Attach file:  (29.83 KB) (29.83 KB)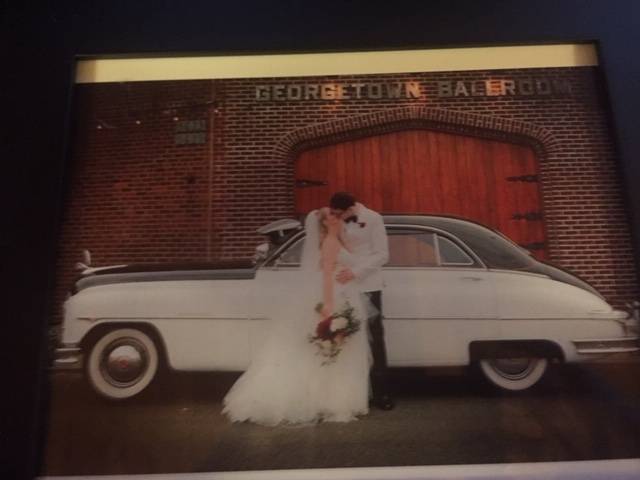
Posted on: 2018/12/26 14:06
|
|||
|
||||
|
Re: Mark's 1950 Super Eight
|
||||
|---|---|---|---|---|
|
Just can't stay away
|
Today I finished the rewiring of the 50. What a job, I did it without taking out the dash finding it very relaxing working on my back feet up in the air on the seat. I worked a little at a time when I got tired I quit. Part time it took me about 3 weeks to complete.
Lessons learned... Remove the heater distribution box from the heater and firewall. As others have said drop the heater controls. Remove the two hidden special nuts holding the switches to the front fascia. Disconnect the cigar lighter, the nameplate illumination light, and the Headlight indicator light from the switch panel. Now you can pull the switches back from the from the fascia. Remove the radio next. It is easier to work underneath when the radio is out. Remove the front fascia. To do this there are two flat head bolts over the ash tray and one over the hole that the radio fits into. Next remove the one Phillips bolt under the radio that holds the bottom of the dash to the face plate. Next remove the small Phillips screw that holds the bottom of the ash tray opening to the dash. The headlight on light is attached here. Lastly, notice that there are two very small Phillips screws at the top of the radio grille opening. These hold the face plate to the dash. There is a metal bar in the opening that the ash tray rocks on. You may have to work that out before the face plate will come out. Carefully work the face plate out of the opening. Now you have a way to get your arm into the space behind the instruments. Remove the nuts holding the harness to the instruments. Carefully disconnect the switch panel from the harness. At this point I cut out the harness severing it at the firewall as I was not going to reuse it. I worked out the harness through the opening I had created by removing the switch panel. I took the old harness indoors and cut it apart as I used the wires that were only behind the dash as patterns for the new wires. Using the wiring diagrams from this site I duplicated the harness carefully labeling each wire on each end with the numbers from the diagram. I did that as it is impossible to get all of the proper colors in cloth covered wire and I wanted to use cloth covered wire for period correctness. I cut the wires that pass through the firewall long and cut and attached them once the under dash work was done. Before I buttoned up the dash I checked each circuit with power to ensure things were right. Good thing too, as when I rewired the turn signal to switch socket I misread the diagram ans wired it from the rear and not the front, so nothing worked right. I had to open up the socket and solder the connections correctly, now it works right. Finally, I tied up all the wiring using tie wraps and reinstalled the components in reverse order. Ran the car for the first time in a month today and everything works as it should.
Posted on: 2018/12/3 19:53
|
|||
|
||||
|
Wiring the 50
|
||||
|---|---|---|---|---|
|
Just can't stay away
|
Today I finished the rewiring of the 50. What a job, I did it without taking out the dash finding it very relaxing working on my back feet up in the air on the seat. I worked a little at a time when I got tired I quit. Part time it took me about 3 weeks to complete.
Lessons learned... Remove the heater distribution box from the heater and firewall. As others have said drop the heater controls. Remove the two hidden special nuts holding the switches to the front fascia. Disconnect the cigar lighter, the nameplate illumination light, and the Headlight indicator light from the switch panel. Now you can pull the switches back from the from the fascia. Remove the radio next. It is easier to work underneath when the radio is out. Remove the front fascia. To do this there are two flat head bolts over the ash tray and one over the hole that the radio fits into. Next remove the one Phillips bolt under the radio that holds the bottom of the dash to the face plate. Next remove the small Phillips screw that holds the bottom of the ash tray opening to the dash. The headlight on light is attached here. Lastly, notice that there are two very small Phillips screws at the top of the radio grille opening. These hold the face plate to the dash. There is a metal bar in the opening that the ash tray rocks on. You may have to work that out before the face plate will come out. Carefully work the face plate out of the opening. Now you have a way to get your arm into the space behind the instruments. Remove the nuts holding the harness to the instruments. Carefully disconnect the switch panel from the harness. At this point I cut out the harness severing it at the firewall as I was not going to reuse it. I worked out the harness through the opening I had created by removing the switch panel. I took the old harness indoors and cut it apart as I used the wires that were only behind the dash as patterns for the new wires. Using the wiring diagrams from this site I duplicated the harness carefully labeling each wire on each end with the numbers from the diagram. I did that as it is impossible to get all of the proper colors in cloth covered wire and I wanted to use cloth covered wire for period correctness. I cut the wires that pass through the firewall long and cut and attached them once the under dash work was done. Before I buttoned up the dash I checked each circuit with power to ensure things were right. Good thing too, as when I rewired the turn signal to switch socket I misread the diagram ans wired it from the rear and not the front, so nothing worked right. I had to open up the socket and solder the connections correctly, now it works right. Finally, I tied up all the wiring using tie wraps and reinstalled the components in reverse order. Ran the car for the first time in a month today and everything works as it should.
Posted on: 2018/12/2 14:42
|
|||
|
||||
|
Re: Mark's 1950 Super Eight
|
||||
|---|---|---|---|---|
|
Just can't stay away
|
Sure:
Cable Craft 4401 South Orchard Street Tacoma, Washington 98411 Phone: 253 475-1080 Fax 253 474-1623 https://www.cablecraft.com/
Posted on: 2018/11/5 11:33
|
|||
|
||||
|
Re: Mark's 1950 Super Eight
|
||||
|---|---|---|---|---|
|
Just can't stay away
|
I haven't posted for a while...
I fixed the overdrive cable by getting a new cable from a company that makes push pull cables for aircraft. ($100) custom length and matching threaded ends. I then wired up a switch on a new bracket next to the pull cable that replaced the switch in the original cable. I also had to rebuild the kick down switch as it was not making contact, works good now. The whole OD is working great! Earlier notes, The engine runs great with the rebuild and I had my old clutch, pressure plate and flywheel rebuilt locally...cost $200. I rebuilt the door panels with new materials and covered them, for now, with fabric I bought from an upholstery supply company. I will someday get original designs instead of just flat material. I am now in the process of rewiring the dash. Most of the wiring is OK but there are some brittle areas that are shorting out so the dash is coming apart. I'm working under the dash laying on my back and slowly removing the old harness. I have new cloth covered wire on the way and will use that to build a new harness. This project started when I discovered that I had destroyed the blower switch the last time I put the radio back in. I'll be more careful with this re-installation. For now the seats are covered with generic seat covers until I get to the point where I want the seats and side panels fixed. That will come when I need to tackle the headliner, which is old but serviceable for now. I had to repaint the hood right before my oldest son's wedding as I had the hood stored beside the house and it got nicked pretty good. But the car made it to the wedding and was a great get away car. That's it for now.
Posted on: 2018/11/4 15:37
|
|||
|
||||
|
Re: Optima Battery Red top 6 volt
|
||||
|---|---|---|---|---|
|
Just can't stay away
|
I have a source for the correct 6v battery for my 23rd series car. They are lead acid. I just paid $120 plus tax to replace my 5 year old one, I bought it from the supplier too. They have 50 in stock but I bet the shipping would be kind of high.
Posted on: 2018/9/30 10:32
|
|||
|
||||
|
23rd series hubcaps
|
||||
|---|---|---|---|---|
|
Just can't stay away
|
Did Packard use 2 different sizes of hubcaps in 1950? I have 2 sets and one is smaller than the other...
Posted on: 2018/9/12 17:09
|
|||
|
||||
|
Re: Proud New Owner of a 49 Packard Club Sedan
|
||||
|---|---|---|---|---|
|
Just can't stay away
|
Great suggestion!
Posted on: 2018/9/5 12:00
|
|||
|
||||


