|
Re: 1924 Sport 136
|
||||
|---|---|---|---|---|
|
Home away from home
|
I'm still waiting for half of my body parts to be painted. But there is still some other work to be done. In one of my “Pre War” posts I reported on the making of my Leaf Gaiters (!!). I will post these pictures here again to complete this restoration blog and to show the missing illustrations of the gaiters.
I had underestimated the time involved in making the gaiters and had forgotten how much time it took to make them. I made the last gaiters for my Jaguar XK 140 28 years ago. A total of 88 leather pieces had to be cut. What makes matters worse is that at some point someone changed the brackets of some of the spring leaves and the cuts had to be specially adjusted. In addition, all the parts in front of and behind the axles are of different lengths. I was able to buy the belt at the ends of the gaiters ready-made. They just had to be cut. To tie the gaiters together, I riveted in 192 lace hooks. 16 pieces of leather had to be sharpened on the leather splitting machine in order to fold over the edge and thus enable optimal riveting of the tip hooks. Karl Attach file:  k-P1030727 - Kopie.JPG (153.09 KB) k-P1030727 - Kopie.JPG (153.09 KB) k-P1040336.JPG (117.17 KB) k-P1040336.JPG (117.17 KB)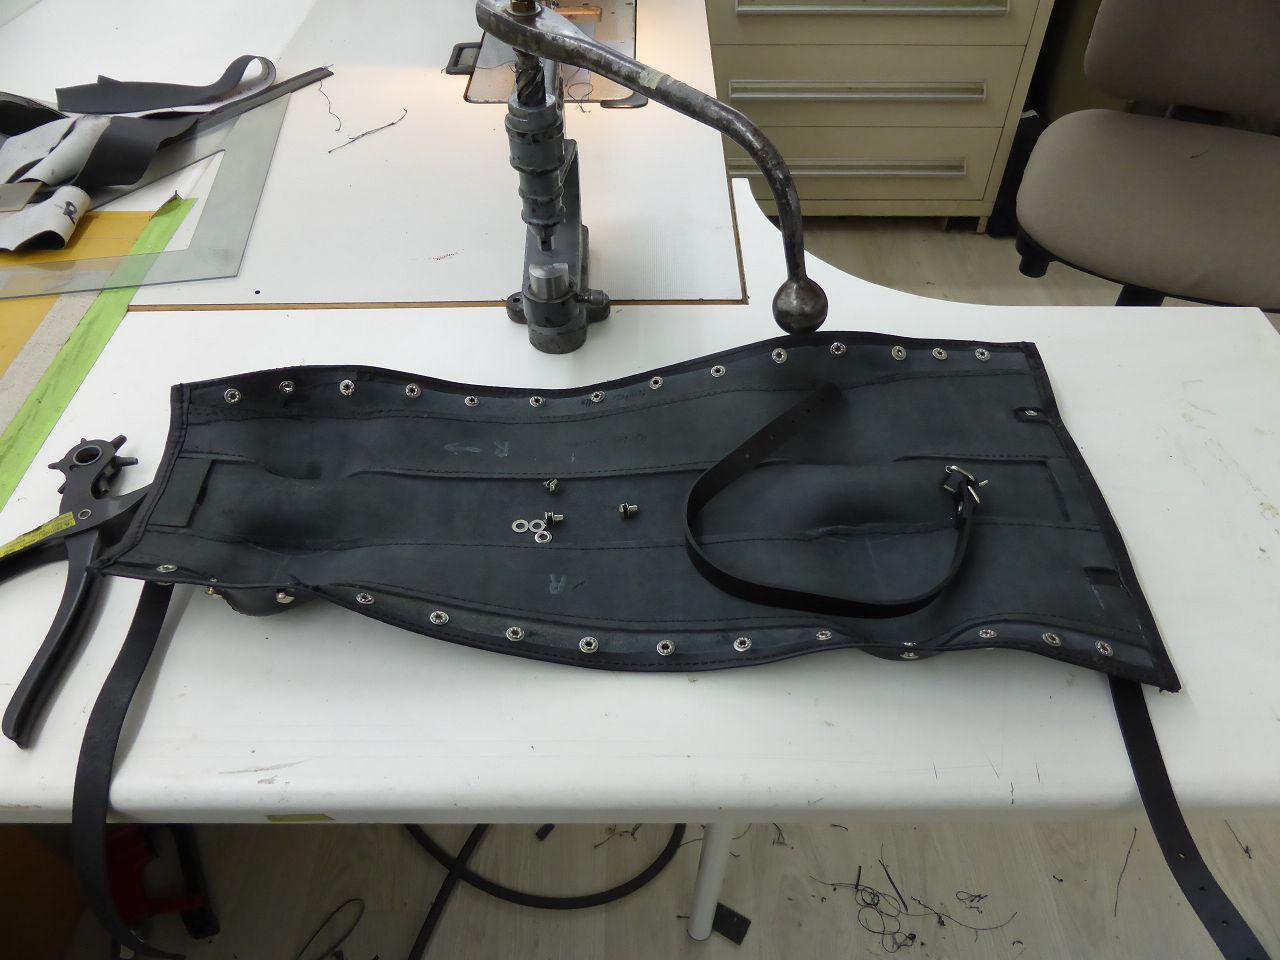 k-P1040337.JPG (103.90 KB) k-P1040337.JPG (103.90 KB)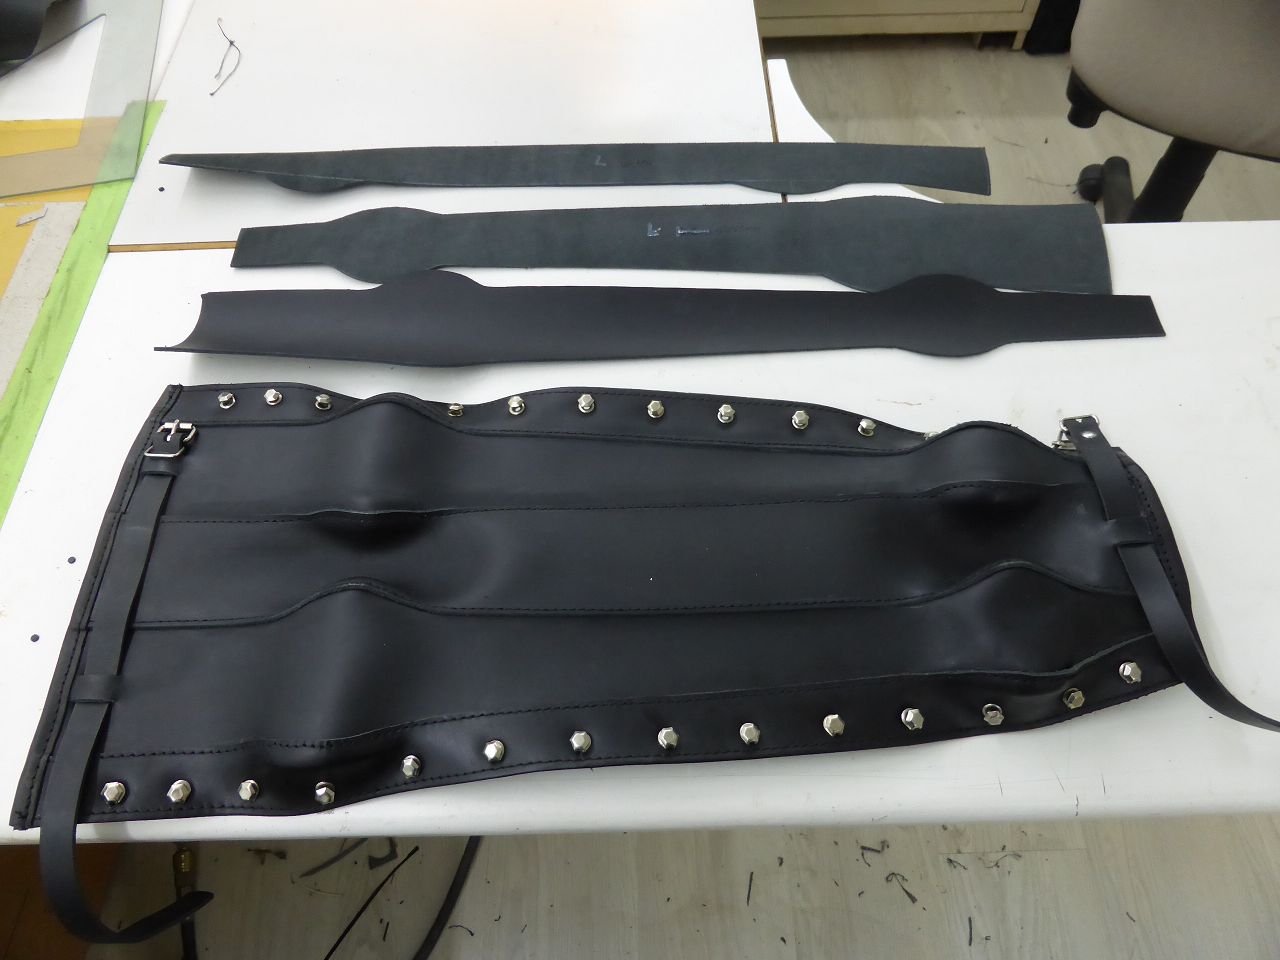 k-P1040390.JPG (81.96 KB) k-P1040390.JPG (81.96 KB)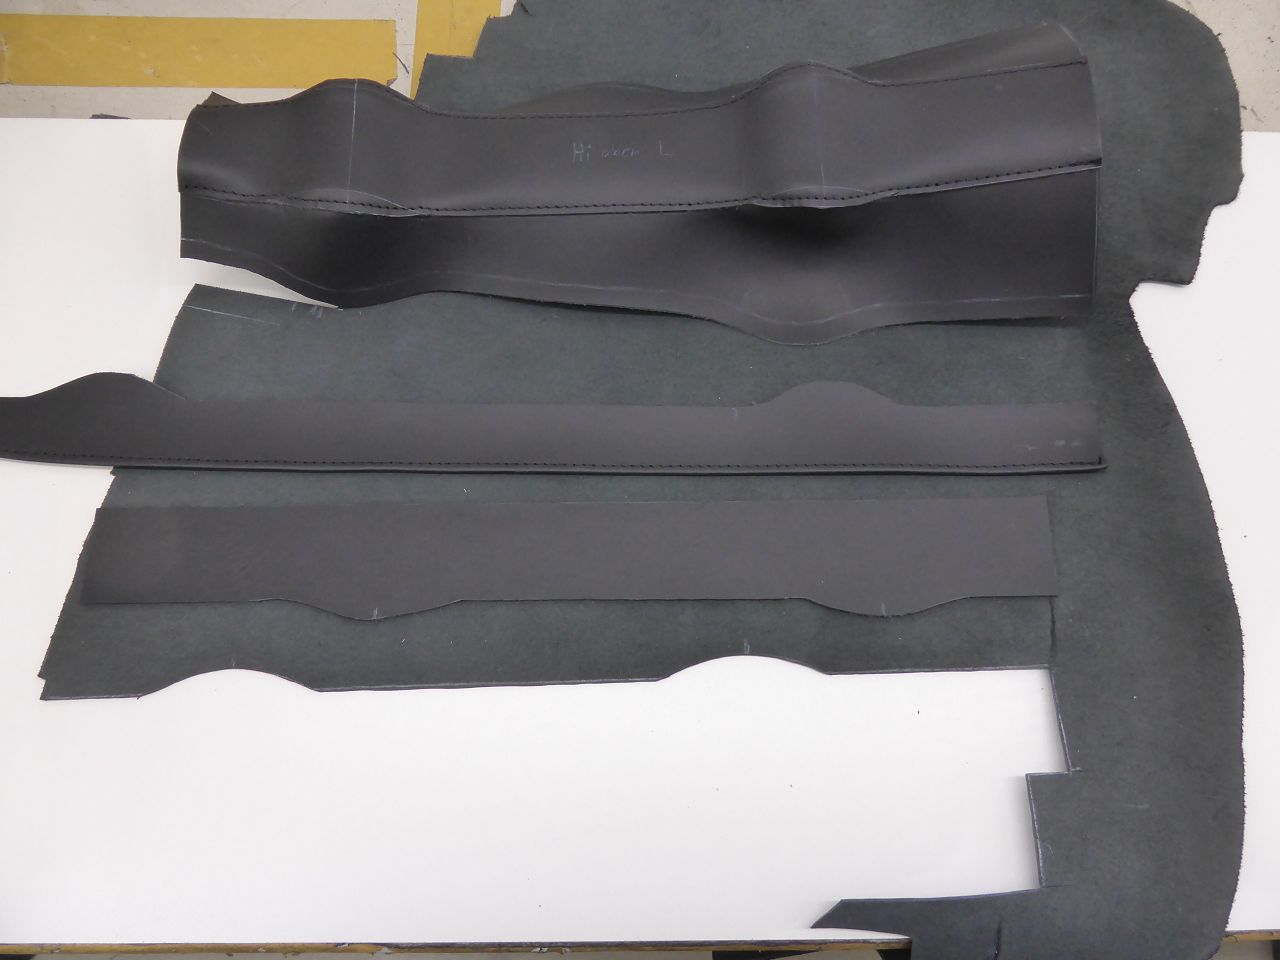 k-P1040392 - Kopie.JPG (90.76 KB) k-P1040392 - Kopie.JPG (90.76 KB)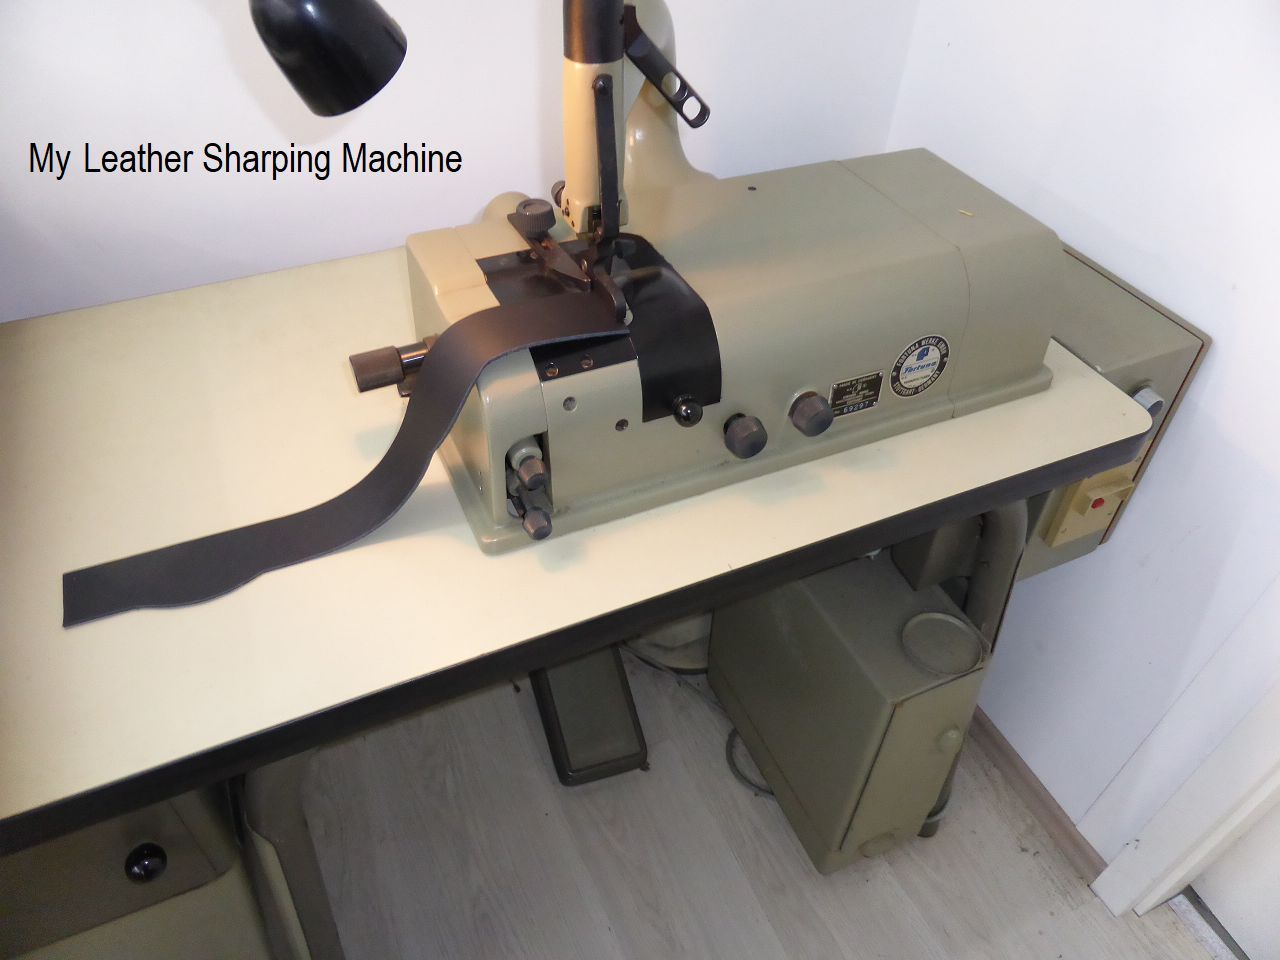 k-P1040393 - Kopie.JPG (93.91 KB) k-P1040393 - Kopie.JPG (93.91 KB)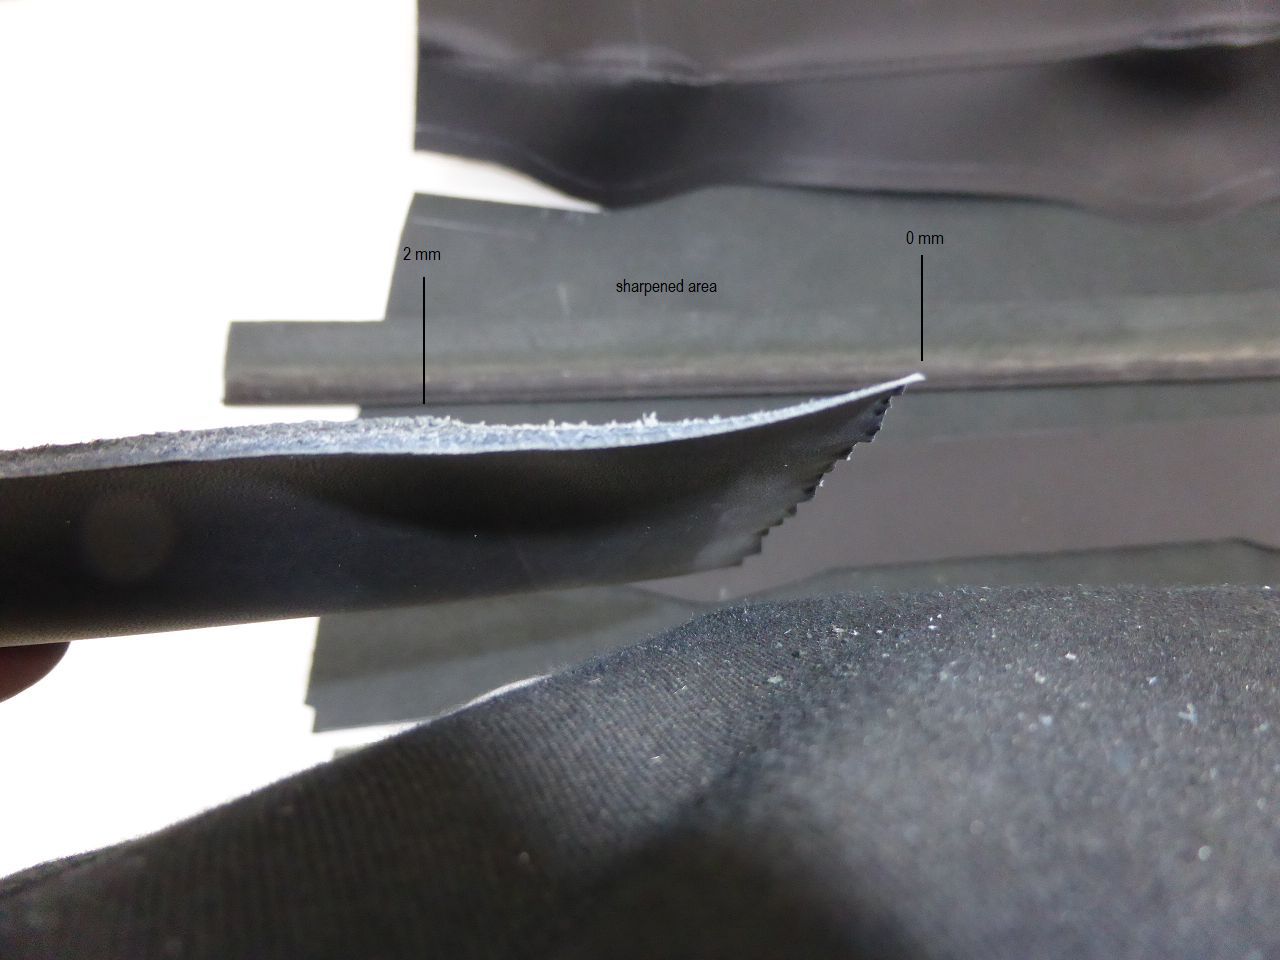 k-P1040394 - Kopie.JPG (121.11 KB) k-P1040394 - Kopie.JPG (121.11 KB)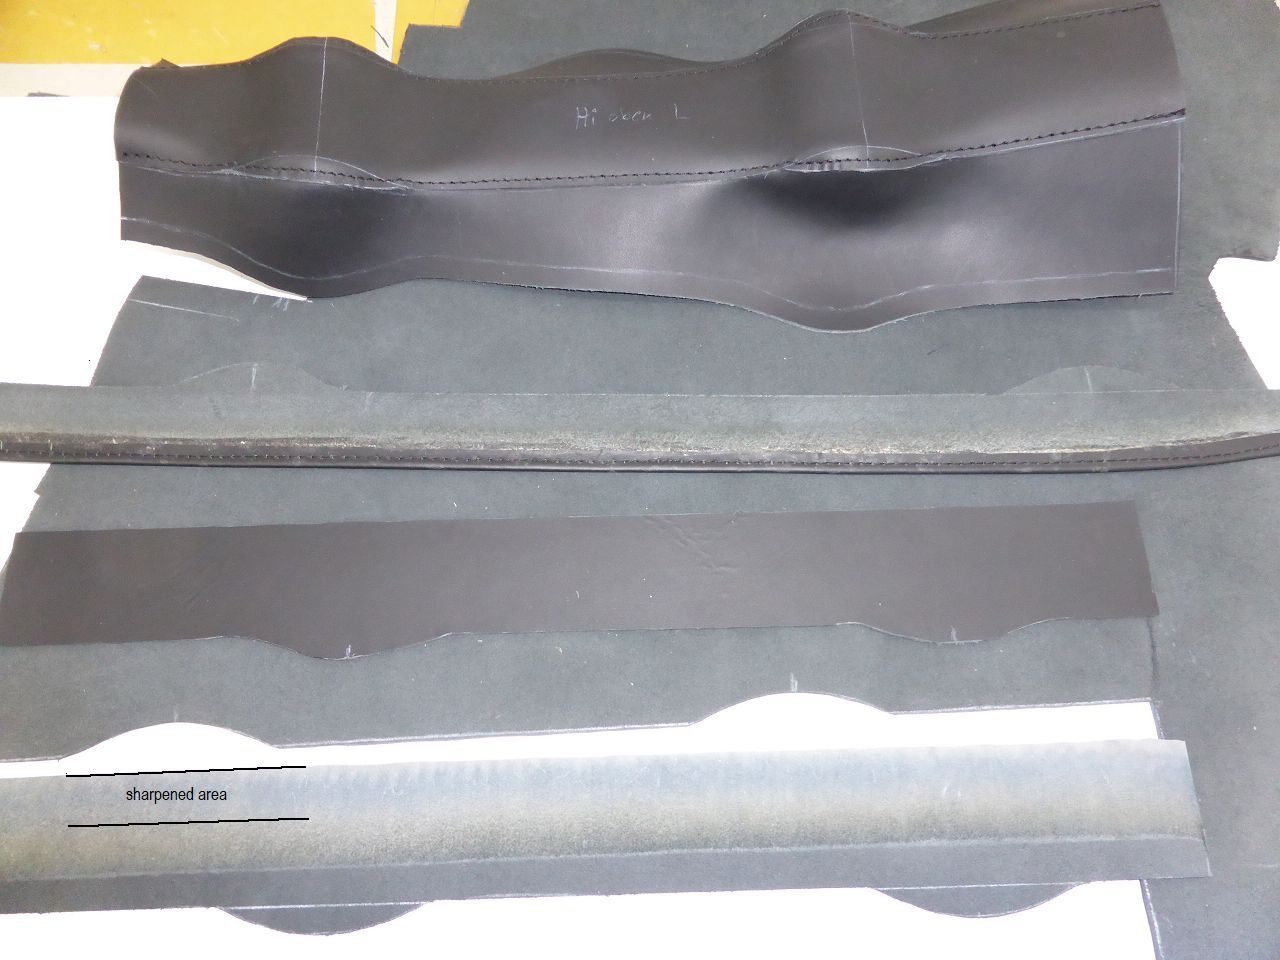 k-P1040339.JPG (131.74 KB) k-P1040339.JPG (131.74 KB)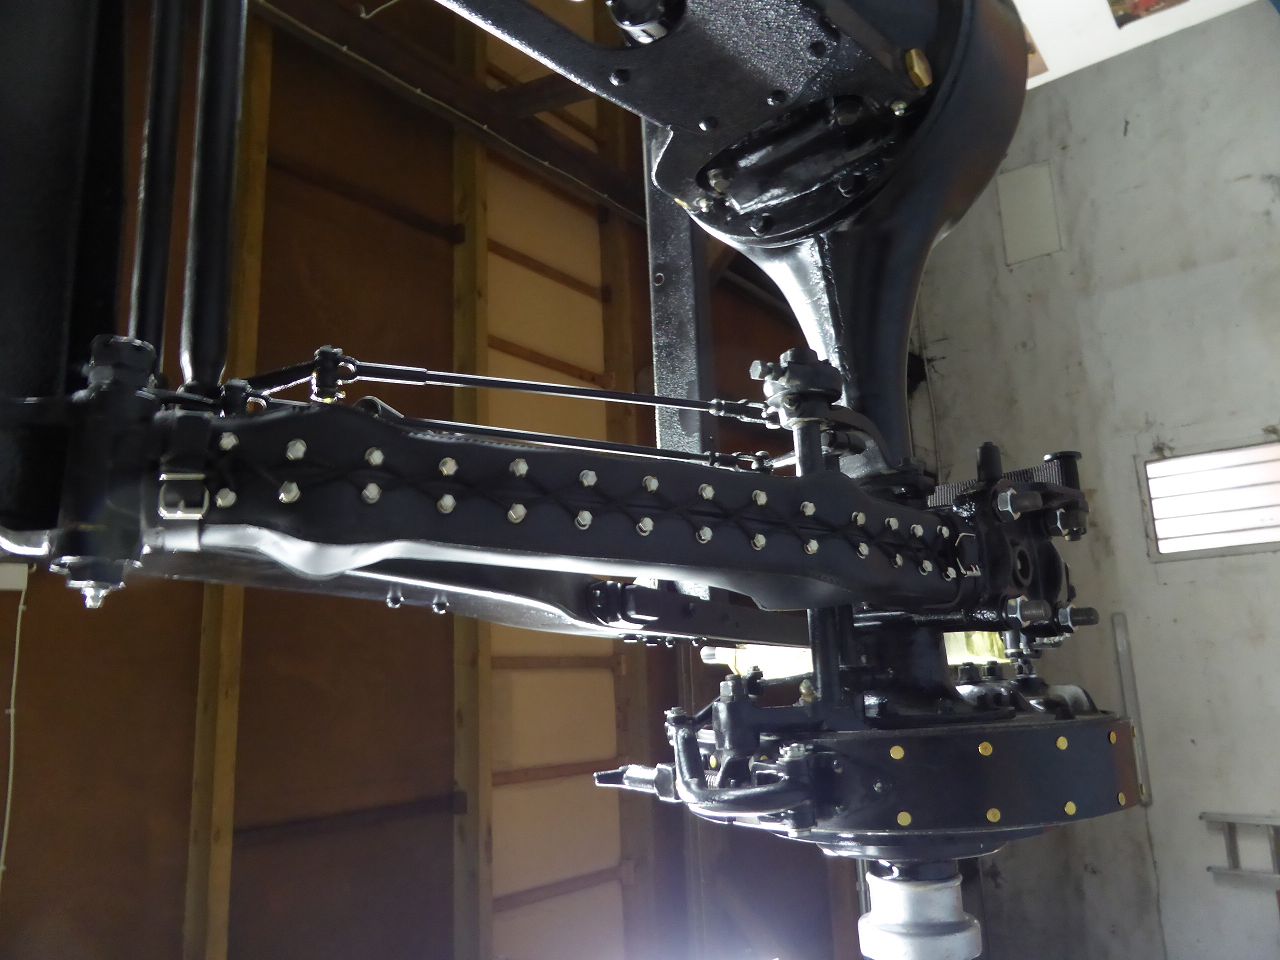 k-P1040342.JPG (143.91 KB) k-P1040342.JPG (143.91 KB)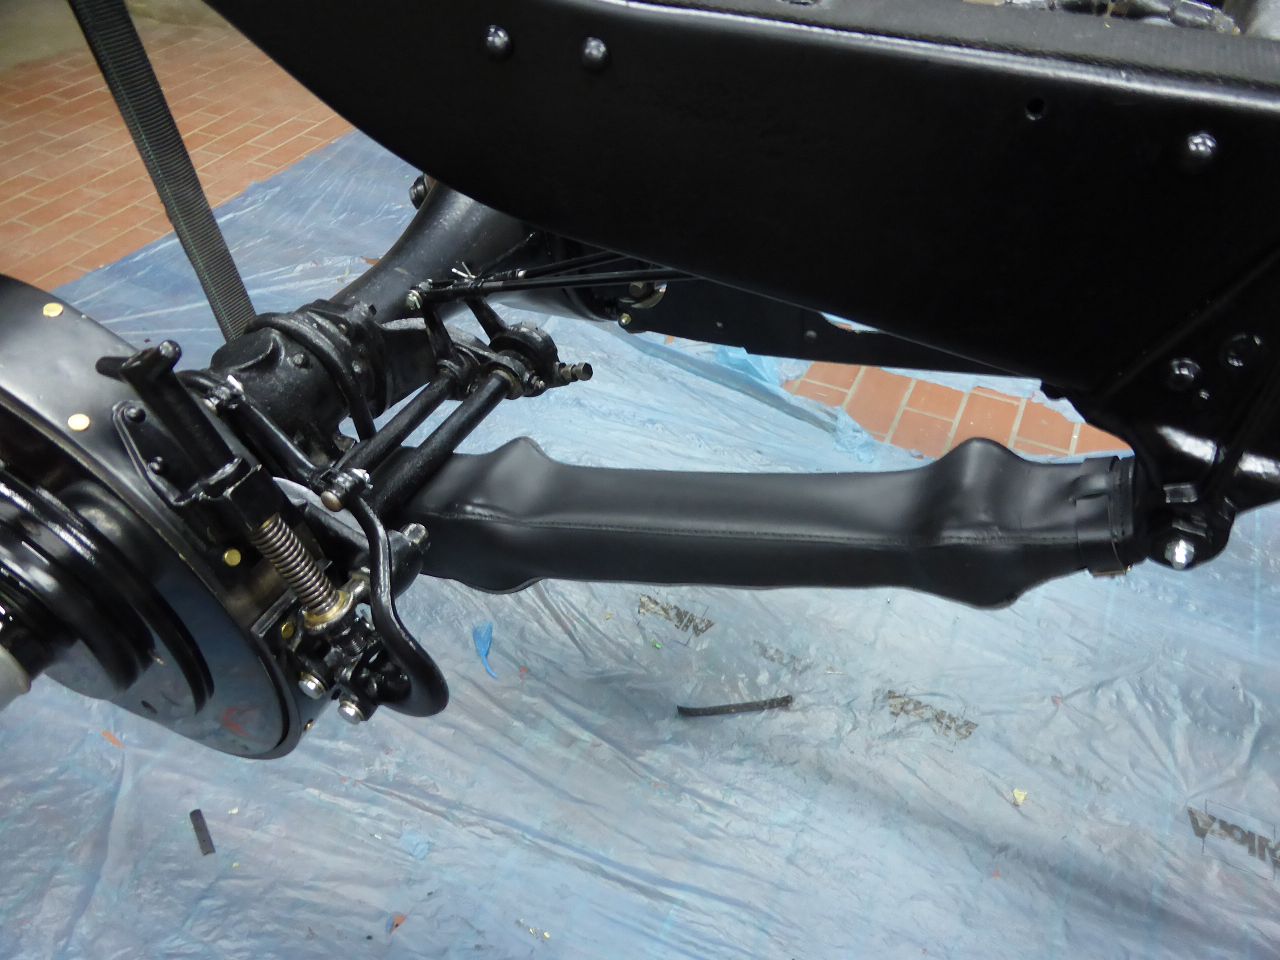
Posted on: 2/18 14:09
|
|||
|
||||
|
Re: 1924 Sport 136
|
||||
|---|---|---|---|---|
|
Home away from home
|
And here my answer for the very worn out ball joints of the front brake lever.
Karl Attach file: k2-P1030183.JPG (102.39 KB)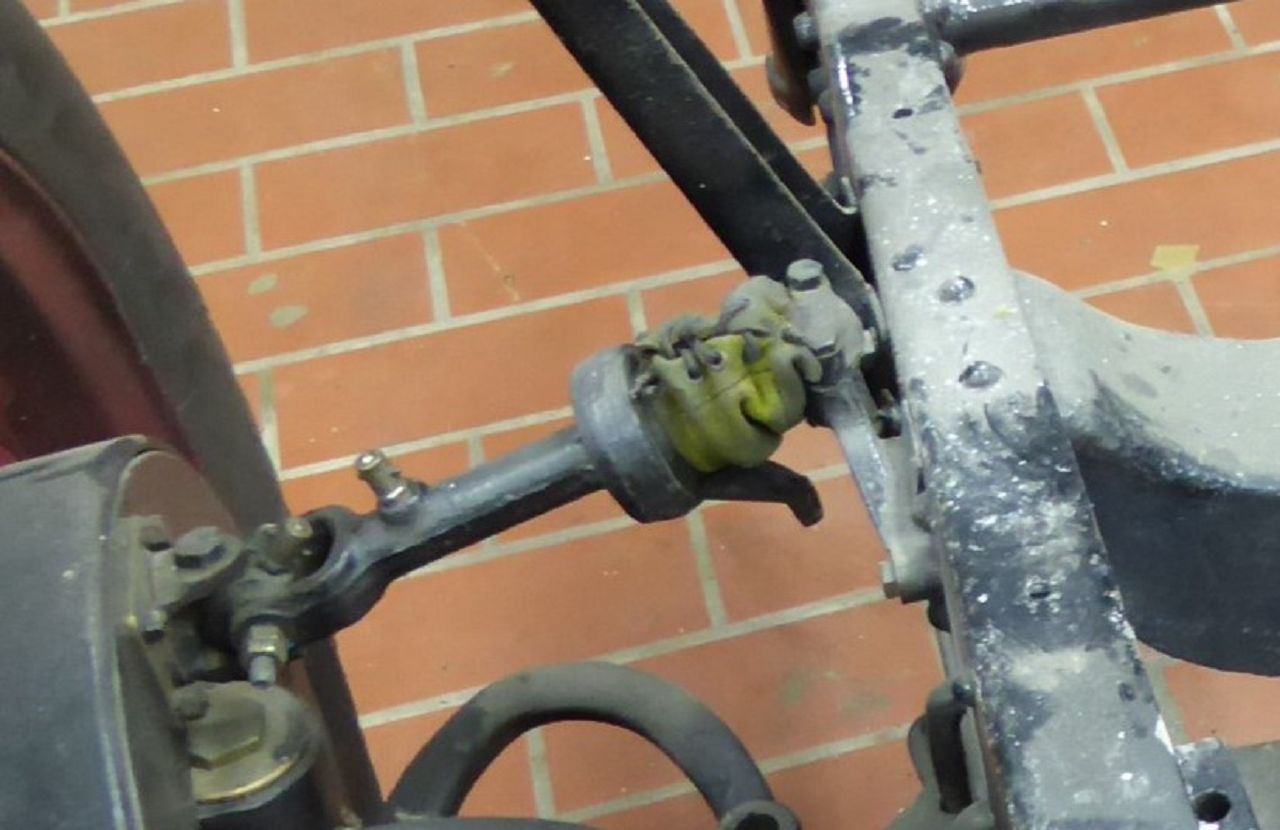 k-P1030505 - Kopie.JPG (105.28 KB) k-P1030505 - Kopie.JPG (105.28 KB)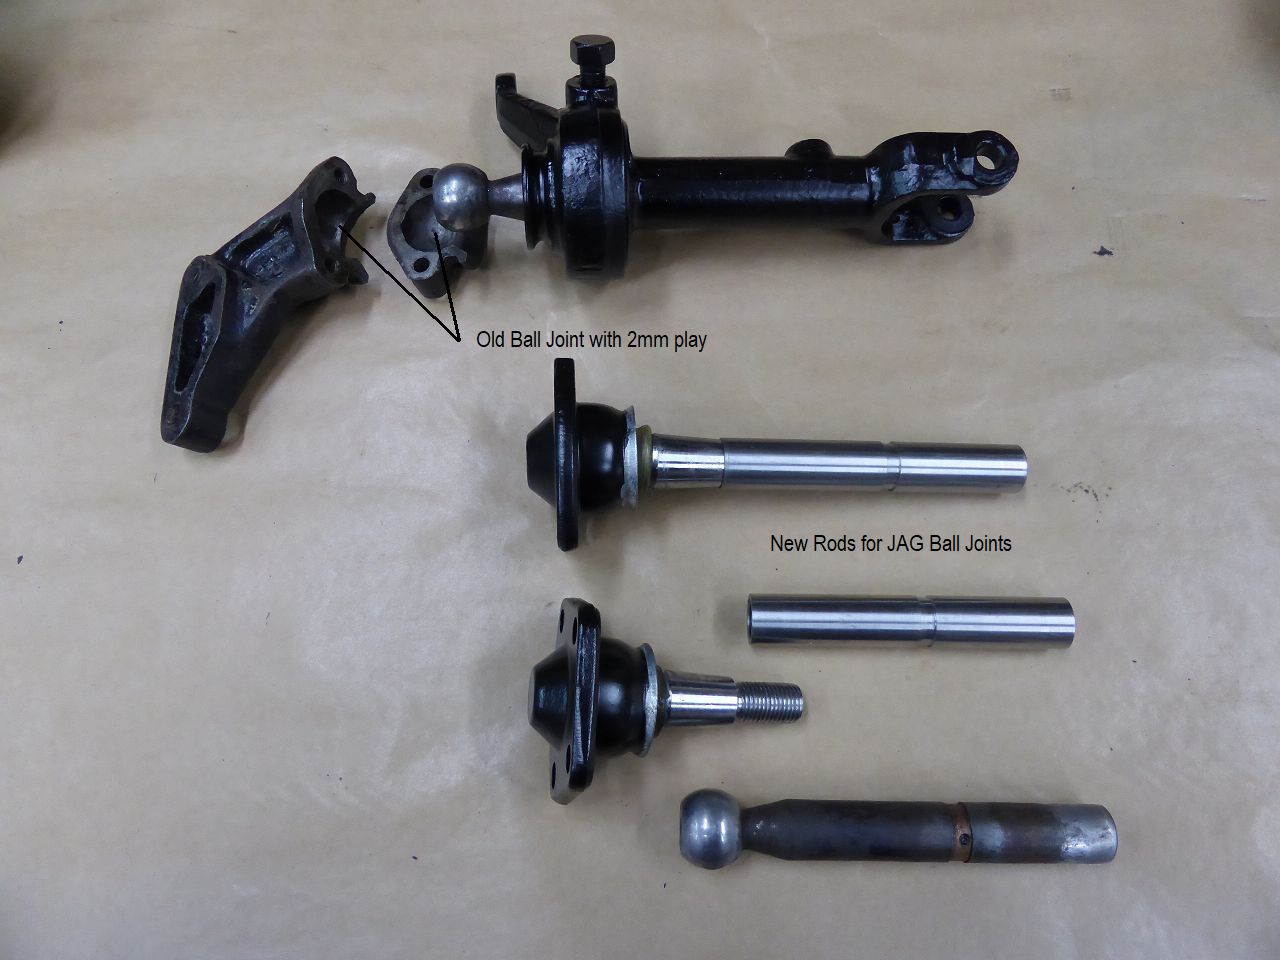 k-P1030738.JPG (142.81 KB) k-P1030738.JPG (142.81 KB)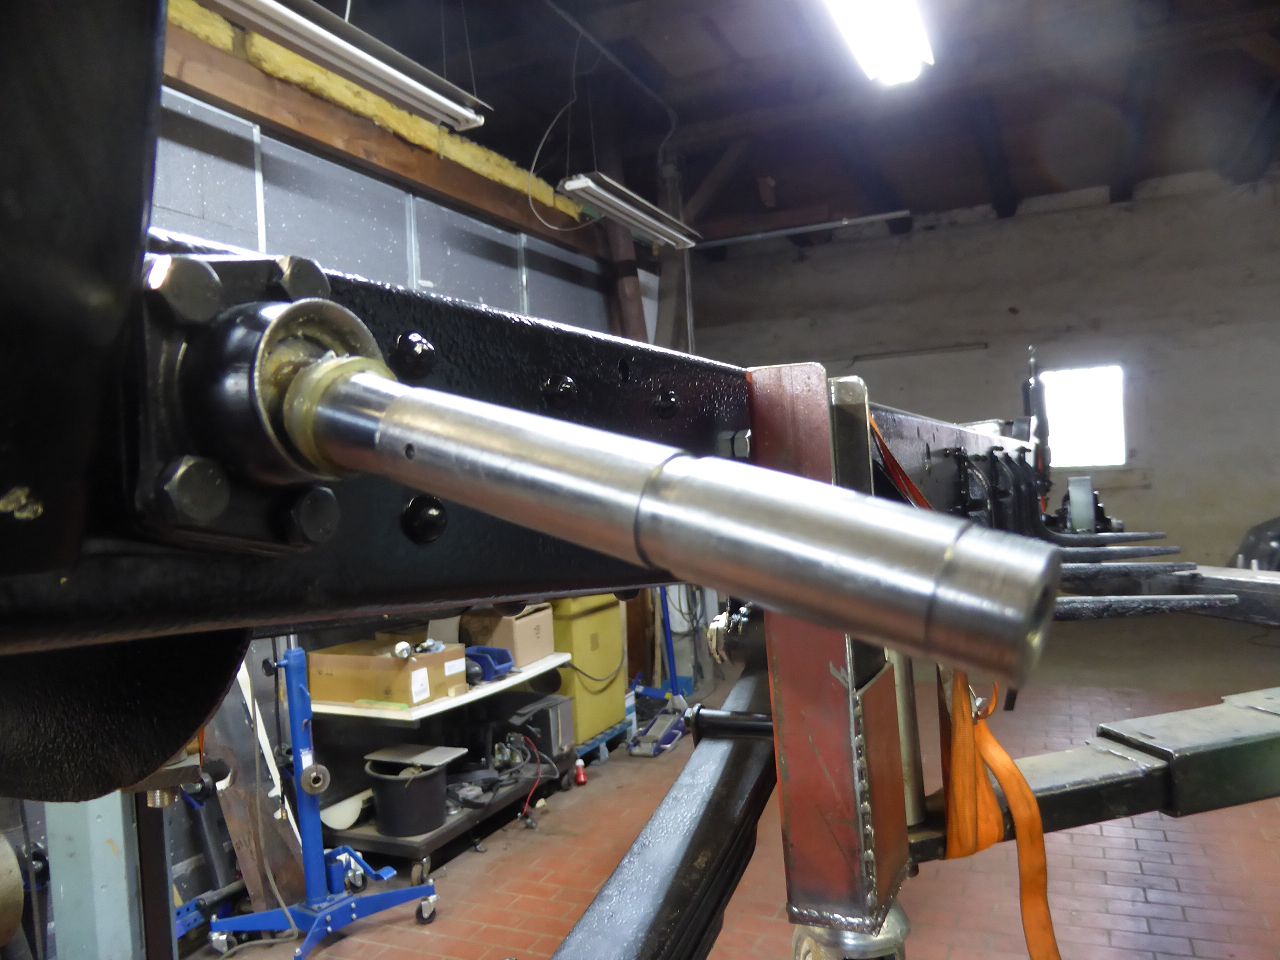 k-P1030735.JPG (169.33 KB) k-P1030735.JPG (169.33 KB) k-P1030261.JPG (177.72 KB) k-P1030261.JPG (177.72 KB)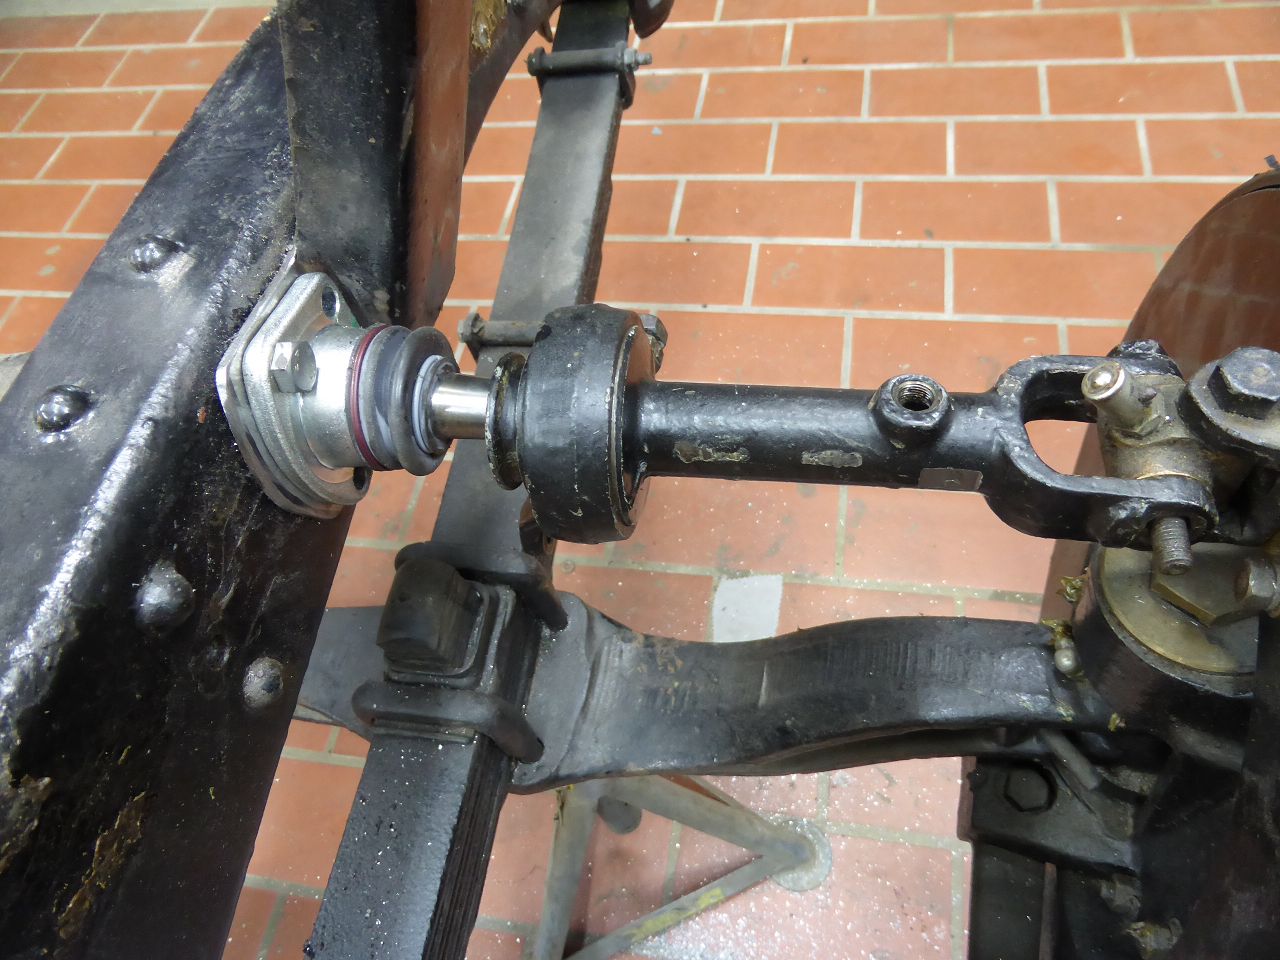
Posted on: 2/11 11:41
|
|||
|
||||
|
Re: 1924 Sport 136
|
||||
|---|---|---|---|---|
|
Home away from home
|
The chassis……well…. the chassis does not differ in any way from the miserable condition of the previously described body parts. Deep rust scars everywhere. The frame was sandblasted, primed and satin painted.
All bushings in the chassis were worn, as were the brake linkages and joints. After I removed all layers of paint from the brake rods, I could see that they were so badly rusted that in some cases only half of the rod diameter was left. I made all the bushings from gunmetal on my lathe. I cut a thread into the bushings of the leaf springs, welded a matching threaded screw to my impact hammer and knocked out the bushings. I made a suitable tool on my lathe to press in the bushings. I remade all the brake rods from stainless steel, recut the appropriate threads at the ends and reused the well-preserved universal joints (forks?). I re-drilled the holes in all the rocker arms and universal joints to the smallest possible next size. I reworked the integrated bolts of the leaf springs on the lathe and adjusted the bushings accordingly. I found a good answer to the completely worn out front link lever and front brake cable ball joint. I thought it was hopeless to find a replica of this component anywhere. So a good solution was needed that could be made from existing components. I found a ball joint that fits exactly where the old bracket was attached. I had 2 matching extension rods made from high-quality steel because my lathe no longer works accurately in the hundredth range. I found the ball joint in the parts list of a 1980 Jaguar XJ6 4.2. Since I have some experience with Jaguar parts, I also found a universal joint for the cardan shaft... but more on that later. Karl Attach file: k-k-P1030182.JPG (192.64 KB)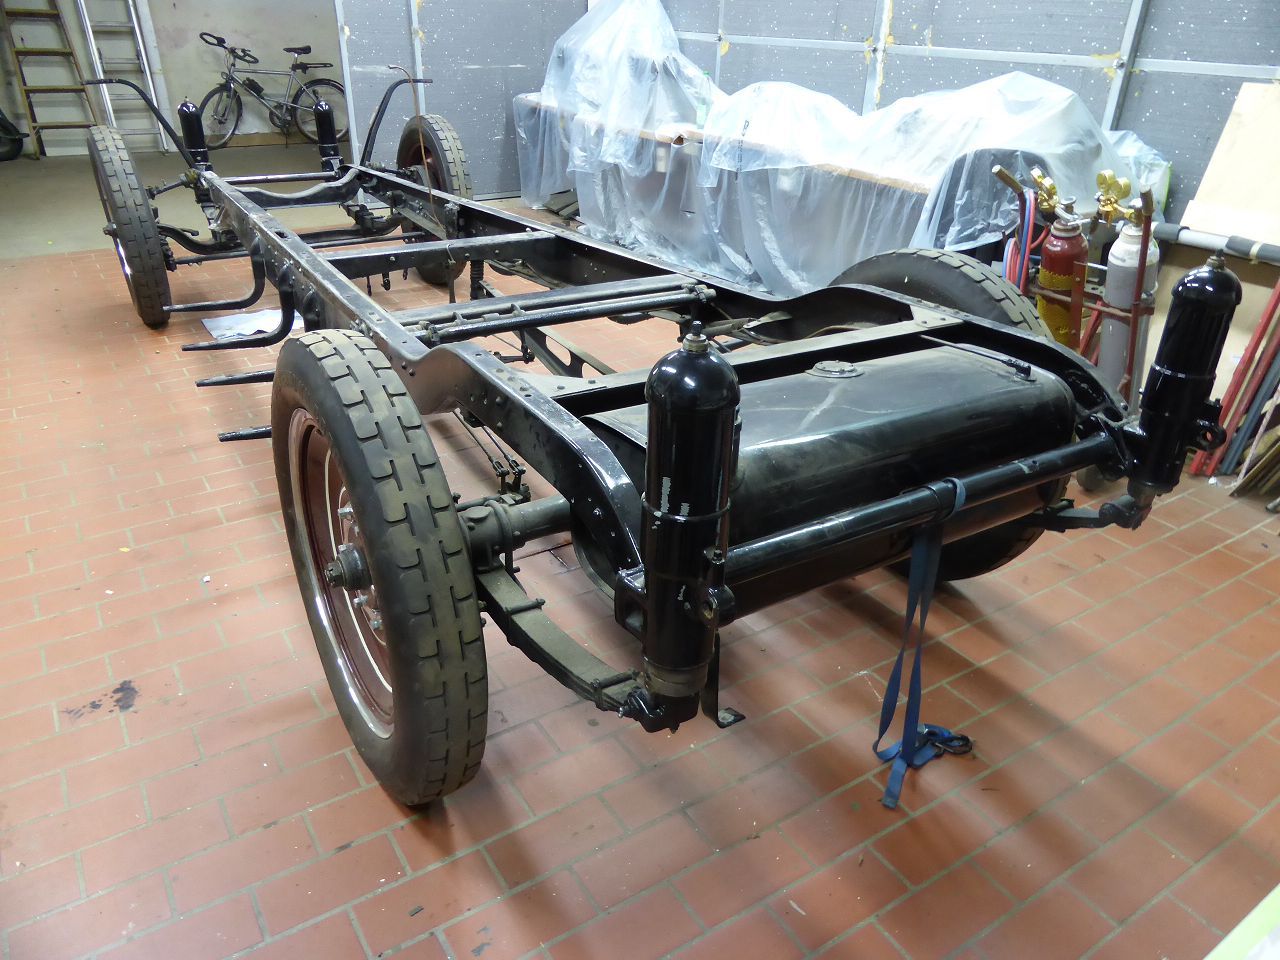 k-P1030462.JPG (163.98 KB) k-P1030462.JPG (163.98 KB)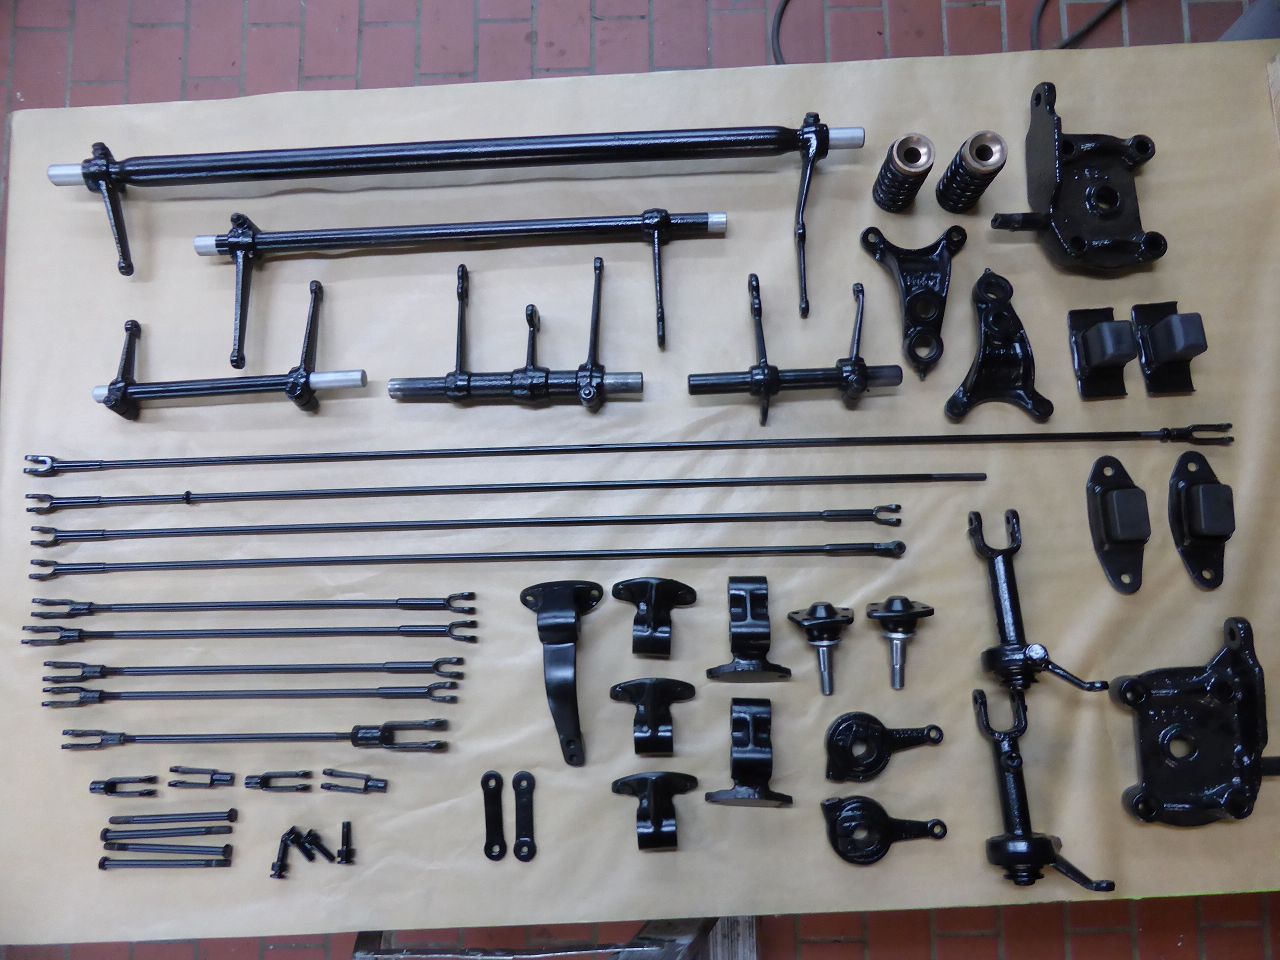 k-P1030722.JPG (109.91 KB) k-P1030722.JPG (109.91 KB)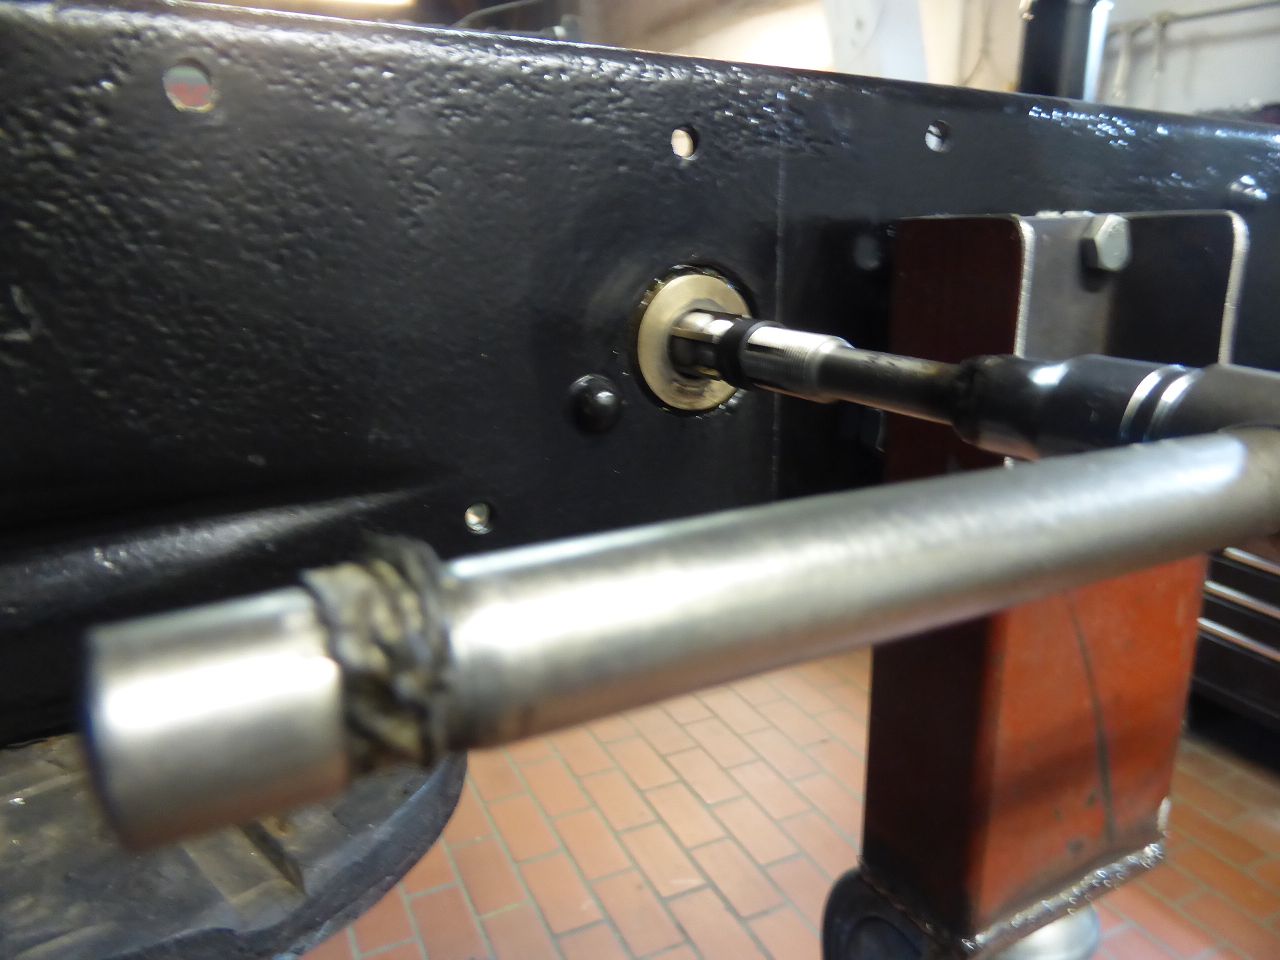 k-P1030723.JPG (150.53 KB) k-P1030723.JPG (150.53 KB)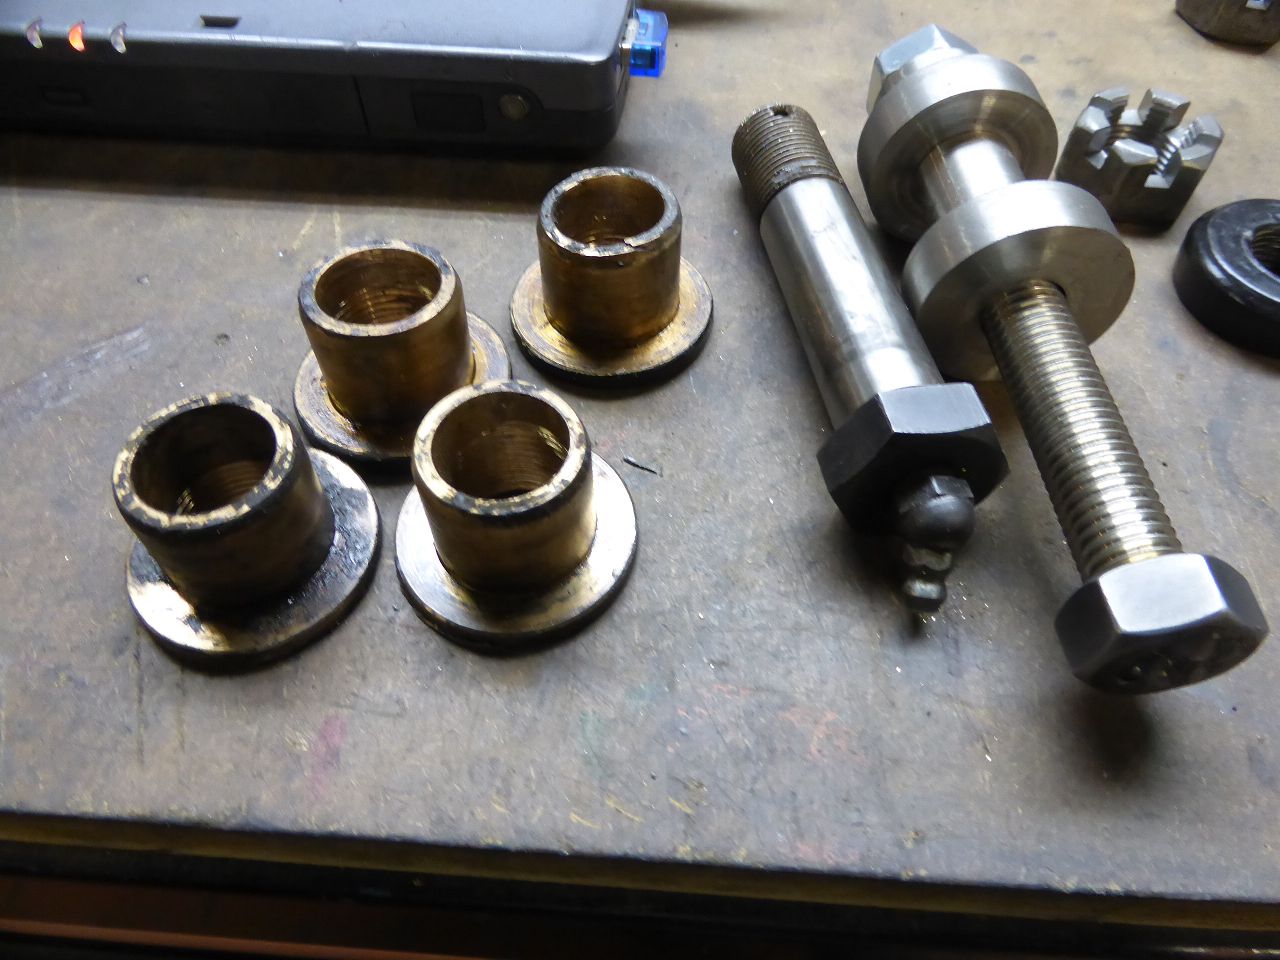 k-P1030740.JPG (210.20 KB) k-P1030740.JPG (210.20 KB)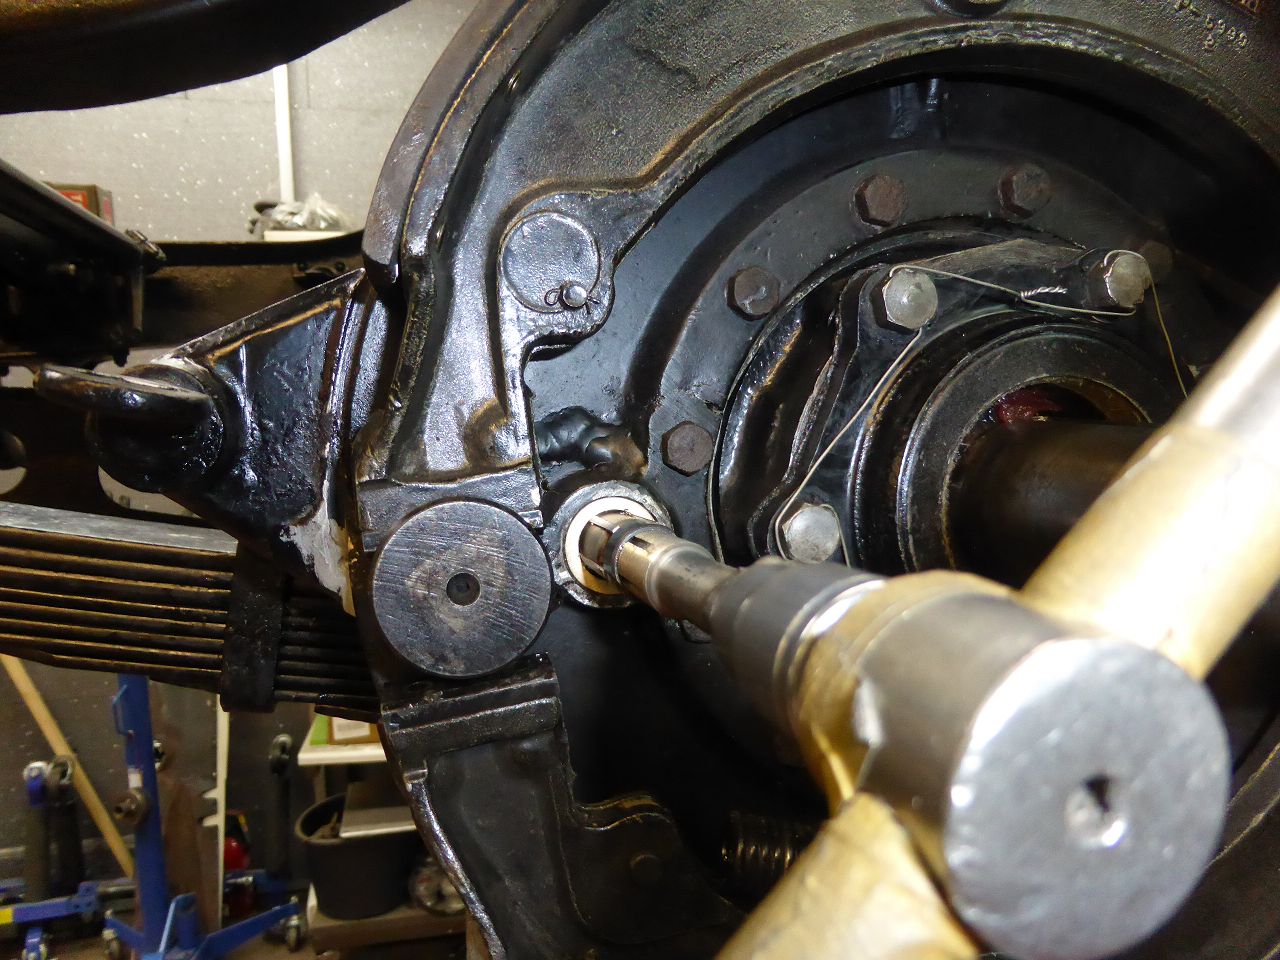
Posted on: 2/11 10:29
|
|||
|
||||
|
Re: 1924 Sport 136
|
||||
|---|---|---|---|---|
|
Home away from home
|
The hood had dents, deformations and rust scars everywhere. Unfortunately I no longer have an English Wheel or an “ECKOLD” power former. So I had to use the old school method with a torch and heat to get the hood back to its old shape. This is very risky if you have little experience with it. You can ruin the whole picture. Thanks heaven I smooth out the dents and shrinkage spots. With a lot of work with the smoothing hammer and also with the hand iron. In any case, it only took a little bit of filler/putty to get the hood in a straight line. By the way, the hood is one of the most visually important parts when you look at a car for the first time. The Packard hood of these models is visually very striking. I used sandpaper the most on this hood...compared to other components. If you do not want distortion or unwanted waves, you should not apply pressure when sanding crosswise and always use sharp sandpaper. So I changed the paper in a quarter of the usual time and took my time.
Karl Attach file: k-P1040281.JPG (135.88 KB) k-P1040331.JPG (141.45 KB) k-P1040331.JPG (141.45 KB)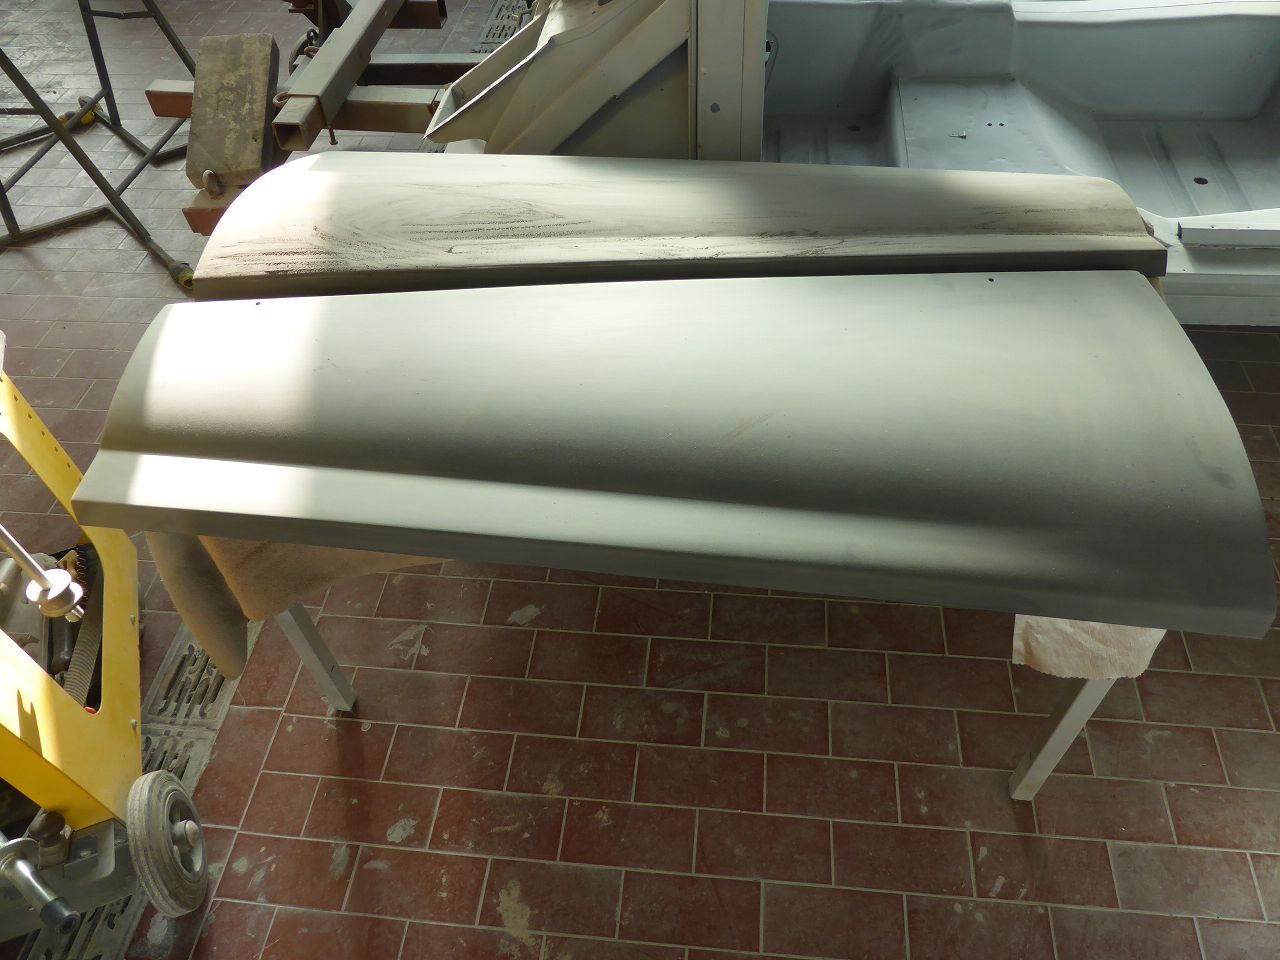 k-p1040361 - kopie.jpg (278.45 KB) k-p1040361 - kopie.jpg (278.45 KB)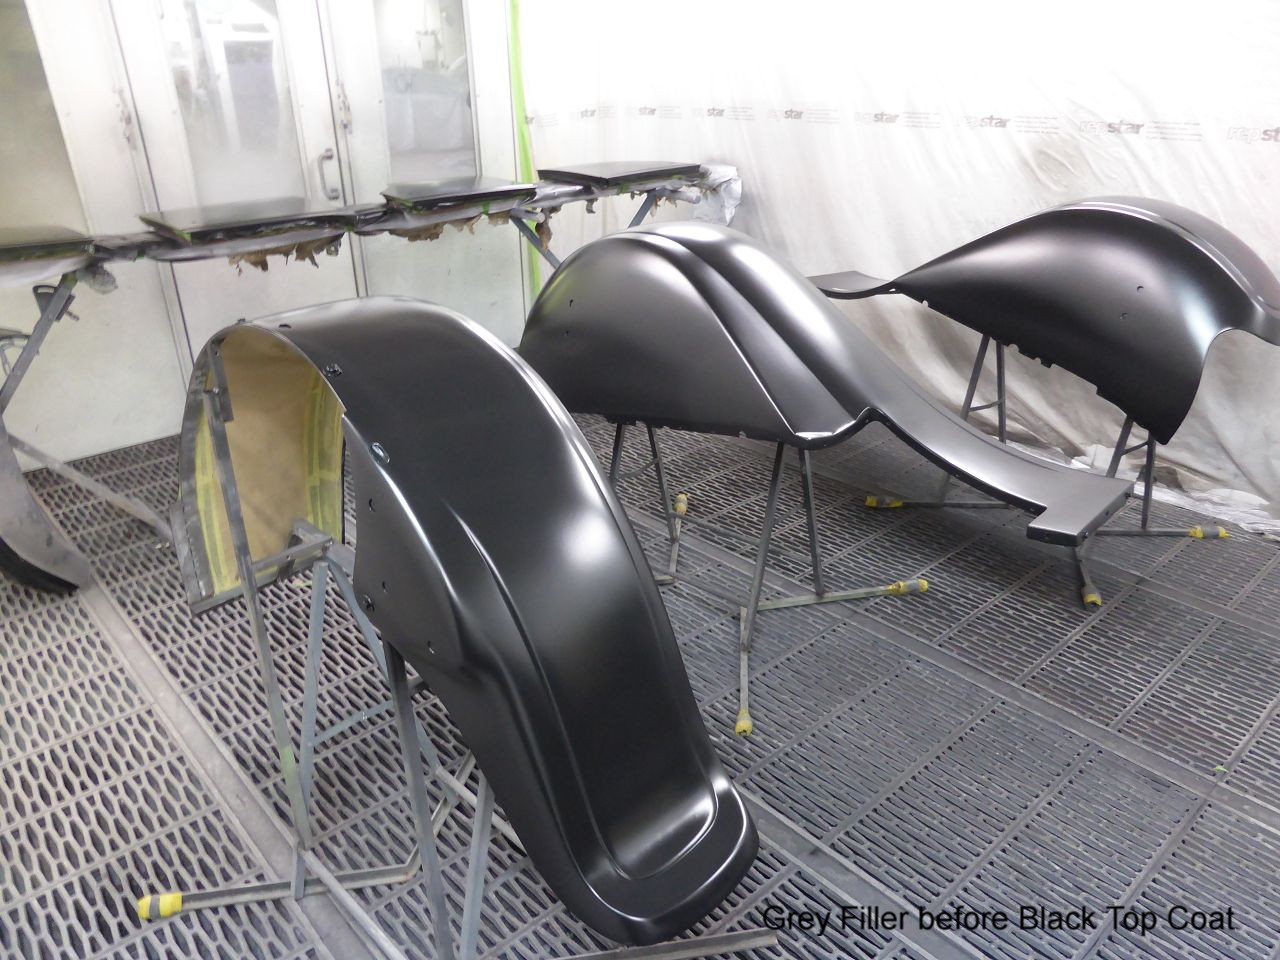 k-p1040362 - kopie.jpg (234.32 KB) k-p1040362 - kopie.jpg (234.32 KB)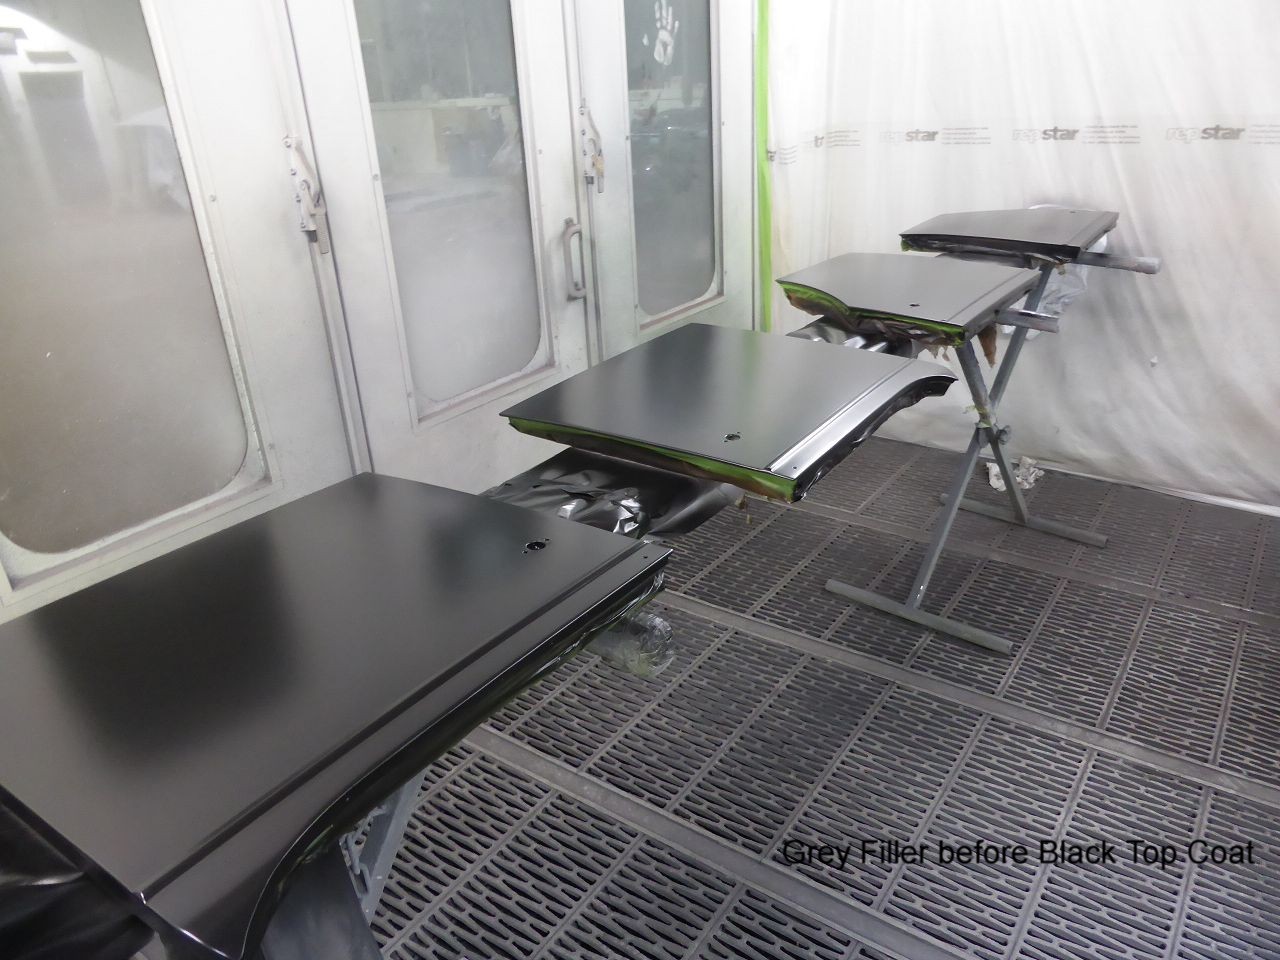 k-p1040365 - kopie.jpg (202.28 KB) k-p1040365 - kopie.jpg (202.28 KB)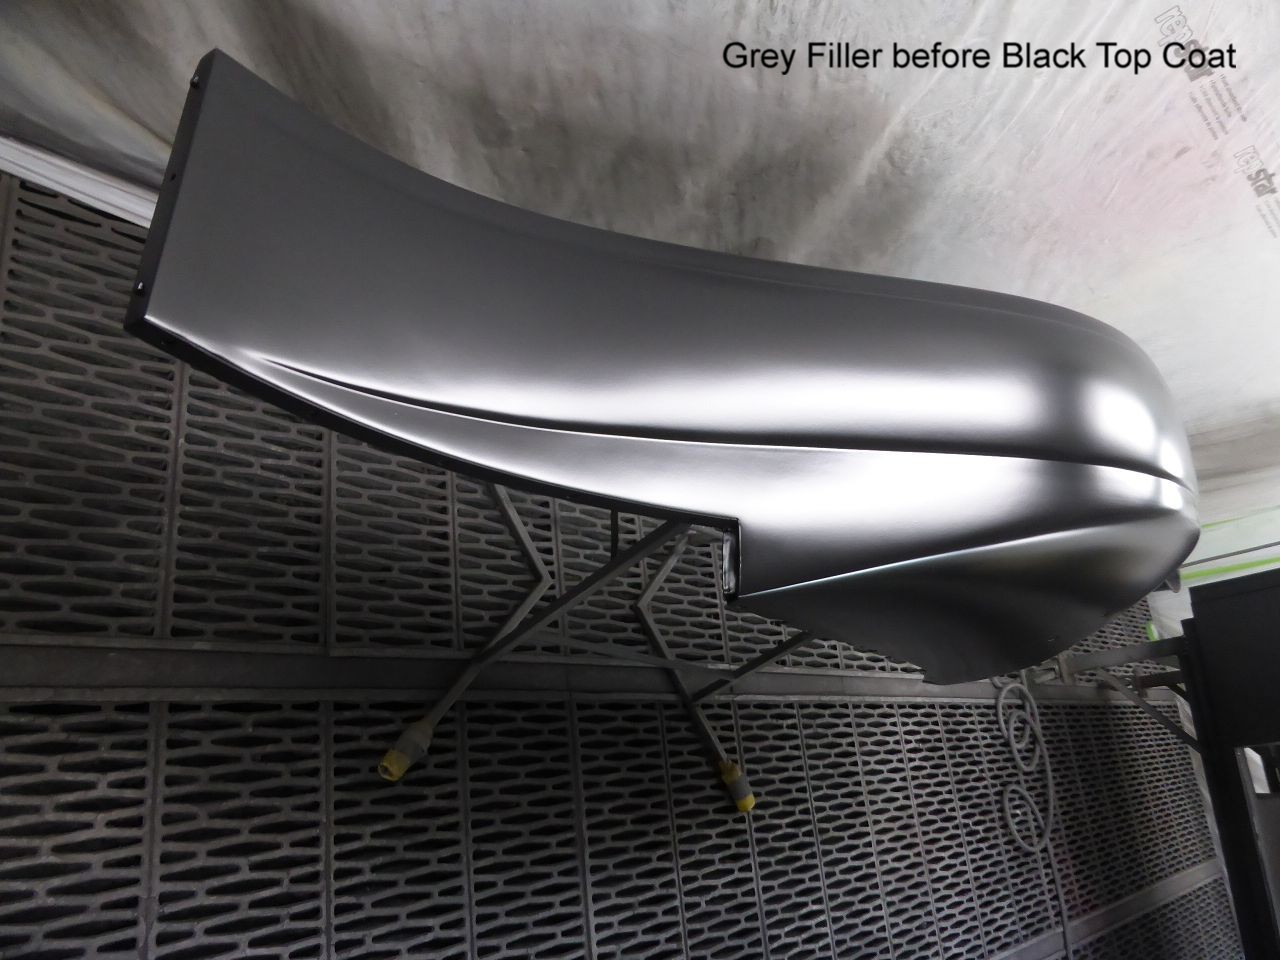 k-p1040379 - kopie.jpg (234.01 KB) k-p1040379 - kopie.jpg (234.01 KB)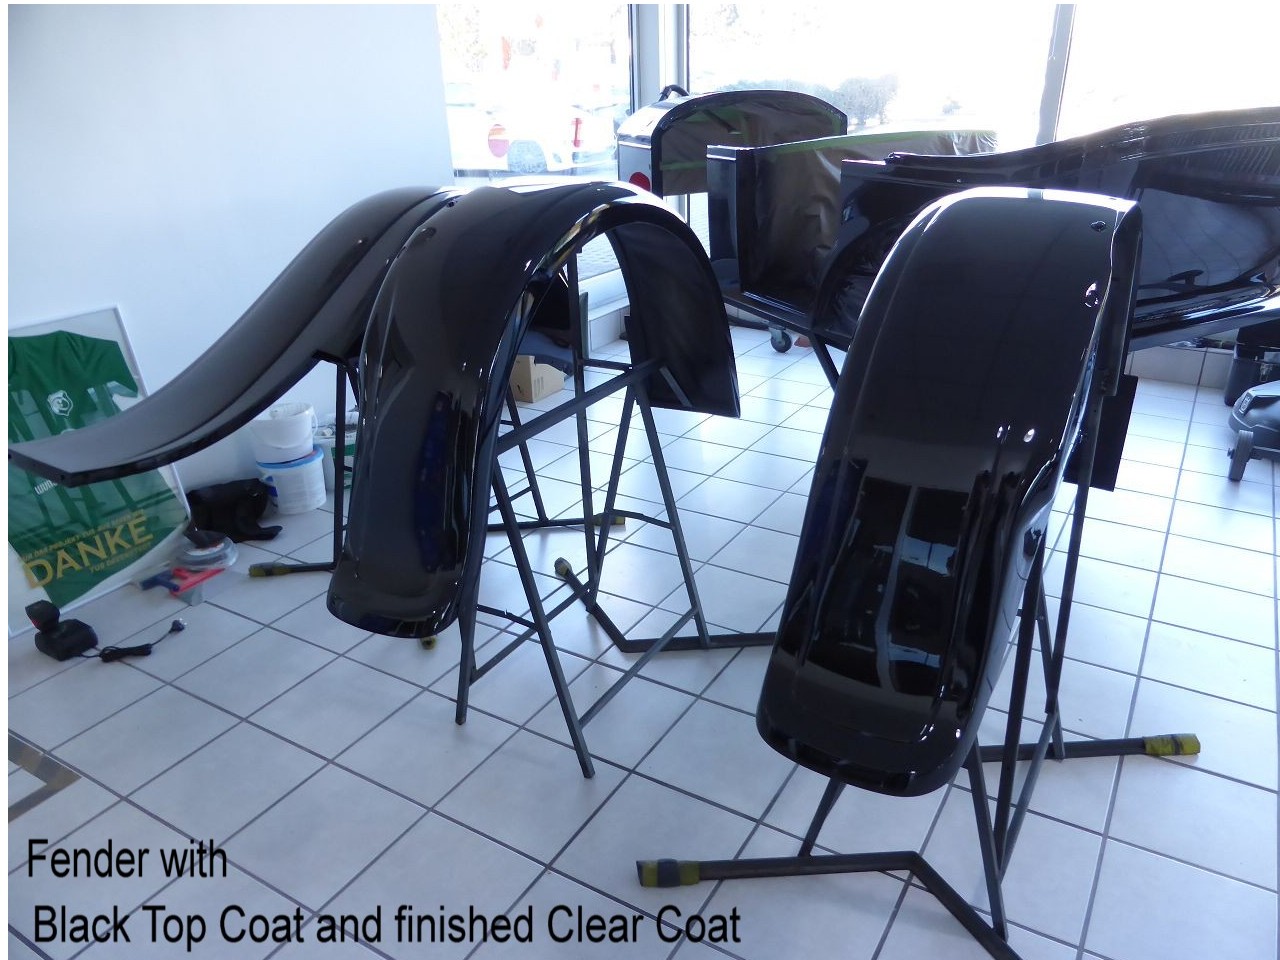
Posted on: 2/7 10:23
|
|||
|
||||
|
Re: 1924 Sport 136
|
||||
|---|---|---|---|---|
|
Home away from home
|
I want to continue showing the restoration process of the "body", ... or as we say over here ... “Karosserie”). If all the components are back from the paint shop I can start rebuilding the body. Yesterday I was able to pick up the finished painted front and rear fenders. Based on the condition after removing the old layers of paint, the result is very satisfactory. As most people here know, the paint job is one of the crucial factors in the first impression and evaluation of a restoration. It can enhance the look of a good restoration or ruin it. This also applies to the work on the interior and the soft top. I've seen a lot of really good restoration work at various classic car shows where these two jobs devalued the restoration result. And I was amazed that the jury at events like “Greenwich”. “Amelia Island” and even “Pebble Beach” always had such a large tolerance range, especially when assessing the work on the interior/soft top.
I did the preparatory work up to the final top coat myself. On the one hand, because this work takes a lot of hours, which has now become almost unaffordable here in Germany. On the other hand, because I very often did not agree with the results of the professional paint shops, especially in the details. The reason for this is always time and therefore profit. If it is done correctly, the complete rebuilding of a paint job, especially the preparatory/putty/filler work, takes a lot of time. And also costs such as heating the paint booth if the specifications of the materials manufacturer are to be adhered to and no “collapses/shrinkage” of the filler surfaces are to become visible after 2-3 years. In addition, it is difficult to find a good painter because their arguments can hardly be contradicted. They say they can complete around 30-40 accident repairs in the time it takes to build up the paint on a classic car and then finish it off. This will make you 3-4 times more money. Then there would also be the costs for materials and cabin heating All parts are painted with 2K lacquer on which additional 2 layers of clear coat were painted. This gives me the opportunity to finally grind out smaller pits and slight imperfections and to polish all surfaces, which ultimately leads to an optimal result. Since I chose a very dark red for the middle area of the body, I first had the black paint with the fender and hood painted over the entire body. This ensures that the red painted area is not brightened by the black “background”, but rather makes it appear darker, which is what I intend. This eliminates the unnecessary masking of the red color areas and improves the execution of the color transition areas. Karl Attach file: k-P1040194.JPG (100.54 KB) k-P1040280.JPG (142.56 KB) k-P1040280.JPG (142.56 KB)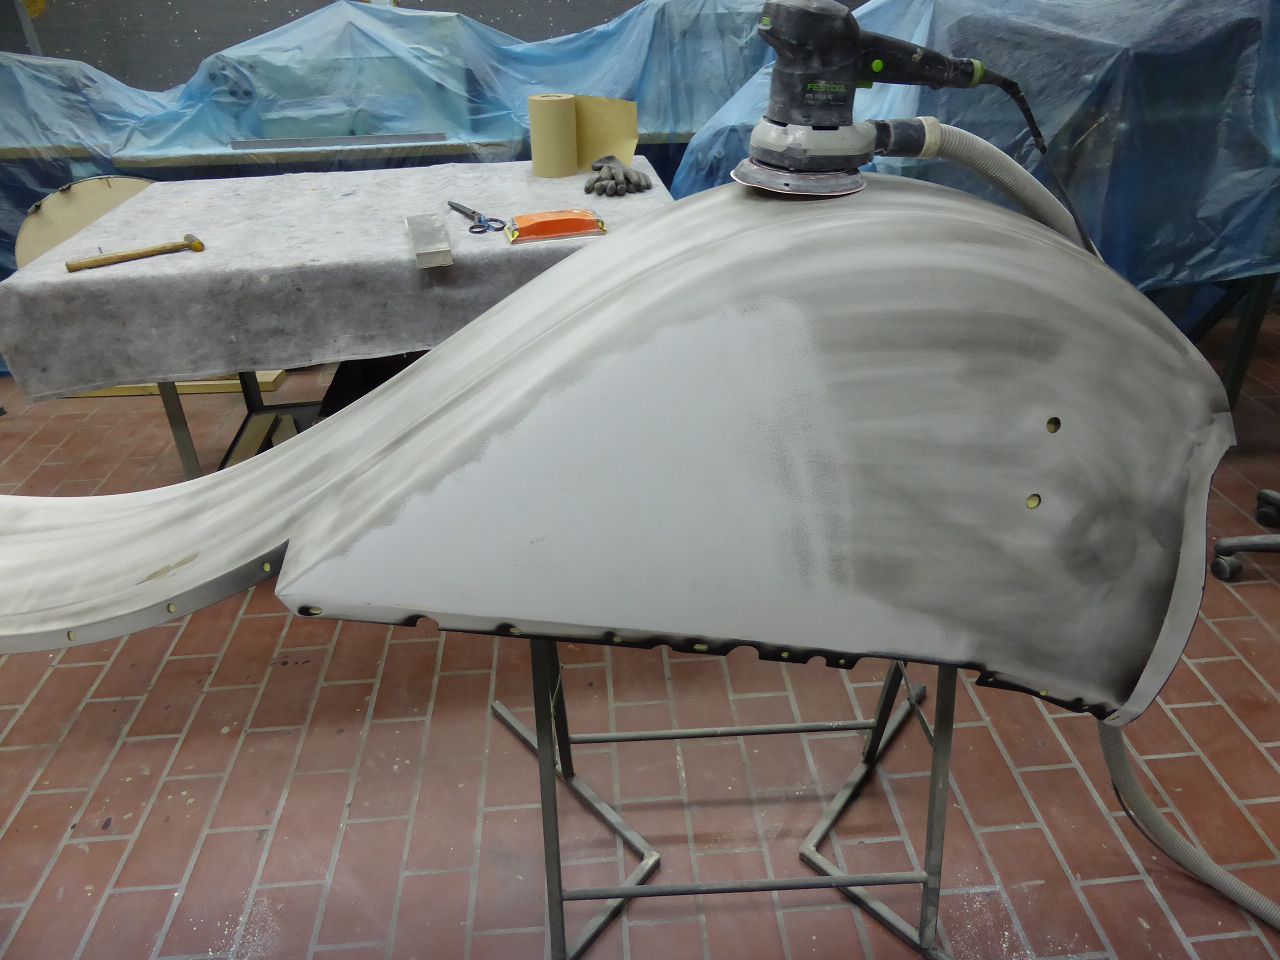
Posted on: 2/7 8:13
|
|||
|
||||
|
Re: 1924 Sport 136
|
||||
|---|---|---|---|---|
|
Home away from home
|
The whole car must have been left outside for a long time. All sheet metal parts had deep rust pits. Simply filling these up with putty would not make sense because later the putty could break in deeper in these areas than in other areas, which would lead to the typical “orange skin”. In addition, putty on the side parts of the hood in the area of the ventilation slots was out of the question anyway. So I painted all surfaces with epoxy spray filler using a spray gun and then sanded these layers back down to the sheet metal. I repeated this twice until all the rust scars were filled. I then placed the parts in the sun for 8 hours a day for 2 weeks last summer. If there is no painting booth with heating, this is one way to shrink the spray filler/putty to such an extent that further paint build-up should not cause any problems. I'm really very happy that I'll never have to do this work again... like grinding the fan slots or grinding out the fender beads.
Karl Attach file: k-P1040195.JPG (136.91 KB)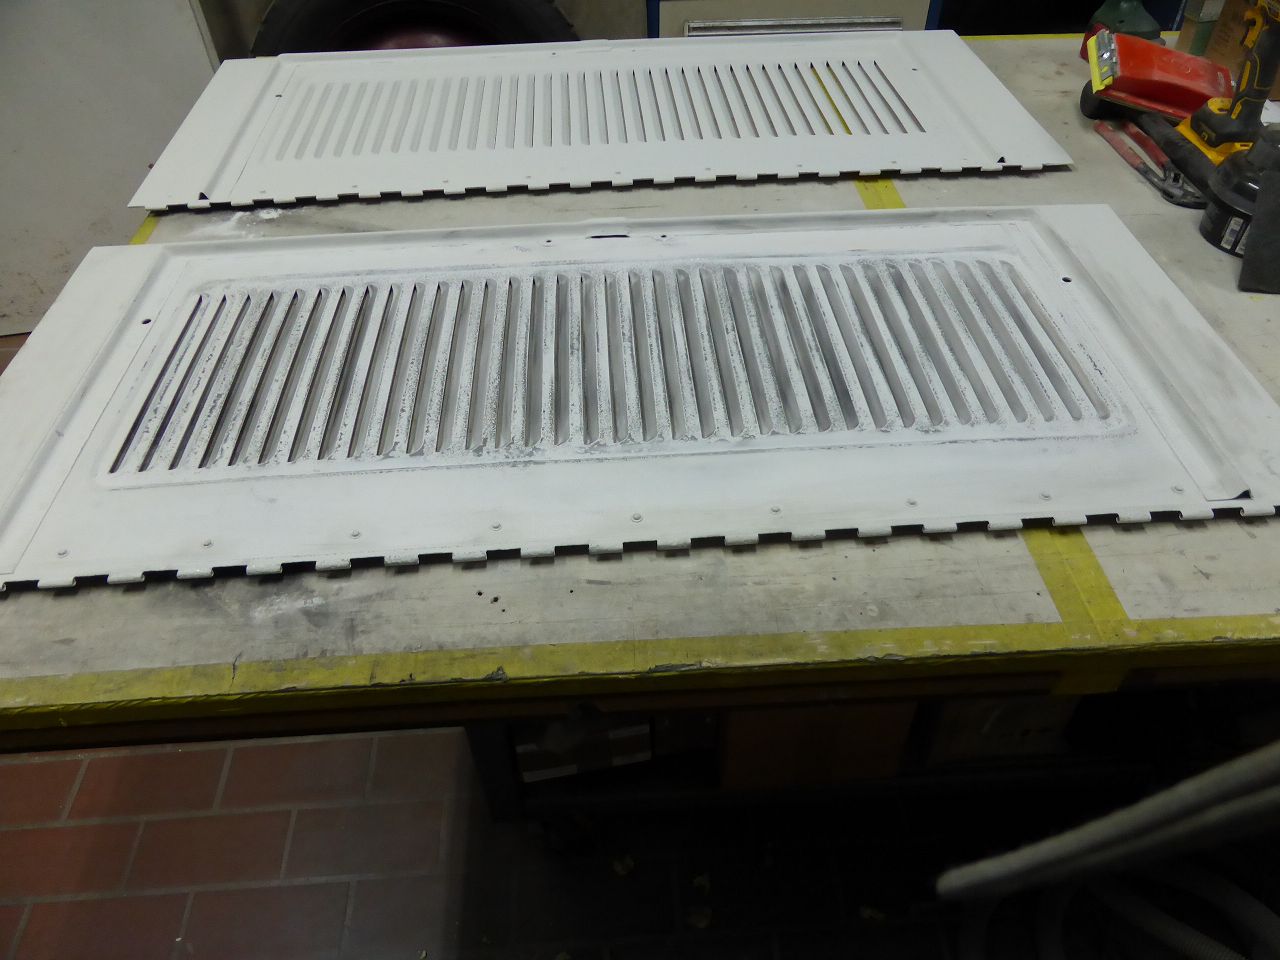 k-P1040198.JPG (138.86 KB) k-P1040198.JPG (138.86 KB)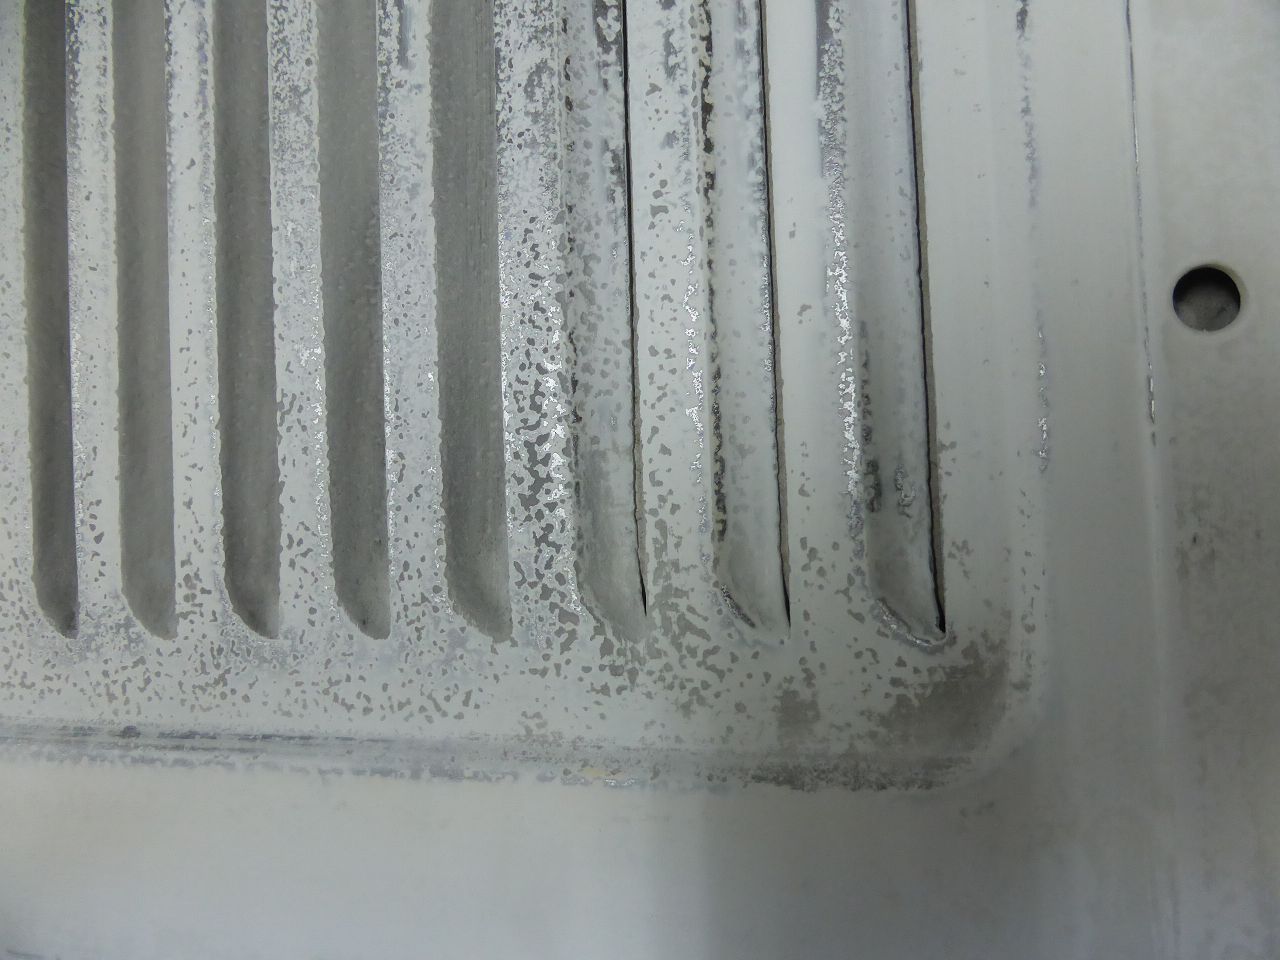 k-P1040200.JPG (125.55 KB) k-P1040200.JPG (125.55 KB)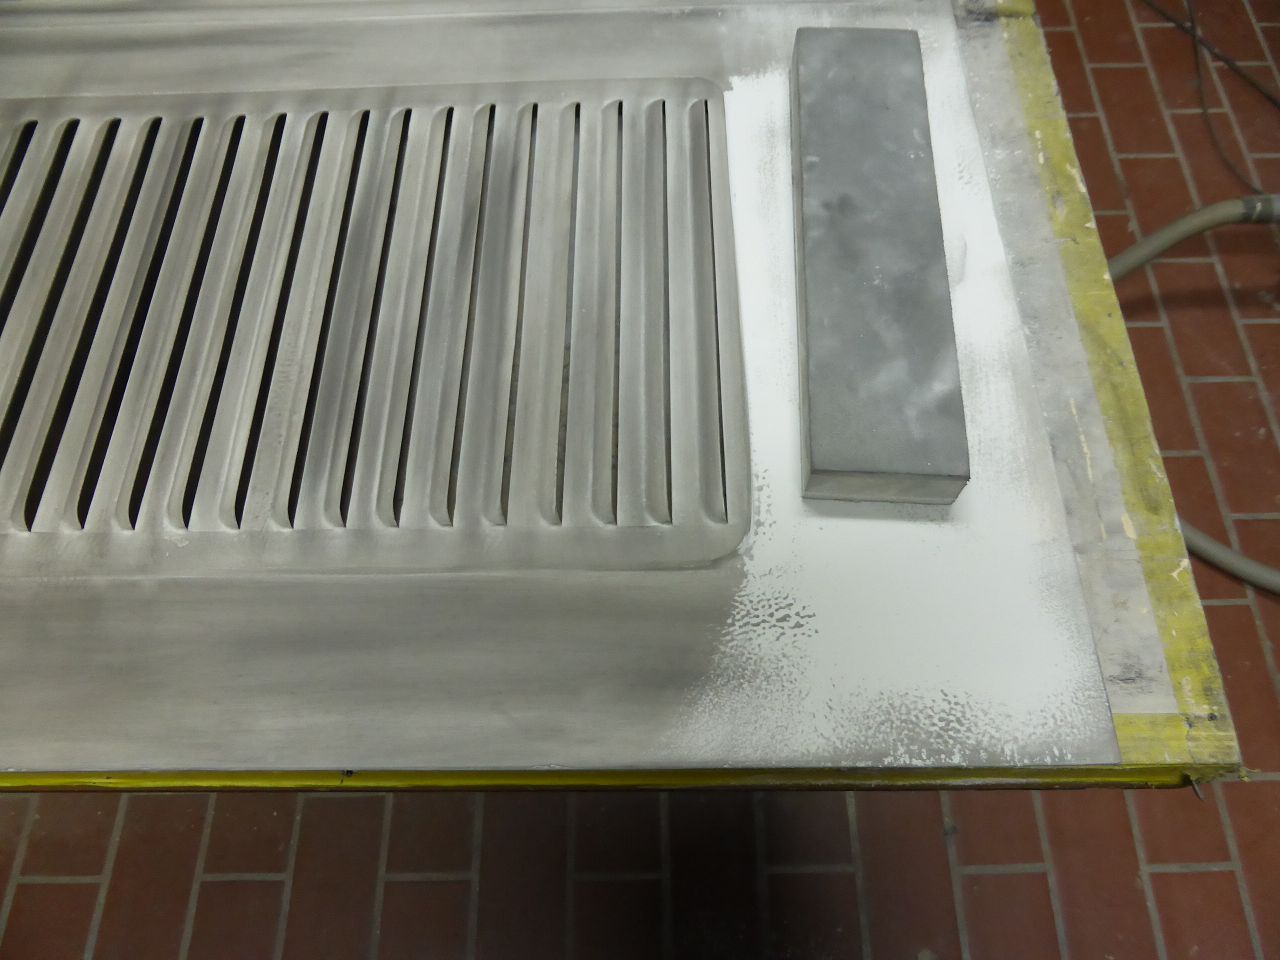 k-P1040201.JPG (159.06 KB) k-P1040201.JPG (159.06 KB)
Posted on: 2/7 8:09
|
|||
|
||||
|
Re: 1924 Sport 136 Muffler Dimensions
|
||||
|---|---|---|---|---|
|
Home away from home
|
Dear Packard Friends.
I'm urgently looking for the dimensions for the muffler of my 1924 Packard Single 8 (Sport Phaeton 136). I asked about all the options that I knew of and that were mentioned to me by members in the Packard forums. Unfortunately, even the well-known museums and administrators of blue prints on Packard vehicles have no data on my 1924 8-cylinder model. There is someone who has this data. But because he rebuilds and sells this silencer himself, he cannot release the dimensions because he is afraid that some 75-year-old dummy in Germany could pass on this data and sales for the sale of this !924-1926 component could at least collapse and so on Its sales/profits are at risk. Of course I understand that. But I would have the opportunity to buy one of his replicas. Unfortunately, the costs for purchase, shipping, + 10% customs duty + 19% import sales tax are utopian for me and not included in my restoration budget. It is my principle to recreate all components myself that can be recreated. And this silencer is a relatively simple construct and it is no problem for me to recreate it. What I'm missing are the exact dimensions of the individual components of the muffler, which can be seen on page 81 of the Parts List 1924-1926. Of course, I don't expect anyone who has such an original silencer installed in their 1924-26 Packard to remove it and disassemble it to give me the dimensions. But maybe there is someone who knows where such a muffler can be found in a removed state. But if this is not possible, perhaps a very good copy from an original parts list would help. The copies I have are copies of copies and are not very suitable for enlargement. Since the components are not drawn but photographed, the images could be enlarged so that the other dimensions and data could be determined using reference dimensions. The most important dimensions are the dimensions of the two inner tubes and here the diameters of the holes in these tubes, as well as the number and location of the holes. The two inner tubes form 3 chambers throughout the entire silencer. Due to the different position and the different number of holes in the two tubes, the clocked sound waves are superimposed in anti-phase in the chambers, thus reducing (dampening) the sound. Construction and material also play an important role in the sound and thus the vehicle-specific and typical sound produced by the various automobiles. Therefore, the dimensions are essential for a usable replica. So, I'm grateful for every hint. Karl Attach file:  k-1924 Muffler- Kopie.png (1,254.70 KB) k-1924 Muffler- Kopie.png (1,254.70 KB)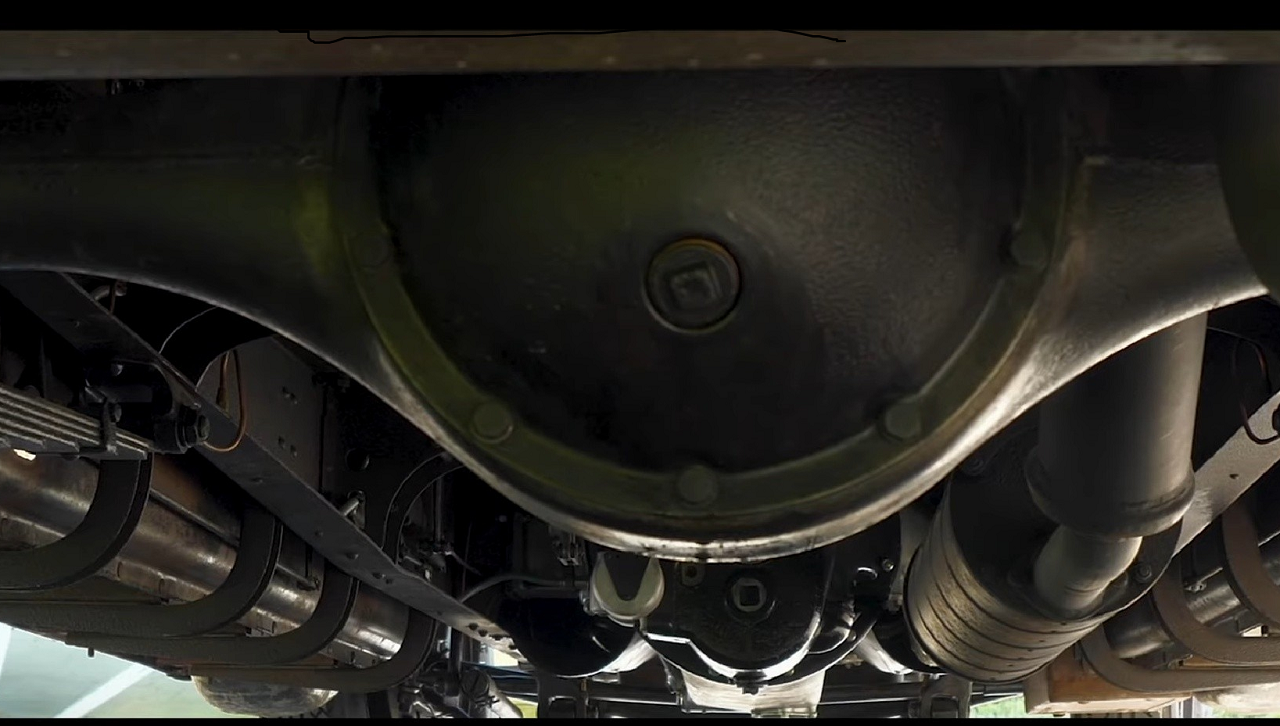 k-Muffler Skitze - Kopie - Kopie.png (1,266.66 KB) k-Muffler Skitze - Kopie - Kopie.png (1,266.66 KB)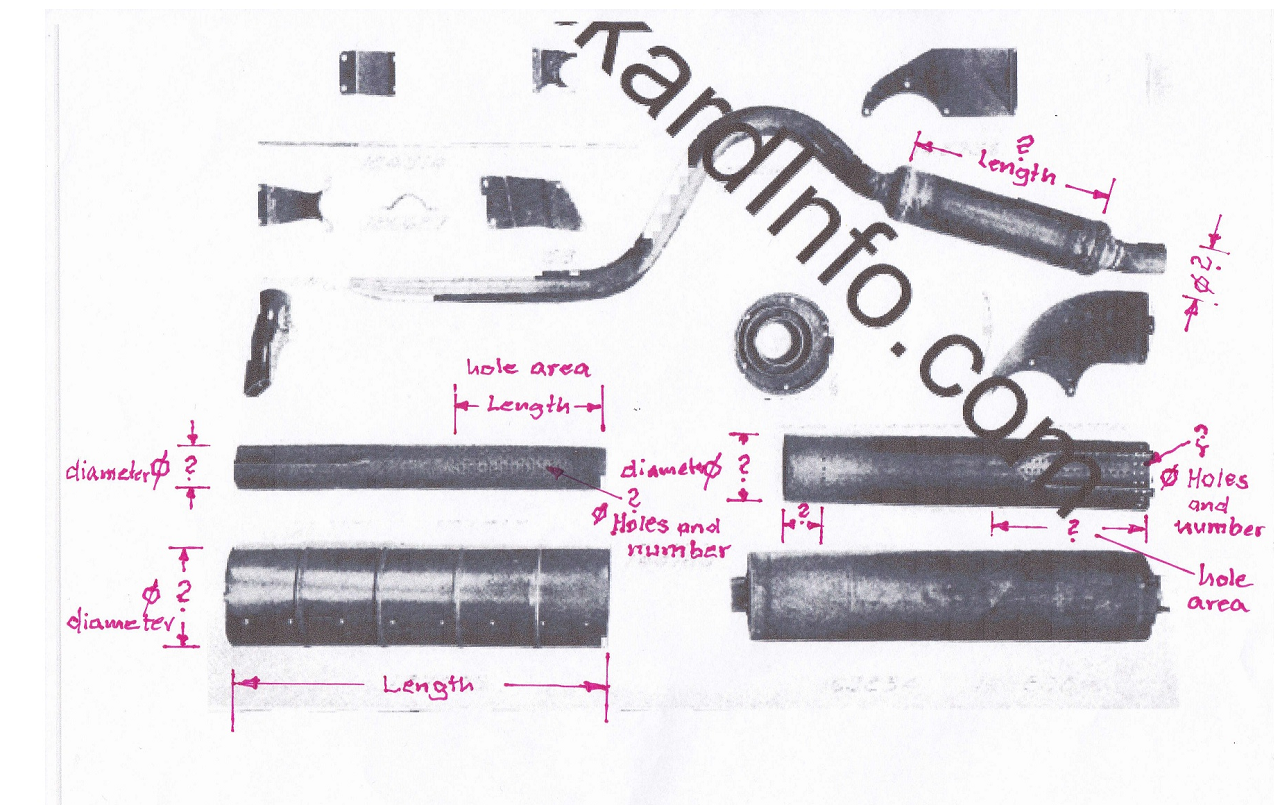
Posted on: 2/2 6:01
|
|||
|
||||
|
Re: 1924 Sport 136
|
||||
|---|---|---|---|---|
|
Home away from home
|
Dear Packard friends,
Today I had a little bit time and read my previous posts, which were translated from German language into English by using the GOOGLE TRANSLATOR. Even with my lousy knowledge of English, I noticed that there were a few things wrong with this translations. So I translated the English translation of some posts back into German. What came out of it ... really surprised me. I can imagine that some of you probably shook your head when you read these texts. It seems as if the proportion of possible „AI“ in this translator is infinitesimally very very small. In no case can the “I” have anything to do with „Intelligence“. So I ask all readers once again to please be patient when reading my posts. If anyone knows a translator... even if it costs something... which is better than this one from GOOGLE, please give me a hint about it. In the meantime, I will try to eliminate the worst errors through “back translation” (German-English >>> English-German) and hope this will help. Karl
Posted on: 1/20 11:37
|
|||
|
||||
|
Re: New member with new Packard
|
||||
|---|---|---|---|---|
|
Home away from home
|
Hi Stan,
if I hadn't found my 1924 Sport Phaeton, I would be extremely jealous of your 1932 903 Phaeton. How about you introduce yourself and your automobile in the “Pre-War” forum and “throw yourself to the wolves” there. Either way, you'll find that this Packard information page can be extremely helpful. In any case, the members have helped me a lot in many cases to save time and find the right answers and how and what to do. In order to avoid driving from one breakdown to the next when purchasing a Packard of this age, a detailed inventory of all technical components is extremely important. Especially if no clear and verifiable documents were provided for the vehicle. And if the car hasn't been driven for a few years, you'll have a lot of work to do before you can really enjoy the car. For me, it has always been fun to bring a vehicle into top technical condition. If you're lucky with the purchase, you'll be able to have fun with the car very quickly. If you're unlucky, it can take a long time and cost a lot. I keep my fingers crossed that you were a lucky guy. Karl from Germany
Posted on: 1/18 9:31
|
|||
|
||||
|
Re: 1924 Sport 136
|
||||
|---|---|---|---|---|
|
Home away from home
|
Here is a suitcase that I recreated the original for another project.
Attach file: k-1 - Kopie.JPG (143.54 KB)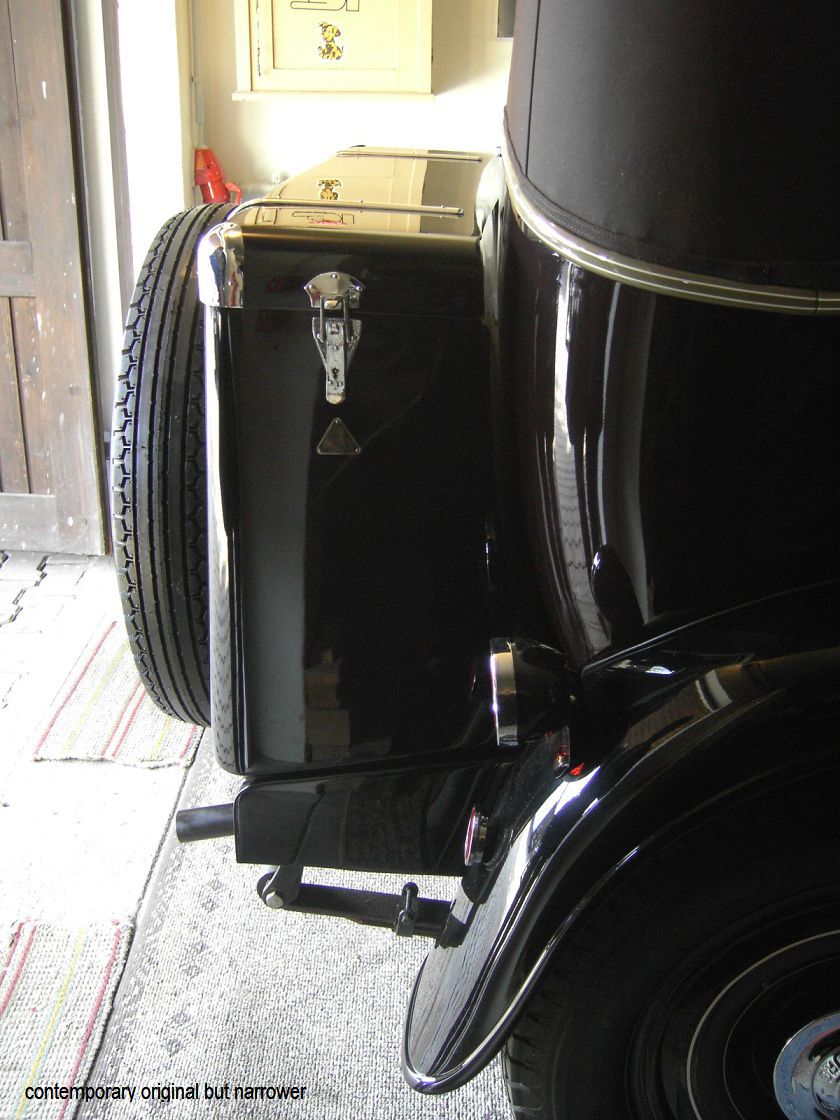 k-2.JPG (262.32 KB) k-2.JPG (262.32 KB)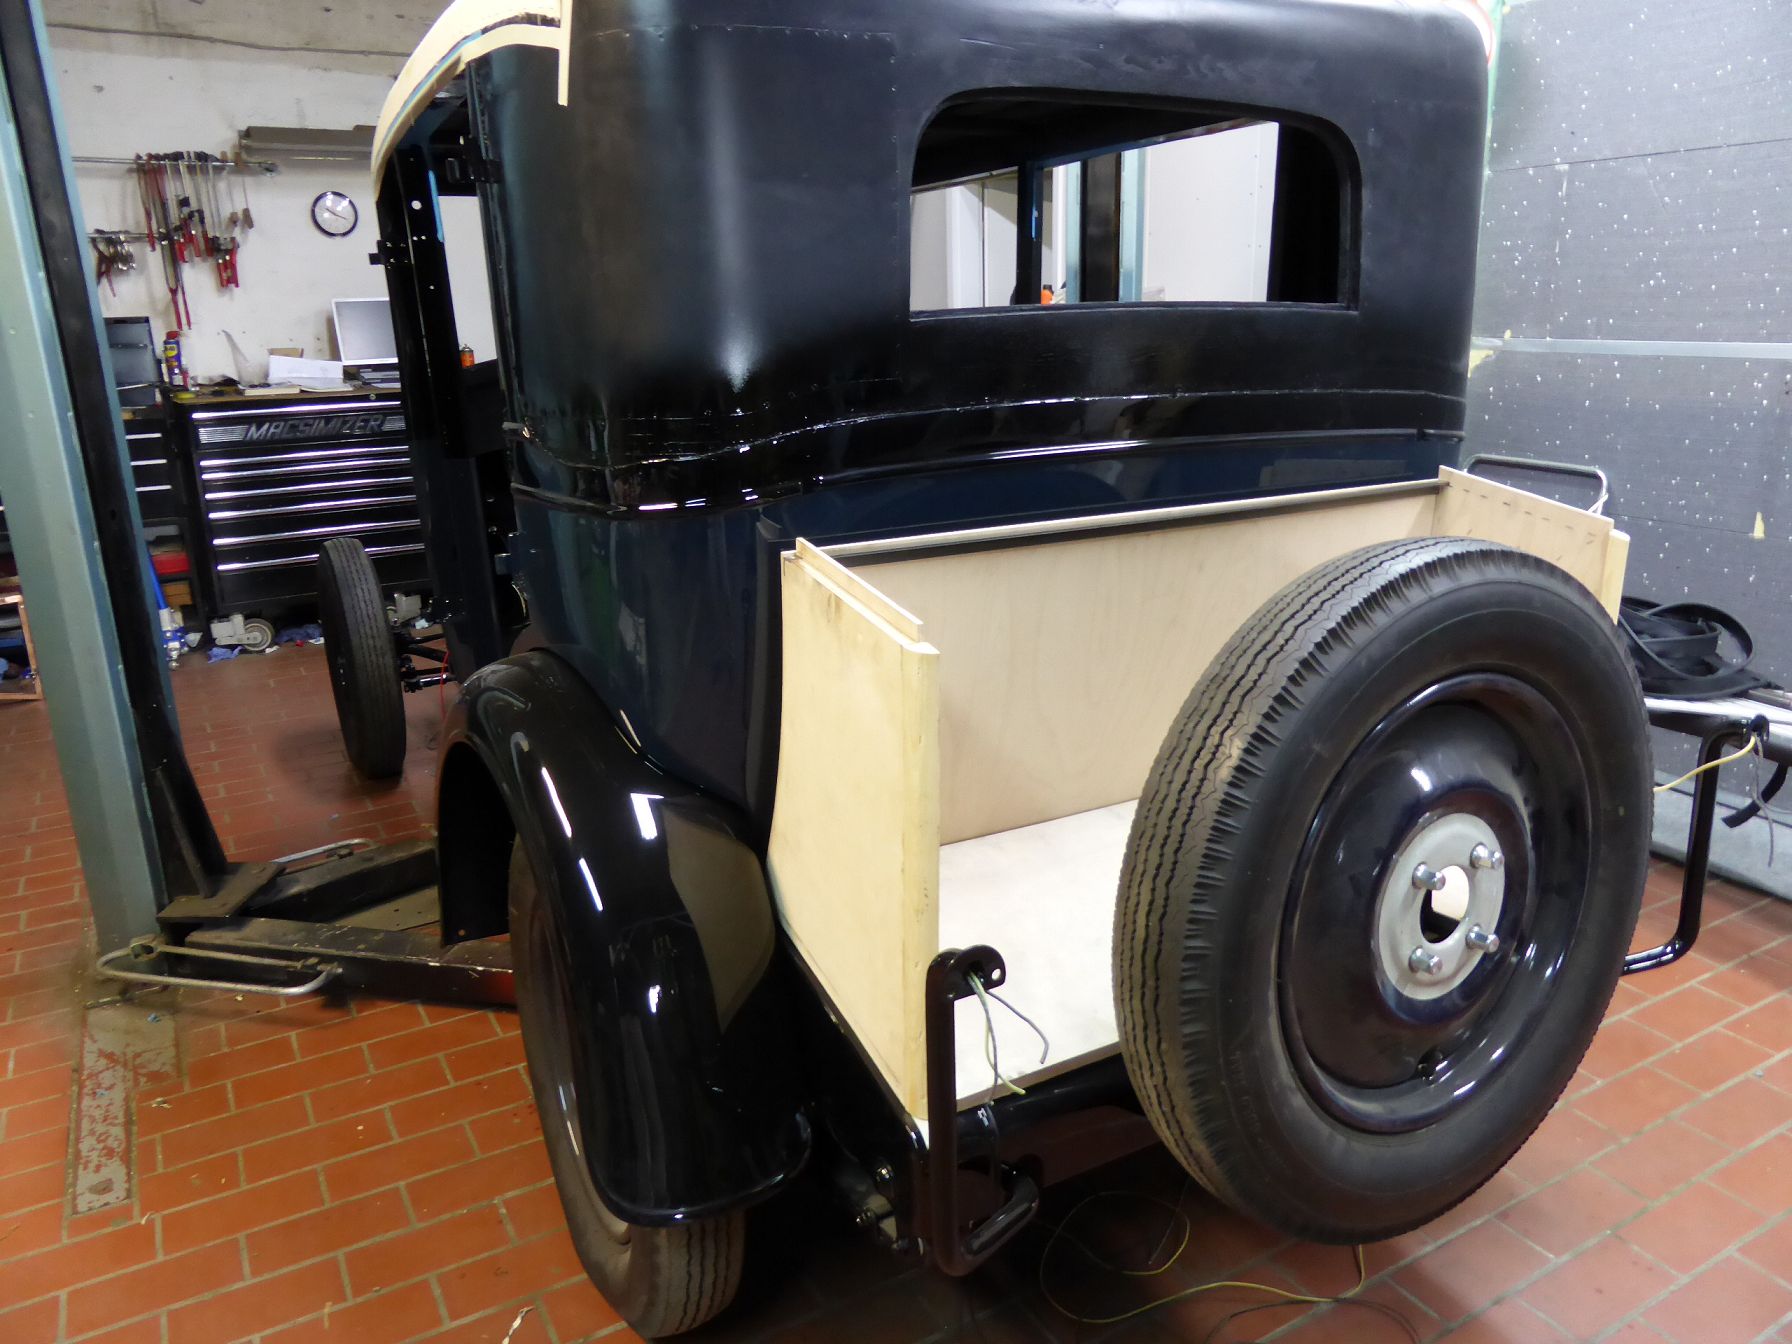 k-4.JPG (197.07 KB) k-4.JPG (197.07 KB)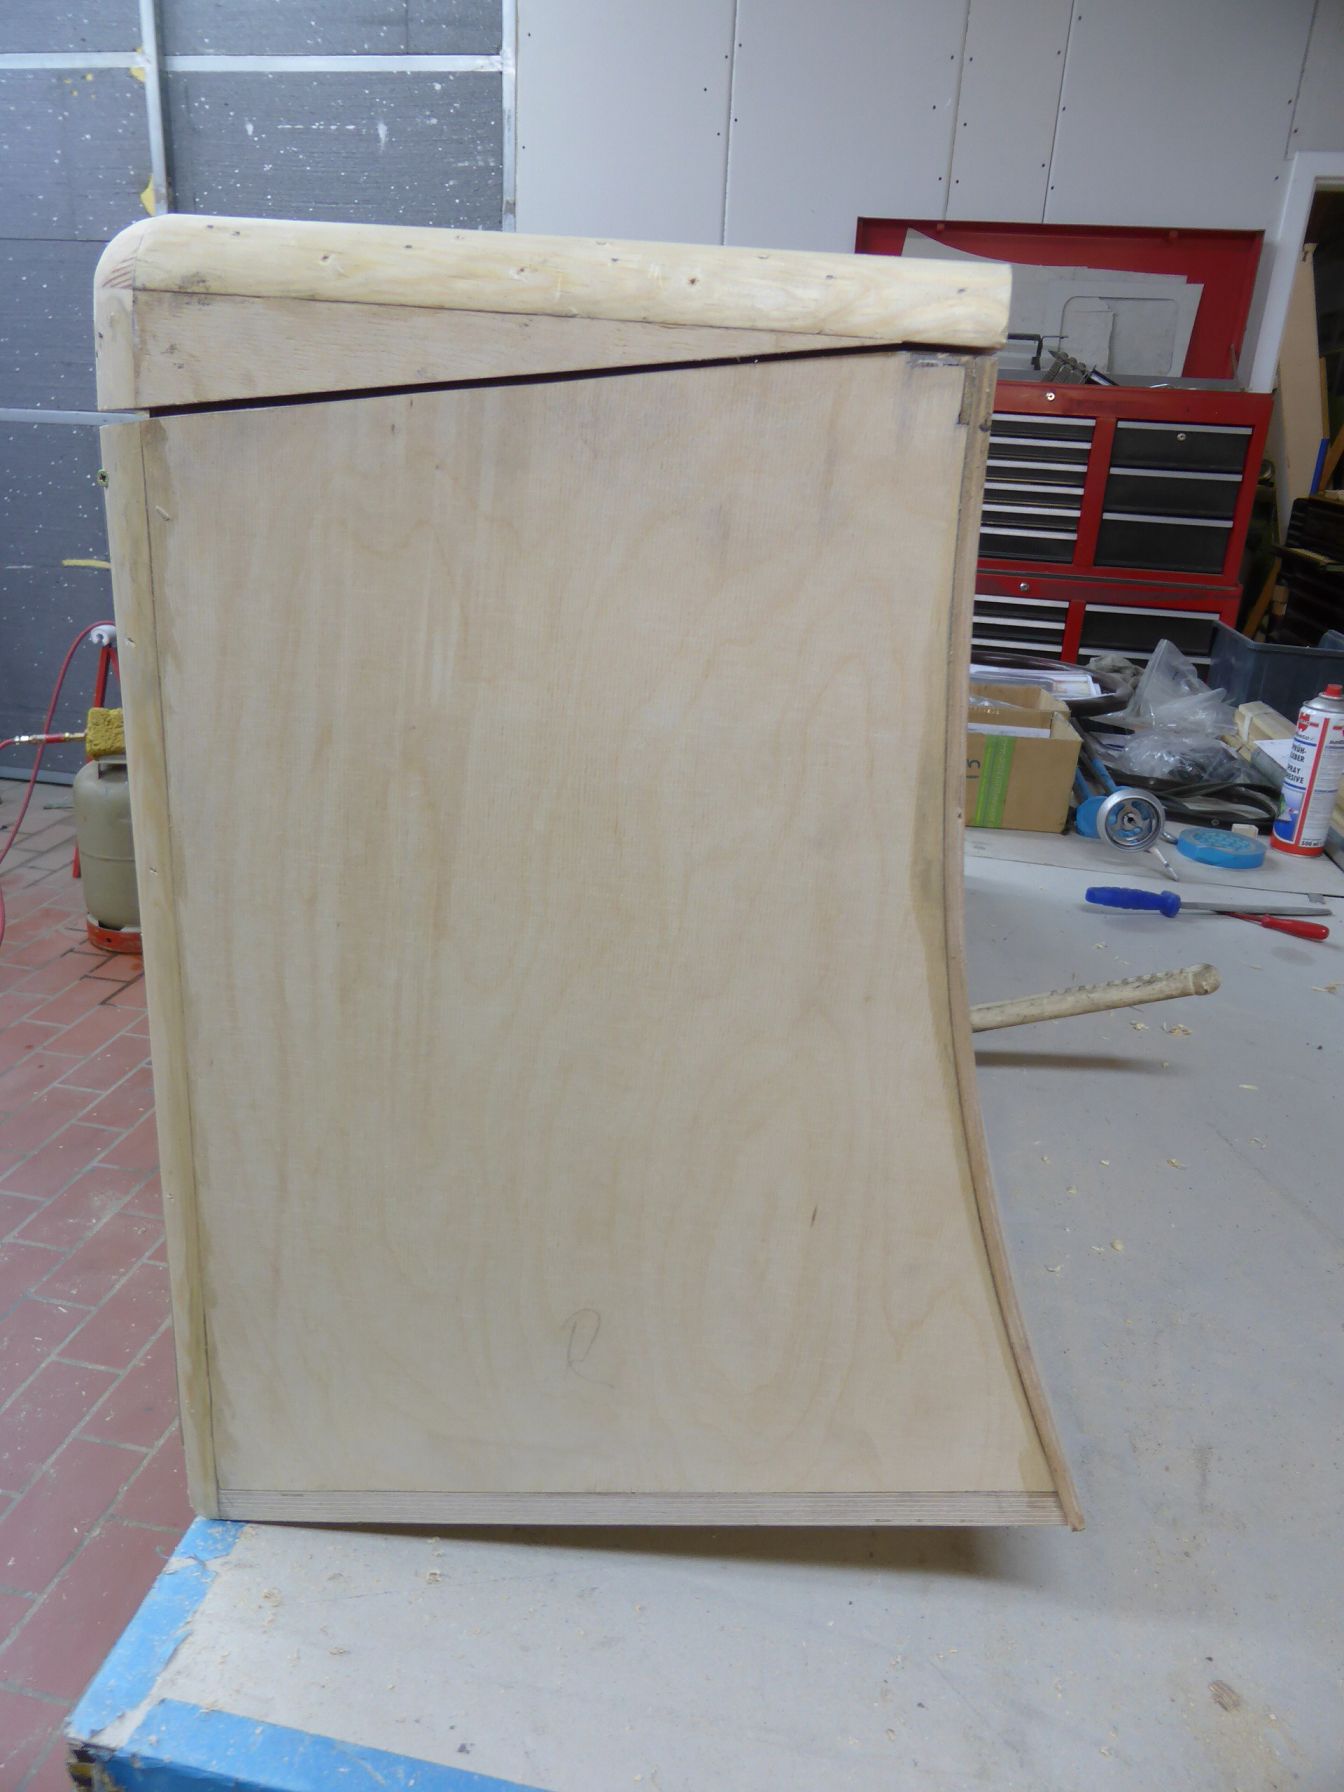 k-p1030077 - kopie.jpg (488.52 KB) k-p1030077 - kopie.jpg (488.52 KB)
Posted on: 1/16 17:56
|
|||
|
||||


