|
Re: 56 Rear Torque Arm Bushiongs
|
||||
|---|---|---|---|---|
|
Home away from home

|
Thanks OD, that's basically what I'm using now in rubber but will check around over here to see if there's something available in polyurethane. I am interested in finding out if there's any difference in performance or is the main benefit just longer life? When I read your comments it started me thinking that polyurethane would be a much better option because it should retain shape more readily than rubber, wear longer and therefore perform better. Cheers, John
Posted on: 2014/6/13 22:35
|
|||
|
||||
|
Re: 56 Rear Torque Arm Bushiongs
|
||||
|---|---|---|---|---|
|
Home away from home

|
Having just replaced all bushes on the arms of my '56 Patrician, there's a couple of tips in this topic I wasn't aware of at the time but would have seriously considered had I known. They are using '55 bushes and inserting a piece of rubber between bushes (size not stated). Anyway the job's done now so there's nothing to worry about for now, but for how long?
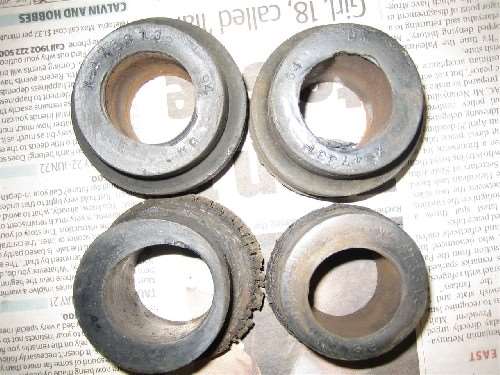
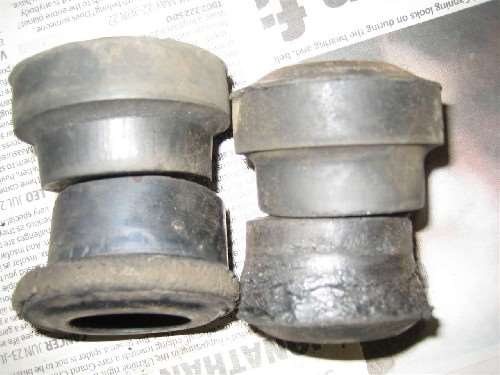
By the way, in disassembling everything I noticed the lower bushes were worn much more than the uppers. I've attached a couple of pics of the RHS bushes as these were replaced by the previous owner not long before I bought the car (I've had it for about 7 years). The LHS wasn't done by him as it apparently didn't need newies, but having a hell of a job disassembling that side makes me think they surely did need doing back then. Anyway, these RHS bushes have Packard numbers moulded into them, no mention of Steele, which could mean they were NOS. If polyurethane bushes are suitable I'd consider redoing the job some time in the near future if it meant not having to do it again for a looong time. With my limited knowledge of the compression stresses on rubber bushes, my only concern is whether polyurethane would perform the same job (ie, compression v hardness). I'm thinking they would work well on the fronts as they seem to have a mostly rotation role, even though they are compressed during assembly. I would also be interested in finding out more about the rear stabiliser bar (watts linkage) polyurethane bushes as the rubber ones I installed a few years ago are already showing signs of wear (the outer ones - not sure about the inners).
Posted on: 2014/6/13 0:24
|
|||
|
||||
|
Re: Rear Bushings
|
||||
|---|---|---|---|---|
|
Home away from home

|
Job's done! Sounds simple and Ross' instructions also sounded simple, but I'm here to tell you that life wasn't meant to be easy, or simple. It seems the Patrician had had the right side bushes replaced in recent history and was able to be disassembled relatively easy, although that 1.5" nut on the front pivot needs a bloody big spanner.
However, for some reason the left side hasn't been touched for donkey's years (that's aussie for a hell of a long time). The rubber components were stuck pretty well to the metal surroundings, but were eventually able to be dislodged with plenty of penetrating lubricant, levering and cutting. After that the fun really started. Both metal sleeves were frozen firmly to the "U" bolt and refused to budge no matter how much penetrating fluid or hammering was done. I don't have an oxy set but do have a small propane torch so eventually called on that to apply some heat. This was alternated with rotational force using vice grips. Nothing seemed to be happening for quite awhile until a small amount of movement was felt. Repeatedly doing this finally dislodged the B. The same thing all over again with the other one. Boy, was I weary after all of this heavy stuff. I turned the sleeves in the lathe to take of the high spots and reamed the inside to remove all rust. Likewise with the "U" bolt regarding rust removal, and assembled everything using plenty of Loctite anti-seize lubricant on metal to metal parts and rubber lubricant on the rubber parts. The suspension arms are pretty long and weighty and reattaching them to the car is awkward. Another pair of hands would have been great but the job can be managed with a jack and a lot of grunting. Was it worth it? Most definitely! I didn't realise the difference it would make having new bushes on both sides and all components being able to move as required. In short, the rear end now feels tighter but more supple. Also, that squeak I thought I had in a left torsion bar bush is gone - maybe it was the rear axle bushes all the time. I feel the car now sits on the road better and corners better. I just hope that I don't have to do it all again anytime soon. Cheers, John
Posted on: 2014/4/27 6:01
|
|||
|
||||
|
Re: Rear Bushings
|
||||
|---|---|---|---|---|
|
Home away from home

|
G'day Pat,
The four piece set goes to the front of the suspension arm (the pivot point) and the eight piece set to the other end where the arm bolts to the axle housing (with "U" bolts). Plate 32B in the Parts Book shows where they fit (all 12 numbered 15.994). I've now started the process of getting the four piece set to do the job properly as recommended by Ross. Cheers, John
Posted on: 2014/4/3 1:12
|
|||
|
||||
|
Re: Rear Bushings
|
||||
|---|---|---|---|---|
|
Home away from home

|
Thanks Ross, your instructions are very detailed but quite easy to follow. Sadly I don't have the space for a lift (we call them hoists) so will have to use the jacking method. I actually ordered a bushings kit from Steele but didn't realise that it was for the axle bushings only - obviously the fronts have to be ordered separately. I take your point about doing the fronts at the same time and I should have done my homework properly and ordered them as well. So, I'll do that today and the job can wait until they arrive. Means paying again for shipping but that's the penalty I'll have to wear for not being thorough enough. Thanks again, John
Posted on: 2014/4/2 16:58
|
|||
|
||||
|
Rear Bushings
|
||||
|---|---|---|---|---|
|
Home away from home

|
G'day Men,
I've just taken delivery of a set of Steele Rubber rear support arm bushings for my '56 Patrician and am seeking some advice about the best way to tackle the job. I've consulted the service manual but it provides very little information That I could find on the subject at all and I've done a search on this website but drew a blank as well. On the face of it, it doesn't look too complicated but with the torsion bars hooked up back there, I don't want to end up with a catastrophe. Are there any pitfalls to be wary of? Also, is there a "better" way to do it rather than just undoing 4 nuts and lifting the axle sufficiently to remove and replace the bushings. All advice gratefully accepted. Thanks, John
Posted on: 2014/4/2 0:07
|
|||
|
||||
|
Re: OIL FILTER MYSTERY
|
||||
|---|---|---|---|---|
|
Home away from home

|
Russ, Ryco has a suitable oil filter over here in Oz - it's an R4P and they can be ordered in if your local Repco doesn't have them in stock. As I understand it, the oil filters are bypass filters and as such don't filter all the oil all the time as it circulates around the engine. Some of the guys on this site have fitted direct inline filters but this apparently needs to be done with the engine apart. I change my filter every second oil change. Cheers, John
Posted on: 2014/3/3 5:11
|
|||
|
||||
|
Re: Windscreen Glass - Front
|
||||
|---|---|---|---|---|
|
Home away from home

|
G'day Fellas, I've got an update for you about the new screen. The fitter came back to fit the external stainless mouldings this week and had all sorts of trouble. Pretty much nothing went back like it used to be, especially the side dog legs. He put that down to the smaller size windscreen plus the Steele rubber gasket, which he said wasn't as good as the original in "retaining" the mouldings. Fortunately, he has a lot of skill and expertise with such difficult tasks and achieved a reasonable outcome. If I had a concours car I definitely wouldn't be happy with the way it looks, but I don't and can live with it.
By the way, a friend has new AGP screen which hasn't yet been fitted so I was able to measure it and it's height is 18 5/16" (465mm) across the flat in the centre. Compared to Warren's dimensions, this is 1/8" shorter, which doesn't seem like a lot. However, this means the rubber gasket isn't stretched by that much and therefore doesn't reach as far on the body' and it also makes it much harder to squeeze the mouldings into their correct positions. I'm unable to comment on whether the Steele gasket actually has the same dimensions as the original, so don't know whether this is an influencing factor as well. John
Posted on: 2013/12/6 5:23
|
|||
|
||||
|
Windscreen Glass - Front
|
||||
|---|---|---|---|---|
|
Home away from home

|
I've just had my front windscreen replaced by a classic car specialist and thought some might be interested in a problem we encountered. The maker of the screen is AGP (American Glass Products) but I don't know which plant it came out of. The part # is DW-0413 and it is tinted with a darker band at the top and from what I understand this is probably the only brand that can be obtained over here.
The problem relates to size, specifically the height of the screen from top to bottom. I wasn't aware we had a problem until the new screen was installed so couldn't actually measure new against old. However, from what the installer told me, the new one is shorter by maybe as much as 3/8" and he had to pack it out to raise it so the thing would seal at the top. By the way, a new Steele rubber was installed at the same time. I thought that this is something to be aware of if you are considering fitting a new screen. For those Aussies amongst us, if you need a new windscreen and are finding it hard to locate one, I suggest you try Ralph Moore. He is very helpful and his details are as follows: Ralph Moore Autoglass Pty. Ltd. 6 John St., Mascot, New South Wales Australia 2020 Telephone (02) 9667 1933 or (02) 9669 1628, Fax (02) 9669 6605, ISD code (61-2) Email: autoglass@bigpond.com Website www.ralphmoore.citysearch.com.au Cheers, John
Posted on: 2013/11/28 22:25
|
|||
|
||||

 (142.06 KB)


