|
Re: Broken Watts Linkage stud
|
||||
|---|---|---|---|---|
|
Home away from home
|
Gerry: thanks. Replacing the whole arm may be what I have to do; although I'd not be looking forward to that.
Dave: I have not been able to find previous posts on replacing the stud itself; although a lot of good info on the Watts bushings themselves. Regarding welding, I was referring to the observation that the stud looks to be welded to the bracket on the rear support arm. If that is the case, I would need to pull the arm out to take it somewhere to cut out the existing, broken stud and have a new one welded in. (I did not mean to try to weld the broken stud back together). Wondering how much better (ride/life) Dwight's urethane bushings would be from Kanter's polyurethane ones?
Posted on: 2018/11/26 17:05
|
|||
|
Bob
1955 Packard Patrician Sapphire Blue |
||||
|
||||
|
Broken Watts Linkage stud
|
||||
|---|---|---|---|---|
|
Home away from home
|
While seeing how hard it would be to remove the Watt's linkage to possibly replace the bushings (reference Heinmuller's article in the Cormorant last year), I snapped the passenger side stud trying to remove the nut. Looking at the parts plate, it seems like I need to take a lot apart to get to this stud; which looks like it is welded to the bracket assembly on the rear support arm (??)
This doesn't seem trivial to do, but maybe the instructions that comes with Heinmuller's kit (was $335 +shipping for just the rear bushings) will help get me to a place where I can replace that stud. Anyone have any lessons learned for this? I don't have the ability to weld at home, so may have to pull out the rear support arm to take somewhere. thx Note the existing bushings are very hard and need replacing. Attach file:  (125.74 KB) (125.74 KB)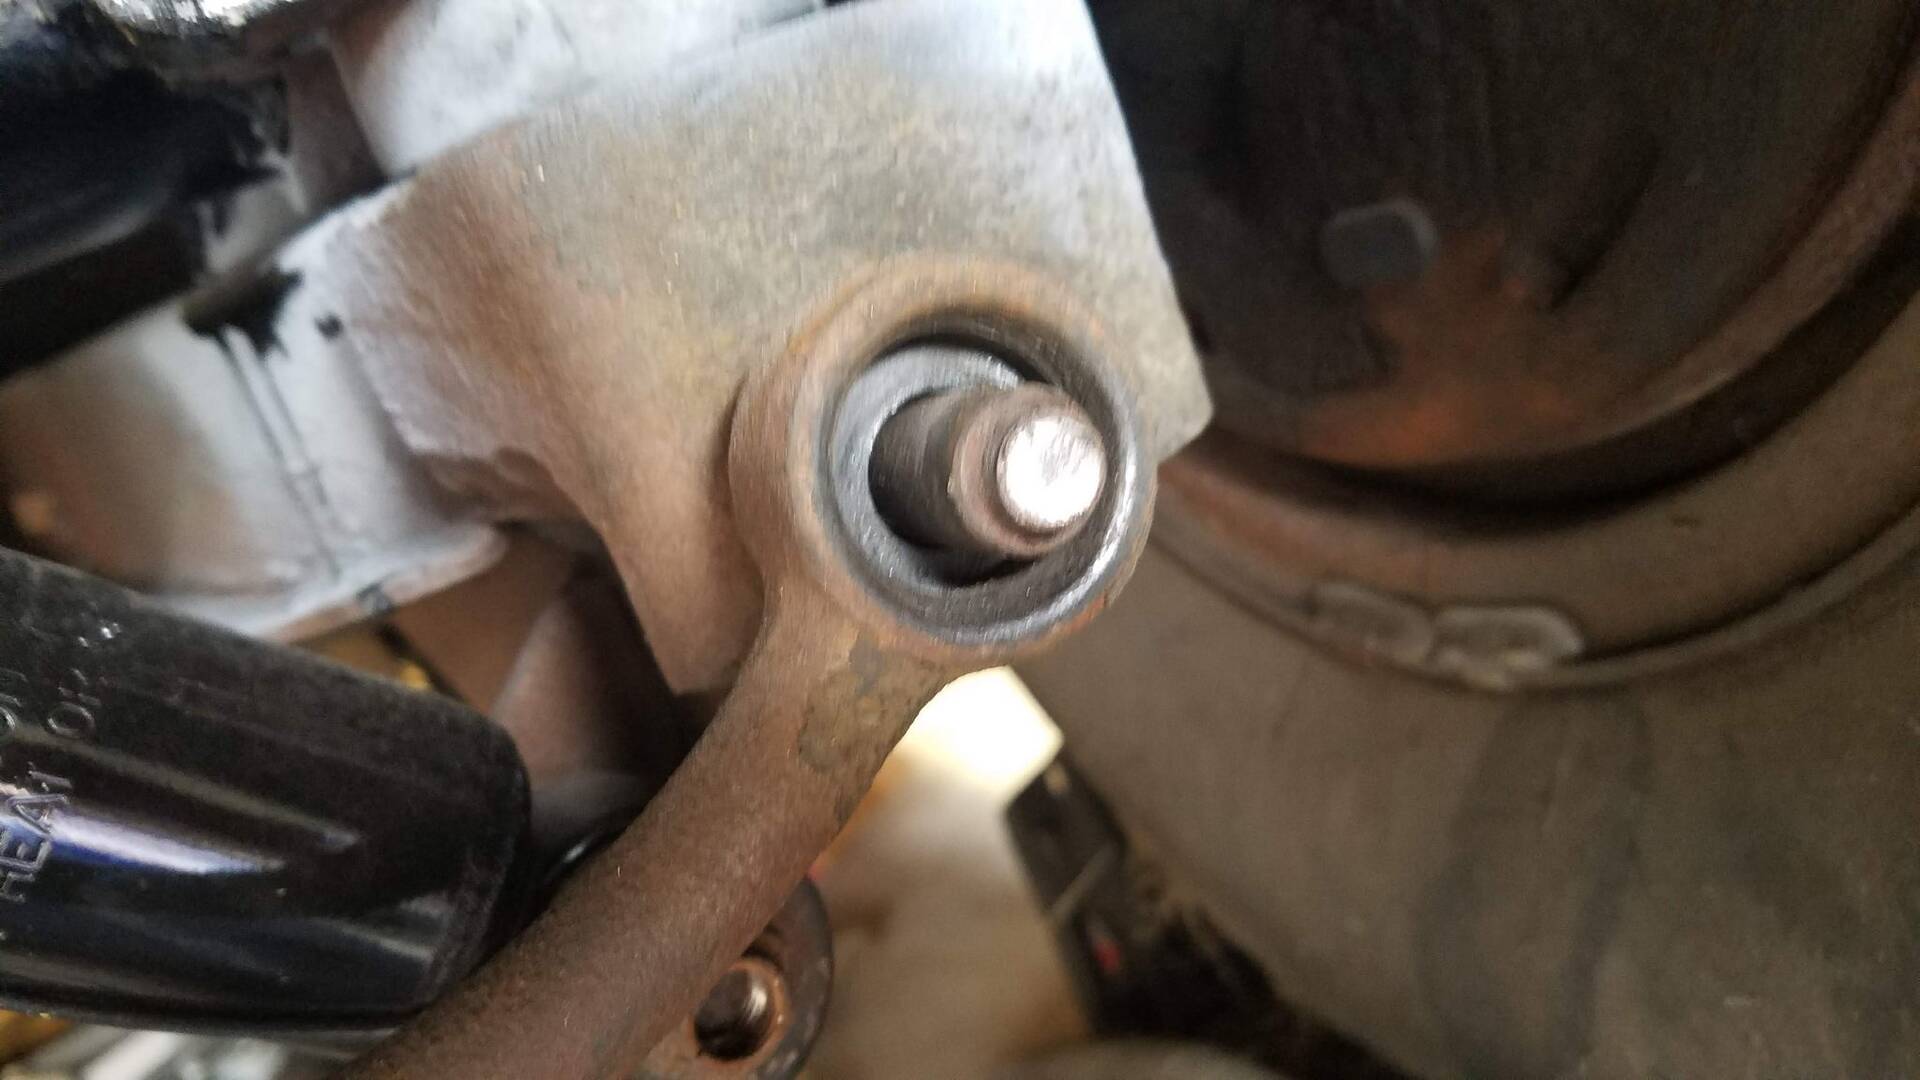 (111.02 KB) (111.02 KB)
Posted on: 2018/11/25 17:18
|
|||
|
Bob
1955 Packard Patrician Sapphire Blue |
||||
|
||||
|
Re: 1956 Patrician vin & firewall stamping
|
||||
|---|---|---|---|---|
|
Home away from home
|
To me, it looks like 33894
Posted on: 2018/9/11 9:16
|
|||
|
Bob
1955 Packard Patrician Sapphire Blue |
||||
|
||||
|
Re: Worn Rocker Arm & bore
|
||||
|---|---|---|---|---|
|
Home away from home
|
thanks Jack.
I replaced all the lifters and all of the old ones show the circular wear pattern implying that they were rotating before this rebuild. The cam wasn't reground for this rebuild (machine shop recommendation) so I would think that if the lifters were rotating before and not now that it wouldn't be the cam lobe taper. (unless I just ruined the taper in my initial startup because the lifters weren't turning for some other reason. the non-turning lifters still have some convexity to their face) I don't know what the machine shop did to clean out the block and bores. They seem smooth and I have cleaned them really well now with a plastic bore brush, soft cloth, and brake cleaner. When I put this together after the rebuild, I was liberal with the assembly lube between the cam lobes and the lifters so I am sure that some of the moly-based lube got into the bores too. There was a little 'grittiness' in the bores when I took out the lifters but some of that was probably when i took the tappet valley cover off and stuff dropped in. This time I was going to be more obsessive with cleanliness, not get any lube in the bores or on the sides of the lifters and just use oil for that part: Reserving the cam lube for the lobes, dist gear, and maybe lifter seat and rocker arm socket. 0.25" seems like plenty. my heads were not milled (nor was the block faces) after the machine shops checked them. The rocker arms tips were very lightly reground. Head machine shop ground the valve stems to be the same installed height. He really wants me to check lifter pre-load to make sure that there is not too much causing this or affecting valve open/close time.
Posted on: 2018/9/7 12:16
|
|||
|
Bob
1955 Packard Patrician Sapphire Blue |
||||
|
||||
|
Worn Rocker Arm & bore
|
||||
|---|---|---|---|---|
|
Home away from home
|
https://packardinfo.com/xoops/html/modules/newbb/viewtopic.php?viewmode=compact&type=&topic_id=20884&forum=3
Although related to my long-winded post (link above) on getting Engine running, I decided to make a new post since this is specifically about rocker arm lever wear. Jack suggested I look into the rocker arm pushrod shaft socket to see if excessive wear would be the cause some of my lifters not rotating. I spend some time tonight measuring the socket depth of all of them and found 1 with obvious physical wear or poor casting, see pic; it is the one on the left. It's depth was 0.230" (#4Exhaust) compared to most of the rest of them on that head being around an average of ~0.185", with the shallowest 0.158". The tip of this worn arm also showed a lot of wear for the limited time I ran this after having tips ground. [Edit: I'm thinking that these were cast then the socket lips machined down as the 'deep' one shows original casting finish and the others a nice flat finish. For some reason, this one wasn't ground down like the others which would give a deeper depth measurement even if the inner contact surface to the pushrod was the same. Maybe this just looks different but functionally isnt? ] I have looked and can't find info on what is nominal or depth when new?? Wondering if I should replace any others. Other head was similar with deepest of 0.208" (5Intake) and remaining average of 0.183", shallowest 0.172" There is no odd sign of wear for the pushrods although I have not found a good way to measure them accurately yet. Thinking I need to replace the deepest one from each head but wondering if should get used ones to keep the socket depths all around the same (crap shoot I guess) or get a new one with its shallower depth. Also, the part numbers are stamped on one side of the arms (440470 and 440471), but there is a number stamped on the other side too. (3, 14, 16, 2, 23,....) Does anyone know what those numbers mean, batch?? Note that neither of the 2 deep socket arms correspond to the lifters that aren't rotating. In my searches for more info, I found the following two links that are interesting, relevant, and shows you guys have been helping people on this forum for a long time, esp jack doing double duty on the Packard and Stude forums. THANKS to all. -Bob UPDATE: slept on this and while 4E is different than the rest, the method of measurement may not be applicable. So, I found a 1/4" drive ratchet socket with O.D of 1/4", put it in each of the rocker sockets and measured the relative depth between the top of the arm and the end of the ratchet socket. That seems to be closer to reality. 4E is still the deepest and 8E is still the shallowest. The difference between those two is 0.071". For comparison, the others difference in depths relative to the deepest are: .014, .024, .046, .031,.017,.024 How much is too much with these hyd lifters? These seem to be well within what the lifters can take out assuming the pushrods are all the right length. Machine shop 'bobbed' the installed valves so that the stem heights are all the same now. https://packardinfo.com/xoops/html/modules/newbb/viewtopic.php?topic_id=3044&viewmode=compact&order=DESC&type=&mode=0&start=10 http://forum.studebakerdriversclub.com/showthread.php?80247-V8-pushrod-wear-theory-and-practice Attach file: (202.29 KB)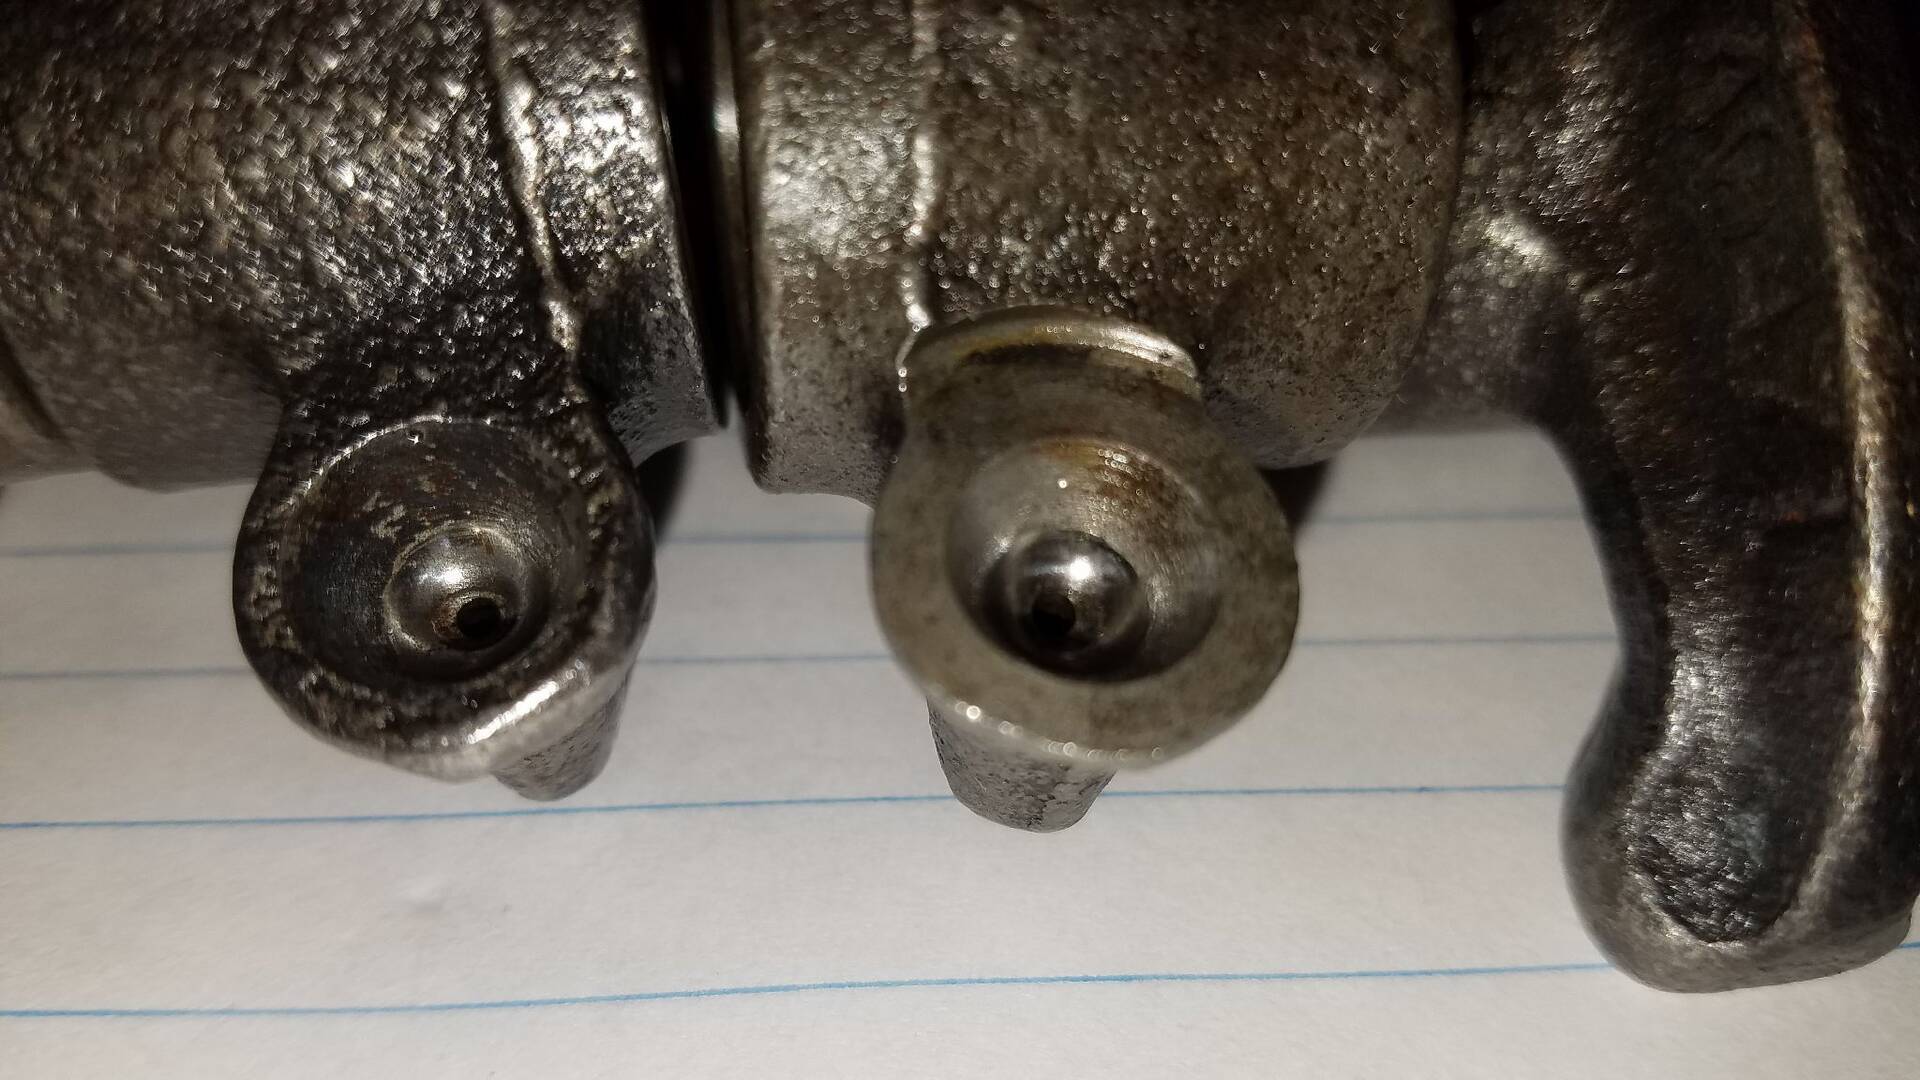 (215.79 KB) (215.79 KB)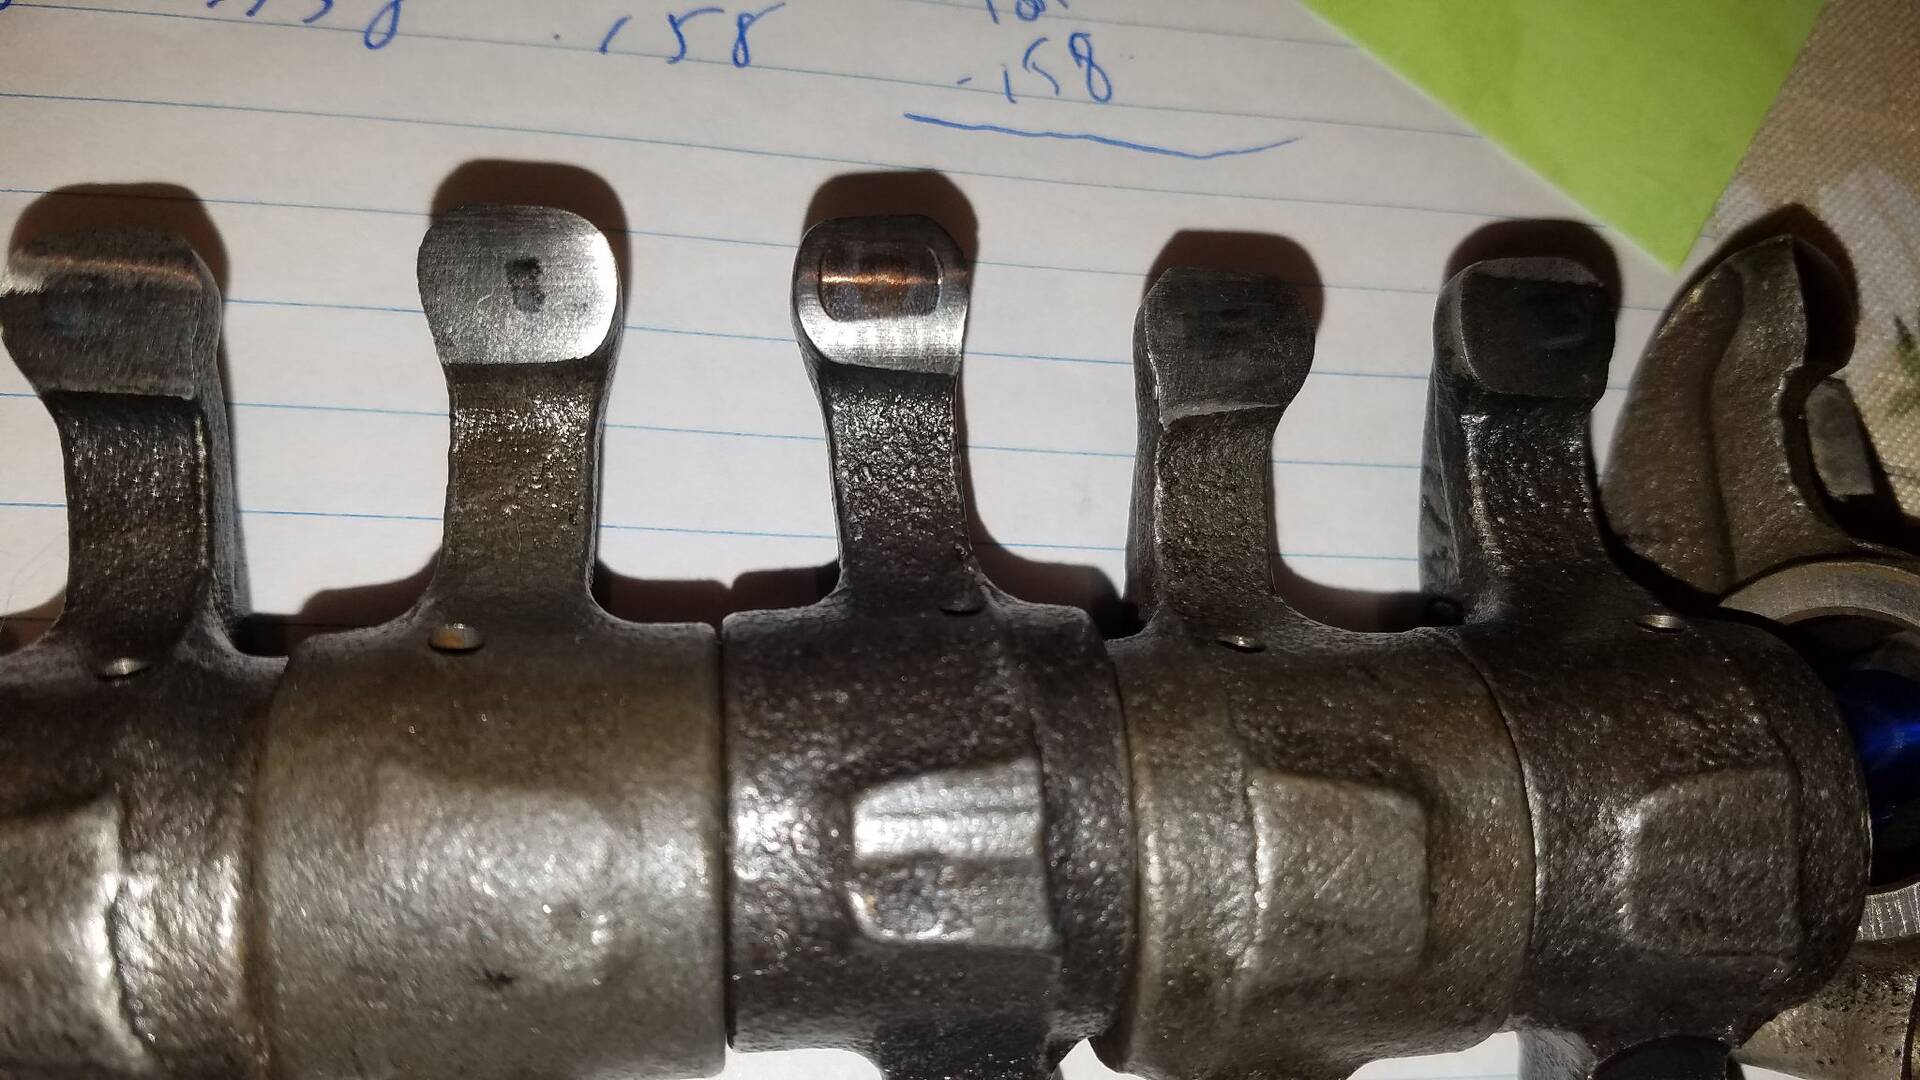
Posted on: 2018/9/6 21:36
|
|||
|
Bob
1955 Packard Patrician Sapphire Blue |
||||
|
||||
|
Re: '55 engine back to life! Mostly worked...
|
||||
|---|---|---|---|---|
|
Home away from home
|
thank you James! This is the 2nd time you offered to send my a part for my car. thanks.
Posted on: 2018/9/6 16:13
|
|||
|
Bob
1955 Packard Patrician Sapphire Blue |
||||
|
||||
|
Re: '55 engine back to life! Mostly worked...
|
||||
|---|---|---|---|---|
|
Home away from home
|
Hi,
I think I found the source of my noise. When I was reassembling the heads, I found that #1 Exhaust valve would not go in easily and was sticking a little. Took it to my machine shop and they said they remedied it by removing a burr and cleaning out the valve guide. He also adjusted the installed valve stem height by grinding the stem ends as he noticed a 'large' variation between the valves. A sticking exhaust valve would explain the frequency of the noise and the presence of so much soot on the back side of the front intake valves. Unfortunately, while putting the engine back together (I removed some pistons to make sure all was clean), I broke the 2nd ring on one of the pistons. They sure break lot easier than I expected. Also struggling with the auto part store piston ring compressors..... I only see a way to buy an entire set of rings. Mine are +0.30. Does it matter what brand etc to fit in my new Egge pistons? I can get a whole set at Egge for $45 with shipping and I see other sets for sale that are NOS https://www.ebay.com/itm/1955-1956-PACKARD-5560-5660-1956-STUDEBAKER-GOLDEN-HAWK-V8-O30-PISTON-RINGS/283122131593?fits=Make%3APackard&hash=item41eb64e289:g:nCMAAOSwA4dWFuII Wondering if it matters as long as they are 4.030" and if I can find something at O'reillys or Autozone in stock that would be just as good??? These are listed in the parts X-ref as compatible: https://www.amazon.com/Hastings-2M139030-Piston-Ring-Set/dp/B000C3D66U anyone have any experience with them? (or a spare ring?? :) ) thx Bob
Posted on: 2018/9/5 22:49
|
|||
|
Bob
1955 Packard Patrician Sapphire Blue |
||||
|
||||
|
Re: '55 engine back to life! Mostly worked...
|
||||
|---|---|---|---|---|
|
Home away from home
|
yes, brand new Egge with 1-1.5hrs of run time. The flash from the camera really makes the wear look dramatic. Maybe that's the best way to look at it, but doesnt' look that bad with the naked eye. I took piston 1 & 2 to the machine shop today. They said it was more than expected for that run time, but not so much wear to concern them to do anything about it. Mic'd the pistons and skirts and they were right on. Said they were more worried about the fact that both the lifters for piston #1 were not rotating and to concentrate on figuring out if it was issues with the cam lobes, lifter pre-load, push rods etc causing that.
He also cautioned about drawing too many conclusions on these symptoms with the limited run time so I should fix the lifter issue, get it running and drive it to get more time/miles on it; then reassess. I have seen zero evidence of any paper towel bits wherever I clean so I think I'm going to start putting this thing back together after I convince myself I've got clean lifter bores, good pre-load etc. Was anyone able to open the zip file with the audio file of 'the noise'? Curious as to what others think it sounds like (metallic impingement, squeaking, etc) thanks for reading Bob
Posted on: 2018/8/24 17:39
|
|||
|
Bob
1955 Packard Patrician Sapphire Blue |
||||
|
||||
|
Re: '55 engine back to life! Mostly worked...
|
||||
|---|---|---|---|---|
|
Home away from home
|
Pulled pistons 1 & 2. Photos below. Certainly signs of wear esp since total time on the engine is probably just over an hour. But oil everywhere, maybe just not enough. I did pull brass plug adjacent to where oil pressure sensor goes and cleaned with a brush down to oil pump (and vice versa). I haven't seen anything besides oil. Ditto with the Melling pump. Took the cover off and it is very clean in there. Bought a new Melling inlet tube & screen.
While there is wear on the pistons, I am thinking it is not significant enough to do anything about it and time to put all this back together. Maybe my noise is attributed to low oil on some part and an unclogged pump screen will address that. I am still stumped as to why the front 4 cylinders were carbon coated and the back 4 are still shiny metal. My plan now is: -Clean lifter bores really good (4 not rotating) -Reinstall the 2 pistons I removed, as is. -Reinstall heads. -Check lifter pre-load from pusher rod -Double the middle exhaust manifold to head gasket (both sides show leaks: wet black streaks on engine just below) -See what changes with full oil flow. I added a .zip file here with the audio of this pesky noise. Please let me know if you recognize it (it is at camshaft frequency) thx Attach file: (173.77 KB)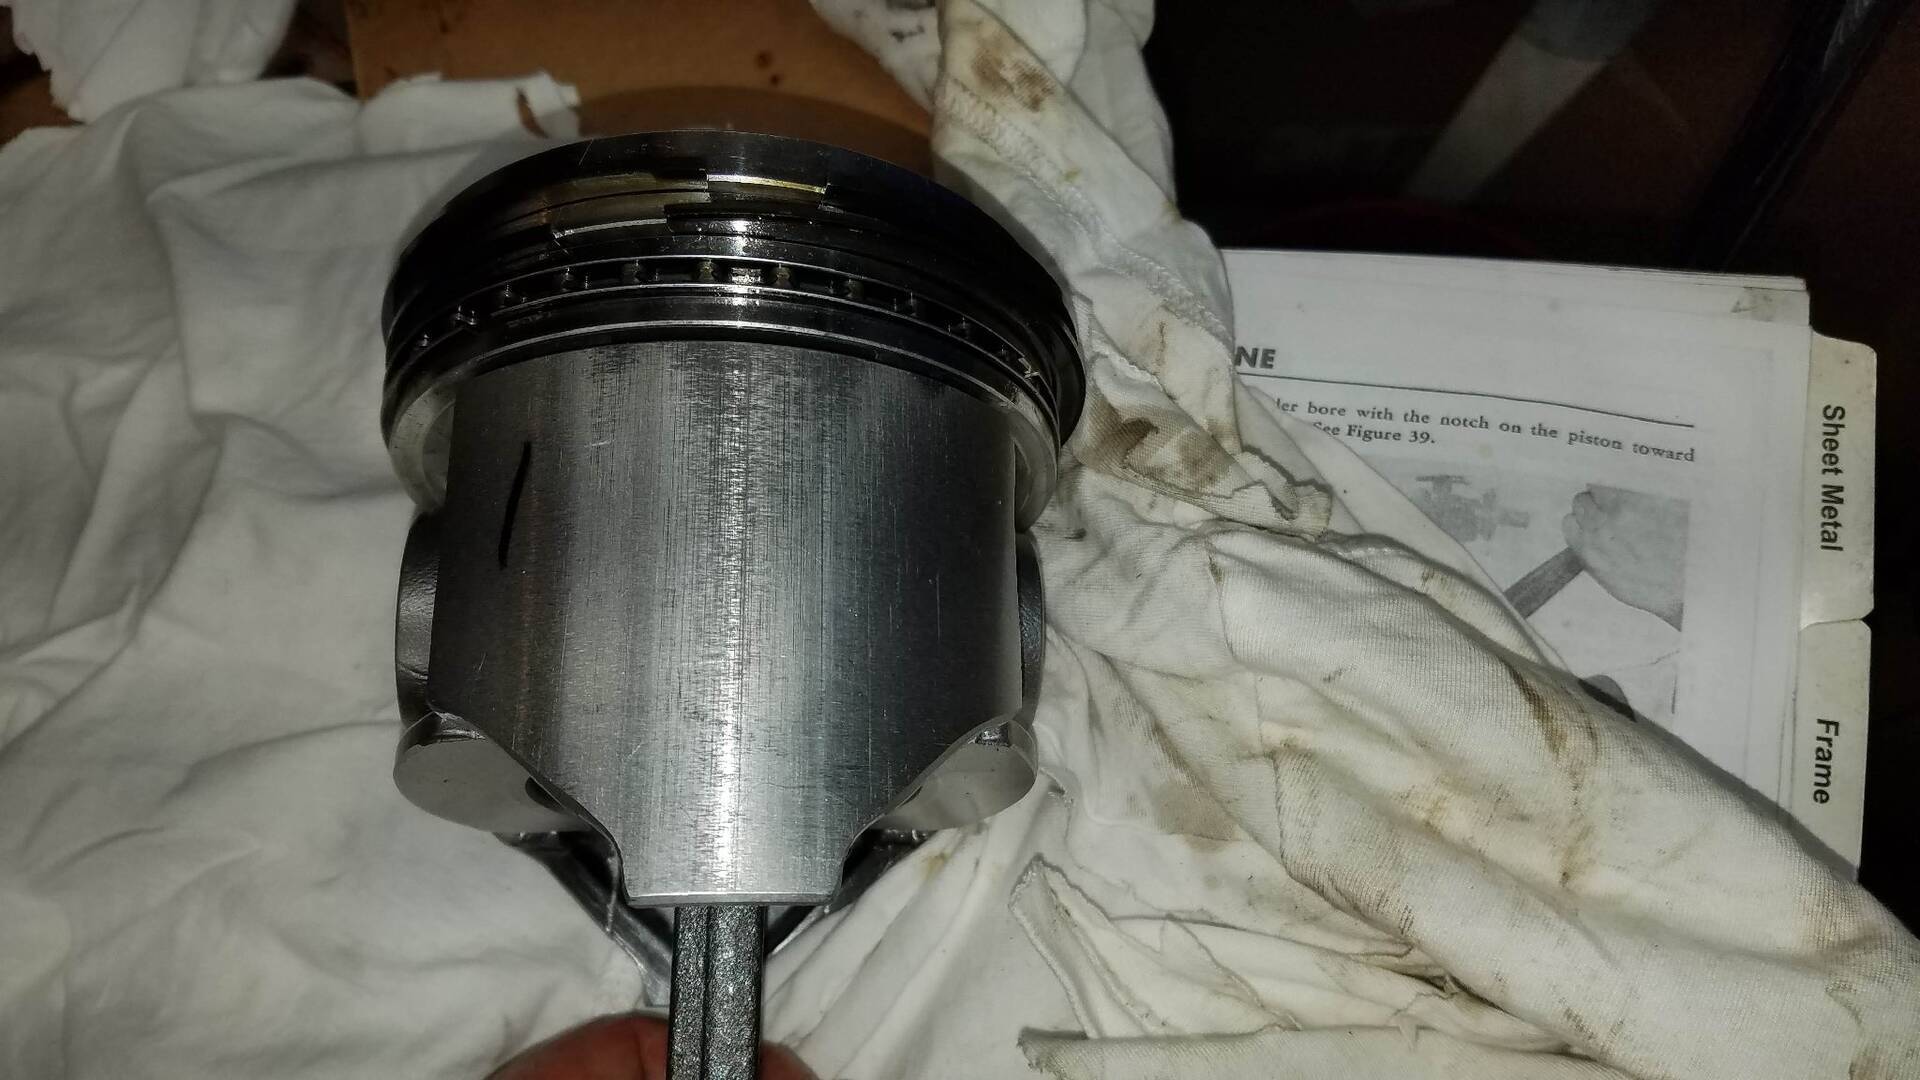 (151.99 KB) (151.99 KB)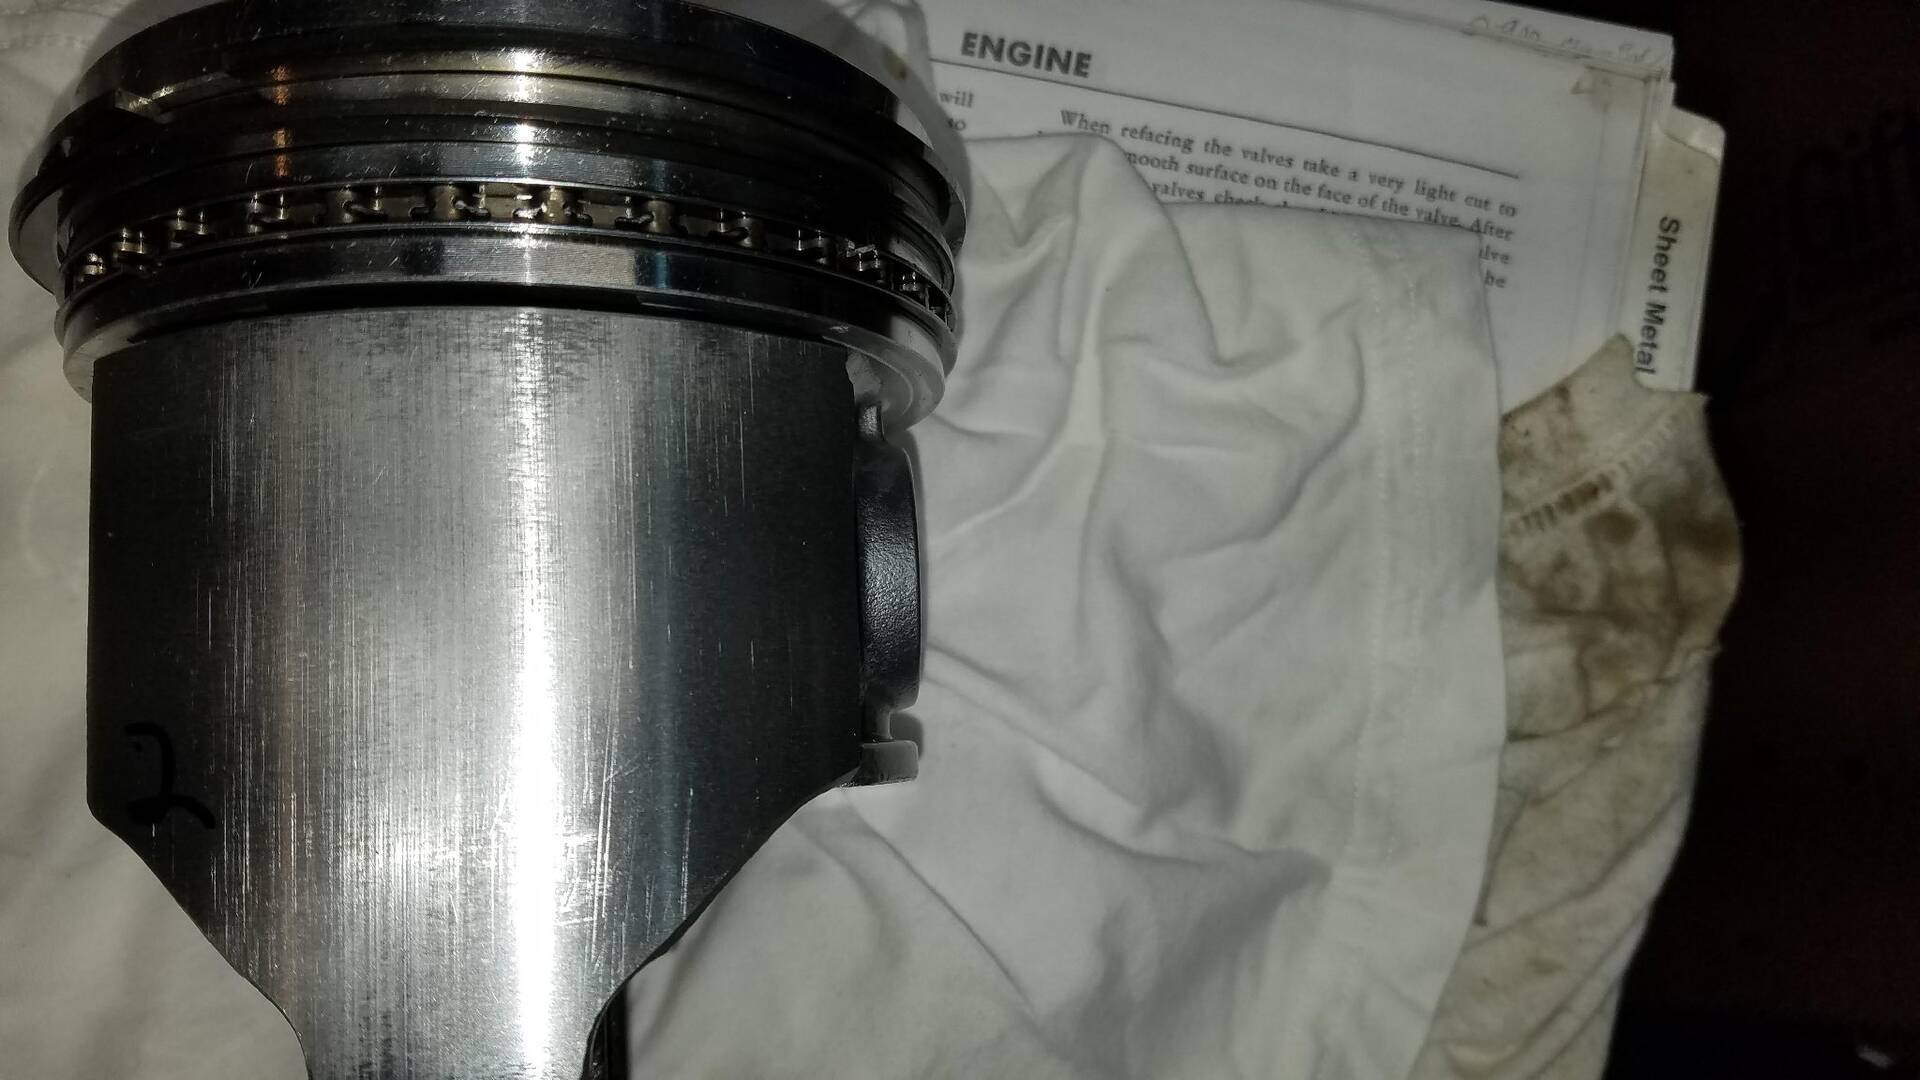 (252.80 KB) (252.80 KB)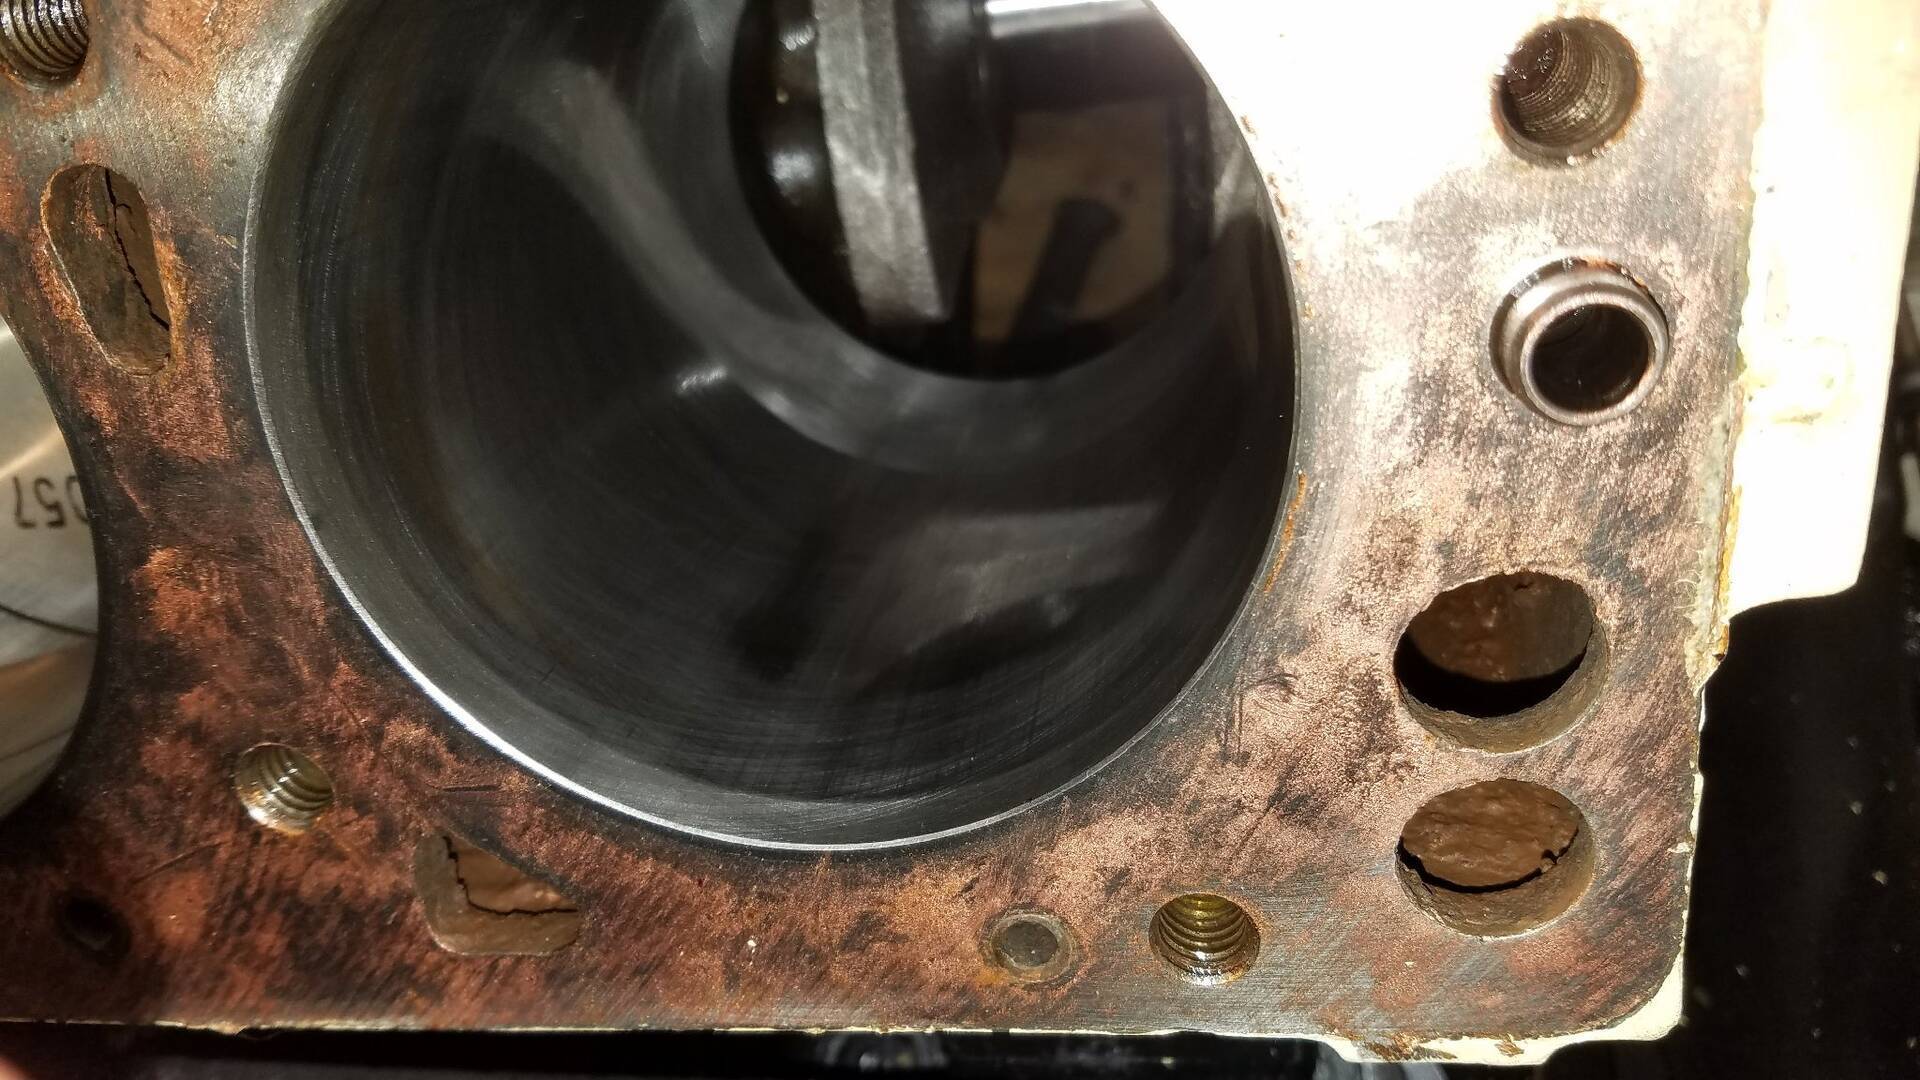  Size: 0.00 KB; Hits: 43 Size: 0.00 KB; Hits: 43
Posted on: 2018/8/24 8:53
|
|||
|
Bob
1955 Packard Patrician Sapphire Blue |
||||
|
||||
|
Re: '55 engine back to life! Mostly worked...
|
||||
|---|---|---|---|---|
|
Home away from home
|
Haven't heard much feedback lately so I continue to plow into this.
Riki: 'Top' is facing the head in this picture. Still don't get why the gaskets don't match the holes in the head/block. Like the big round one in the middle. Seems like that coolant should go through there and not have the gasket stop it. Took out all the lifters and the camshaft. Seems like oil everywhere but 4 (#1 Intake, #1 Exhaust,#4 Ex, #7 In) of them show wear signs that they are not rotating. They seem to rotate easily by hand when installed. Example picture below. Pulled the camshaft while I was at it. Some wear evident but also all surfaces coated in a light film of oil. Here are pics of the front cam bearing and the corresponding camshaft journal. The bright lights from the camera seem to make it look worse than they do by eye. Took my heads to the shop that redid them. They looked them over and said all looked good to them. Suggested that I look for a vacuum leak esp where the intake manifold meets the heads to maybe explain why the front 4 cylinders appear to be running rich while the back 4 are not. They didnt think the standard, thin metal gasket would cover much in the way of non-uniformities across the mating surfaces. So suggested I make my own out of thicker gasket material or use Ultra Gray (instead of the Copper Coat I used). More to come. Any thoughts would be helpful. thx Attach file: (103.87 KB)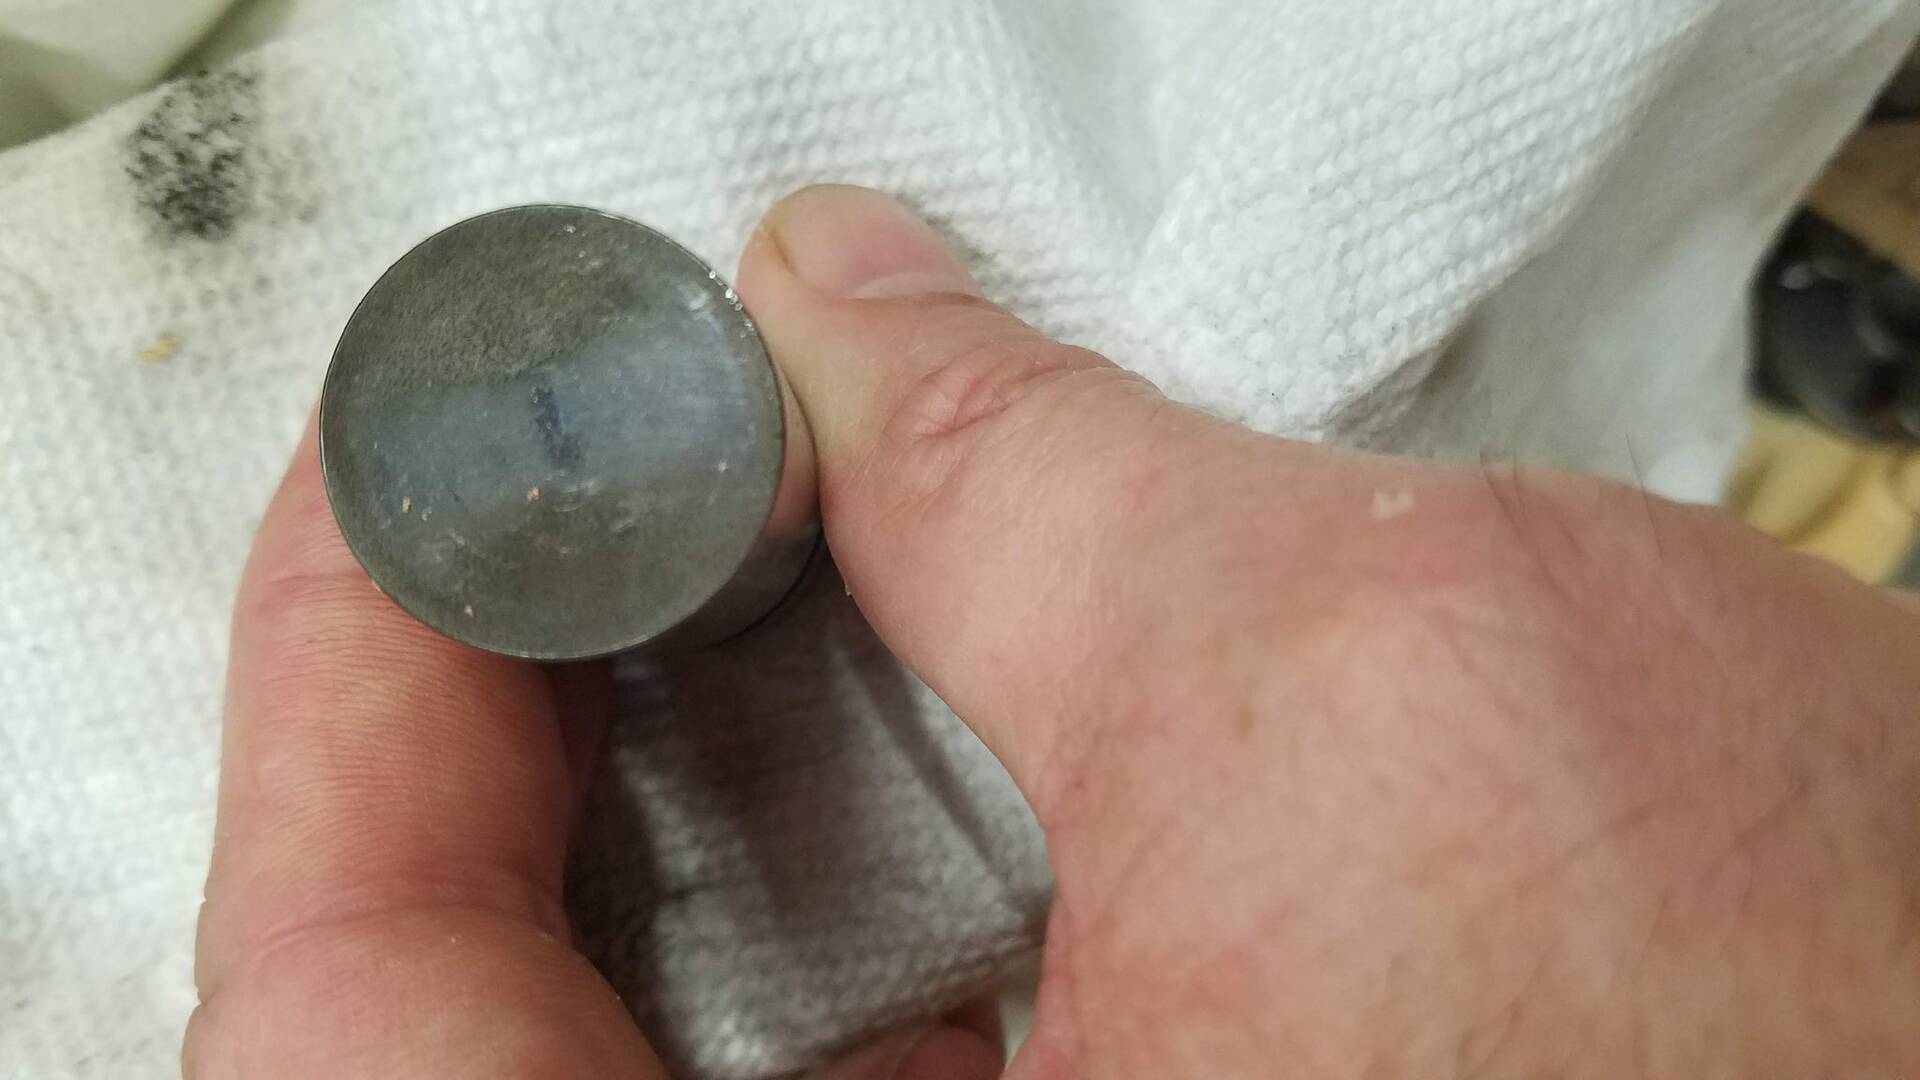 (154.83 KB) (154.83 KB) (135.57 KB) (135.57 KB)
Posted on: 2018/8/22 22:01
|
|||
|
Bob
1955 Packard Patrician Sapphire Blue |
||||
|
||||


