|
Re: KPack's 1954 Panama
|
||||
|---|---|---|---|---|
|
Home away from home

|
Quote:
I polished the commutator again after clearing out the grooves. I don't have a lathe, so I'm just using fine sandpaper. That's not going to take down the ridges that have been worn into it by the brushes. If you're talking about the grooves with the mica, I'm pretty sure those grooves are supposed to be there. They were pretty obviously there before.
Posted on: 3/12 8:44
|
|||
|
||||
|
Re: KPack's 1954 Panama
|
||||
|---|---|---|---|---|
|
Home away from home
|
Thanks for the tip Ross. Always good to add more tools to the toolbox. The wobble extension will make my life much easier!
Just waiting on parts from Max Merritt now. New brushes and bushing will be replaced. Currently cleaning up and painting the housing. Also polished the commutator and cleaned out the grooves and mica. They were completely filled with copper. Much better now.  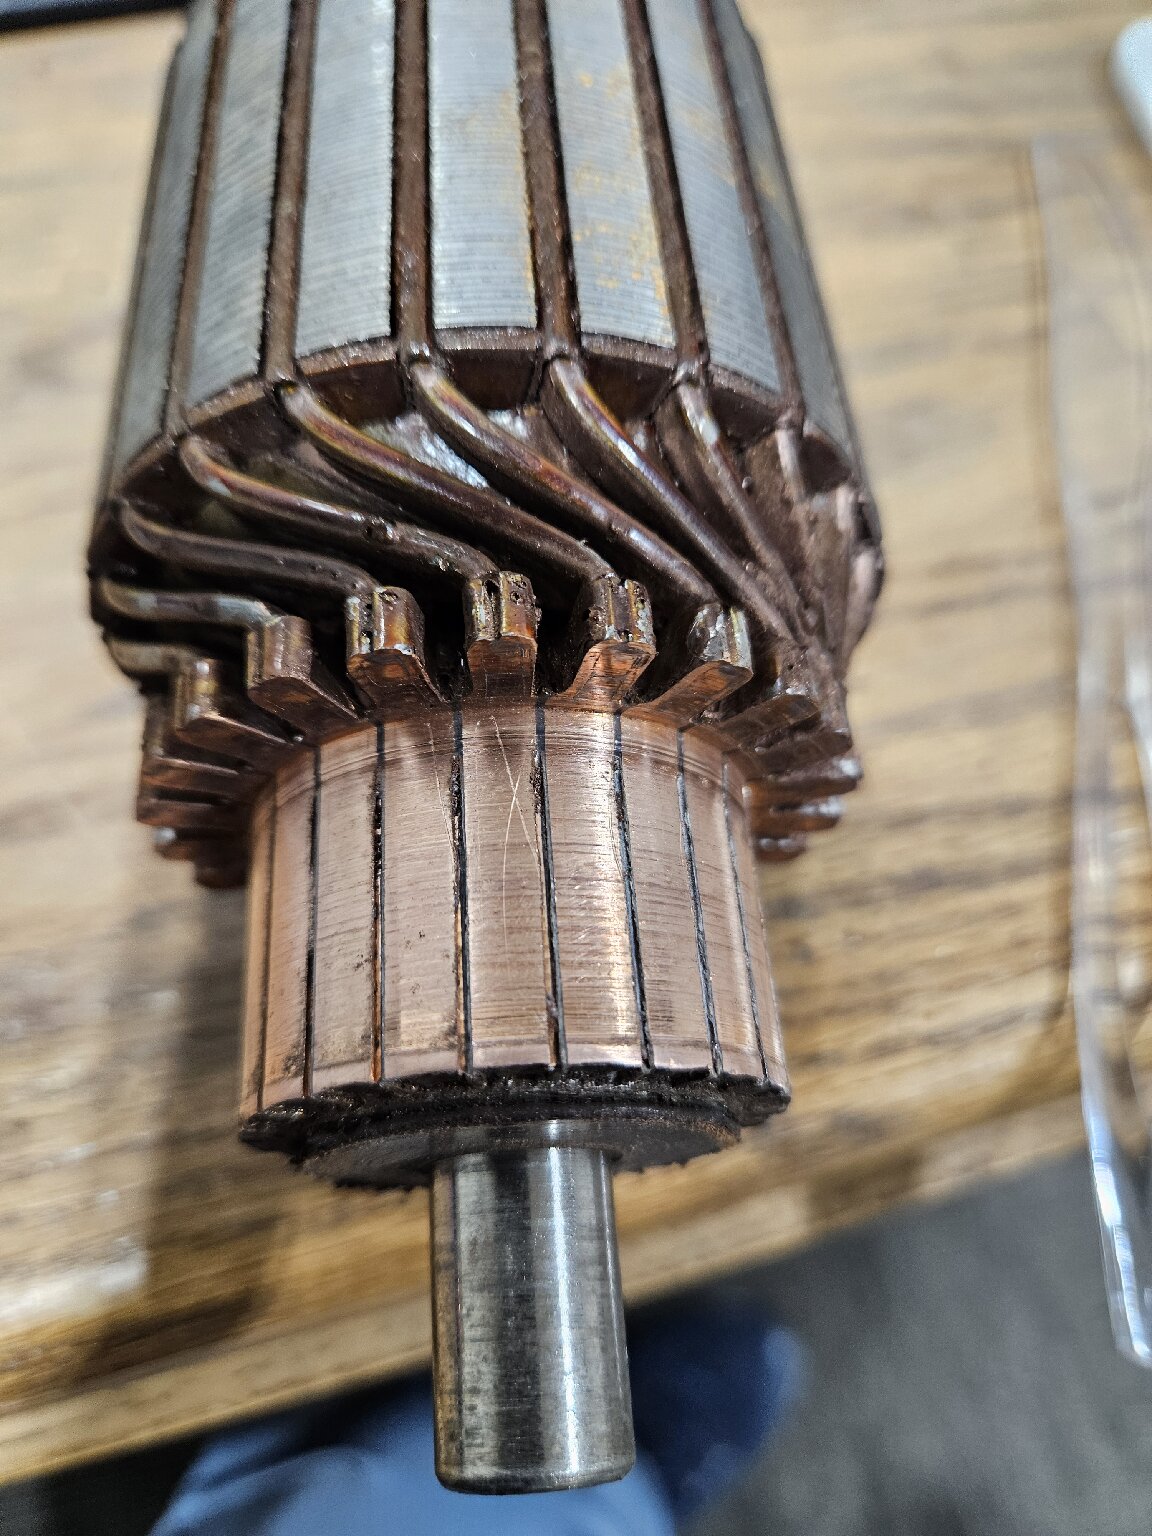
Posted on: 3/11 20:32
|
|||
|
||||
|
Re: Various CL Pickings
|
||||
|---|---|---|---|---|
|
Home away from home
|
That 400 with the orchid cloth is not too far from me. Never seen that cloth pattern before, looks nice. Nice color combo and wire wheels are a bonus.
Two others near me that are interesting for different reasons. 1941 120 Business Coupe project. This one was posted here not long ago, but the guy has now dropped the price twice. Started at $17,500, now at $11,000 which is much more reasonable. Was a frame-off restoration that either stalled or the guy doing it is unable due to health. Lots of newly chromed parts, engine is apart and ready to reassemble. No interior that I can see in the pictures. But it looks like it's close to the point of primer and paint, then reassembly. This would be a super fun project. Tempting. 1953 Clipper Sportster. I remember this car being for sale a few years ago. The guy had re-chromed a bunch of stuff (bumper, grille, headlight rings, etc) and had reupholstered the seats and door cards (in incorrect cloth and color). But the floors were completely shot. This car popped up again a month or so ago in the middle of Oregon, and now it's up for sale again in the different city for only $500. Sounds like the guys that bought it realized it was worse than they thought. But I'm halfway tempted to get it, just so I can swap all the good chrome pieces for the crap that's on my car. Plus a spare engine (if it can be salvaged), transmission, and other spare parts. Heck, I might even see about repairing the floors, paint the body dark gray, the wheels red, new whitewalls, and put a glasspack on the exhaust.
Posted on: 3/11 20:25
|
|||
|
||||
|
Re: Wheel Well Paint Color 56 Caribbean
|
||||
|---|---|---|---|---|
|
Home away from home
|
My understanding is that from the factory the wheel wells were painted body color. Later many cars had undercoating applied that would cover that paint with black. My '54 Panama showed body color under areas where the undercoat had flaked off. I'm not an expert on this, so take my words with a grain of salt.
-Kevin
Posted on: 3/8 1:01
|
|||
|
||||
|
Re: KPack's 1954 Panama
|
||||
|---|---|---|---|---|
|
Home away from home
|
Don - Yes, it is the mechanical lever type. It's gigantic. Almost half the size of the starter itself (more like 1/4 but half sounds better).
 David - That's exactly how it went. Small turn, flip the wrench, over and over for about 15 minutes. I don't want to do that again in the future if I can avoid it. How do I check the solenoid contacts? I haven't looked closely to see if I can open it up or not. -Kevin
Posted on: 3/7 19:11
|
|||
|
||||
|
Re: KPack's 1954 Panama
|
||||
|---|---|---|---|---|
|
Home away from home
|
John - thank you, great info. I'll do those things.
Don - Yes, that's the correct part number. Looks like it was found only on the 54th series....5402-06-11-13-26-31. 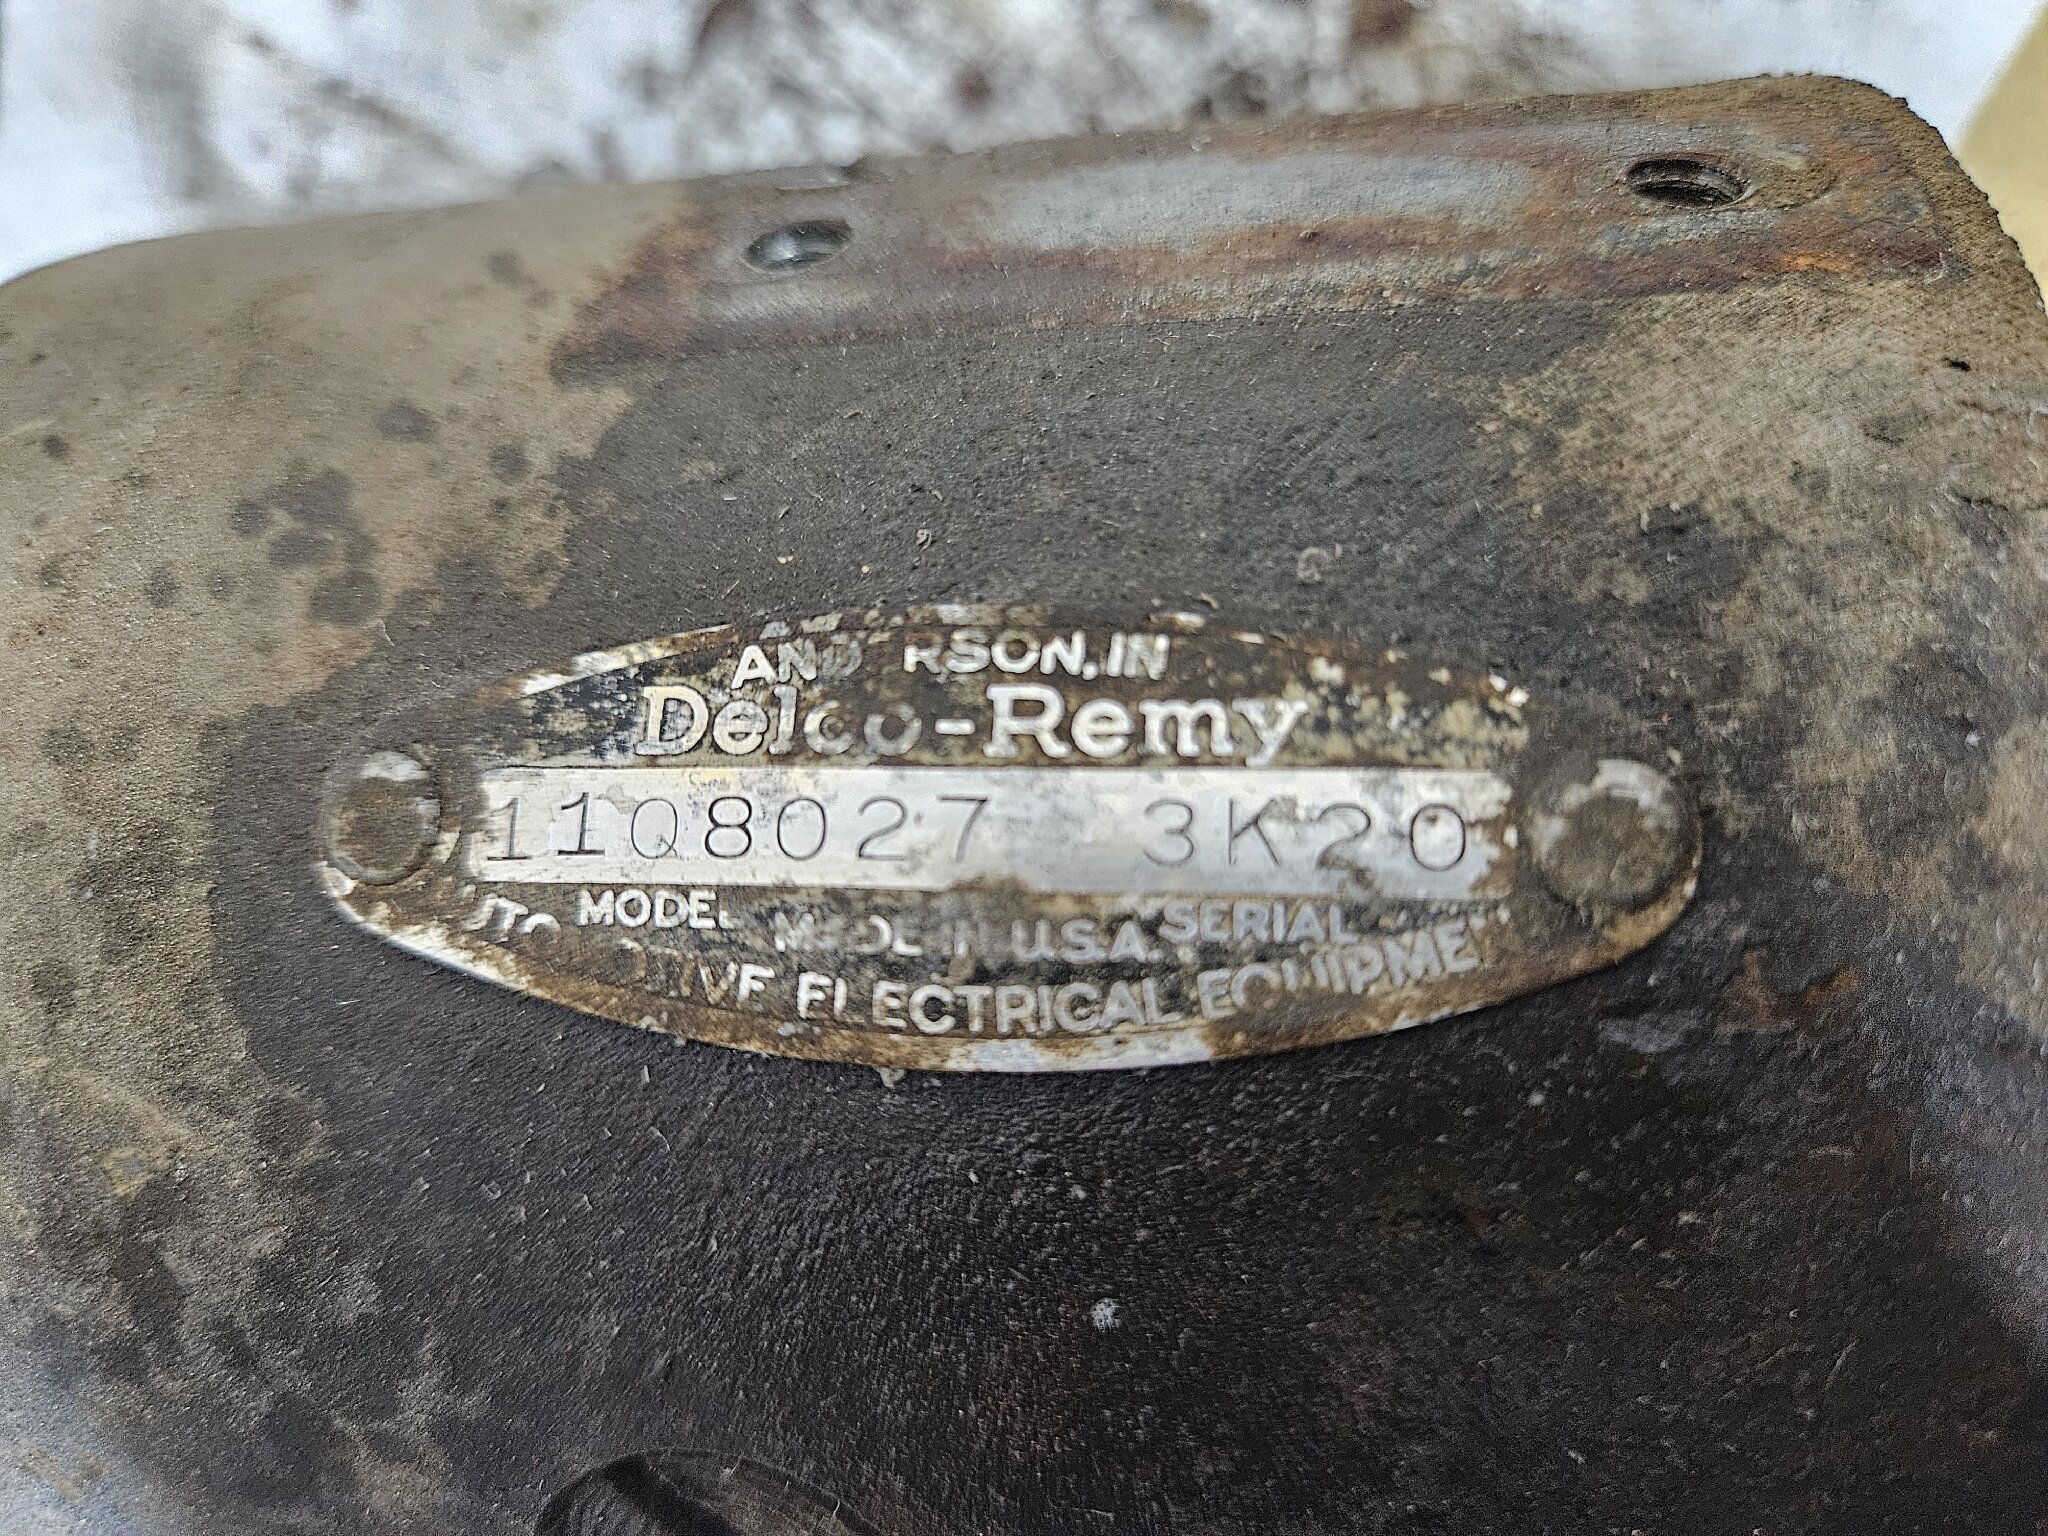 BigKev - from what I can find, the '54 Clippers used the much smaller electronic solenoid. I would have to change starters in order to use a different relay.
Posted on: 3/7 16:22
|
|||
|
||||
|
Re: KPack's 1954 Panama
|
||||
|---|---|---|---|---|
|
Home away from home
|
Quote:
There's no access to the upper bolt from underneath. I also could not fit a socket with extension in there. The solenoid is massive. From what I've seen on other '54 Panama's it is the right solenoid. The Panama's don't seem to follow the typical Clipper equipment. They seem to be a mishmash of junior and senior parts. -Kevin
Posted on: 3/7 14:28
|
|||
|
||||
|
Re: KPack's 1954 Panama
|
||||
|---|---|---|---|---|
|
Home away from home
|
Howard - thanks for that info, that's good to know. The ignition switch is not original. It was replaced by the previous owner with something that is not Packard as far as I can tell. So hopefully not an issue within the switch itself. Possibly combination of wiring, worn brushes, poor connections.
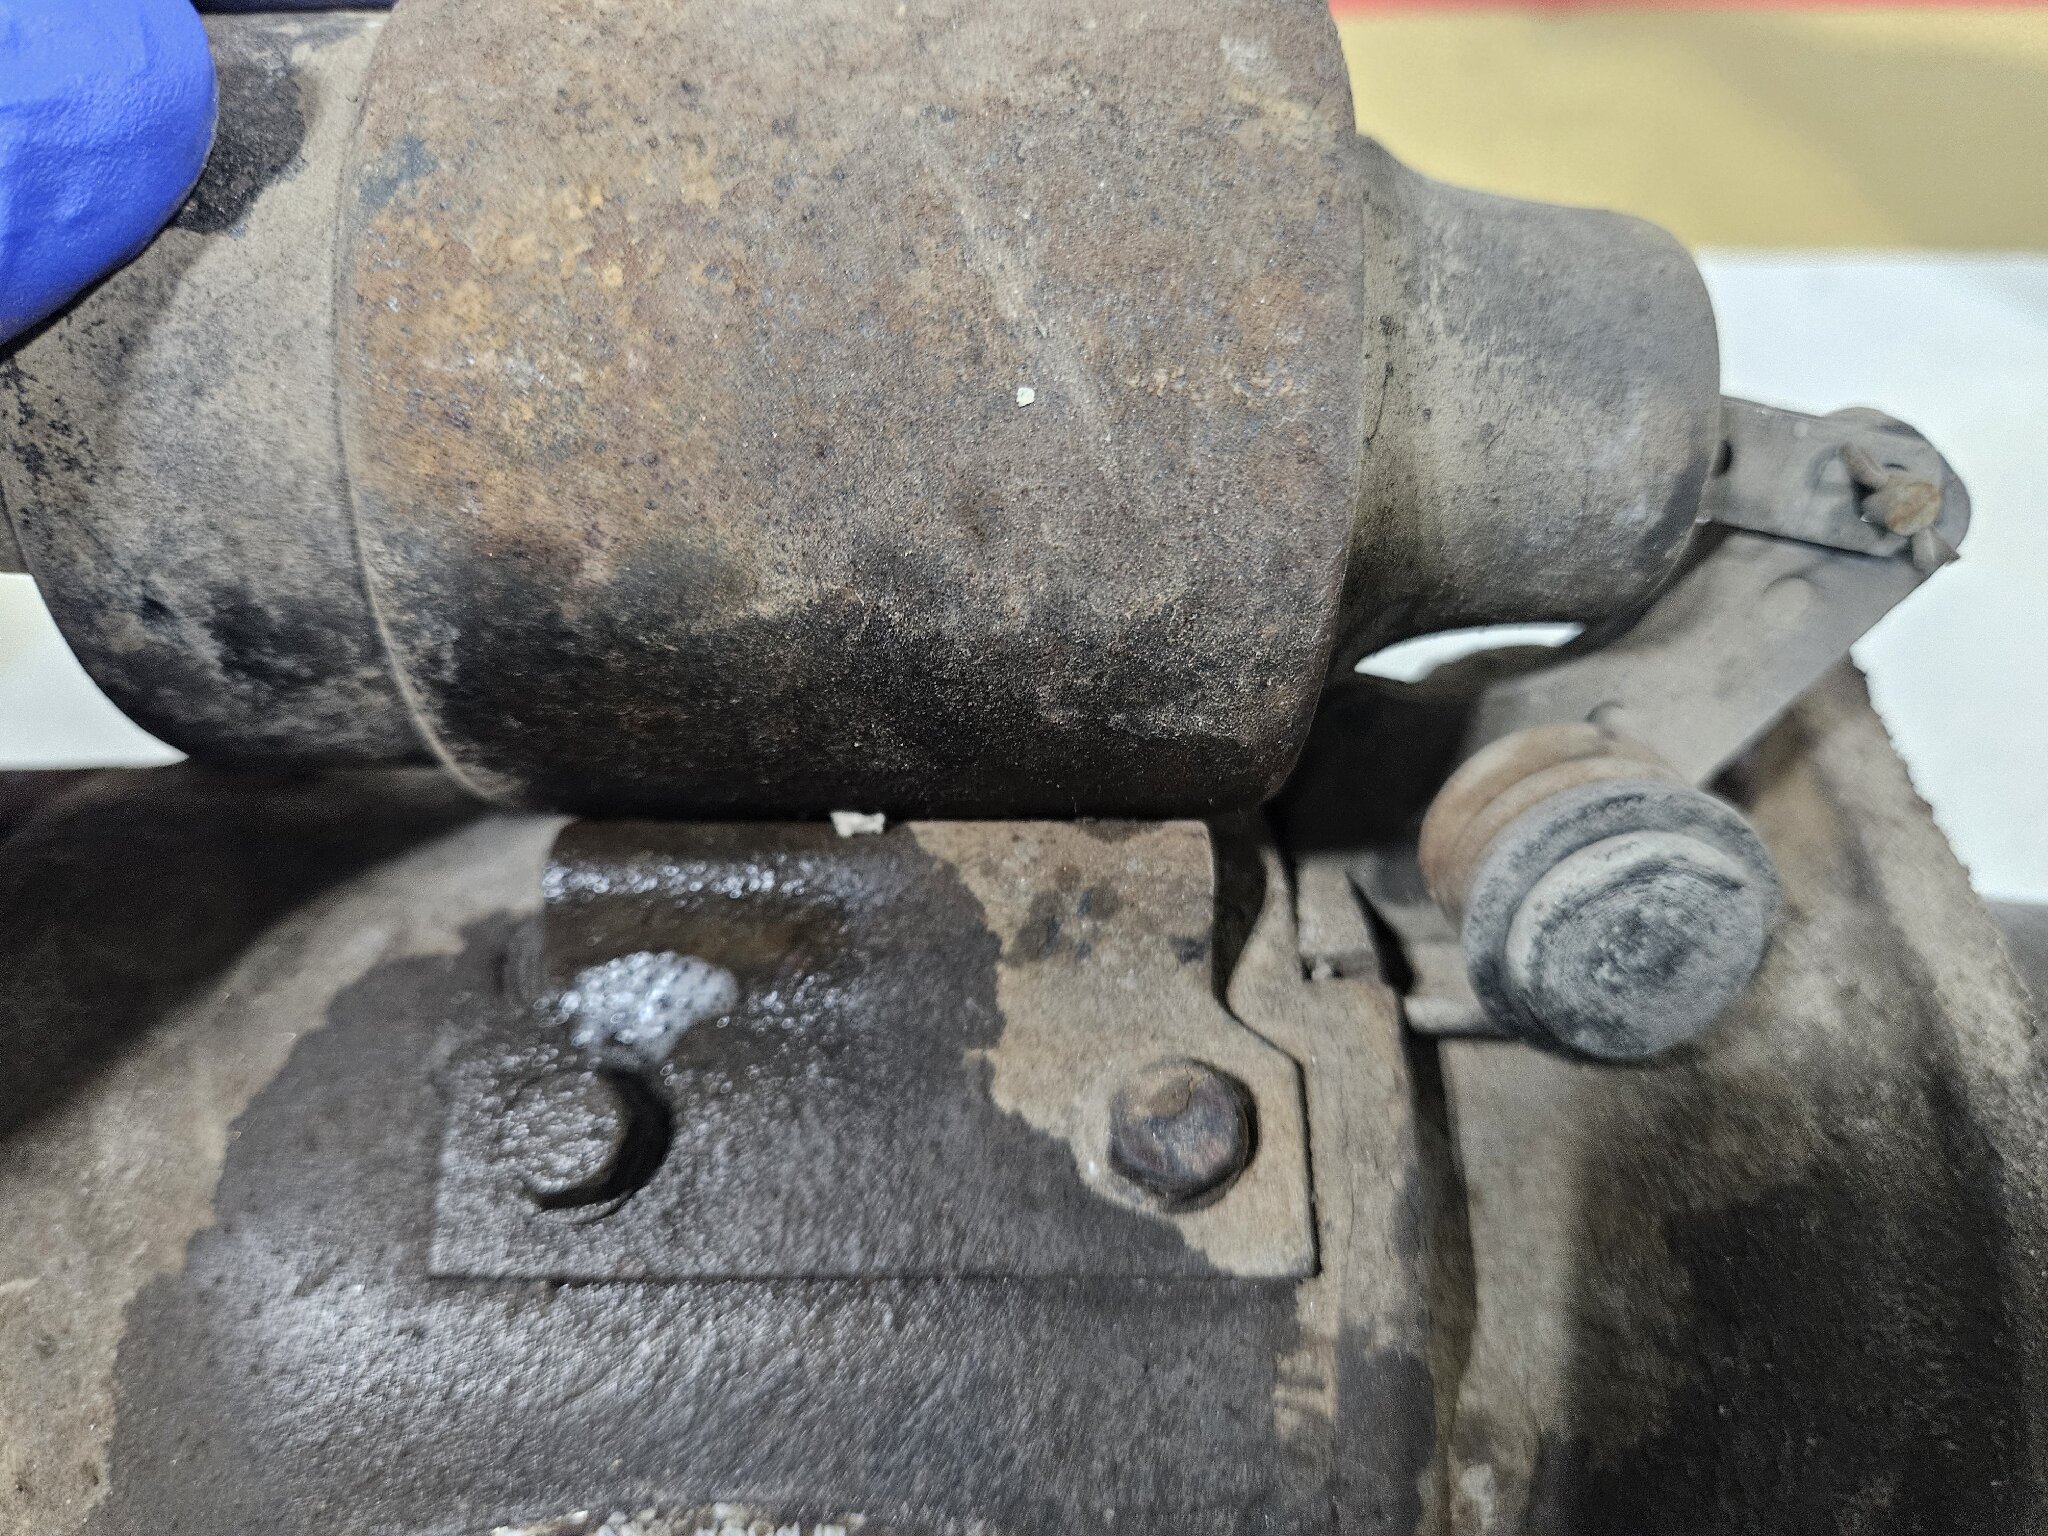
Don - I couldn't figure out a better way to access that spot. It was awkward any way I tried. But at least the bolt wasn't seized and there was room behind the upper block and firewall to squeeze a wrench and my hand in there. I'm not looking forward to putting it back in. -Kevin
Posted on: 3/7 13:37
|
|||
|
||||
|
Re: KPack's 1954 Panama
|
||||
|---|---|---|---|---|
|
Home away from home
|
Vinyl shipped yesterday, so I should have all the upholstery materials I need to get the seats done. I'm booked with the upholstery shop for the end of the month. Then the seats go back in and the interior should be "done". There will still be a few other things to address here and there, but not much.
While I wait for that to happen I'm moving down the list of other projects. First up is the starter. The car was getting much more difficult to start towards the end of last year. More than half the time I would get a single 'click' when turning the key, then nothing. Pulling the inspection band off the starter and physically moving the armature to a different spot normally got me going again. I couldn't tell if I was dealing with brush problems, solenoid problems, or wiring problems (the wiring by the previous owner to the starter was all messed up....I already corrected that). So the starter needed to come off to investigate, and it looked ugly anyways so I plan to freshen it up. This upper bolt is the devil's work. The solenoid is massive and makes getting to this bolt a real pain. I got it eventually, but involved me laying across the fender and engine with my feet in the air. 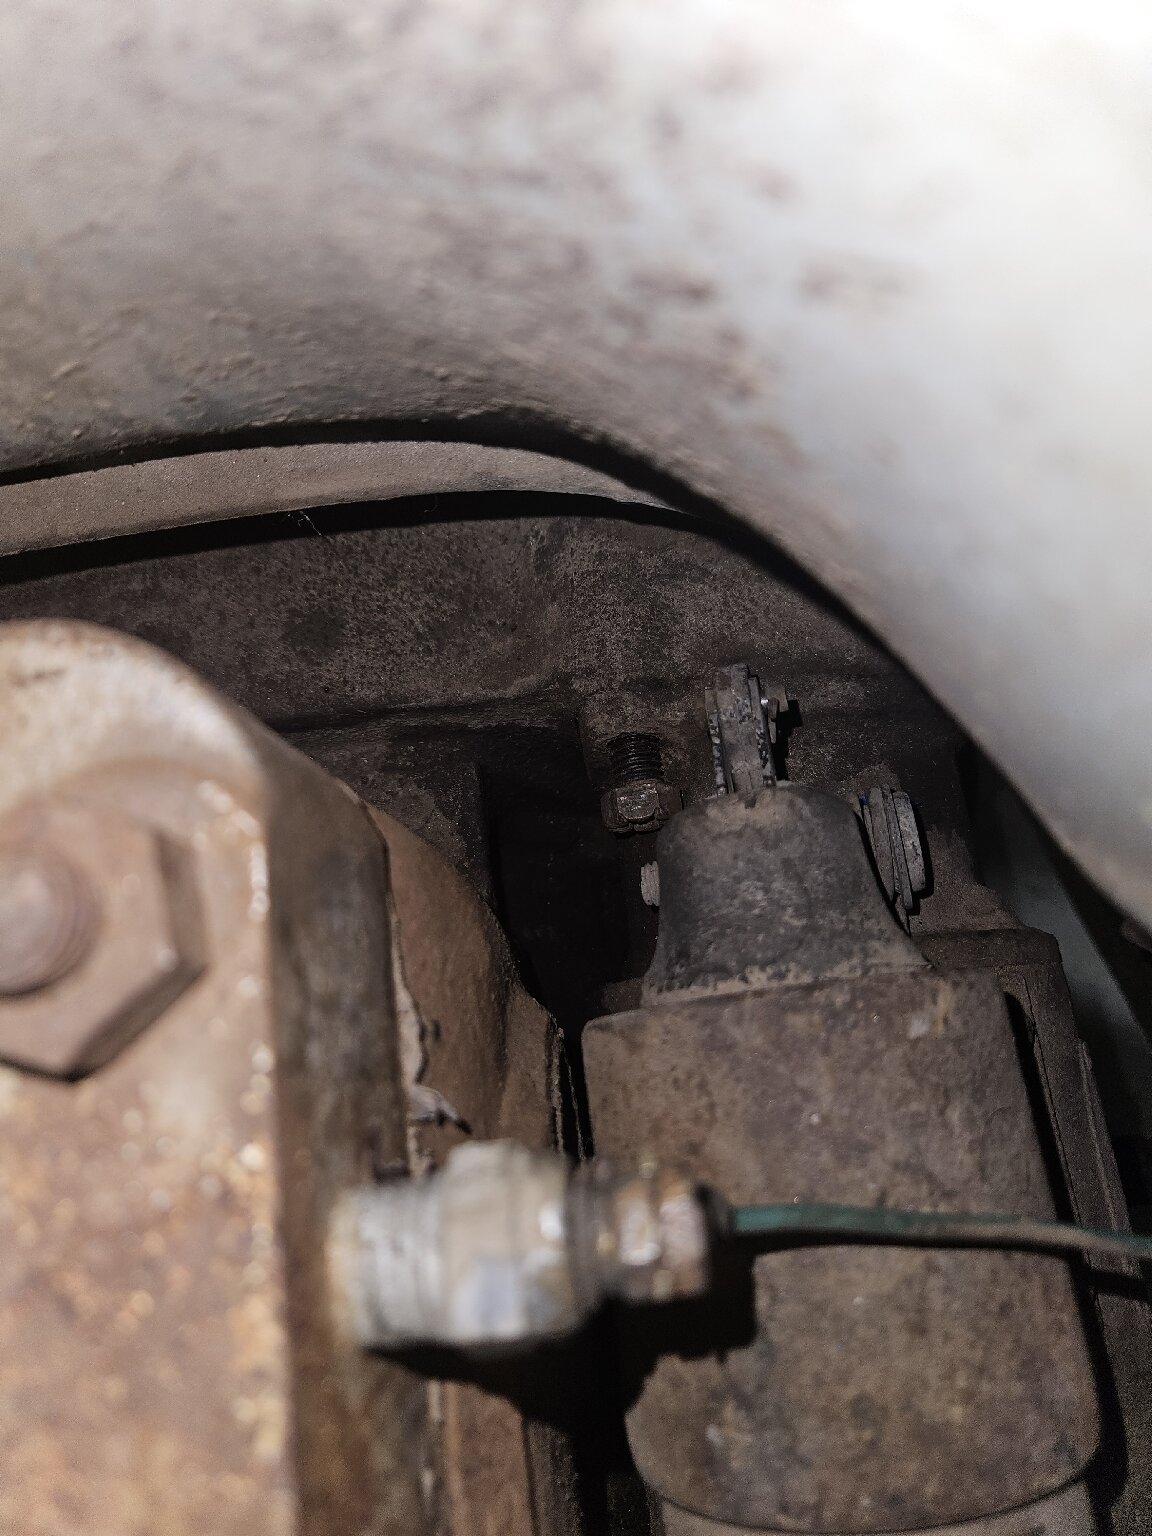 Once that bolt and lower were out the starter lifted out easily. It's much lighter than the starter out of my dad's '38 Super. 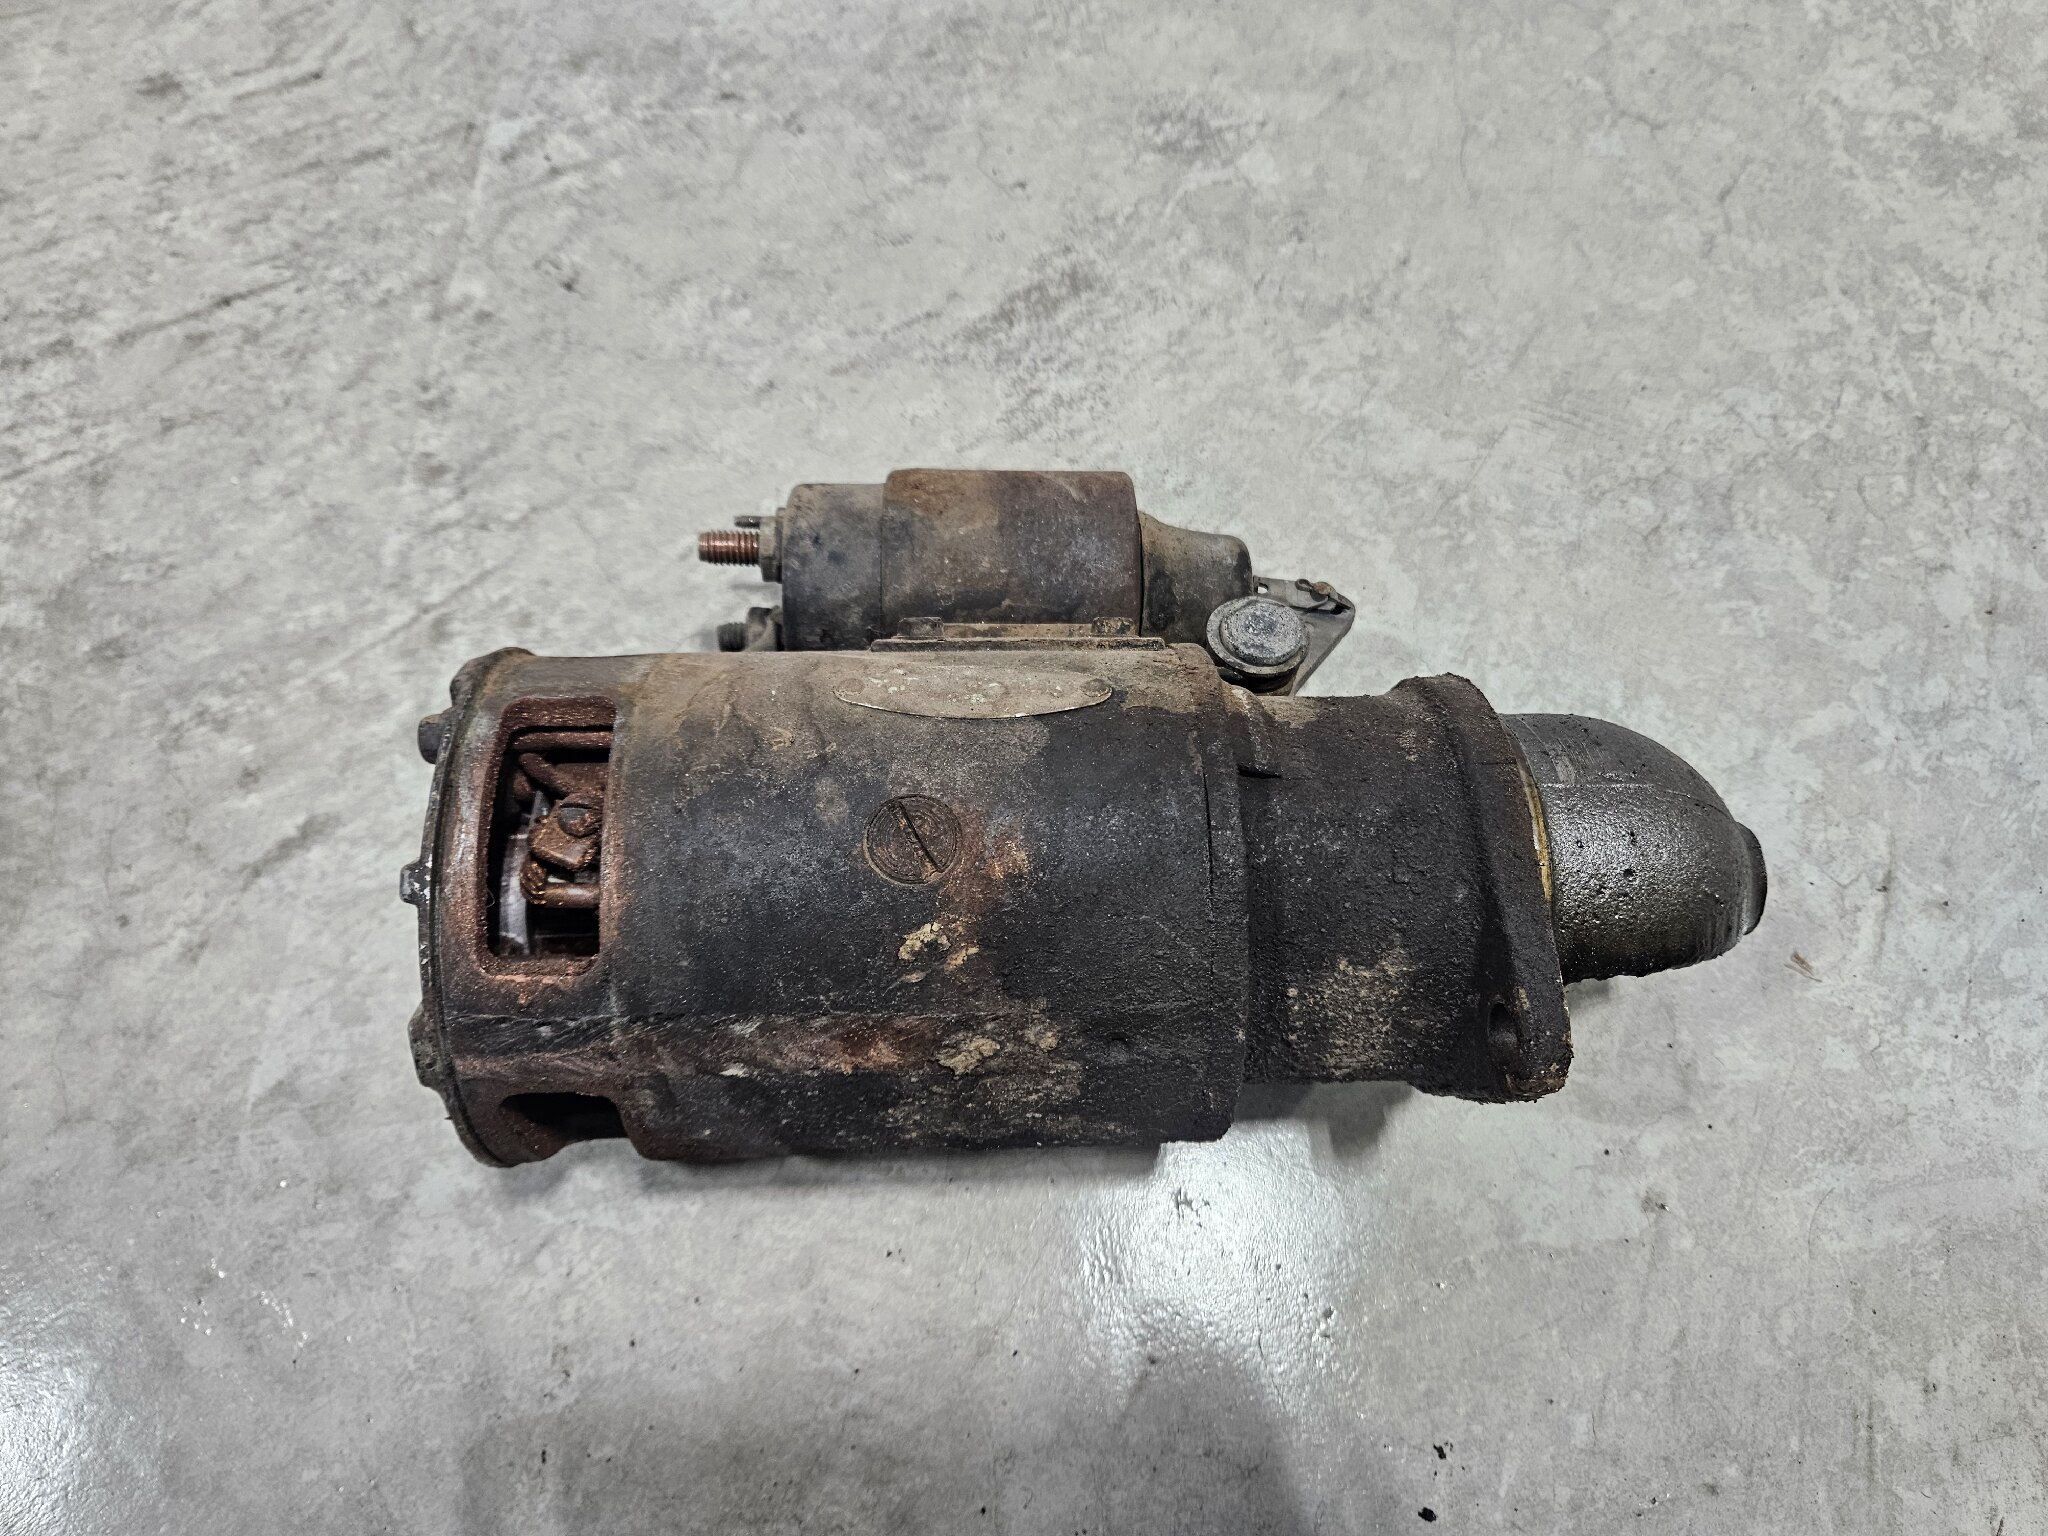 Armature looks okay from what I can tell. Looks like some oil got in somehow, so I will clean that off. The magnets on the housing also look okay, just dirty. 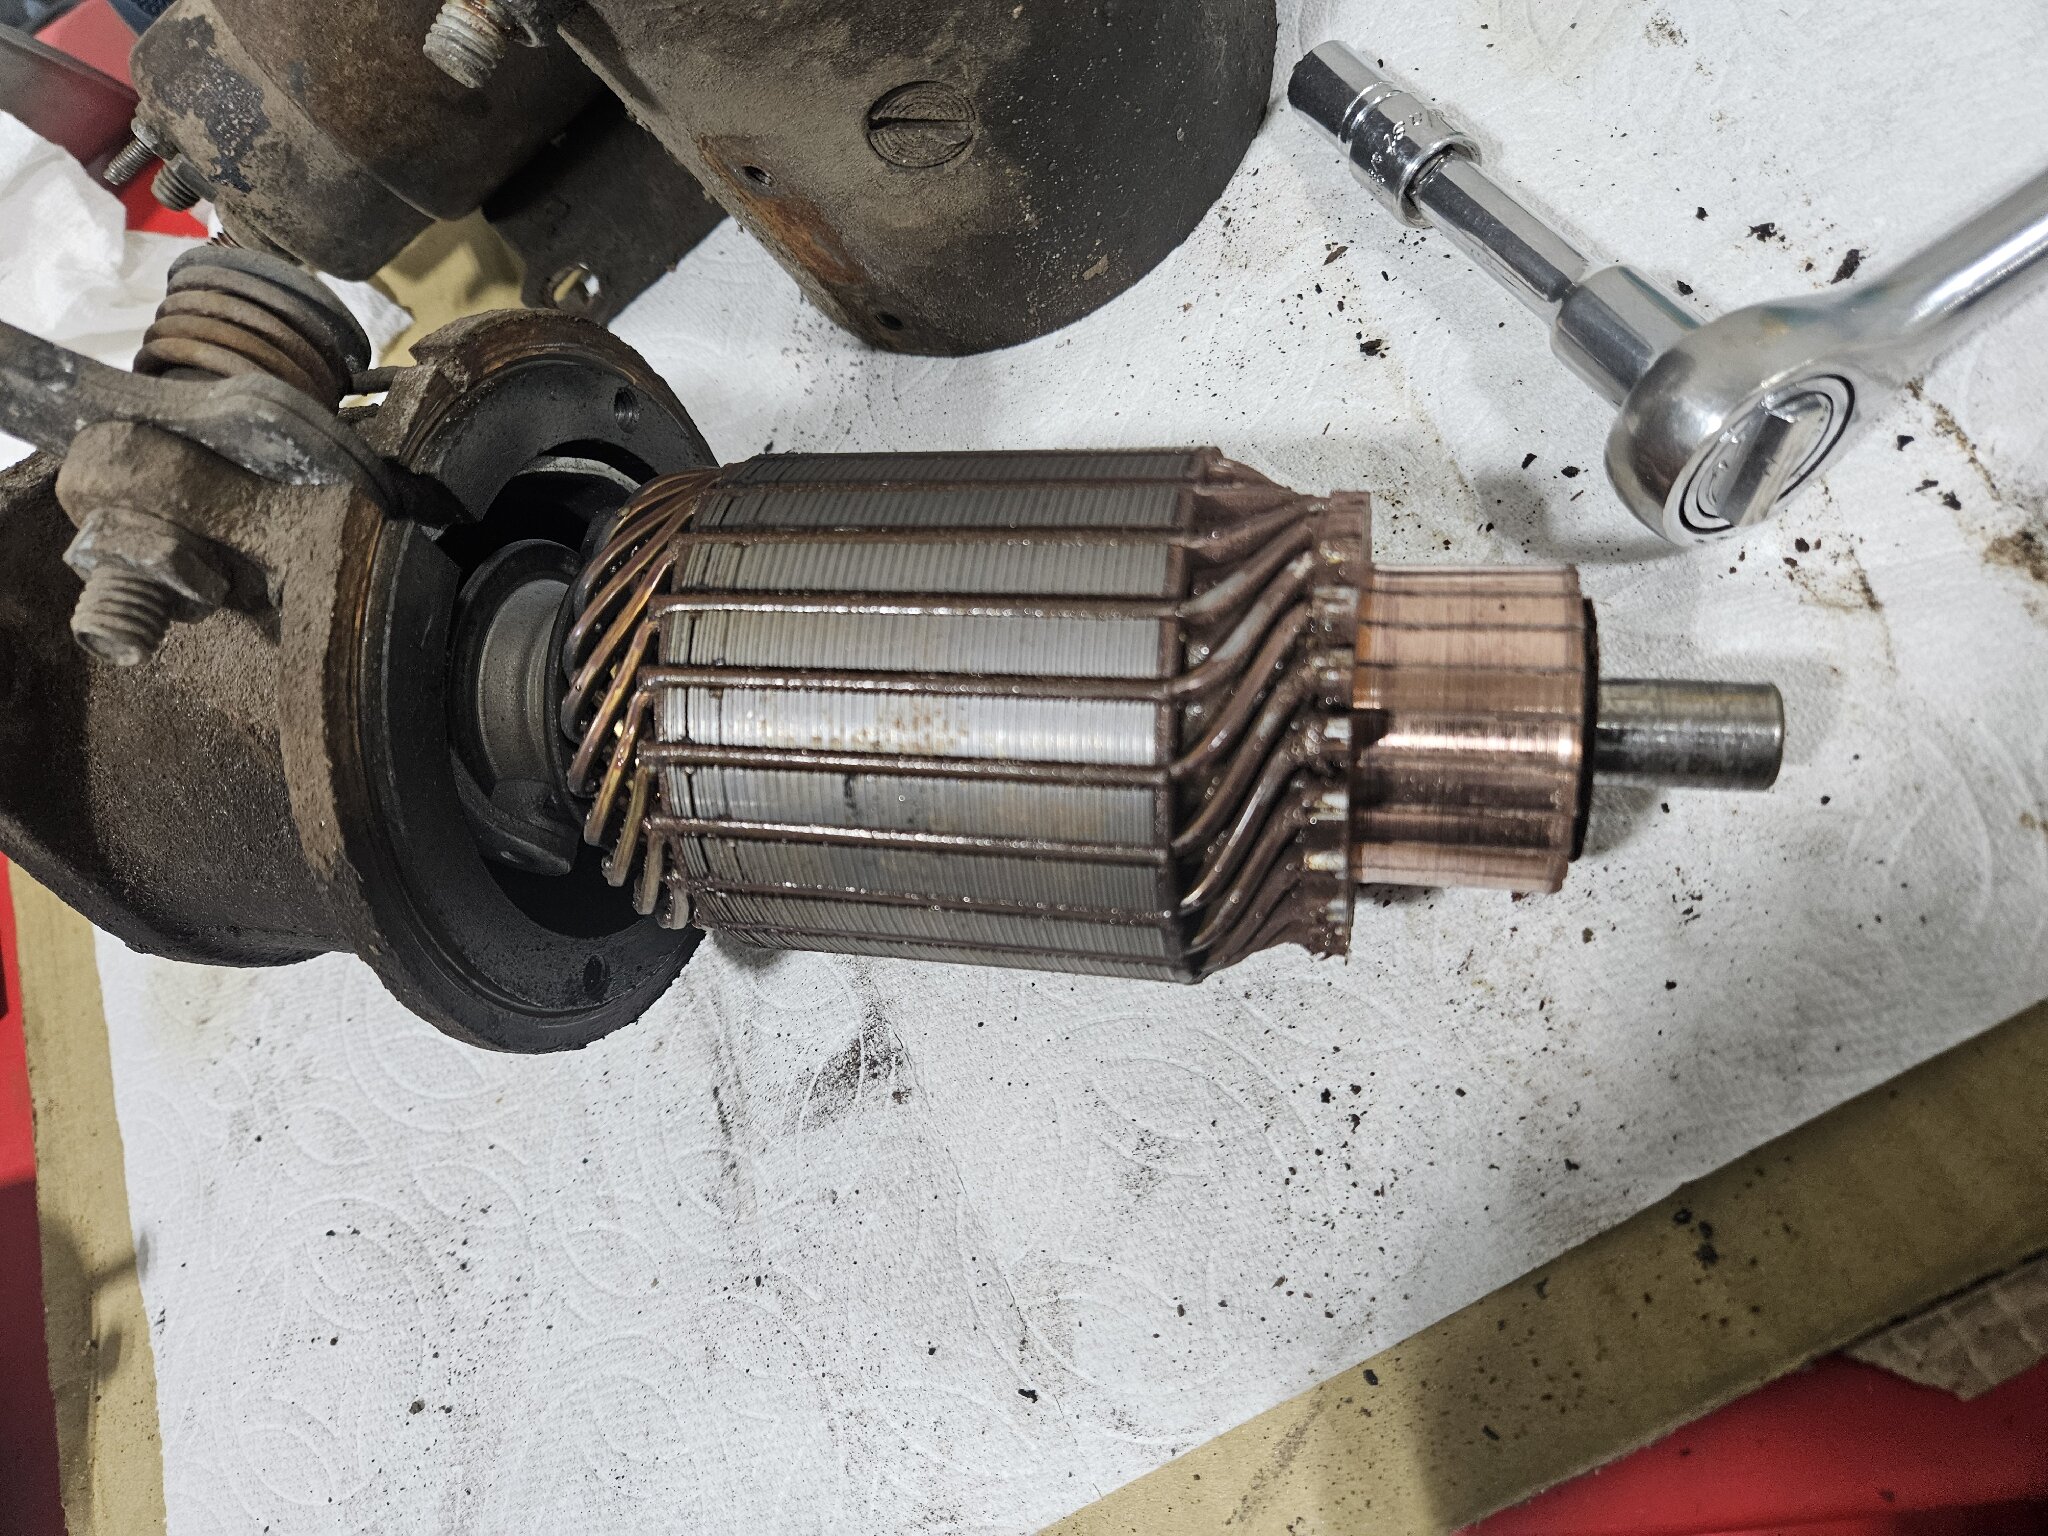 The commutator is worn and the mica undercuts seem to be filled in with copper shavings. Am I good to clean out the undercuts and leave the rest as is? Or do I need to have it all turned on a lathe? 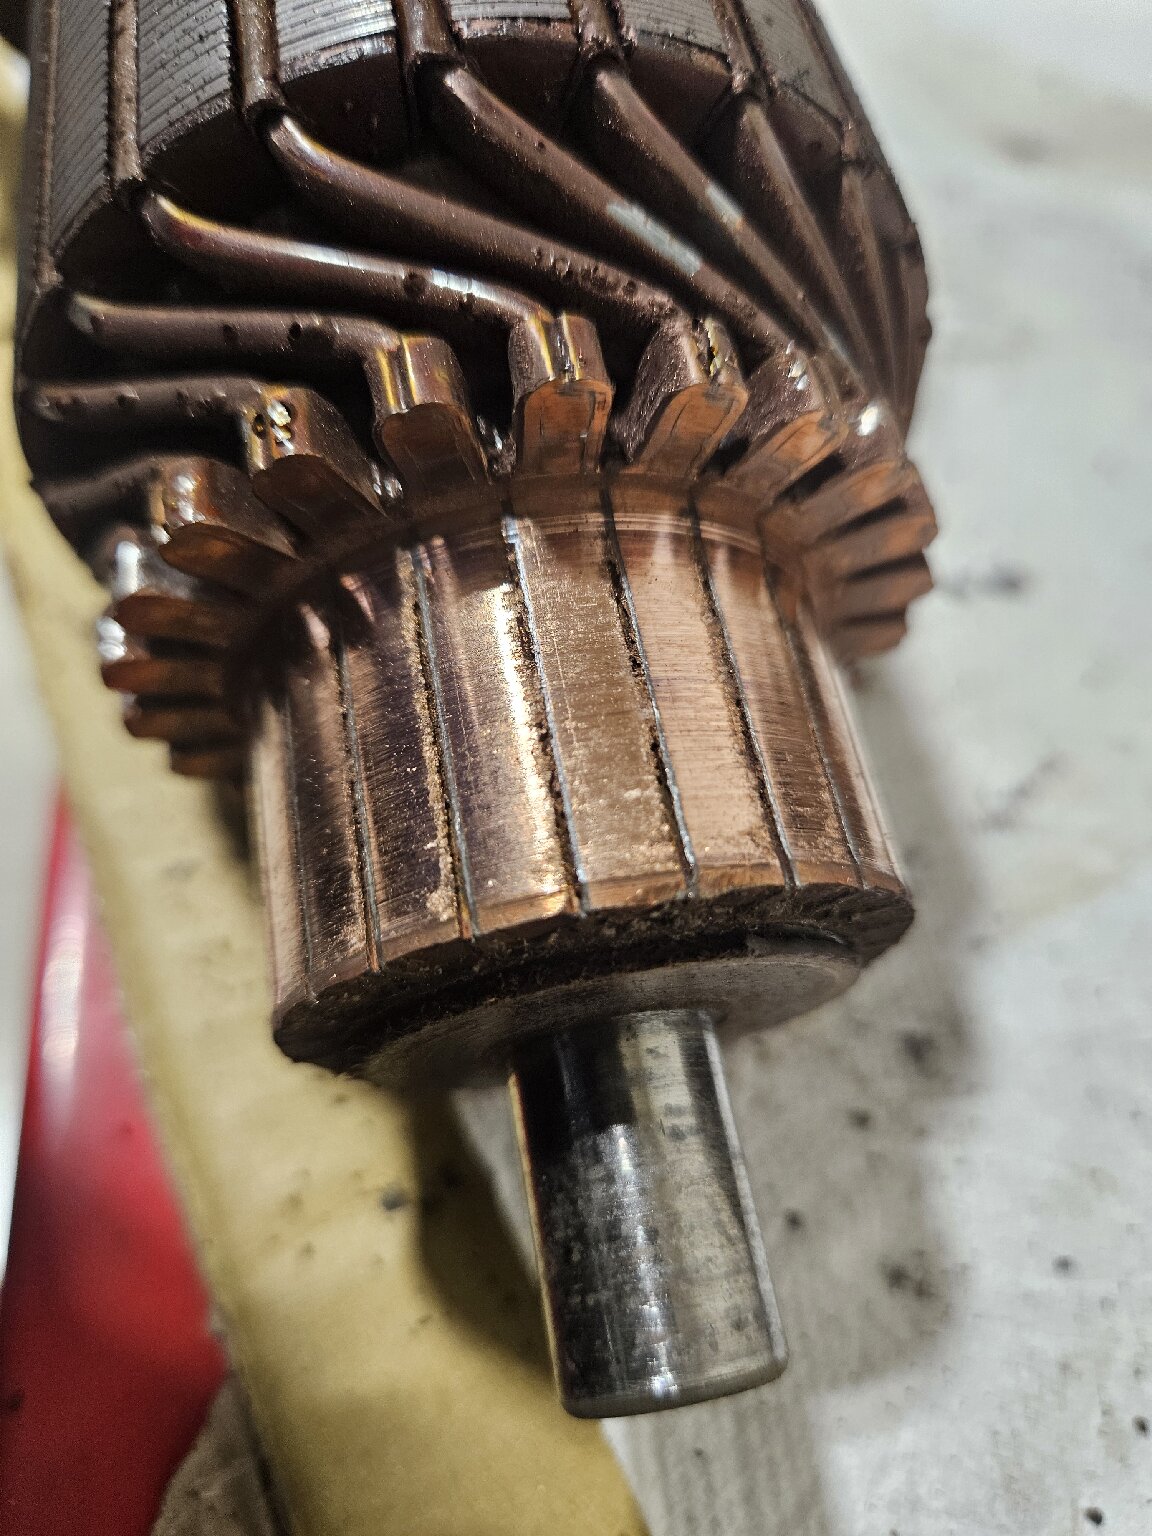 The brushes are worn down to very little. It looks as if they were barely touching the commutator. Some of them have odd curls on the edges of them. I'll be replacing all these as well as the bushing. 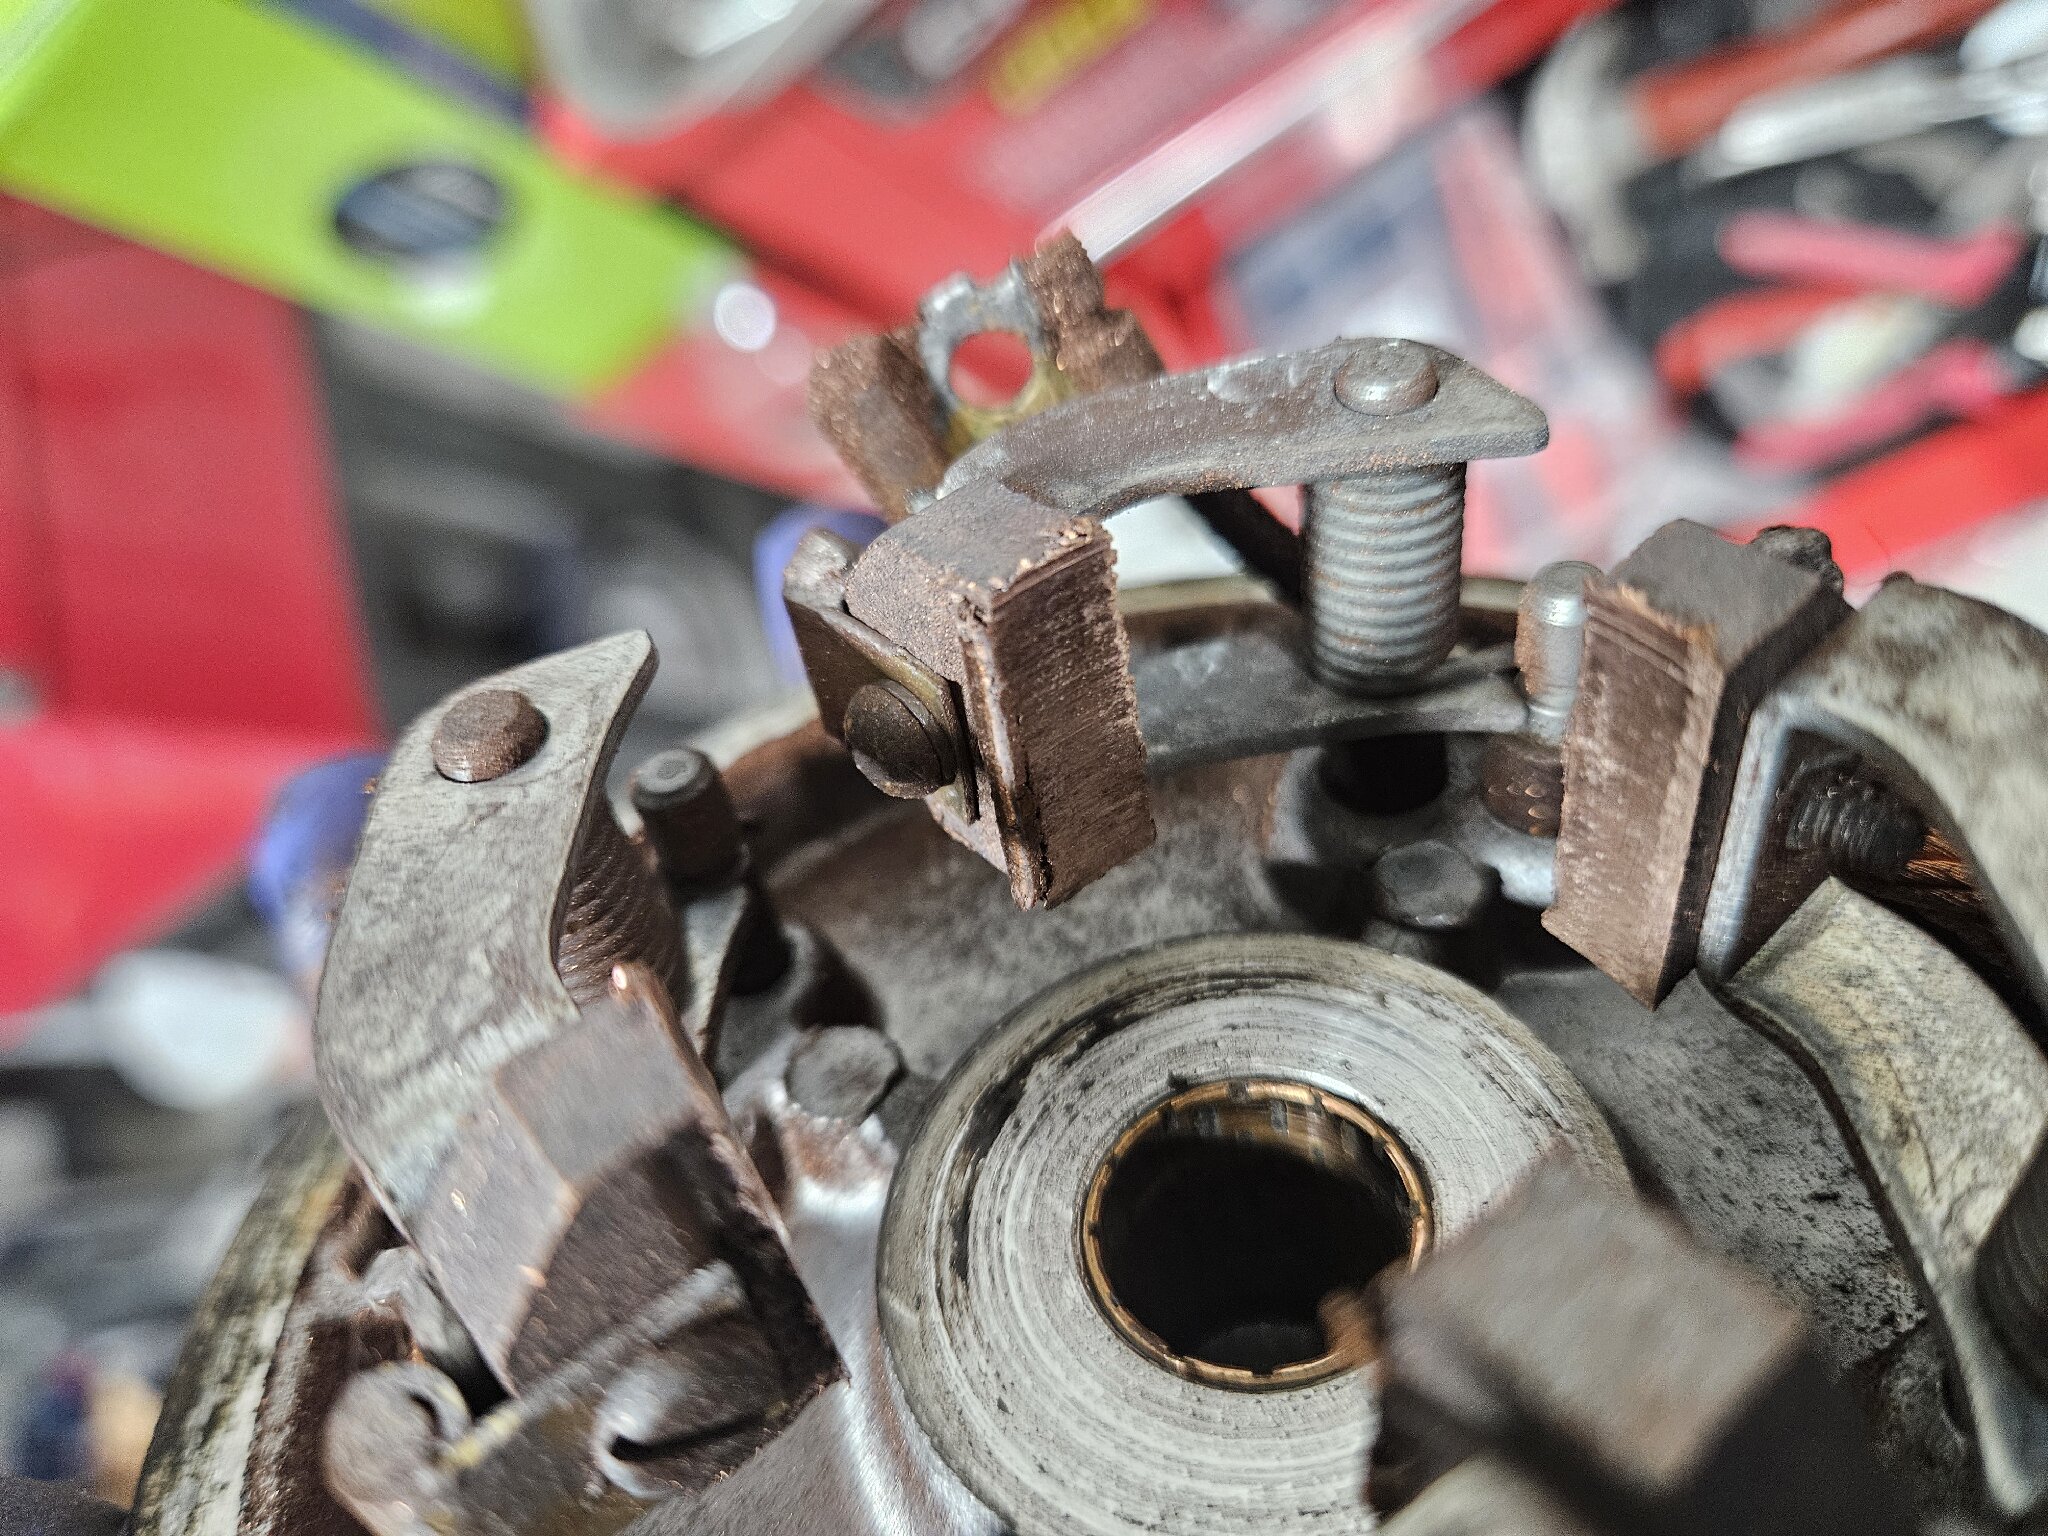 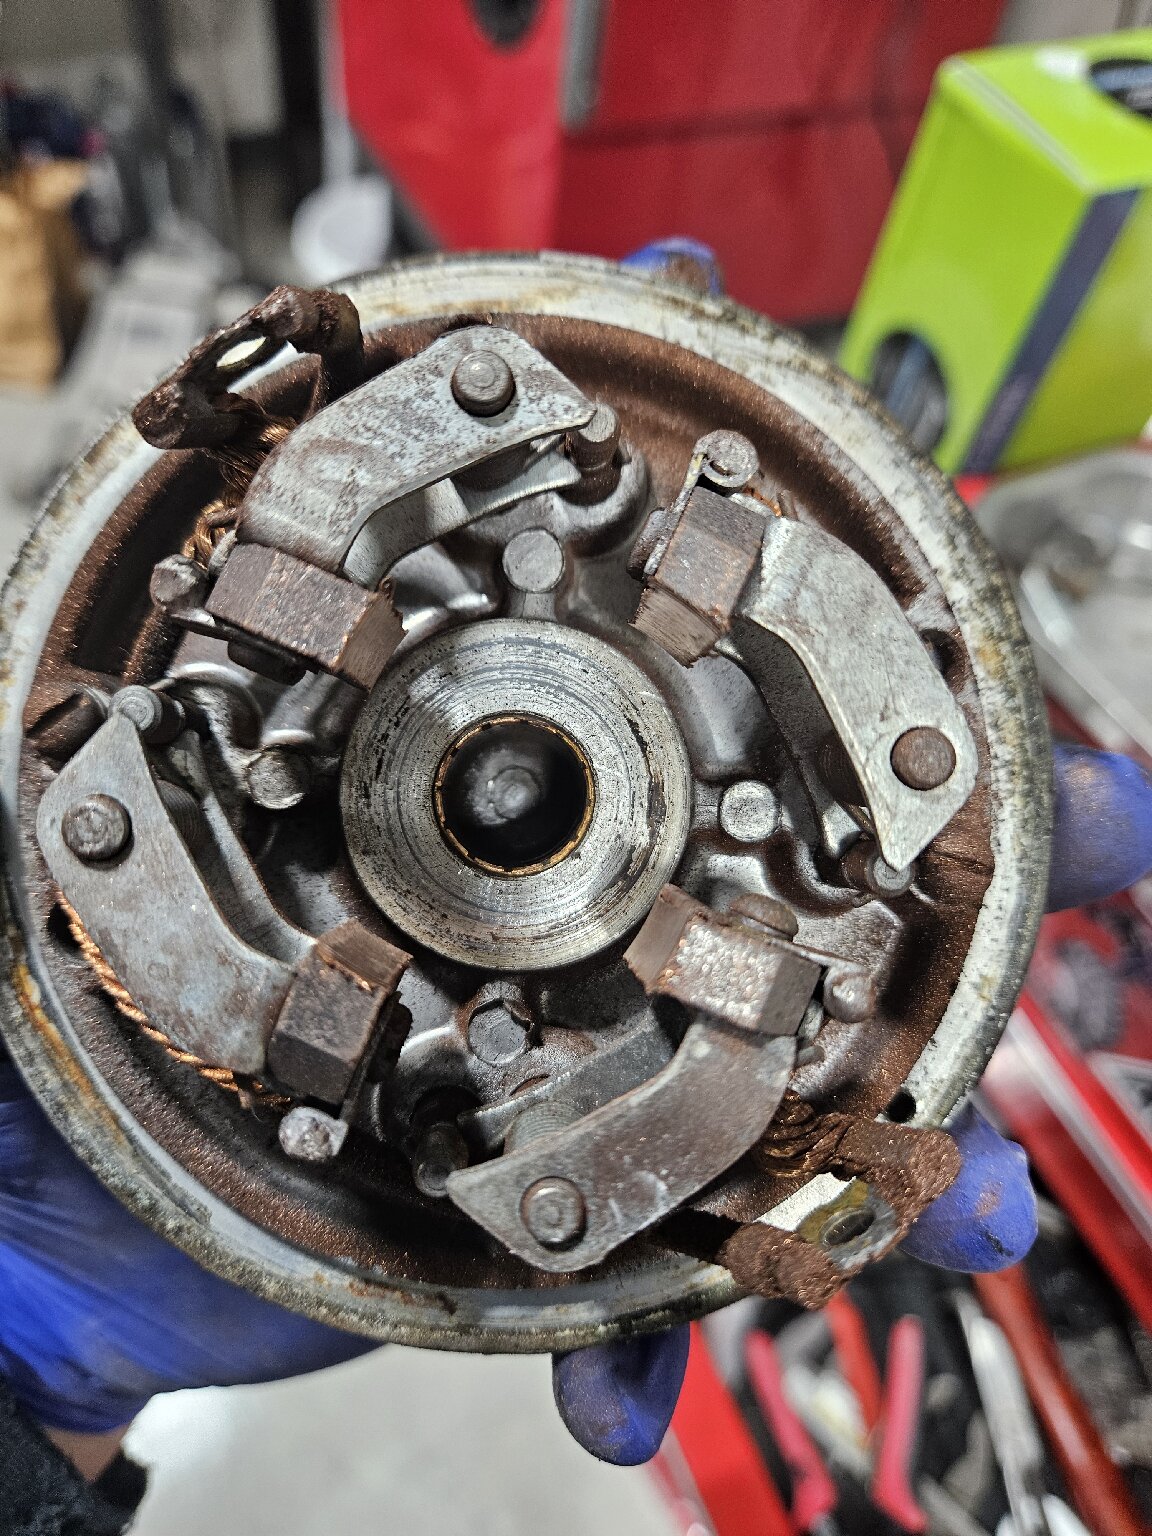 Lastly, there is copper dust everywhere. I don't know if that means anything or not, but it's messy. 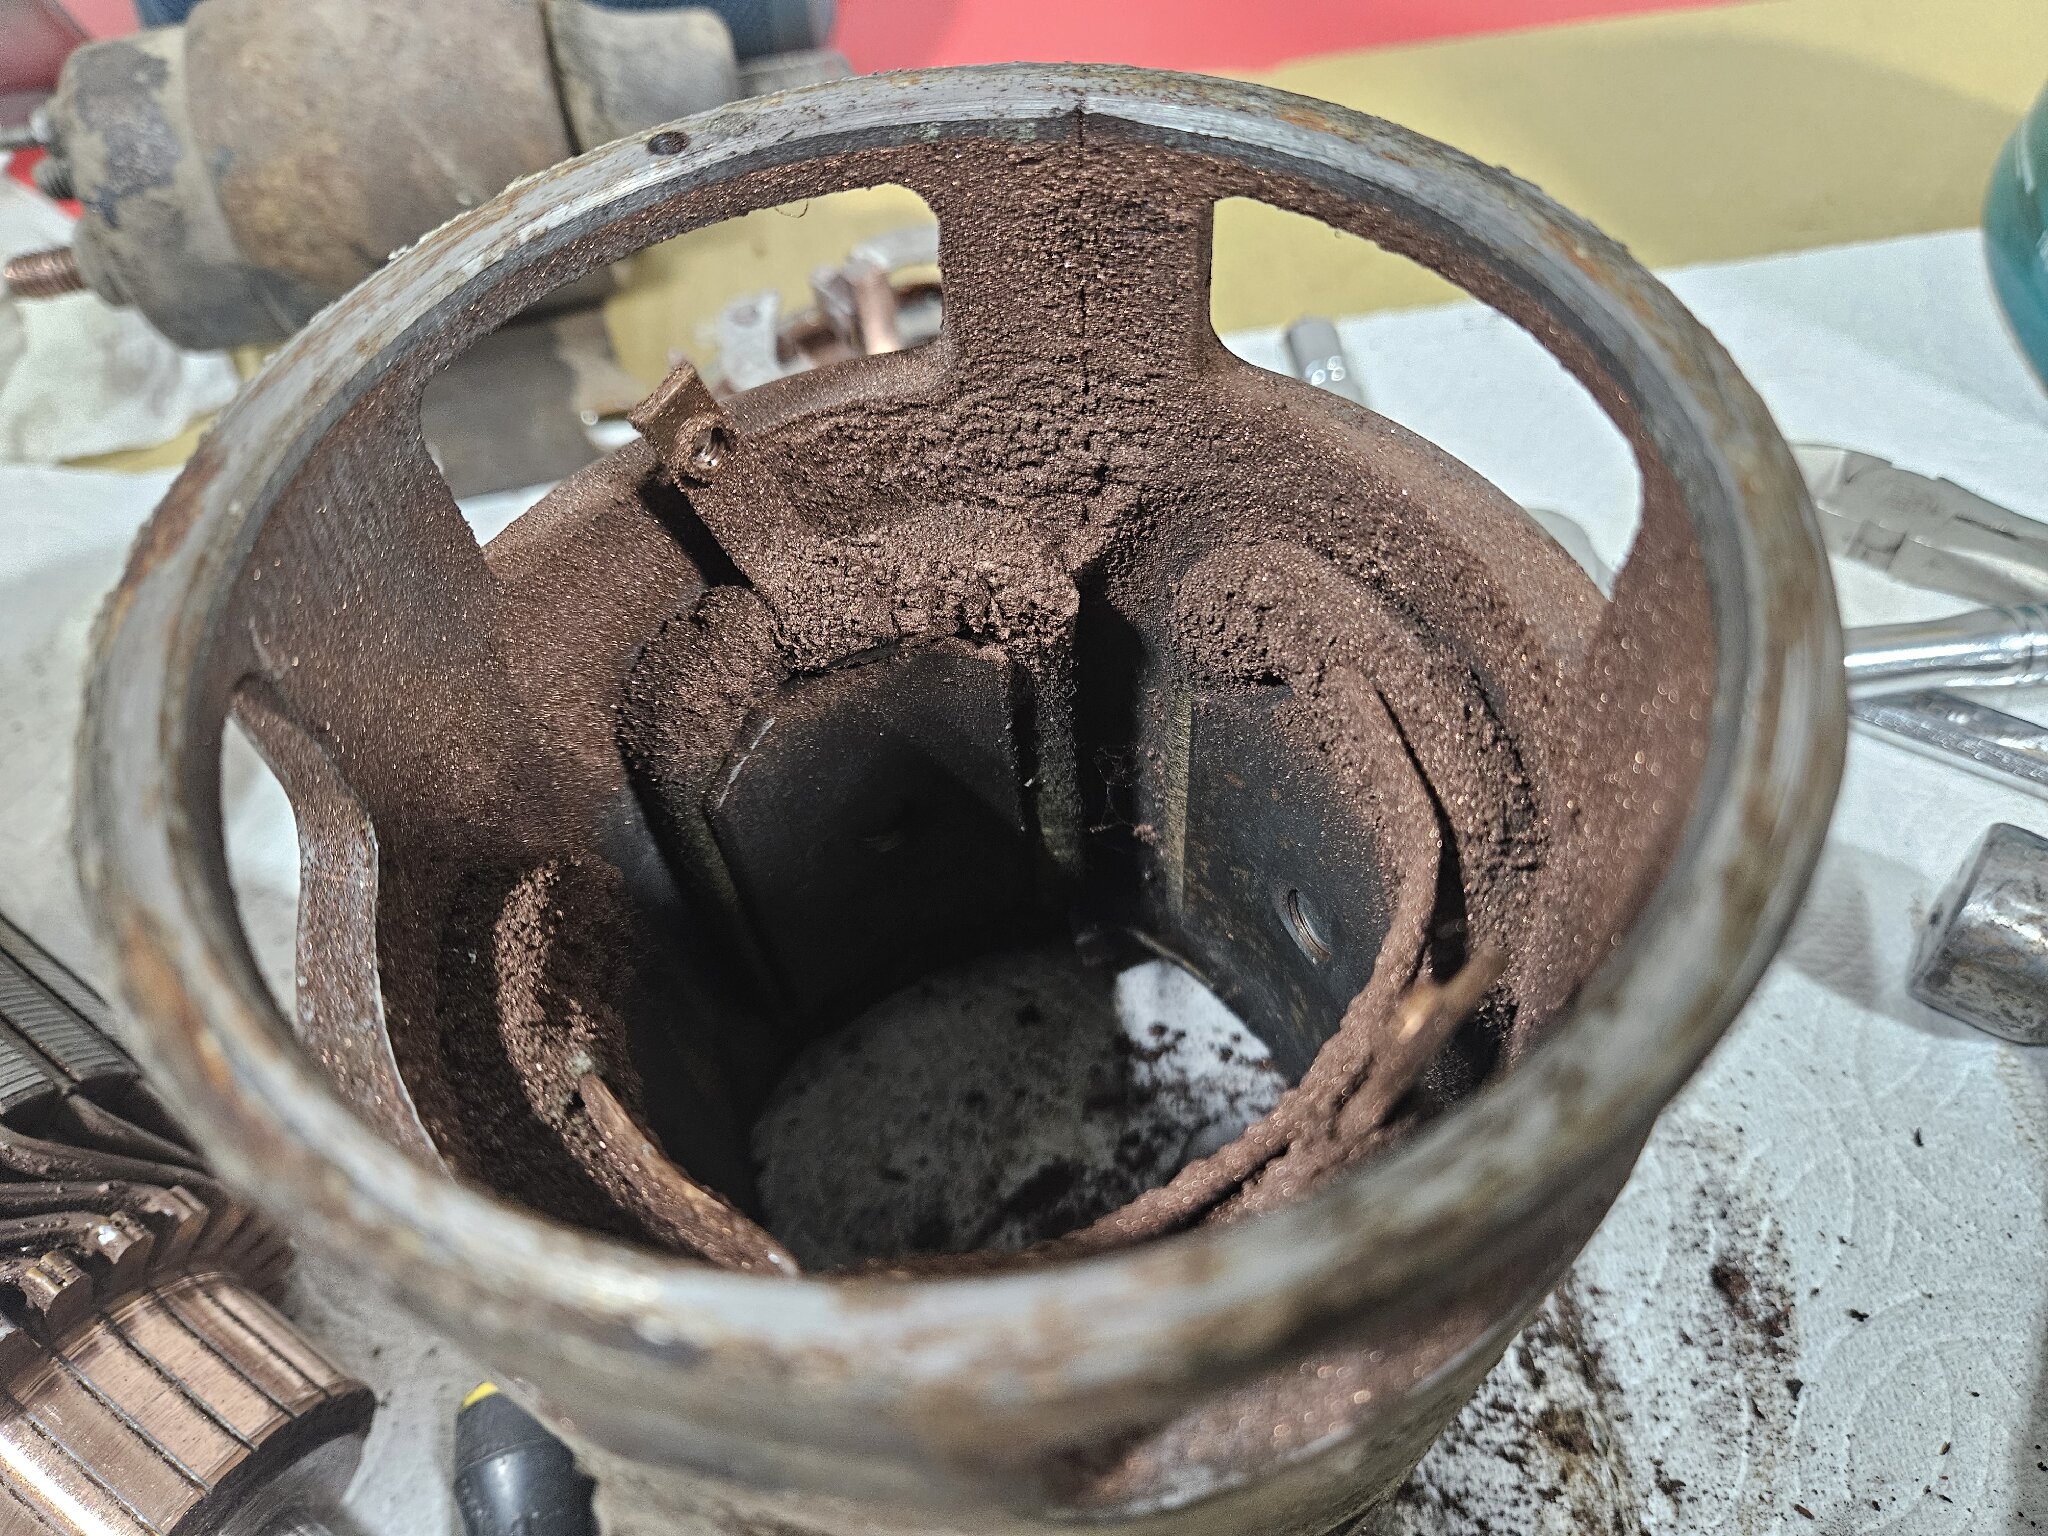
Posted on: 3/7 11:55
|
|||
|
||||
|
Re: Vacation Car - 56 Patrician
|
||||
|---|---|---|---|---|
|
Home away from home
|
It's great to see you getting close to hitting your goal. Lots of work, and it shows.
-Kevin
Posted on: 3/7 11:27
|
|||
|
||||


