|
Re: 1941 Packard Clipper Eight Special Sedan
|
||||
|---|---|---|---|---|
|
Home away from home

|
I am getting to the point where i am going to need to remove whats left of the headlining. I see that it looks like it is clamped between a metal strip and which screw to the inner side of the roof. Has anybody fitted a new headliner just wondered how it is done. Thanks Howard
Posted on: 2017/2/18 14:42
|
|||
|
||||
|
Re: 1941 Packard Clipper Eight Special Sedan
|
||||
|---|---|---|---|---|
|
Home away from home
|
Can some one recommend a supplier for parts. I want to try and get it all in one go. I need to get all the rubbers, door weather strips, trunk weather strips, front vent weather strip, grommets, Windscreen rubbers, rear window rubbers.
Thanks Howard
Posted on: 2017/2/18 14:55
|
|||
|
||||
|
Re: 1941 Packard Clipper Eight Special Sedan
|
||||
|---|---|---|---|---|
|
Forum Ambassador

|
The headliner retainer strips have sharp barbs or prongs which face inward toward the body sheetmetal and hold the headliner on the sides. It is a combination of tacks and glue at the windshield and rear window. The original headliner is glued to the header above the windshield and the side retainer strips extend almost to the header to take care of that end. There is another separate piece which extends from the top header to the dash and is tacked to a cardboard tack strip. Headliner is glued to the car body under the gasket around the rear window so in the rear, to install it as the factory did the rear window has to come out.
Unlike the windshield which is flat glass and easily available, the rear window is curved and not an item easily found if it should get broken during removal. Rather than tempt fate, and since the gasket was in decent condition, I decided on my 47 not to remove it. Body should be the same as yours and if so, there was enough of a metal flange or frame surface around the rear window before the gasket that the headliner could glue to that instead of removing the window. The interior finish molding covers the glued area and raw fabric edge nicely. Below the window and around the sides of the package shelf is a combination of glue and a cardboard tack strip. Driving tacks in that area and trying to keep the headliner tight was a pain and where I had the most difficulty. I still have a couple of wrinkles which I might go back and try to work out at some point. Straight lengths of replacement tack strip are readily available but not the curved so hopefully yours in in good shape. There is a flexible modern plastic strip that will work but is not the same size. Opening the clips holding the tack strip to remove the old may result in them breaking off so be prepared to install some countersunk screws to hold the new strip if the clips break. The metal barbed retainer strips need to be removed to install the windlacing around the doors The windlacing is tacked to cardboard tack strips at the center post and goes under some pointed prongs across the top and down the front side of front doors. Rear doors have a combination of the tack strip at front, prongs across the top and partially down the rear before coming to another curved tack strip where the fender curve starts. There are some tacks which are more like screw nails driven directly into metal at some of the stress points. Once the windlacing is in place the retainer strips are screwed over it leaving a narrow gap. Headliner is supported by the bows and then using a flat but dull tool the side material is pushed up into the narrow gap between windlacing and retainer strip to catch on the retainer strip barbs. It is important to get the headliner centered and straight so sides are smooth and even. Once the headliner is pushed into the barbs, there is not much that can be done to remove and reposition it a second time without doing some damage to the new material. The fabric for the side pillars is the same as the headliner material. It is on a padded hardboard material which is held to the pillar metal by a row of serrated nails right down the middle. There are 7 or 8 nails 6-8 inches apart which fit into some retainers pressed into the sheetmetal. To remove those panels use a flat but strong prybar and work it in to get as close to the nails as possible before prying them out. If you try and work between nails or on the edges the board will break. IIRC, at the top the material is tacked directly into the body sheetmetal and is also under the barbed retainers. I doubt you are going to find everything needed at one vendor. On the rubber I would suggest you go to the Steele Rubber websitehttp://www.steelerubber.com/parts and on the custom catalog page you can request a custom list. They will send a list of every part they have for your car. Steele is good for most grommets, bumpers and gasket type rubber as well as some of the weatherstripping. Going thru the list they make will familiarize you with some of the smaller items. You can also call or go to Kanters sitehttps://www.kanter.com and request a printed catalog for your Clipper. Near the back of the catalog is a listing of various levels of weatherstrip kits that will take care of a good portion if not all of of what you need for doors, trunk etc. There are 6 kits covering basics of one or two doors to the complete car. I don't know what your upholstery looks like -- patterned or solid -- but premade kits are not available so your local upholsterer will have to work from scratch. Bill Hirschhttp://www.hirschauto.com has the fine woolen broadcloth in solid colors for seats and door panels. I believe he said the fabric is custom made in England so you may be able to find the same material at suppliers near home. Hirsch can also make up a headliner in the proper weight wool material. NOT cheap. SMShttps://www.smsautofabrics.com is another that sells some NOS material and also broadcloth but their wool is coarser than Hirsches. There were various levels of carpets for different models but Hirsch has some fine Wilton woolen carpet materials which come close to duplicating the NLA mosstread or thick fine pile original texture used on the senior models. The windlacing around the doors and, if the interior styling is the same as 47, the complementary piping material on the seats is going to be a problem. AFAIK, there is nothing modern made that duplicates the original in color or pattern -- at least not the 47-- We found a fabric which had a pattern similar to the original texture and color that worked so the upholsterer made the windlace and piping using that material.
Posted on: 2017/2/18 16:26
|
|||
|
Howard
|
||||
|
||||
|
Re: 1941 Packard Clipper Eight Special Sedan
|
||||
|---|---|---|---|---|
|
Home away from home
|
Hi, well thats all very helpfull, I will take a closer look and get my upholsterer to take a look at it. I shall also make contact with some of the suppliers. Many Thanks
Howard
Posted on: 2017/2/19 8:11
|
|||
|
||||
|
Re: 1941 Packard Clipper Eight Special Sedan
|
||||
|---|---|---|---|---|
|
Home away from home
|
I have already decided on the cloth trim I am using a Bedford cord and the colour is a light colour, it almost resembles the colours of the US air trousers during the 1940s called Pinks. The head liner is a light caromel colour and a pure wool material. Bottom of doors will have same color pvc trim. Couple pics of the bedford cord against original seat covering.
Attach file:  (279.61 KB) (279.61 KB) (258.17 KB) (258.17 KB)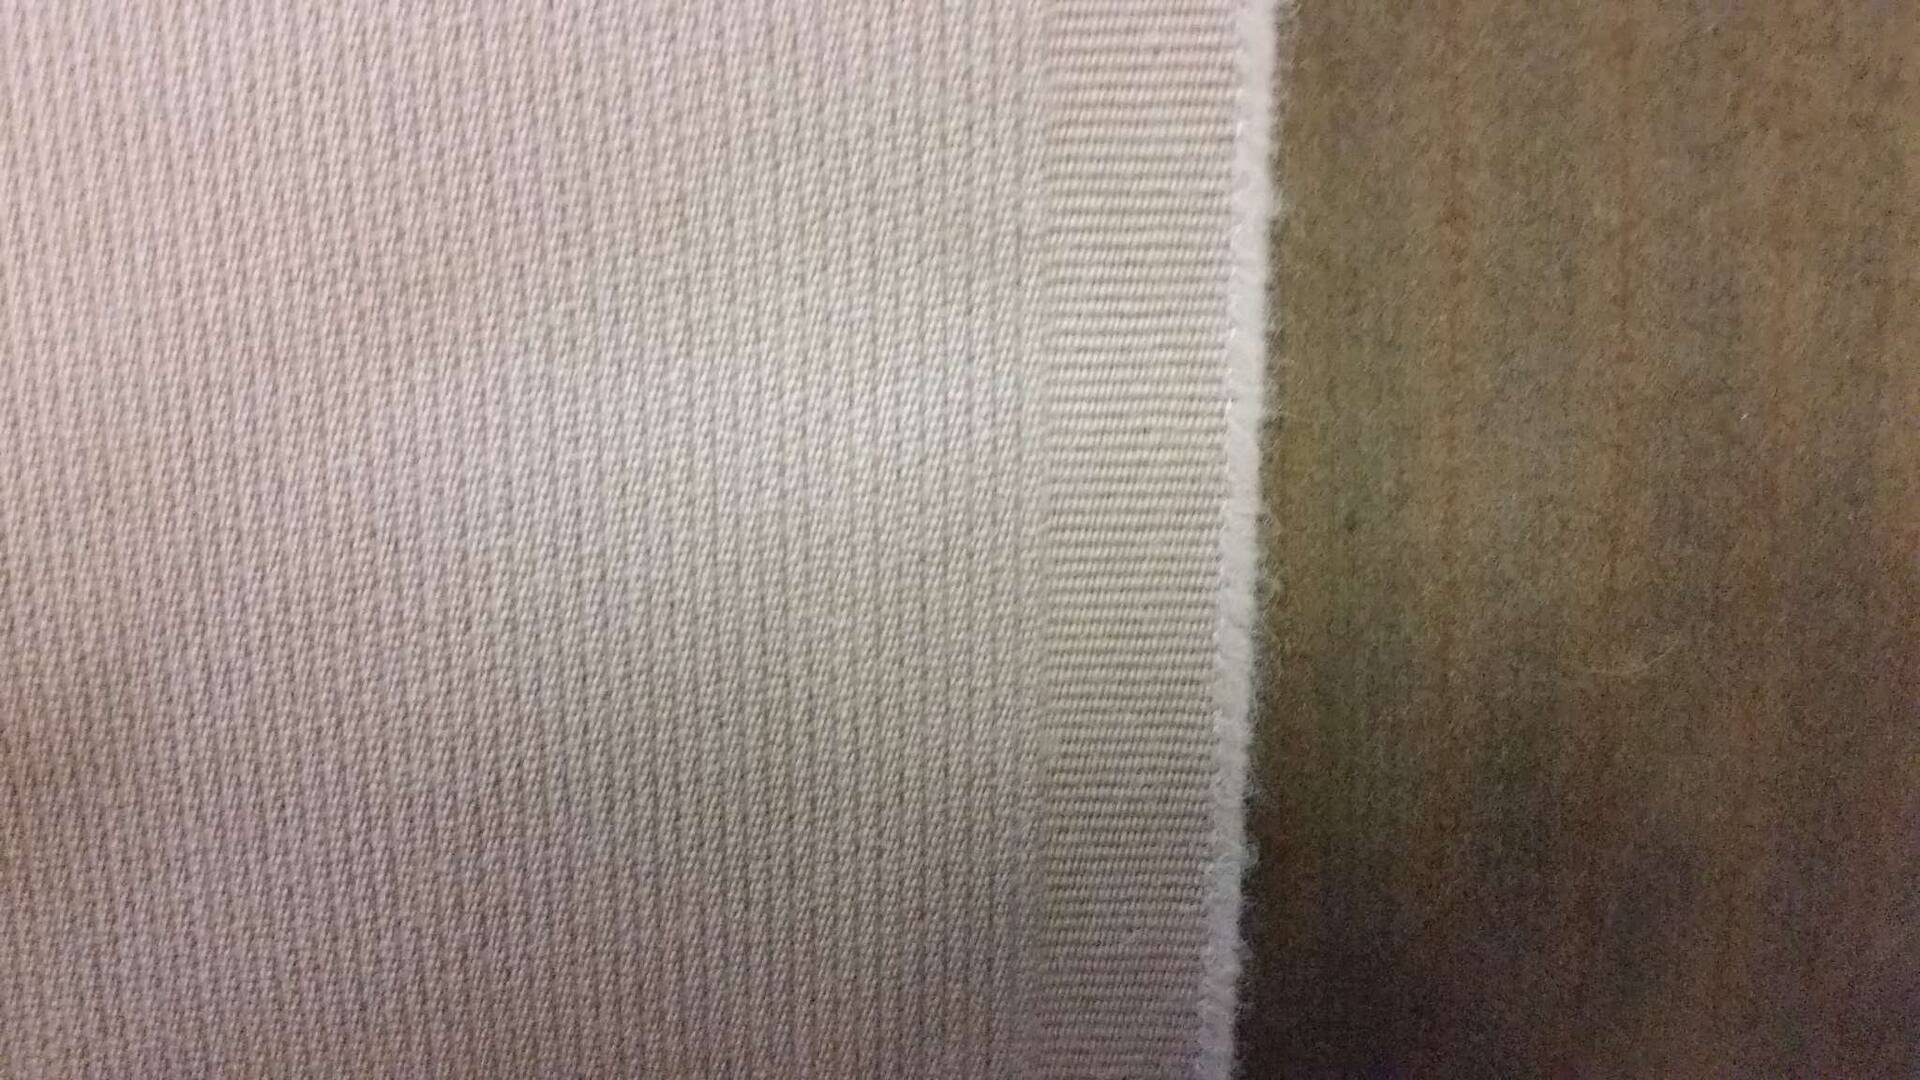
Posted on: 2017/2/19 8:33
|
|||
|
||||
|
Re: 1941 Packard Clipper Eight Special Sedan
|
||||
|---|---|---|---|---|
|
Home away from home
|
Well I have managed to get all the bolts holding the body to the chassis removed. I just have the pedals and steering to remove and i should be able to lift off the body. Are take some pics during the lifting process. Thanks Howard
Posted on: 2017/2/23 19:04
|
|||
|
||||
|
Re: 1941 Packard Clipper Eight Special Sedan
|
||||
|---|---|---|---|---|
|
Home away from home
|
Well I have had a good day and i have managed to lift off the body of the clipper off its chassis. The chassis is in real good order. The body will need some welding on the sills, and at bottom of the front floor near the posts. But all in all the car is in real good shape. I plan to get the engine out of the chassis and make a frame for the engine to sit in. Then get the chassis and blasted.
Attach file: (186.57 KB)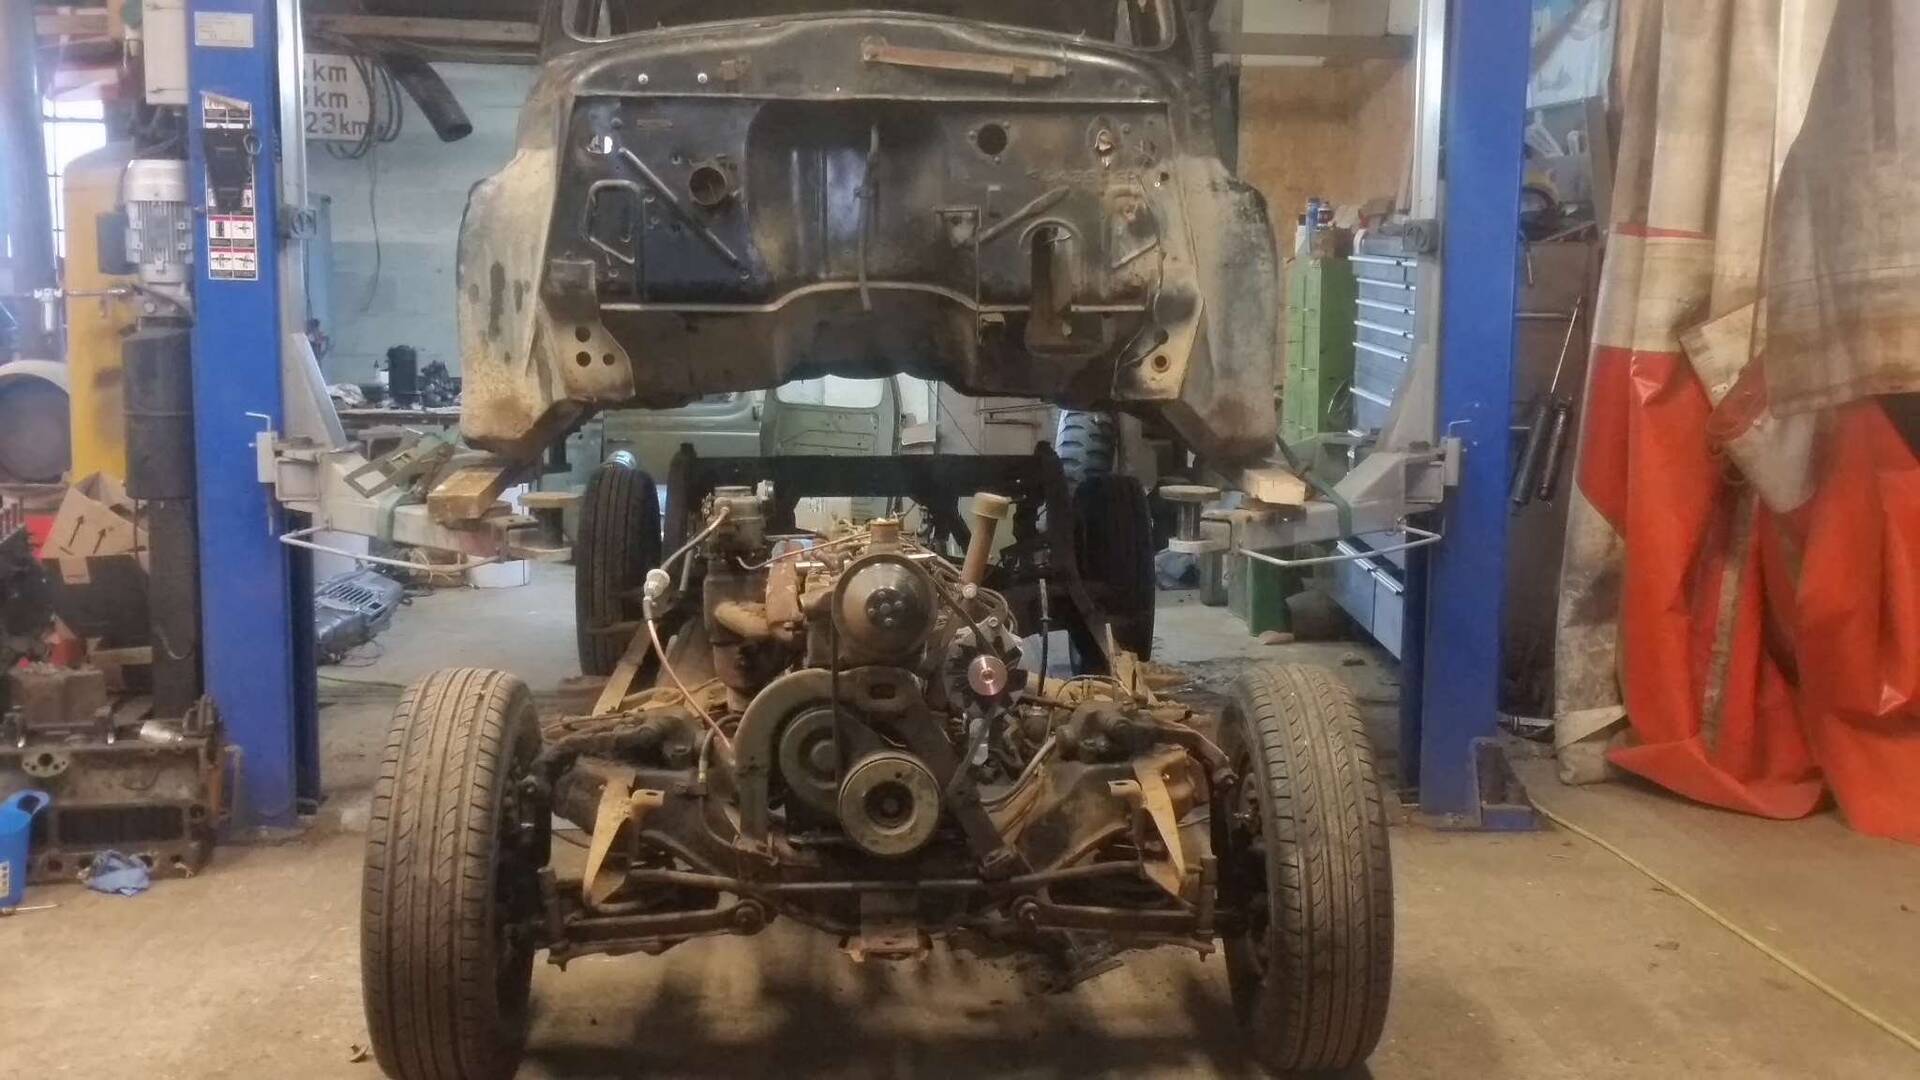 (168.64 KB) (168.64 KB)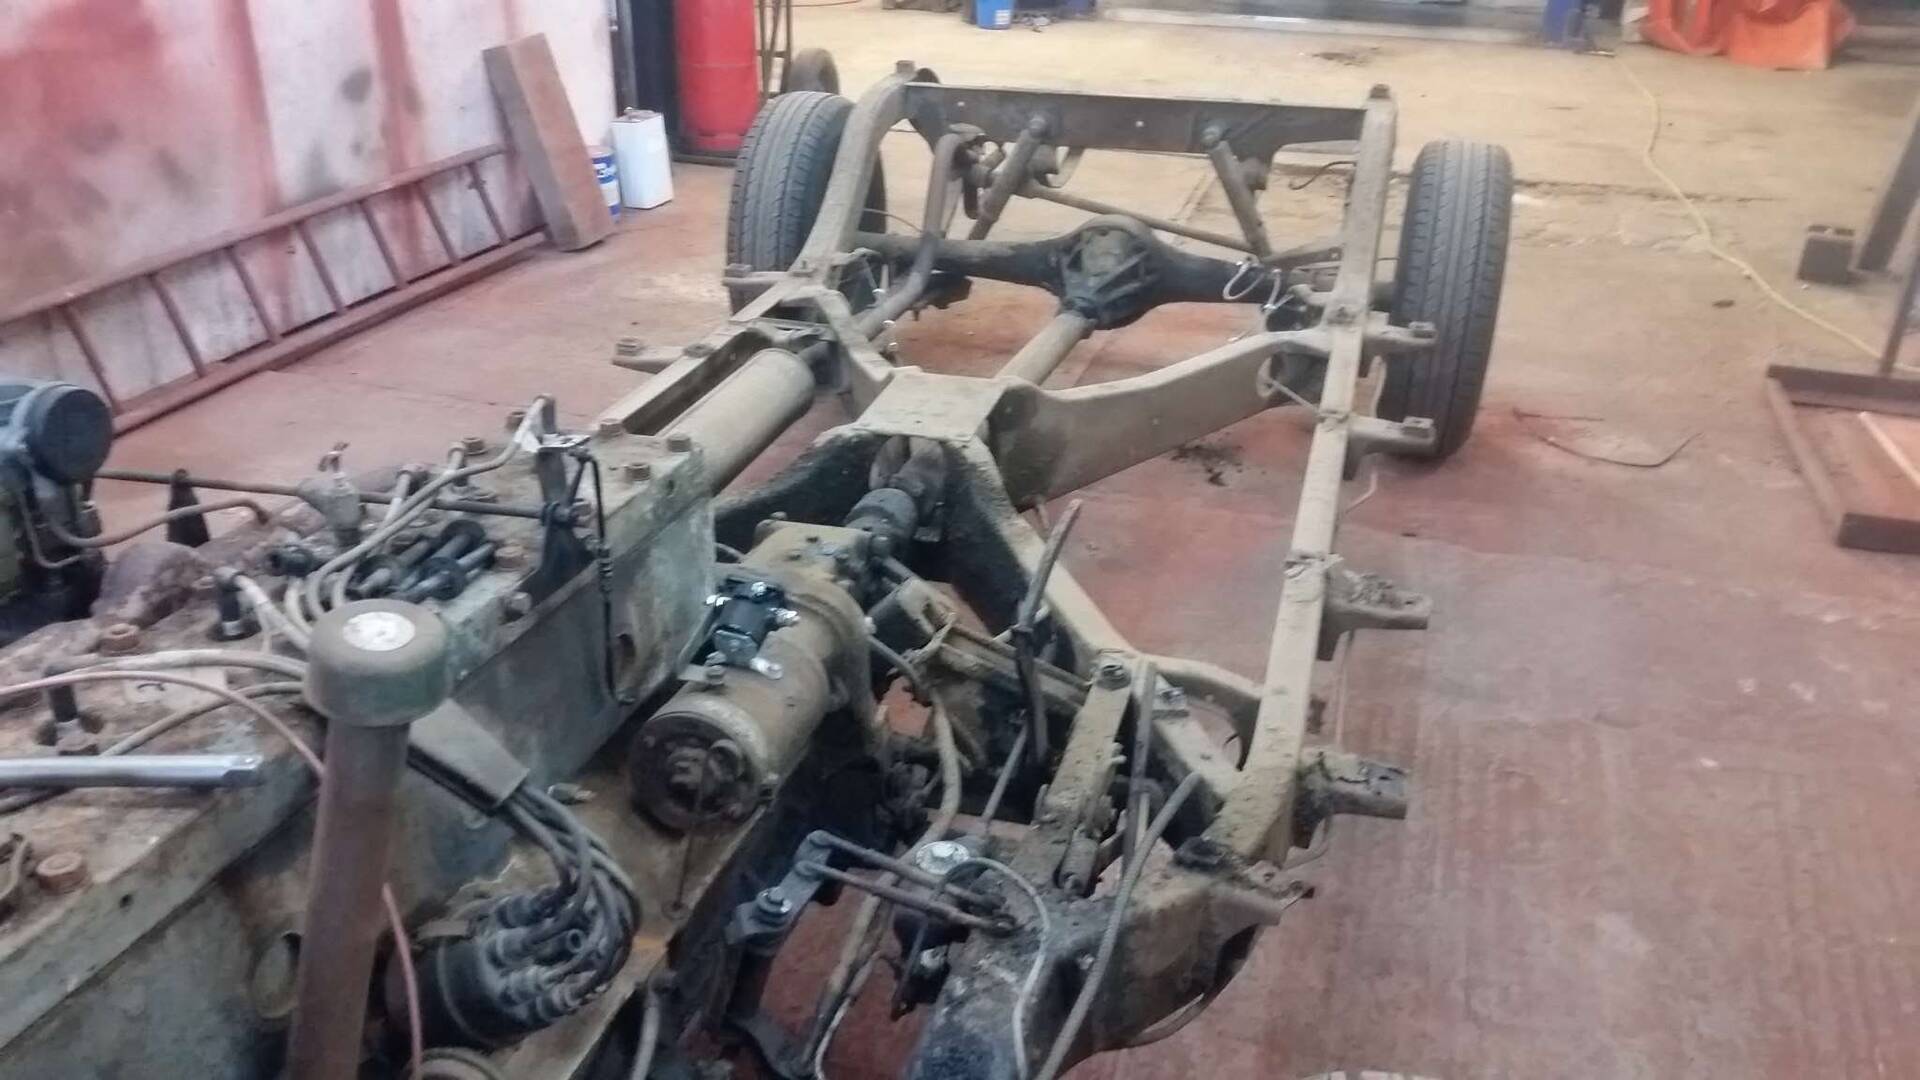
Posted on: 2017/2/24 16:57
|
|||
|
||||
|
Re: 1941 Packard Clipper Eight Special Sedan
|
||||
|---|---|---|---|---|
|
Home away from home
|
Well I have got more done to the car. The engine and gear box has been removed. The chassis has been shot blasted primed and top coated in black. The engine has also been gone through and painted. The prop has also been blasted and painted. Now need to go through the gear box clean and paint. Just need to buy a new clutch plate. then get gear box and engine back together.
Posted on: 2017/3/29 16:22
|
|||
|
||||
|
Re: 1941 Packard Clipper Eight Special Sedan
|
||||
|---|---|---|---|---|
|
Home away from home
|
Well here are a few pics of the chassis, and running gear blasted primed and top coated. Going to strip of the hubs clean out and replace seals then look at making up the new brake pipes fuel lines ect. sorry pics not the best quality.
Attach file: (197.38 KB)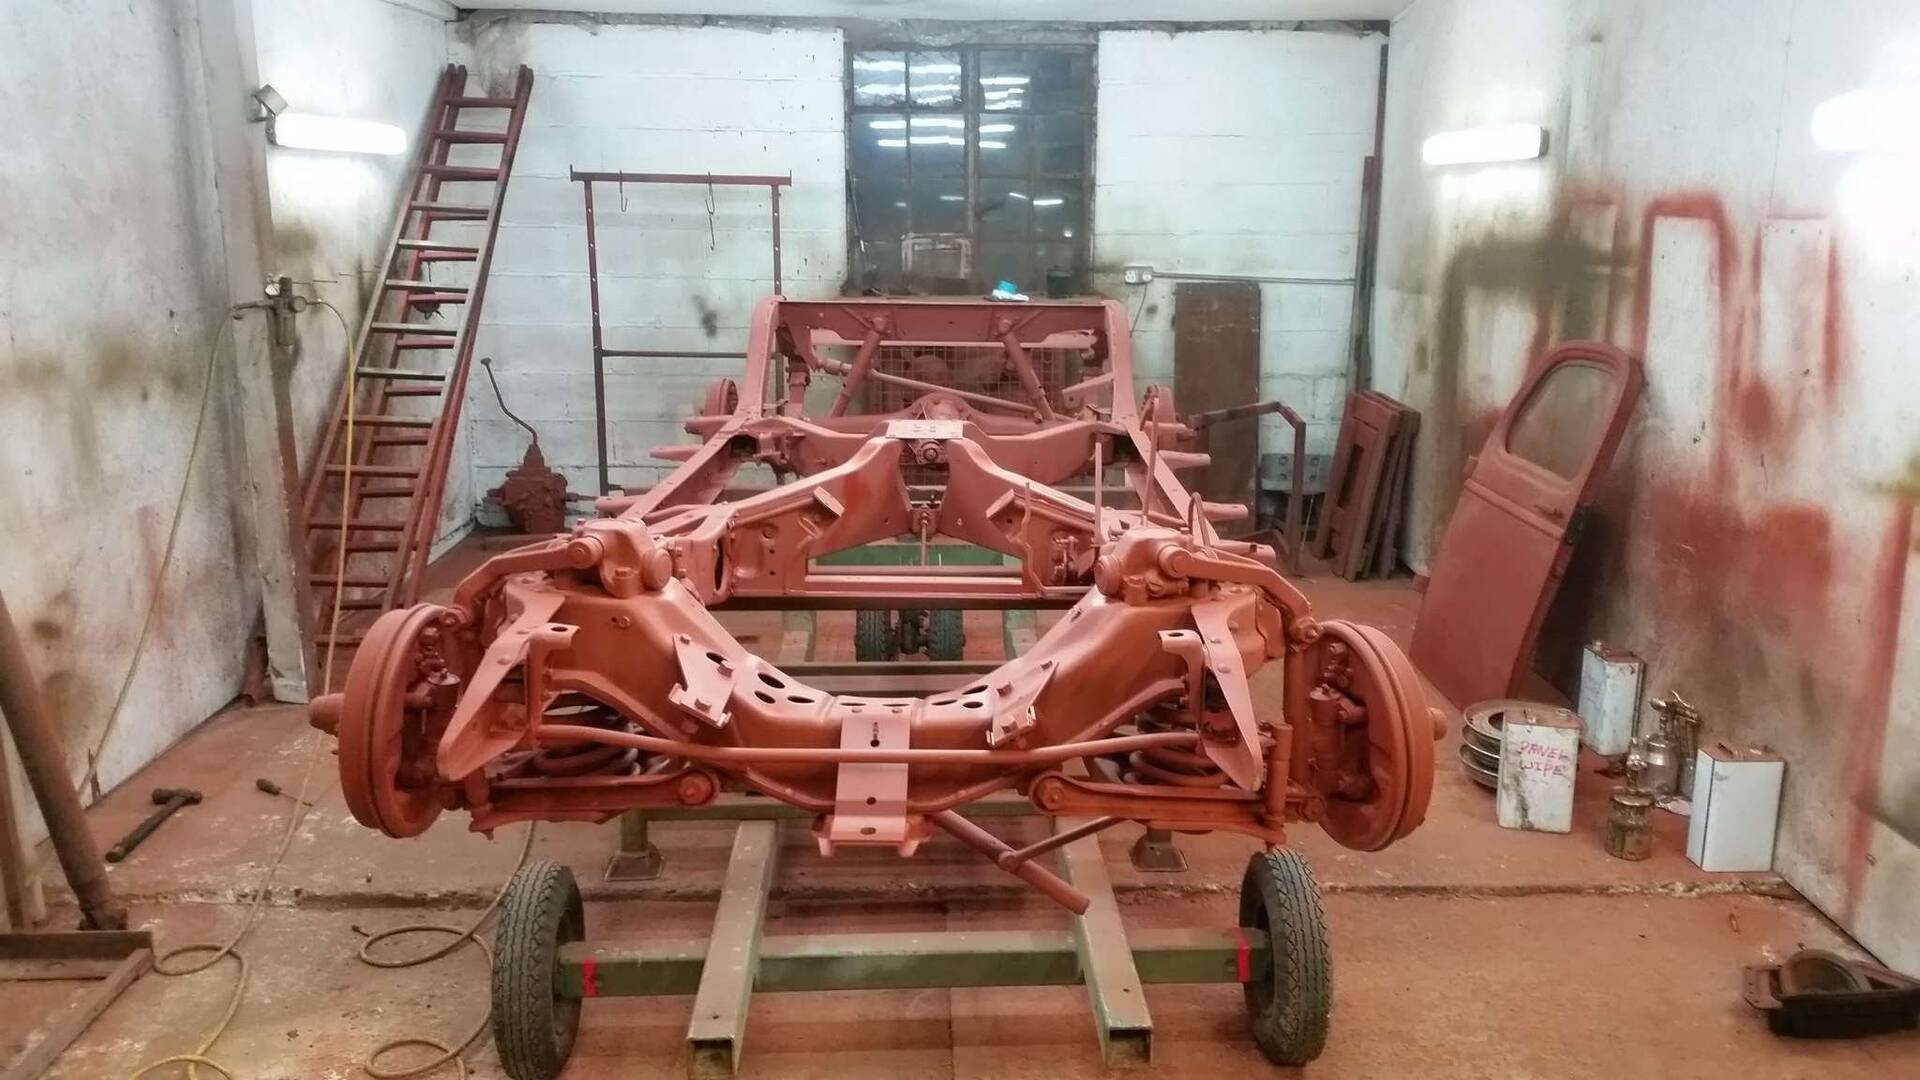 (224.44 KB) (224.44 KB)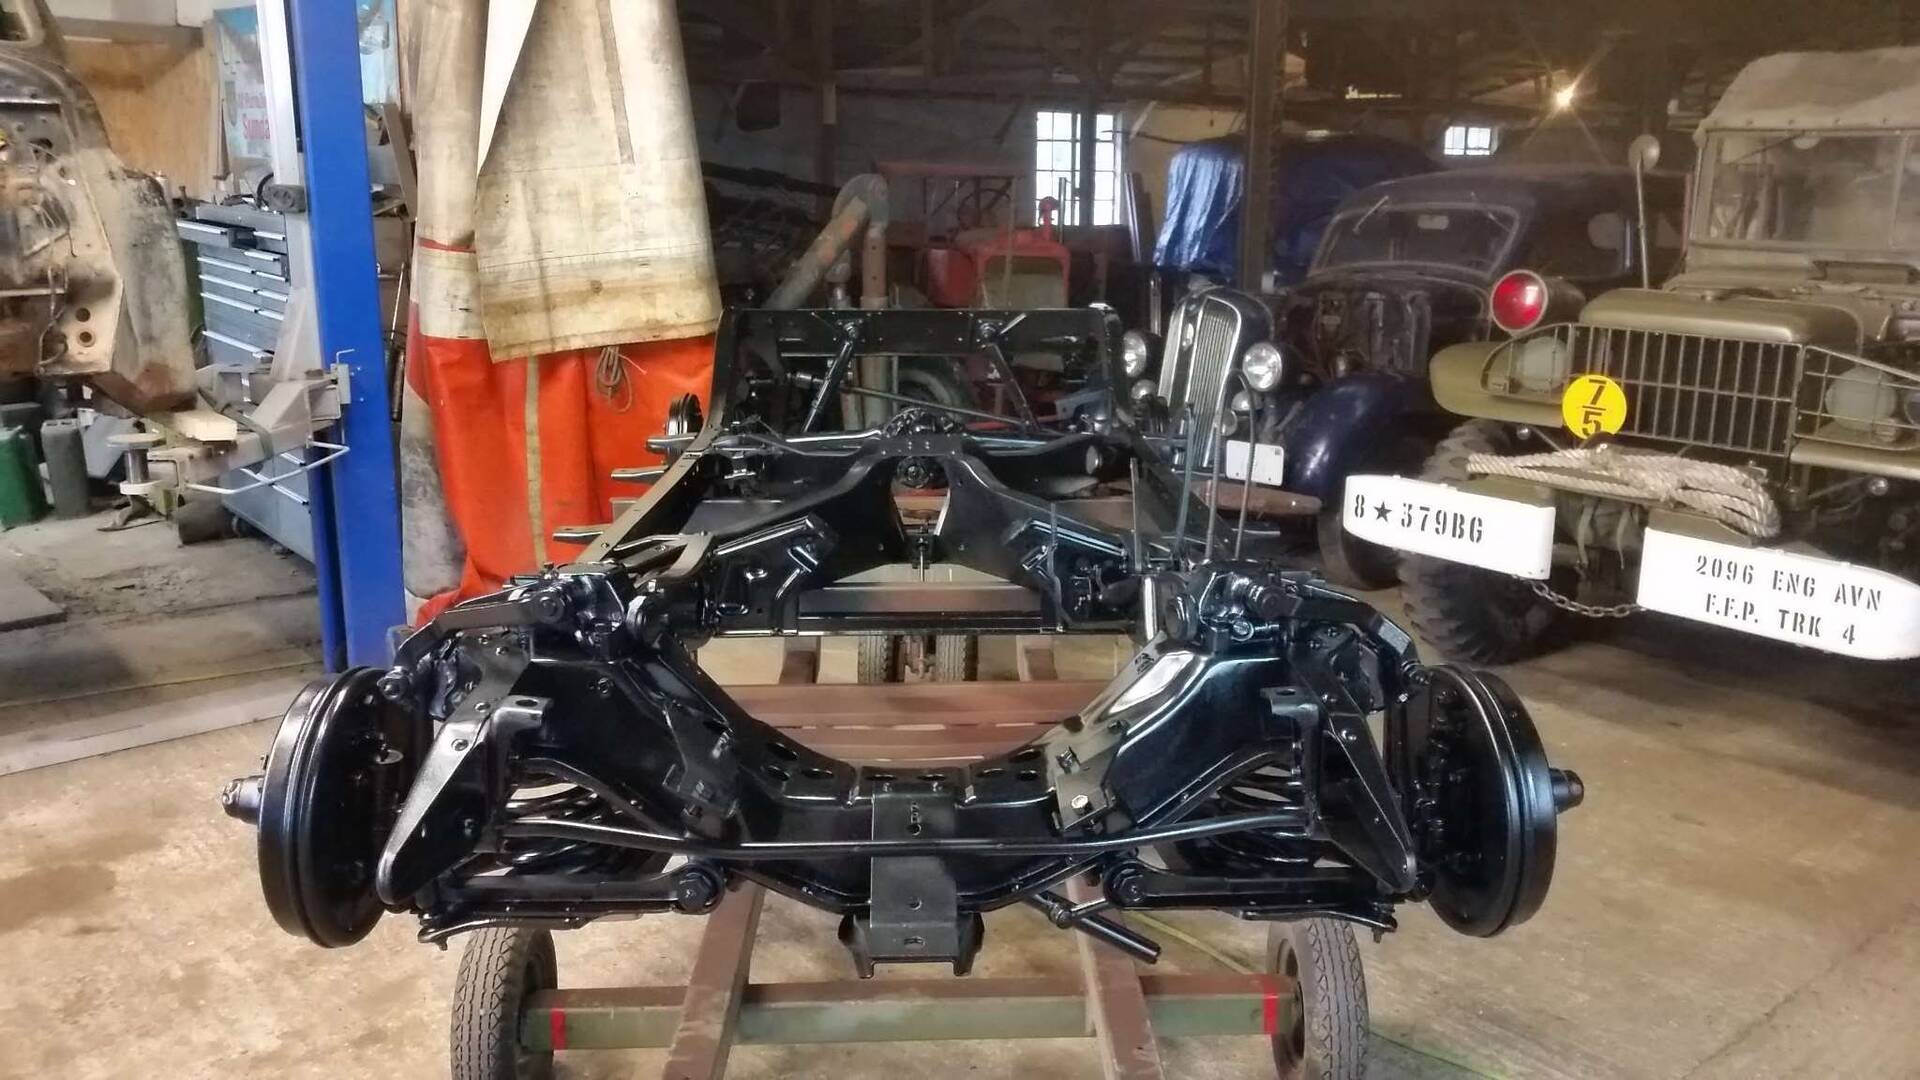
Posted on: 2017/3/30 0:59
|
|||
|
||||


